
In an increasingly digital world, the need for physical copies of documents, photos, and other materials remains surprisingly prevalent. From printing important contracts and school assignments to cherished family photos and event tickets, a reliable printer is an indispensable tool for many homes and businesses. However, the prospect of installing a new printer, especially for those less familiar with technology, can often seem daunting. Driver conflicts, connectivity issues, and confusing setup instructions can quickly turn excitement into frustration.
This comprehensive guide aims to demystify the printer installation process, breaking it down into clear, actionable steps. Whether you’ve just unboxed a brand-new multifunction device or are trying to reconnect an existing printer, we’ll walk you through everything you need to know. We’ll cover various connection methods, driver installation nuances, and essential troubleshooting tips, ensuring you can get your printer up and running smoothly. By the end of this article, you’ll be equipped with the knowledge and confidence to tackle printer setup like a pro, transforming a potentially complex task into a straightforward one.
Laying the Foundation: Pre-Installation Essentials
Before you even think about plugging in cables or connecting to Wi-Fi, a few crucial preliminary steps can significantly streamline the entire installation process. Taking the time to properly prepare your printer and workspace will prevent common frustrations and ensure a smoother setup experience.
Unboxing and Physical Setup
The journey begins with carefully unboxing your new printer. Remove all packaging materials, including any protective tapes, plastic films, or foam inserts that secure moving parts during transit. These are often brightly colored and clearly labeled, but it’s worth double-checking every nook and cranny inside and outside the printer, especially around the paper tray, ink/toner compartment, and output area. Leaving packaging materials in place can lead to paper jams, poor print quality, or even damage to the printer.
Next, choose an appropriate location for your printer. Consider factors like proximity to a power outlet, your computer (if connecting via USB), and network access points. Ensure the surface is stable, level, and strong enough to support the printer’s weight. Allow sufficient space around the printer for proper ventilation, paper loading, and document retrieval. If it’s a multi-function device, ensure enough clearance for opening the scanner lid.
Powering On and Connecting Cables
Once the printer is free of packaging and positioned correctly, connect the power cord securely to the printer and then to a grounded electrical outlet. Avoid using surge protectors or power strips that are already heavily loaded, as some printers can draw significant power during operation. Power on the printer using its dedicated power button. At this point, the printer might go through an initial startup sequence, calibrate itself, or prompt you to install ink/toner.
If you plan to connect via USB, make sure you have the correct USB cable (usually included with the printer). Do not connect the USB cable to your computer yet, unless the printer’s setup guide specifically instructs you to do so at this early stage. Many modern operating systems prefer the printer to be powered on and drivers initiated before the USB connection is established. For Ethernet connections, run a standard Ethernet cable from your printer’s network port to an available port on your router or network switch.
Installing Ink or Toner Cartridges
This step is critical for laser printers (toner) and inkjet printers (ink). The specific procedure varies by model, but generally involves opening a designated access panel on the printer, removing any protective seals or tabs from the cartridges, and carefully inserting them into their respective slots until they click into place. Most printers use color-coded slots (e.g., C for Cyan, M for Magenta, Y for Yellow, K for Black) to guide you.
Ensure the cartridges are securely seated. Improperly installed cartridges are a common cause of “printer not ready” errors or poor print quality. After installation, close the access panel. The printer may then perform an alignment process or print a test page to ensure the cartridges are working correctly. Always use genuine cartridges or reputable third-party alternatives recommended by the brand to ensure optimal performance and avoid voiding warranties.
Connecting Your Printer: Choosing the Right Method
Modern printers offer a variety of connection options, each with its own advantages. Understanding these methods will help you choose the best fit for your home or office setup, optimizing convenience and performance.
The Simplicity of USB Connection
The USB connection is perhaps the most straightforward and reliable method for connecting a single printer to a single computer.
- Preparation: Ensure your printer is powered on and has completed its initial startup. Have the correct USB cable ready.
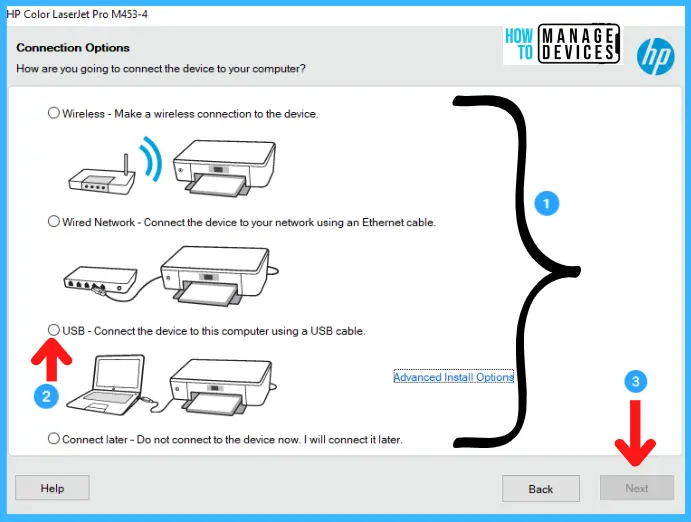
- Connect: Plug one end of the USB cable into the appropriate USB port on your printer and the other end into an available USB port on your computer.
- Automatic Detection: Most modern operating systems (Windows, macOS) feature “Plug and Play” functionality. Upon connection, your computer should automatically detect the new hardware, attempt to install necessary drivers, and potentially prompt you through a basic setup wizard.
- Follow On-Screen Prompts: If a wizard appears, follow the instructions to complete the installation. This often involves naming the printer and setting it as the default.
USB offers a direct, fast connection and minimal setup fuss. Its primary limitation is that the printer must be physically close to the computer and cannot be easily shared across multiple devices without additional networking hardware or software.
Embracing Wireless Freedom (Wi-Fi Setup)
Wireless connectivity is incredibly popular due to its convenience, allowing you to place your printer almost anywhere within your Wi-Fi network’s range and print from multiple devices without cables.
- Direct Wi-Fi Setup (WPS): Many modern printers support Wi-Fi Protected Setup (WPS). If your router has a WPS button, you can often connect by:
- Pressing the WPS button on your printer (usually a Wi-Fi or WPS icon).
- Within two minutes, pressing the WPS button on your Wi-Fi router.
- The printer and router will communicate and establish a connection automatically.
- Manual Wi-Fi Setup via Printer’s Control Panel: If WPS isn’t available or preferred:
- Navigate to the printer’s control panel (LCD screen).
- Go to the “Setup,” “Network,” or “Wireless” menu.
- Select “Wireless Setup Wizard” or similar.
- The printer will scan for available Wi-Fi networks. Select your network from the list.
- Enter your Wi-Fi password (network security key). This can be tedious using the printer’s small keypad.
- Once connected, the printer will display a confirmation message, often with its IP address.
- Wi-Fi Setup via Computer Software: Some manufacturers provide software that can help configure the printer’s Wi-Fi settings from your computer, either via a temporary USB connection or a direct connection to the printer’s temporary Wi-Fi hotspot.
After the printer is connected to your Wi-Fi network, your computer (and other devices on the same network) should be able to detect it. You may still need to install drivers on each computer.
Network Connectivity for Shared Environments (Ethernet)
For offices or homes with multiple users who frequently print large volumes, an Ethernet connection (wired network) offers superior speed, reliability, and security compared to Wi-Fi.
- Connect the Cable: Plug an Ethernet cable into the printer’s Ethernet port and the other end into an available LAN port on your router or network switch.
- Power On: Turn on the printer. It should automatically obtain an IP address from your network via DHCP.
- Verify Connection: Check the printer’s control panel for network status. It should display an IP address, confirming its connection to the network.
- Add Printer on Computer: On your computer, you’ll typically add a new printer by selecting “Add a printer using a TCP/IP address or hostname” or “Add a network, wireless or Bluetooth printer” and letting your operating system discover it, or by manually entering its IP address.
Ethernet printers are excellent for centralized printing and offer a very stable connection, reducing latency and potential interference issues common with wireless setups. This is often the preferred choice for business settings where performance and uptime are critical.
Mobile Printing: Setup for Smartphones and Tablets
The ability to print directly from smartphones and tablets has become a staple of modern convenience.
- AirPrint (iOS/macOS): If you have an Apple device and an AirPrint-compatible printer (most modern Wi-Fi printers are), setup is minimal. Ensure both devices are on the same Wi-Fi network. When you go to print from an app, simply select the printer from the list. No additional drivers or apps are usually needed on the iOS device itself.
- Mopria Print Service (Android): Mopria is a universal print solution for Android. Many Android devices have Mopria Print Service pre-installed or available as a free download from the Google Play Store. Once installed and enabled, it allows seamless printing to Mopria-certified printers on the same Wi-Fi network.
- Manufacturer-Specific Apps: Most major printer brands (e.g., HP Smart, Epson iPrint, Canon PRINT Inkjet/SELPHY, Brother iPrint&Scan) offer their own free apps for iOS and Android. These apps provide advanced features like scanning directly to your device, checking ink levels, performing maintenance, and offering more control over print settings. Download the app, ensure your phone and printer are on the same Wi-Fi network, and follow the in-app instructions to discover and connect to your printer.
- Cloud Print Services (e.g., Google Cloud Print – deprecated, manufacturer’s own cloud services): While Google Cloud Print has been deprecated, some manufacturers offer their own cloud printing solutions, allowing you to print from anywhere with an internet connection. These usually require setting up an account and registering your printer with the service.
Mobile printing adds immense flexibility, allowing you to print on the go without needing a computer, further integrating your printer into your digital ecosystem.
Driver Installation: The Brains Behind the Operation
Once your printer is physically connected (via USB, Wi-Fi, or Ethernet), the next critical step is installing the correct software, or “drivers,” on your computer. Drivers are essential pieces of software that allow your operating system to communicate with and control the printer. Without them, your computer won’t know how to “talk” to the printer.
Automatic Driver Installation (Plug and Play)
For many modern printers, particularly those connected via USB or detected on a network, your operating system’s “Plug and Play” capabilities can handle most of the driver installation automatically.
- Windows: When you connect a new printer or power on a networked one, Windows often detects it, searches its extensive driver database or Windows Update online, and automatically installs the appropriate basic drivers. You might see a notification indicating “Device setup complete” or “Installing device software.”
- macOS: Similar to Windows, macOS is highly adept at auto-detecting printers, especially AirPrint-compatible ones. When you try to add a printer through “System Settings” (or “System Preferences” in older versions) > “Printers & Scanners,” macOS will often find the printer and automatically suggest or install the necessary software.
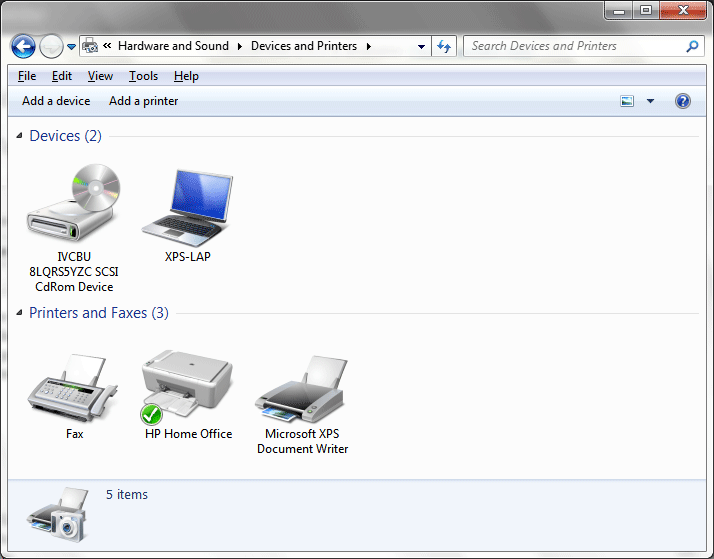
While automatic installation is convenient, it sometimes installs only generic drivers, which might lack advanced features (like duplex printing, specific paper types, or utility functions) offered by the full software package from the manufacturer.
Leveraging Manufacturer Resources (CD/Website)
For the most comprehensive functionality and to ensure you have the latest drivers, it’s always recommended to use the manufacturer’s resources.
- Installation CD/DVD: If your printer came with an installation CD/DVD and your computer has an optical drive, insert the disc. It will usually launch an installer program that guides you through driver installation, additional software (like photo editing tools, scanning utilities), and even network configuration. This method is becoming less common as optical drives disappear from computers.
- Manufacturer’s Official Website: This is the most reliable and up-to-date method.
- Identify Your Printer Model: Locate the exact model number on your printer (usually on a label on the front, back, or bottom).
- Visit the Support Page: Go to the official website of your printer’s brand (e.g., HP.com, Epson.com, Canon.com, Brother.com). Navigate to the “Support” or “Downloads” section.
- Search for Your Model: Enter your printer’s exact model number.
- Select Your Operating System: Choose your specific operating system (e.g., Windows 11 64-bit, macOS Sonoma 14). This is crucial for downloading compatible drivers.
- Download and Install: Download the recommended driver package. It’s often an “all-in-one” installer that includes drivers, utilities, and setup software. Run the downloaded executable file (.exe for Windows, .dmg or .pkg for macOS) and follow the on-screen instructions. The installer will typically detect your printer’s connection method (USB, Wi-Fi, Ethernet) and guide you through the final steps.
Downloading drivers from the official brand website is also a critical digital security practice. Third-party driver sites can sometimes host outdated or malicious software, potentially compromising your system. Always prioritize official sources to protect your privacy and data.
Manual Driver Installation Through OS Settings
In situations where automatic installation fails, or you need to install a specific driver package, you can manually add the printer through your operating system’s settings.
For Windows:
- Go to “Settings” > “Bluetooth & devices” > “Printers & scanners.”
- Click “Add device.” Windows will search for available printers.
- If your printer is found, select it and follow the prompts.
- If not found, click “Add manually” or “The printer I want isn’t listed.”
- You’ll then have options like “Add a local printer or network printer with manual settings,” “Add a printer using a TCP/IP address or hostname,” or “Add a Bluetooth, wireless or network discoverable printer.”
- If you’ve downloaded drivers, you might need to point the installer to a specific driver file (.inf file) that was extracted from the manufacturer’s package.
For macOS:
- Go to “System Settings” (or “System Preferences”) > “Printers & Scanners.”
- Click the “+” button (or “Add Printer, Scanner, or Fax…”).
- Your Mac will search for available printers.
- If detected, select it. macOS will often automatically suggest the correct driver.
- If not found, you can try adding an “IP” printer by providing its IP address or a “Windows printer” if sharing from a Windows machine. For USB, ensure the printer is connected and powered on.
Manual installation provides granular control and is particularly useful for legacy printers, specific network configurations, or when troubleshooting driver issues.
Testing Your New Printer and Troubleshooting Common Hurdles
After the physical setup and driver installation are complete, the moment of truth arrives: printing your first document. While often seamless, encountering issues is not uncommon. Knowing how to test your printer and troubleshoot effectively can save you considerable time and frustration.
Printing Your First Test Page
The simplest way to confirm your printer is working is to print a test page.
- From Printer’s Control Panel: Many printers have an option to print a “Self-Test Page,” “Network Configuration Page,” or “Nozzle Check Pattern” directly from their built-in menu. This verifies the printer’s internal hardware and ink/toner system.
- From Windows: Go to “Settings” > “Bluetooth & devices” > “Printers & scanners.” Select your printer, click “Printer properties” (or “Printing preferences”), and look for a “Print Test Page” button.
- From macOS: Go to “System Settings” > “Printers & Scanners.” Select your printer, click “Printer Queue” (or “Open Print Queue”), then usually under “Printer” in the menu bar, you’ll find an option like “Print Test Page” or “Print a Test Page.”
A successful test page confirms that your printer is communicating with your computer (or operating independently) and that ink/toner is flowing correctly.
Addressing Connectivity Issues
- USB:
- Ensure the USB cable is securely connected at both ends.
- Try a different USB port on your computer.
- Try a different USB cable (they can go bad).
- Restart both the printer and your computer.
- Wi-Fi:
- Verify the printer is connected to the correct Wi-Fi network and has an IP address (check the printer’s display).
- Ensure your computer is also on the same Wi-Fi network.
- Restart your Wi-Fi router, printer, and computer.
- Check for Wi-Fi signal strength at the printer’s location.
- Temporarily disable your computer’s firewall to see if it’s blocking communication (remember to re-enable it).
- Ethernet:
- Check the Ethernet cable connection at both the printer and router/switch. Look for activity lights on the ports.
- Verify the printer has obtained an IP address (check the printer’s display).
- Restart your router/switch and printer.
Resolving Driver-Related Problems
- “Printer Not Found” / “Driver Unavailable”:
- Ensure the printer is powered on and properly connected.
- Re-download the latest drivers from the manufacturer’s official website and reinstall them. Ensure you select the correct operating system and version (32-bit vs. 64-bit).
- Uninstall any previous or conflicting printer drivers from your system before reinstalling. (In Windows: Device Manager > Print queues. In macOS: Printers & Scanners > Select printer > Remove).
- Run your OS’s built-in troubleshooter (Windows: Settings > Troubleshoot > Other troubleshooters > Printer).
- Printer Functionality Issues (e.g., only basic printing, no scanning):
- This often indicates that only generic drivers were installed. Reinstall the full software package from the manufacturer’s website.
- Check the printer’s software utility (often found in your computer’s applications folder or system tray) for specific settings or error messages.
Dealing with Printing Errors and Queues
- “Printer Offline” / “Error State”:
- Ensure the printer is powered on and connected.
- Check the print queue (double-click the printer icon in your system tray/dock or access it via printer settings). Right-click on any pending print jobs and try “Restart” or “Cancel All Documents.”
- Right-click the printer icon and ensure “Use Printer Offline” is unchecked.
- Restart the printer and computer.
- Paper Jams:
- Follow the printer’s instructions for clearing jams (usually involves opening specific panels and gently pulling out jammed paper).
- Ensure you’re using the correct paper type and loading it properly in the tray.
- Poor Print Quality:
- Run the printer’s head cleaning and alignment utilities (usually accessible via the printer’s control panel or software utility on your computer).
- Check ink/toner levels.
- Ensure you’re using genuine or quality compatible cartridges.
- Calibrate colors if necessary through the printer’s software.
Optimizing Your Printing Experience: Beyond the Basics
Once your printer is successfully installed and functioning, there are several advanced steps you can take to enhance its utility, security, and longevity, making it a truly integral part of your technology ecosystem.
Sharing Your Printer Across a Network
If you have a printer connected to one computer via USB, you can often share it with other computers on your home network without needing a dedicated network printer.
- Windows:
- Go to “Settings” > “Bluetooth & devices” > “Printers & scanners.”
- Select the printer you want to share, click “Printer properties.”
- Go to the “Sharing” tab, check “Share this printer,” and give it a share name.
- Ensure network discovery and file/printer sharing are enabled in “Network and Sharing Center” for your private network profile.
- On other computers, go to “Settings” > “Printers & scanners” > “Add device” and select “The printer I want isn’t listed,” then choose “Select a shared printer by name” or “Add a network, wireless or Bluetooth printer.” You may need to browse for the computer sharing the printer.
- macOS:
- Go to “System Settings” > “General” > “Sharing.”
- Enable “Printer Sharing.”
- Select the printer(s) you wish to share.
- On other Macs, the shared printer should appear automatically under “Printers & Scanners.”
Sharing a printer is a cost-effective solution for multi-computer households or small offices, extending the utility of a single device.
Keeping Your Drivers Up-to-Date
Just like any other software, printer drivers receive updates. These updates can improve performance, fix bugs, add new features, enhance compatibility with new operating system versions, and even address security vulnerabilities.
- Regular Checks: Periodically visit your printer manufacturer’s support website. Look for “Drivers & Software” for your specific model. Compare the version number of the available drivers with what’s installed on your system.
- Manufacturer Utilities: Many printer brands offer utility software that runs in the background and automatically checks for driver and firmware updates. These are highly recommended for hassle-free maintenance.
- Operating System Updates: Windows Update and macOS updates sometimes include driver updates for common printer models. Keep your operating system updated to benefit from these.
Maintaining current drivers ensures optimal functionality, reliability, and security for your printer.

Security Considerations for Networked Printers
In today’s interconnected world, even your printer can be a potential security vulnerability, especially if it’s connected to a network.
- Strong Passwords: If your printer has a web interface for administration, ensure it’s protected by a strong, unique password. Change default passwords immediately.
- Firmware Updates: Printer firmware (the internal software that controls the printer’s hardware) also receives security updates. Check your manufacturer’s website for available firmware updates and install them as recommended.
- Network Security: Ensure your Wi-Fi network is secured with WPA2 or WPA3 encryption. Use a strong, complex Wi-Fi password.
- Access Control: For business environments, consider implementing network access controls or dedicated printer VLANs to restrict who can access and print to certain devices.
- Data Security: Some advanced printers have internal storage. For devices handling sensitive documents, be aware of how data is managed and erased.
By addressing these security aspects, you protect not only your printer but also your entire network from potential threats, reinforcing your digital security posture.
In conclusion, installing a printer doesn’t have to be a source of stress. By approaching the task methodically, understanding the different connection types, and knowing where to find the right drivers, you can achieve a seamless setup. From the initial unboxing to troubleshooting the occasional hiccup, this guide has provided you with the essential knowledge to confidently manage your printing needs. A well-installed and maintained printer is a valuable asset, contributing to your productivity and ensuring your digital work can easily transition into the physical realm. Embrace these tips, and enjoy the convenience of effortless printing.
aViewFromTheCave is a participant in the Amazon Services LLC Associates Program, an affiliate advertising program designed to provide a means for sites to earn advertising fees by advertising and linking to Amazon.com. Amazon, the Amazon logo, AmazonSupply, and the AmazonSupply logo are trademarks of Amazon.com, Inc. or its affiliates. As an Amazon Associate we earn affiliate commissions from qualifying purchases.