In today’s interconnected world, a network printer is an indispensable tool for both home and business environments. Gone are the days of wrestling with cumbersome USB cables, limiting your printing flexibility. A network printer allows multiple devices on the same network to share a single printing resource, fostering collaboration and streamlining workflows. But if you’re new to setting up such a device, the process might seem a little daunting. Fear not! This comprehensive guide will demystify the installation process, ensuring you can enjoy the convenience of a shared printer in no time.

Whether you’re a tech enthusiast looking to optimize your home office, a small business owner aiming for efficient resource management, or simply someone seeking to simplify their printing setup, understanding how to install a network printer is a valuable skill. This guide will walk you through the essential steps, covering everything from initial preparation to troubleshooting common issues.
Understanding Network Printers and Their Benefits
Before diving into the installation process, it’s beneficial to understand what a network printer is and why it’s a superior choice for shared printing environments. Unlike a direct-connect printer that plugs into a single computer via USB, a network printer connects directly to your network, either wirelessly (Wi-Fi) or via an Ethernet cable. This means any device on that network can access and print to it without being physically tethered.
The advantages of using a network printer are numerous:
- Shared Access and Collaboration: This is the primary benefit. Multiple users and devices can print to the same printer, enhancing productivity in offices and making it easy for family members to print from their own laptops or tablets at home.
- Reduced Clutter: Eliminates the need for multiple printers or a tangle of USB cables running to each workstation.
- Flexibility and Mobility: Users can print from any device connected to the network, regardless of its physical location relative to the printer. This is especially useful in larger homes or office spaces.
- Cost-Effectiveness: Investing in one network printer for multiple users is generally more cost-effective than purchasing individual printers for each user.
- Centralized Management: In business settings, network printers can be managed centrally, simplifying maintenance, supply ordering, and security.
Preparing for Network Printer Installation
A smooth installation begins with proper preparation. Before you start clicking through installation wizards, take a few moments to ensure you have everything you need and that your network is ready. This proactive approach will save you time and frustration down the line.
Gathering Necessary Information and Equipment
The first step is to ensure you have the printer itself, its power cable, and any accompanying documentation. Crucially, you’ll need your network information.
- Network Name (SSID) and Password: For wireless network printers, you’ll need to know your Wi-Fi network’s name (SSID) and its password. Ensure you have this readily available before you begin.
- Printer’s IP Address (Optional but Recommended): While most modern printers can obtain an IP address automatically, knowing how to find or assign a static IP address can be helpful for troubleshooting and advanced configurations. You can often find this information in your printer’s manual or by printing a network configuration page from the printer’s control panel.
- Printer Drivers: Most modern operating systems will automatically detect and install basic drivers for new hardware. However, it’s always a good idea to have the latest printer drivers readily available. You can usually download these from the manufacturer’s official website. Navigate to the support or downloads section and search for your specific printer model. Downloading them beforehand ensures you have them even if your internet connection is unstable during the installation process.
- Administrator Privileges: On most computers, you will need administrator privileges to install new hardware and software. Ensure you are logged in with an account that has these permissions.
Connecting the Printer to Your Network
The method for connecting your printer to the network will depend on whether it’s a wired or wireless model.
Wired Network Connection (Ethernet)
For a wired connection, the process is straightforward:
- Locate an Ethernet Port: Find an available Ethernet port on your router or network switch.
- Connect the Ethernet Cable: Plug one end of the Ethernet cable into the port on your printer and the other end into the available port on your router or switch.
- Power On: Connect the power cable to the printer and plug it into a power outlet. The printer should automatically attempt to obtain an IP address from your router.
Wireless Network Connection (Wi-Fi)
Wireless setup offers more placement flexibility but requires a few more steps:
- Power On: Connect the power cable to the printer and plug it into a power outlet.
- Access Printer’s Control Panel: Most wireless printers have a small screen or buttons on the device itself. Navigate through the menu to find the network or Wi-Fi setup options.
- Select Your Network: The printer will scan for available Wi-Fi networks. Select your network’s SSID from the list.
- Enter Password: You will be prompted to enter your Wi-Fi password using the printer’s control panel. Be mindful of case sensitivity.
- Confirm Connection: The printer will attempt to connect to your Wi-Fi network. It will usually display a confirmation message or an icon indicating a successful connection.
Tip: If you encounter difficulties during the wireless setup, consult your printer’s manual. Some printers also offer a Wi-Fi Protected Setup (WPS) button for a simpler connection, which involves pressing a button on both the printer and your router.
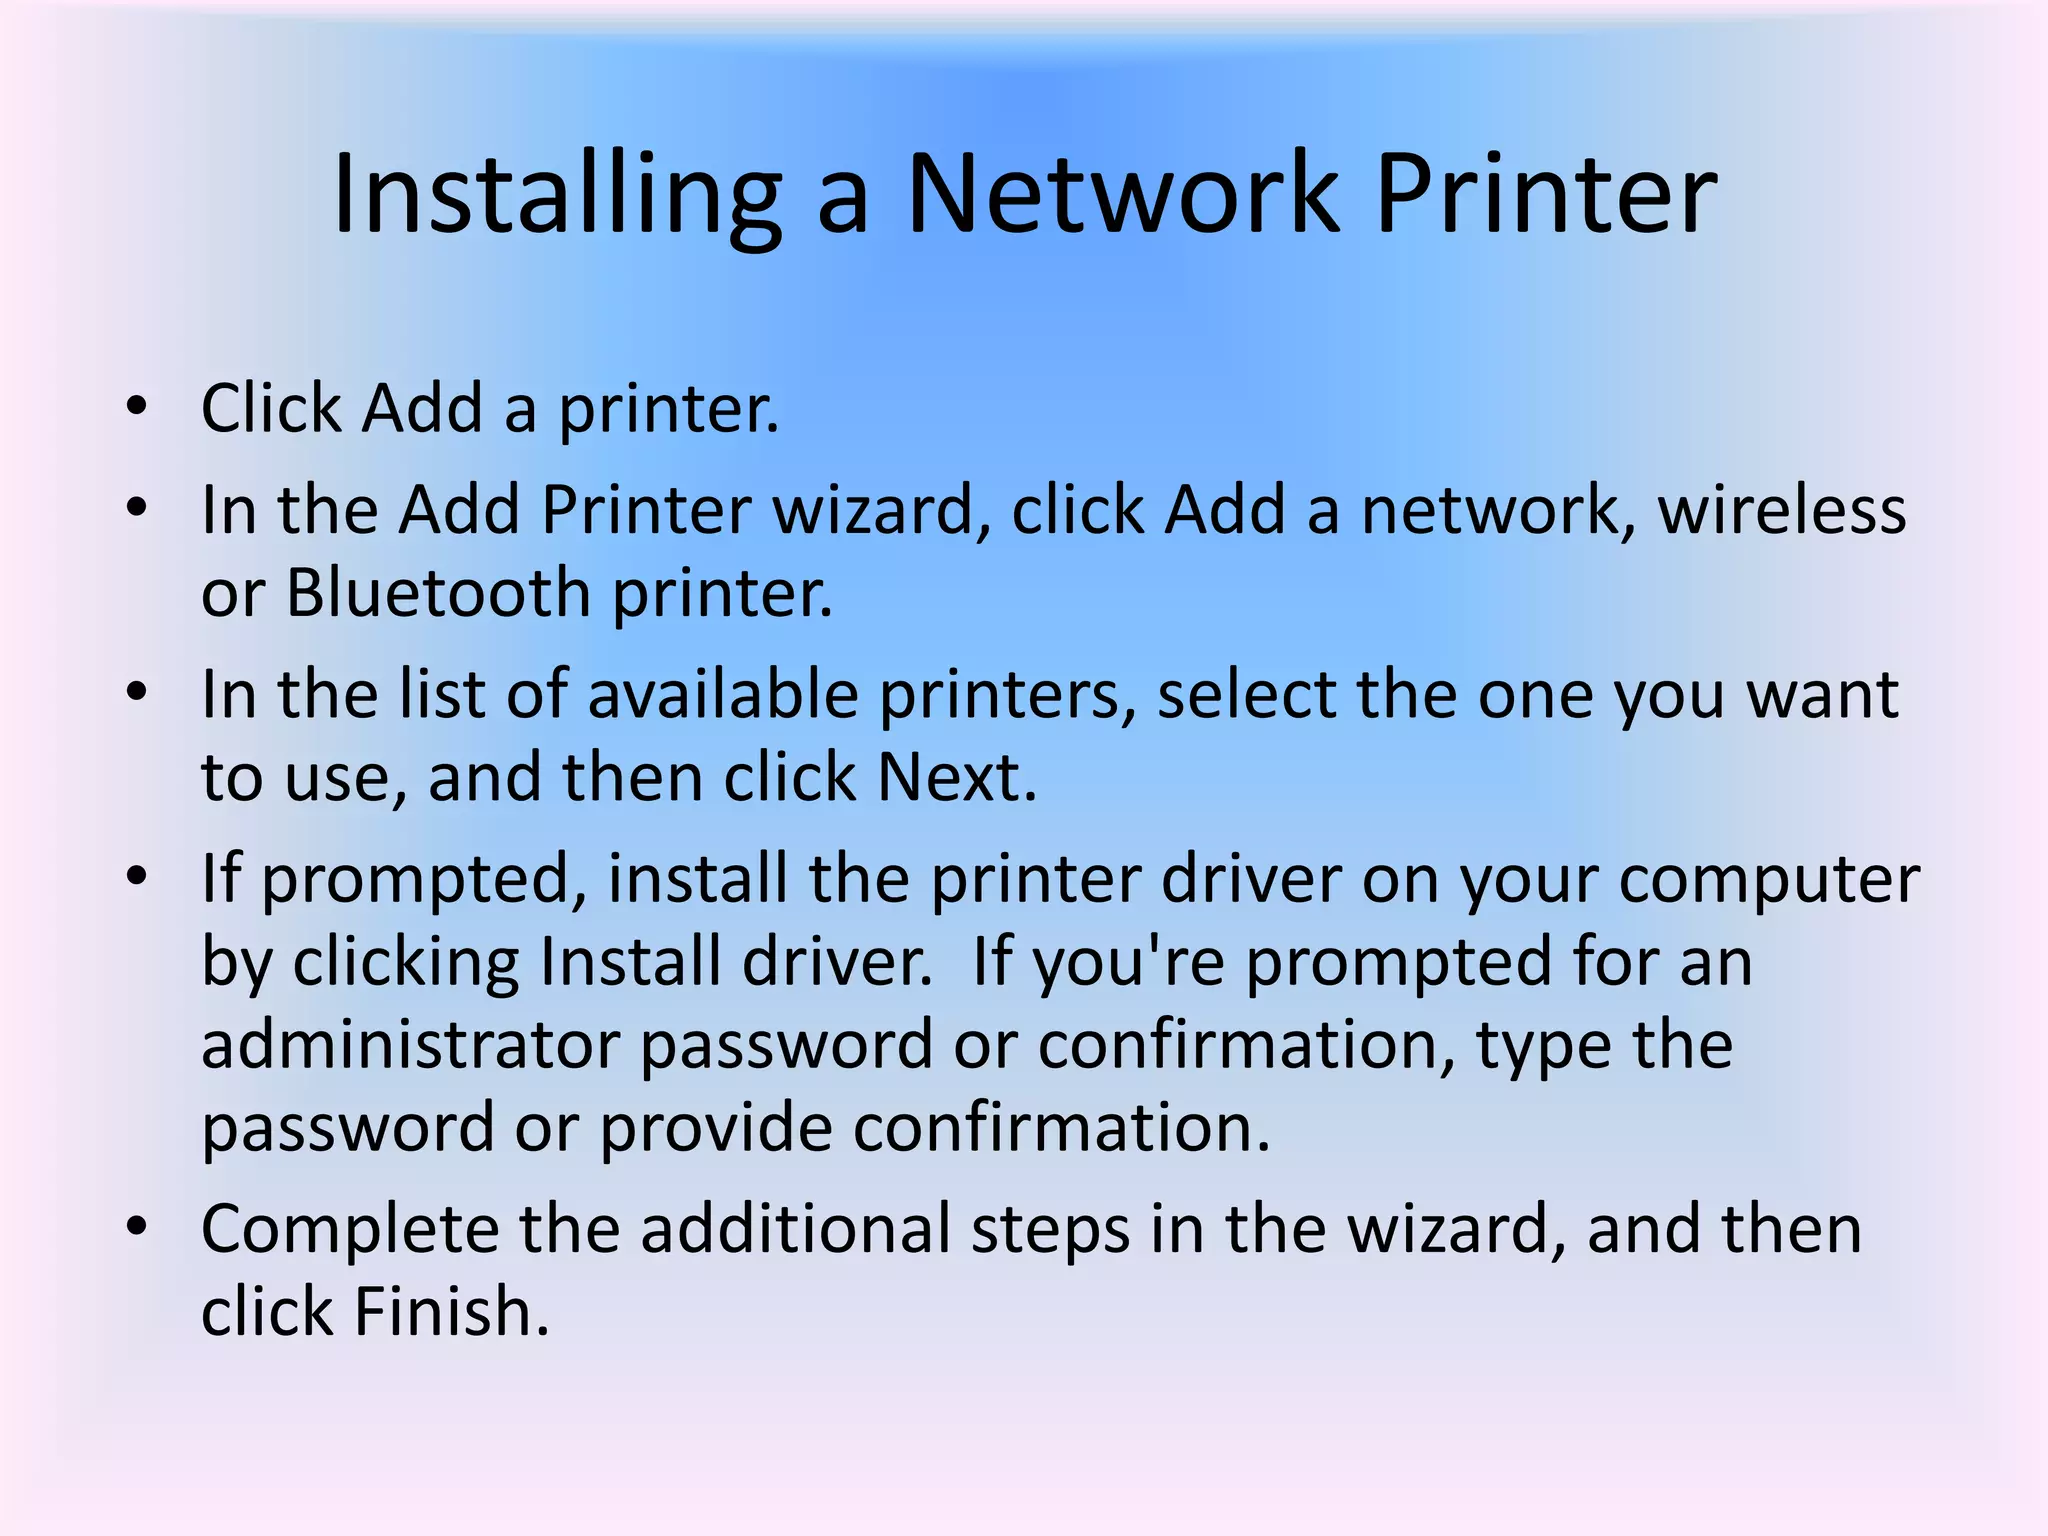
Installing the Network Printer on Your Computer
Once your printer is successfully connected to the network, you can proceed to install it on your computer(s). The steps will vary slightly depending on your operating system (Windows or macOS).

Installing on Windows
Windows typically offers an automated way to discover and install network printers.
Automatic Detection and Installation
- Open Settings: Click the Start button and select the “Settings” gear icon.
- Navigate to Devices: In the Settings window, click on “Devices.”
- Select Printers & Scanners: From the left-hand menu, choose “Printers & scanners.”
- Add a Printer: Click on the “+ Add a printer or scanner” button. Windows will begin searching for printers on your network.
- Select Your Printer: If your network printer is detected, it will appear in the list. Click on your printer’s name and then click “Add device.” Windows will then attempt to install the necessary drivers.
- Manual Driver Installation (If Needed): If Windows cannot find the correct drivers automatically, or if you prefer to use the latest ones you downloaded, click “The printer that I want isn’t listed” after the initial search. This will give you options to add a printer by TCP/IP address or by browsing for a specific driver.
Manual Installation via IP Address
This method is useful if automatic detection fails or if you want to ensure you’re using a specific IP address.
- Follow Steps 1-5 above, but when prompted, click “The printer that I want isn’t listed.”
- Select “Add a printer using a TCP/IP address or hostname” and click “Next.”
- Device Type: Choose “TCP/IP Device” from the dropdown.
- Hostname or IP Address: Enter the IP address of your network printer. You can leave the “Port name” as default or change it to something descriptive (e.g., “OfficePrinter”).
- Query the printer: Ensure “Query the printer and automatically select the driver to use” is checked, then click “Next.”
- Driver Installation: Windows will try to detect the printer and install the driver. If it can’t, you’ll be prompted to select the manufacturer and model from a list or to click “Have Disk” to browse to the location where you saved the driver files.
- Name Your Printer: Give your printer a name (e.g., “Home Office Printer”) and click “Next.”
- Printer Sharing: You can choose to share the printer or not. For a network printer, sharing is usually desirable.
- Print a Test Page: It’s highly recommended to print a test page to confirm the installation was successful.
Installing on macOS
macOS also excels at automatically detecting network printers.
Automatic Detection and Installation
- Open System Preferences: Click the Apple menu in the top-left corner and select “System Preferences.”
- Navigate to Printers & Scanners: Click on “Printers & Scanners.”
- Add Printer: Click the “+” button located below the list of printers.
- Discover Printers: macOS will automatically search for printers on your network. Your network printer should appear in the list.
- Select Your Printer: Click on your printer’s name. macOS will usually automatically select the correct driver (often labeled “AirPrint” if supported, or the specific model name). If not, you can select it from the “Use” dropdown menu.
- Add: Click the “Add” button. macOS will install the printer and its drivers.
- Print a Test Page: Once added, you can select the printer from the dropdown menu in any print dialog and print a test page.
Manual Installation (If Needed)
If automatic detection fails, you can try adding the printer manually:
- Follow Steps 1-3 above, but after clicking “+”, select the “IP” tab at the top of the “Add Printer” window.
- Address: Enter the IP address of your network printer.
- Protocol: Choose the appropriate protocol. “Line Printer Daemon – LPD” or “HP Jetdirect – Socket” are common choices. Consult your printer’s manual if unsure.
- Queue: Leave this field blank unless specified by your printer’s documentation.
- Name: Give your printer a descriptive name.
- Use: macOS will attempt to identify the printer. If it can’t, select “Select Software” and browse for your printer’s model or select the appropriate driver.
- Add: Click the “Add” button.
Troubleshooting Common Network Printer Installation Issues
Even with the best preparation, you might encounter a snag during installation. Here are some common issues and their solutions:
Printer Not Detected by the Computer
- Check Network Connectivity:
- Wired: Ensure the Ethernet cable is securely plugged into both the printer and the router/switch. Try a different cable and port if possible.
- Wireless: Verify that the printer is connected to the correct Wi-Fi network and that the Wi-Fi password was entered correctly. Check the printer’s network status indicator. Ensure your computer is on the same network as the printer.
- Restart Devices: Try restarting your printer, router, and computer. This can resolve temporary network glitches.
- Firewall Issues: Your computer’s firewall might be blocking communication with the printer. Temporarily disable your firewall to test if this is the case, and if it is, configure the firewall to allow printer communication.
- IP Address Conflict: If you’ve assigned a static IP address to the printer, ensure it doesn’t conflict with another device on your network. You might need to reconfigure the printer’s IP settings.
- Printer’s Network Configuration: Print a network configuration page from the printer’s control panel to confirm it has a valid IP address assigned by your router.
Driver Installation Problems
- Incorrect Driver: Ensure you are downloading the correct drivers for your specific printer model and operating system version (e.g., Windows 10 64-bit).
- Corrupt Download: If you downloaded drivers, try downloading them again.
- Administrator Privileges: Make sure you are installing drivers with administrator rights.
- Uninstall and Reinstall: If you’ve previously attempted to install the printer with incorrect drivers, it might be necessary to uninstall existing printer software before attempting a new installation.
Printing Errors After Installation
- Check Printer Status: Ensure the printer has paper, ink/toner, and no error messages are displayed on its control panel.
- Default Printer: Make sure the correct printer is set as the default printer on your computer.
- Print Queue: Check the print queue for any stuck print jobs. Cancel them and try printing again.
- Network Interruption: If the network connection drops while printing, the job might fail. Re-establish the network connection and try again.
By following these steps and understanding common troubleshooting techniques, you can confidently install and utilize your network printer, unlocking a more efficient and flexible printing experience for everyone on your network.
aViewFromTheCave is a participant in the Amazon Services LLC Associates Program, an affiliate advertising program designed to provide a means for sites to earn advertising fees by advertising and linking to Amazon.com. Amazon, the Amazon logo, AmazonSupply, and the AmazonSupply logo are trademarks of Amazon.com, Inc. or its affiliates. As an Amazon Associate we earn affiliate commissions from qualifying purchases.