In the world of photography, mastering exposure is fundamental to capturing compelling images. At the heart of exposure lies the “exposure triangle,” a critical relationship between aperture, shutter speed, and ISO. While aperture controls depth of field and shutter speed manages motion, ISO dictates the camera sensor’s sensitivity to light. Understanding how to appropriately set your ISO based on the available lighting conditions is not merely a technical skill but a foundational aspect of photographic artistry, directly impacting image quality and creative control.
Understanding the Exposure Triangle: ISO’s Role
To effectively choose the right ISO, it’s essential to first grasp its nature and how it interacts with the other two pillars of exposure.
What is ISO?
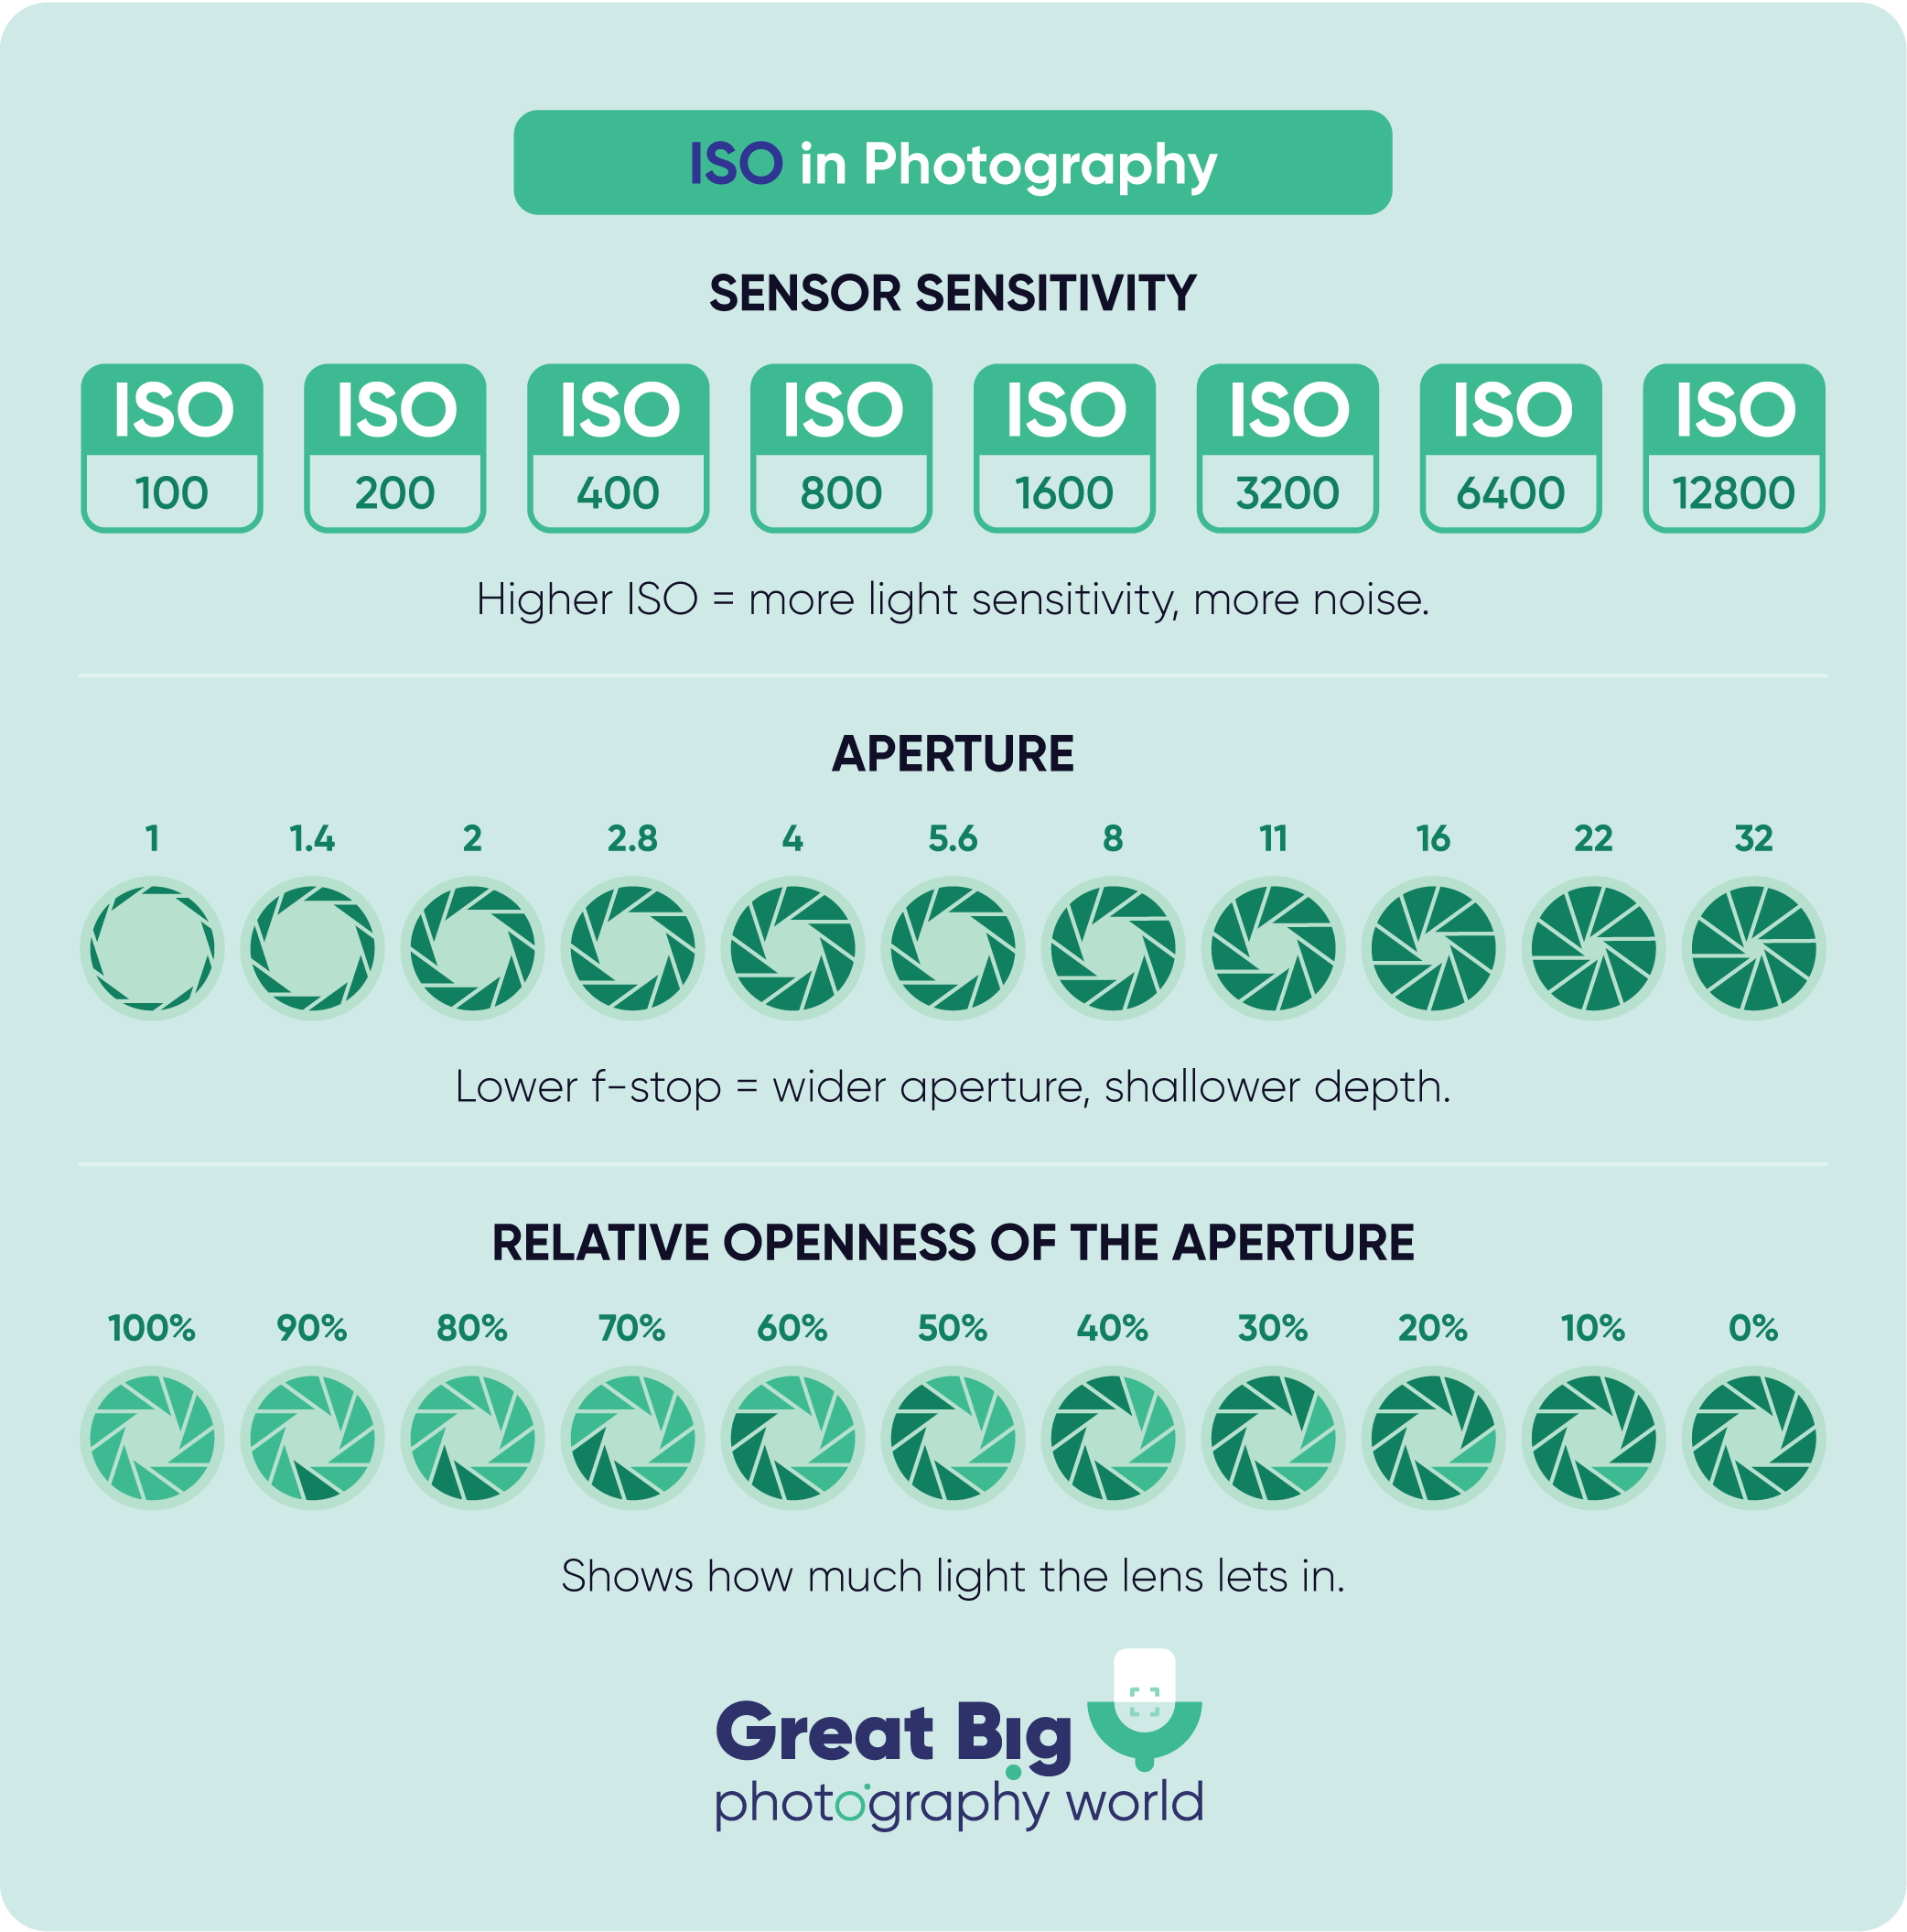
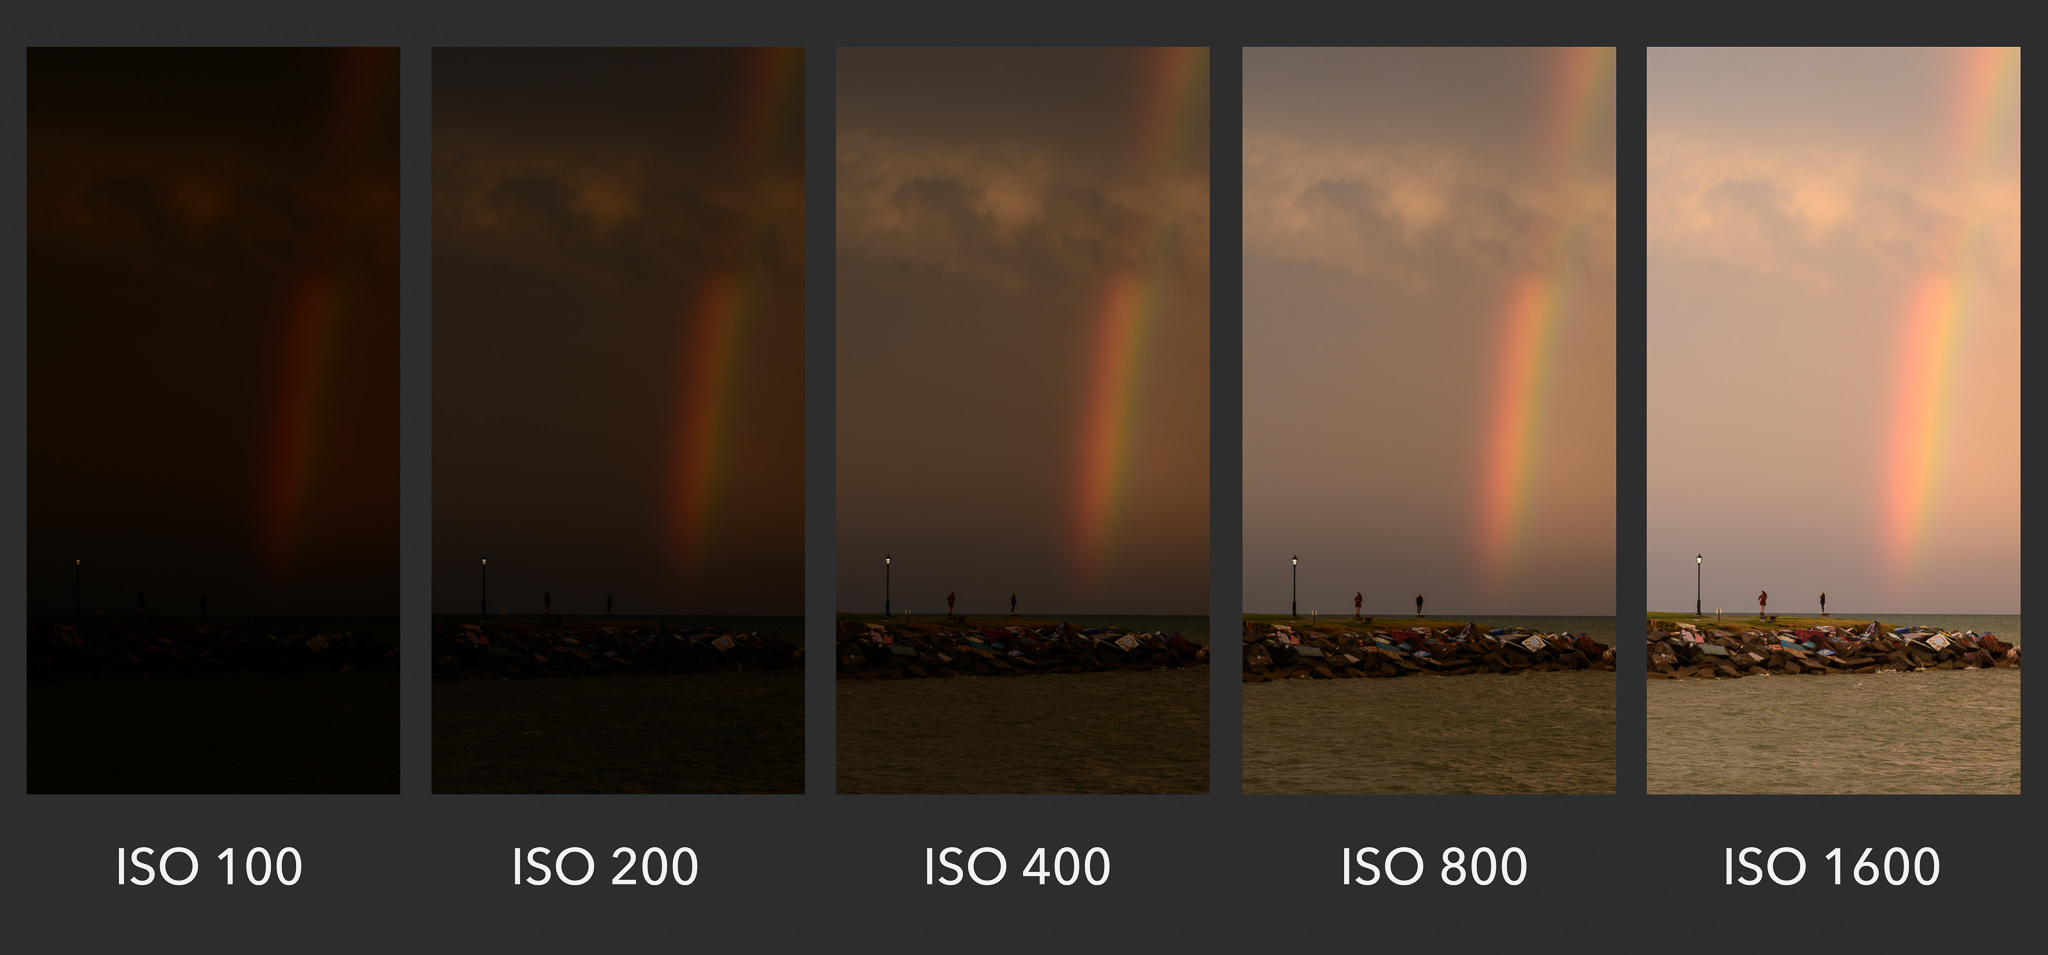
ISO, originally an acronym for the International Organization for Standardization, in photography refers to the camera sensor’s sensitivity to light. A lower ISO setting, such as ISO 100 or 200, indicates lower sensitivity, requiring more light to achieve a proper exposure. Conversely, a higher ISO setting, like ISO 1600, 3200, or even 6400+, signifies higher sensitivity, allowing the camera to capture an image in dimmer conditions with less light. Each full stop increment (e.g., ISO 100 to 200, 200 to 400) effectively doubles the sensor’s sensitivity to light.
Historically, ISO was a measure of film’s sensitivity, and the digital equivalent functions similarly. While it provides immense flexibility, increasing ISO comes with a significant trade-off: digital noise.
The Interplay with Aperture and Shutter Speed
ISO never works in isolation. It’s an integral part of the exposure triangle. To achieve a correctly exposed image, any change to one leg of the triangle usually necessitates an adjustment to one or both of the others.
- Aperture (f-stop): Controls the size of the lens opening, regulating how much light enters the camera. A wider aperture (smaller f-number, e.g., f/2.8) lets in more light, allowing for lower ISOs. A narrower aperture (larger f-number, e.g., f/16) lets in less light, often requiring higher ISOs or slower shutter speeds.
- Shutter Speed: Determines how long the camera’s shutter remains open, controlling the duration of light exposure to the sensor. A faster shutter speed (e.g., 1/1000s) freezes motion but reduces light intake, potentially needing a higher ISO. A slower shutter speed (e.g., 1/30s) allows more light but can introduce motion blur, enabling lower ISOs.
The goal is always to find a balance that achieves the desired creative effect (depth of field, motion rendition) while maintaining optimal image quality.
The Trade-off: Sensitivity vs. Noise
The most crucial consideration when setting ISO is the relationship between sensitivity and digital noise. Digital noise manifests as random speckles or discoloration in an image, particularly noticeable in shadow areas.
- Low ISO (e.g., 100-400): Produces the cleanest images with the least noise. This is always the preferred starting point when light permits. Ideal for landscapes, studio portraits, and bright outdoor scenes where maximum detail and smooth tones are paramount.
- Mid-Range ISO (e.g., 800-1600): Often a good compromise. Modern cameras handle this range well, offering usable images with acceptable noise levels for many situations, such as overcast days, well-lit interiors, or street photography at dusk.
- High ISO (e.g., 3200-6400+): Necessary in very low-light conditions where aperture and shutter speed alone cannot achieve proper exposure. While noise becomes more prominent, a noisy but sharp image is often preferable to a clean but blurry or underexposed one. Crucial for concerts, night photography, or indoor sports.
The level of acceptable noise is subjective and also depends heavily on the camera’s sensor size and technology. Full-frame sensors generally perform better at high ISOs than APS-C or Micro Four Thirds sensors due to larger individual photosites.
Analyzing Lighting Conditions for ISO Selection
The primary factor guiding your ISO choice is the quantity and quality of ambient light. Being able to quickly assess the lighting environment is a skill that develops with practice.
Bright, Abundant Light (Sunny Outdoors, Studio Strobes)
When shooting in bright sunlight, open shade, or with controlled studio lighting, you’ll generally want to use the lowest native ISO setting your camera offers, typically ISO 100 or 200. This minimizes noise and maximizes dynamic range, ensuring the cleanest possible image with the richest colors and most detail.
- Strategy: Start at ISO 100 (or your camera’s base ISO). Adjust aperture for desired depth of field and then adjust shutter speed for proper exposure. If the light is too bright, you might need a very fast shutter speed or a narrower aperture, or even a Neutral Density (ND) filter to slow things down.
Moderate Light (Overcast Day, Well-Lit Interiors)
In conditions like an overcast day, a brightly lit room with windows, or well-lit indoor events, you’ll likely need to increase your ISO slightly to maintain a hand-holdable shutter speed or a specific aperture.
- Strategy: Start with ISO 400-800. Assess if you can maintain your desired aperture (e.g., f/4 for a shallow depth of field portrait) and a sufficiently fast shutter speed (e.g., 1/125s or faster to prevent blur). If you need more light, increase ISO to 800 or 1600. Modern cameras typically handle this range very well with minimal discernible noise.
Low Light (Dawn/Dusk, Dim Interiors, Night)
This is where ISO becomes a critical tool. When shooting at dawn or dusk, in dimly lit rooms, or at night, aperture is likely wide open, and shutter speed might already be as slow as you can hand-hold (or on a tripod). ISO then becomes the primary lever to achieve proper exposure.

- Strategy: Be prepared to use ISO 1600, 3200, 6400, or even higher. Prioritize achieving a sharp image over absolute noise-free perfection. If hand-holding, increase ISO until your shutter speed is fast enough to prevent motion blur. If using a tripod, you can often keep ISO lower and use a longer shutter speed, but if there’s subject movement, higher ISO will be necessary to freeze it.
Mixed Lighting Challenges
Environments with varied light sources (e.g., window light mixed with artificial room light, or strong backlighting) can pose unique challenges. While ISO directly responds to the quantity of light, metering modes (evaluative, center-weighted, spot) help the camera interpret the light. Often, in mixed lighting, you’ll expose for the highlights or the subject, which might mean a higher ISO than you’d expect if the subject is in shadow.
Practical Strategies for ISO Management
Beyond understanding the theory, applying ISO knowledge effectively in real-world scenarios requires practical strategies.
Prioritizing Image Quality: Start Low, Go Up Reluctantly
The general rule of thumb is to always use the lowest possible ISO setting that allows you to achieve your desired aperture and shutter speed for a proper exposure. Think of ISO as your last resort in the exposure triangle, to be increased only when aperture and shutter speed options have been exhausted or are unsuitable for your creative vision. This approach ensures maximum image fidelity.
When to Embrace Higher ISO
There are specific situations where a higher ISO is not just acceptable but essential:
- Action in Low Light: Shooting fast-moving subjects (sports, wildlife, children) in dim conditions requires a fast shutter speed to freeze motion. This inevitably means a higher ISO setting.
- Hand-Holding in Low Light: To avoid camera shake, you need a shutter speed that matches or exceeds your lens’s focal length (e.g., 1/100s for a 100mm lens, though image stabilization helps). If the light is dim, increasing ISO is often the only way to achieve this.
- Maximizing Depth of Field in Low Light: If you need a narrow aperture (e.g., f/11) for extensive depth of field in low light (e.g., a night landscape focusing on both foreground and background without a tripod), a higher ISO might be necessary to keep shutter speeds manageable without excessive blur from wind or subject movement.
Leveraging Camera Technology (Auto ISO, Noise Reduction)
Modern cameras offer features to assist with ISO management:
- Auto ISO: This mode allows you to set a maximum ISO limit and a minimum shutter speed. The camera will then automatically adjust ISO within those parameters to achieve correct exposure, prioritizing your set aperture and shutter speed. This is incredibly useful in dynamic lighting conditions where you can’t constantly adjust settings manually.
- In-Camera Noise Reduction: Most cameras apply some level of noise reduction to JPEGs shot at high ISOs. While this can smooth out noise, it can also soften fine details. For maximum control, many photographers prefer to shoot in RAW and apply noise reduction during post-processing.
Post-Processing Considerations
Shooting in RAW format provides significant advantages when dealing with higher ISOs. RAW files contain more data than JPEGs, offering greater flexibility to recover detail and apply more sophisticated noise reduction algorithms in software like Adobe Lightroom or Capture One. Specialized noise reduction software can also yield impressive results, making higher ISO images more usable than ever before.
Advanced Considerations and Workflow
Mastering ISO extends beyond the basic settings to a deeper understanding of your gear and workflow.
Sensor Size and ISO Performance
As mentioned, sensor size plays a critical role in high ISO performance. Larger sensors (full-frame) generally have larger individual photosites (pixels), which can collect more light, leading to a better signal-to-noise ratio at higher ISOs compared to smaller sensors (APS-C, Micro Four Thirds, compact cameras). If low-light performance is a priority, investing in a camera with a larger sensor is a significant consideration.
The Importance of a Fast Lens
A “fast” lens is one with a wide maximum aperture (e.g., f/1.4, f/1.8, f/2.8). These lenses allow more light to reach the sensor, meaning you can use lower ISO settings in dimmer conditions while still achieving shallow depth of field and fast shutter speeds. A fast lens can often make the difference between a usable image and one that is too noisy or blurry.
Shooting RAW vs. JPEG
For critical work, especially in challenging lighting, always shoot in RAW. RAW files preserve all the data captured by the sensor, allowing you to make significant exposure adjustments (+/- 1-2 stops) and apply noise reduction with much less degradation than with JPEGs. JPEGs are processed and compressed in-camera, locking in decisions about noise reduction and white balance, leaving less room for error correction.
Continuous Learning and Practice
Developing an intuitive understanding of ISO and how it relates to lighting comes with practice. Regularly experiment with different ISO settings in various lighting conditions. Review your images critically, paying attention to noise levels, sharpness, and overall exposure. Over time, you’ll develop a keen eye for assessing light and making swift, informed decisions about your camera’s ISO setting, ultimately enhancing your photographic capabilities.
By treating ISO not just as a number but as a powerful tool within the exposure triangle, photographers can confidently navigate diverse lighting scenarios, ensuring their images are not only well-exposed but also of the highest possible quality.
aViewFromTheCave is a participant in the Amazon Services LLC Associates Program, an affiliate advertising program designed to provide a means for sites to earn advertising fees by advertising and linking to Amazon.com. Amazon, the Amazon logo, AmazonSupply, and the AmazonSupply logo are trademarks of Amazon.com, Inc. or its affiliates. As an Amazon Associate we earn affiliate commissions from qualifying purchases.