The precise selection of a drill bit for tapping is a cornerstone of mechanical engineering and fabrication, ensuring the integrity and strength of threaded fasteners. When encountering a specification like “5/16-18 tap,” the immediate question for many machinists, engineers, and DIY enthusiasts is “what drill size should I use?” This seemingly simple query unlocks a deeper understanding of threading mechanics, material science, and precision tooling. The correct drill size is not merely a number; it dictates the percentage of thread engagement, directly impacting the joint’s load-bearing capacity and resistance to stripping.
Understanding Tap and Drill Sizing Fundamentals
Before diving into the specifics of the 5/16-18 tap, it’s essential to grasp the foundational principles that govern tap and drill sizing. This knowledge empowers users to make informed decisions beyond simply consulting a chart, especially when non-standard materials or applications are involved.
The Basics of Threading
Threading is the process of creating screw threads inside a pre-drilled hole (internal thread, using a tap) or on the outside of a rod (external thread, using a die). The objective is to form a helical ridge that allows for mechanical fastening, adjustment, or power transmission. A tap, in this context, is a cutting tool used to create internal threads. It features a hardened body with cutting flutes, designed to progressively cut material from the walls of a pre-drilled hole, forming the desired thread profile.
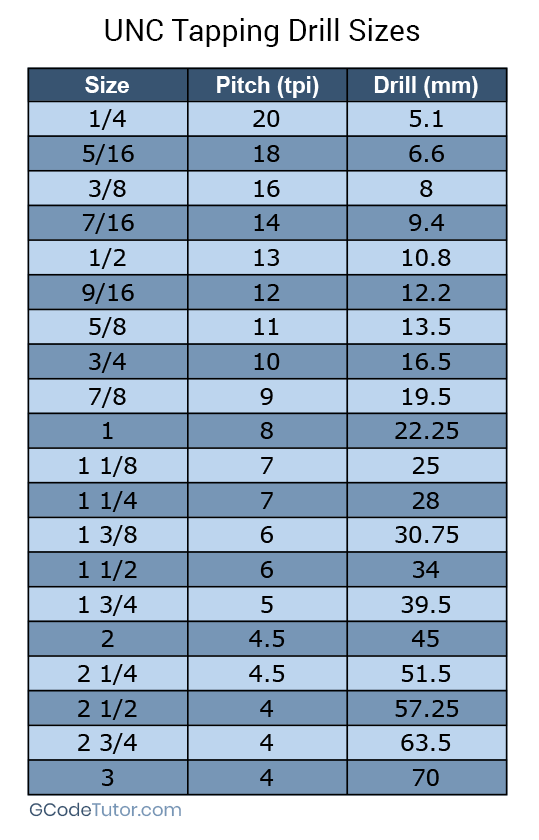
Standard threads are categorized by their major diameter (the largest diameter of the thread), pitch (the distance between corresponding points on adjacent threads, or threads per inch), and form (the shape of the thread, e.g., Unified National Coarse – UNC, Unified National Fine – UNF). For the “5/16-18” designation, “5/16” refers to the nominal major diameter in inches, and “18” indicates 18 threads per inch. This combination typically refers to a Unified National Coarse (UNC) thread, known for its robustness and ease of assembly.
Why Predrilling is Crucial
The tapping process absolutely relies on a correctly sized pilot hole. This hole, created by the tap drill, serves several critical functions:
- Material Removal: It removes the bulk of the material, leaving only enough for the tap’s cutting edges to form the threads. If the hole is too small, the tap will have to remove excessive material, leading to increased torque, potential tap breakage, and poor thread quality.
- Tap Guidance: The pilot hole guides the tap, ensuring it starts straight and maintains its alignment throughout the threading process, crucial for perpendicular threads.
- Thread Engagement Control: Most importantly, the diameter of the pilot hole directly determines the percentage of thread engagement.
Common Tap Specifications and Their Nomenclature
Tap specifications follow a standardized format. For fractional sizes (like 5/16-18), it’s typically:
- Nominal Diameter: The major diameter of the thread (e.g., 5/16 inch).
- Threads Per Inch (TPI): The number of thread crests per inch of length (e.g., 18).
- Thread Series: Often implied or explicitly stated (e.g., UNC for Unified National Coarse, UNF for Unified National Fine). UNC threads have fewer, deeper threads per inch, making them stronger and less prone to stripping in softer materials, while UNF threads have more, shallower threads, ideal for vibration resistance and thin-walled materials.
For the 5/16-18 tap, this signifies a thread with a 5/16 inch (0.3125 inches) major diameter and 18 threads per inch, commonly a UNC thread. This specific combination is widely used in general-purpose fastening applications due to its balance of strength and machinability.
Determining the Correct Drill Bit for a 5/16-18 Tap
The primary goal in selecting a tap drill is to achieve the optimal balance between thread strength and ease of tapping. A 100% thread engagement sounds ideal, but in practice, it’s difficult to achieve, requires excessive tapping force, and offers diminishing returns on strength. Most applications target a thread engagement between 60% and 75%.
Standard Tap Drill Charts
The most common and reliable method for determining tap drill sizes is by consulting a standard tap drill chart. These charts are widely available in machinist handbooks, online resources, and sometimes directly on tap packaging. They provide a quick reference for specific tap sizes, listing the recommended drill bit in both fractional, letter, and number sizes, along with its decimal equivalent.
For a 5/16-18 UNC tap, standard tap drill charts almost universally recommend an F drill bit.
- F Drill Bit: Has a decimal equivalent of 0.2570 inches.
While an F drill is the most common recommendation for approximately 75% thread engagement, other options exist depending on the desired thread percentage and material. A 1/4 inch drill bit (0.2500 inches) is also frequently used, especially in harder materials or when less thread engagement (around 60-65%) is acceptable or even preferred to reduce tapping torque and prevent tap breakage.
The 75% Thread Rule
The “75% thread rule” is a widely accepted guideline in machining. It states that a thread engagement of approximately 75% of the full theoretical thread depth provides nearly the maximum achievable strength while significantly reducing the torque required for tapping compared to a 100% thread. Beyond 75%, the increase in thread strength is marginal, while the risk of tap breakage and the required tapping force increase exponentially. For most common materials and applications, a 75% thread is considered the optimal balance.
Calculating the Tap Drill Size
While charts are convenient, understanding the underlying calculation offers deeper insight. The formula for calculating the tap drill diameter (TD) for a specific percentage of thread (TP) is:

TD = MD - [(0.0130 * TP) / N]
Where:
- TD = Tap Drill Diameter (in inches)
- MD = Major Diameter of the thread (in inches)
- TP = Percentage of thread engagement desired (e.g., 75 for 75%)
- N = Number of Threads Per Inch (TPI)
Let’s apply this to a 5/16-18 tap with a desired 75% thread:
- MD = 5/16 inch = 0.3125 inches
- TP = 75
- N = 18
TD = 0.3125 - [(0.0130 * 75) / 18]
TD = 0.3125 - [0.975 / 18]
TD = 0.3125 - 0.054166
TD ≈ 0.2583 inches
Comparing this calculated value (0.2583 inches) to standard drill sizes:
- F drill = 0.2570 inches
- E drill = 0.2500 inches (this is incorrect, E is 0.2500, which is also 1/4″, but is not the F drill. For context, G is 0.2610 inches)
- 1/4 inch = 0.2500 inches
The F drill (0.2570 inches) is the closest standard drill size to our calculated 0.2583 inches, confirming its suitability for approximately 75% thread engagement. The 1/4 inch drill (0.2500 inches) would yield a slightly lower percentage of thread engagement, around 68-70%, which is still perfectly acceptable for many applications, especially in harder materials.
Specifics for 5/16-18 UNC
To summarize for the 5/16-18 UNC tap:
- Recommended Drill for ~75% Thread: F drill (0.2570 inches)
- Alternative for ~68-70% Thread (easier tapping, harder materials): 1/4 inch drill (0.2500 inches)
Always prioritize the F drill for optimal strength in most general-purpose applications unless specific material hardness or tapping challenges dictate a slightly larger hole.
Practical Application and Best Practices for Tapping
Knowing the correct drill size is only one part of the equation. Successful tapping requires careful execution and adherence to best practices to ensure high-quality threads and prevent tool breakage.
Selecting the Right Drill Bit Material and Type
The material of the drill bit should match the workpiece material.
- High-Speed Steel (HSS): Suitable for most common metals, including steel, aluminum, brass, and plastics. Cost-effective and versatile.
- Cobalt (HSS-Co): Enhanced heat resistance and hardness, ideal for drilling harder materials like stainless steel and high-tensile alloys.
- Carbide: Extremely hard and heat-resistant, used for very hard or abrasive materials, often requiring rigid setups and higher speeds.
For general-purpose use with an F drill, HSS is usually sufficient.
Preparing the Workpiece
Proper workpiece preparation is crucial:
- Secure the Workpiece: Ensure the material is clamped firmly to prevent movement during drilling and tapping.
- Center Punch: Mark the center of the hole accurately with a center punch. This prevents the drill from “walking” and ensures precise hole placement.
- Countersink (Optional but Recommended): Lightly countersink the drilled hole. This deburrs the edge, makes tap starting easier, and prevents the creation of a sharp edge that can fray the initial threads of the tap.
Drilling Techniques for Precision
Accuracy in drilling directly translates to thread quality:
- Use a Drill Press: Whenever possible, use a drill press to ensure the hole is perpendicular to the workpiece surface. Hand drilling can easily lead to crooked holes, resulting in misaligned threads or tap breakage.
- Proper RPM: Select the correct drill speed (RPM) for the material. Too fast can overheat the drill and material, too slow can cause excessive friction and dull the bit.
- Coolant/Lubricant: Use appropriate cutting fluid or lubricant during drilling. This reduces friction, dissipates heat, and flushes chips, extending drill bit life and improving hole quality.
- Peck Drilling: For deeper holes, use the peck drilling method (drilling a short distance, retracting to clear chips, then re-engaging) to prevent chip buildup and overheating.
Tapping Techniques and Lubrication
Tapping is a delicate process that requires patience and proper technique:
- Tap Handle Selection: Use a tap handle that securely holds the tap and allows for a comfortable grip and leverage. Ratcheting tap wrenches are convenient for blind holes or tight spaces.
- Start Straight: Crucially, ensure the tap starts perfectly perpendicular to the workpiece. Use a tap guide, a square, or even the tailstock of a drill press (without power) to align the tap initially.
- Lubrication is Key: Apply a generous amount of cutting oil specifically designed for tapping. This significantly reduces friction, prevents galling, and aids in chip evacuation, preventing tap breakage and producing cleaner threads. Different materials (e.g., steel, aluminum, stainless) may benefit from specific types of tapping fluid.
- “Two Turns Forward, Half Turn Back” Rule: This widely adopted technique is essential. Turn the tap forward (clockwise for right-hand threads) approximately two full turns to cut new material, then turn it backward (counter-clockwise) about half a turn. This back-and-forth motion breaks off the chips, prevents them from binding in the flutes, and helps clear them from the hole. Repeat this cycle until the desired thread depth is reached.
- Feel for Resistance: Pay close attention to the feel of the tap. If resistance suddenly increases, stop immediately. Forcing the tap is the most common cause of breakage.

Post-Tapping Inspection
After tapping, inspect the threads:
- Thread Gauge: Use a thread gauge to verify the thread pitch and form.
- Go/No-Go Gauge: For critical applications, use a Go/No-Go gauge to ensure the threads are within tolerance.
- Visual Inspection: Check for clean, uniform threads, free from burrs, tears, or incomplete profiles.
By meticulously following these guidelines, you can ensure that the investment in selecting the correct F drill for your 5/16-18 tap translates into perfectly formed, robust threads, capable of meeting the demands of your application.
aViewFromTheCave is a participant in the Amazon Services LLC Associates Program, an affiliate advertising program designed to provide a means for sites to earn advertising fees by advertising and linking to Amazon.com. Amazon, the Amazon logo, AmazonSupply, and the AmazonSupply logo are trademarks of Amazon.com, Inc. or its affiliates. As an Amazon Associate we earn affiliate commissions from qualifying purchases.