
The precise selection of a drill bit size for tapping is a cornerstone of robust mechanical assembly, directly impacting thread integrity, fastener strength, and the longevity of components. When confronting the task of threading a hole for a 5/16-inch tap, understanding the underlying principles and technical specifications is paramount. This isn’t merely about picking a drill; it’s about engineering a precise foundation for a critical connection.
Understanding Tap & Drill Bit Fundamentals for Precision Engineering
Tapping is a machining process that creates internal screw threads in a hole. A tap itself is a cutting tool designed with a specific thread pattern. For a successful tap, the hole drilled prior to tapping, known as the pilot or tap drill hole, must be precisely sized. If the hole is too small, excessive material removal will occur, leading to high torque requirements, increased risk of tap breakage, and potentially oversized or damaged threads. Conversely, if the hole is too large, the tap will remove insufficient material, resulting in shallow, weak threads with reduced thread engagement.

The 5/16-inch tap refers to the nominal major diameter of the thread it will produce. However, a crucial detail often overlooked is the thread pitch, which dictates the number of threads per inch (TPI) and, consequently, the depth of the thread profile. For a 5/16-inch diameter, there are two common standard thread pitches:
- 5/16-18 UNC (Unified National Coarse): This has 18 threads per inch and is generally used for applications requiring rapid assembly, in softer materials, or where resistance to stripping is less critical than ease of manufacturing. The coarser pitch provides deeper threads, offering good resistance to vibration loosening.
- 5/16-24 UNF (Unified National Fine): This has 24 threads per inch and is typically employed where finer adjustments, thinner materials, or higher strength in harder materials are required. The finer pitch results in more threads per unit length, distributing the load over a greater number of threads, which can increase resistance to fatigue and shear.
The choice between UNC and UNF significantly influences the required tap drill size because the minor diameter of the thread (the smallest diameter of the threaded hole) changes with the pitch. The goal of the tap drill is to create a hole that is precisely the minor diameter of the intended thread, allowing the tap to cut the thread crests and valleys accurately. Without this foundational understanding, even the most meticulous drilling technique can yield suboptimal results, compromising the structural integrity of the threaded connection.
The Science Behind the Hole: Pilot Hole Sizing and Thread Engagement
The core principle guiding tap drill selection is achieving an optimal “thread engagement” percentage. Thread engagement refers to the amount of actual thread material that interlocks between the internal (tapped) and external (fastener) threads, expressed as a percentage of the theoretical maximum. While 100% thread engagement sounds ideal, it’s rarely practical or necessary. A 100% engaged thread would require a pilot hole so small that the tap would encounter extreme resistance, leading to excessive torque, increased risk of tap breakage, and often, actual thread damage due to material displacement rather than clean cutting.
The 5/16 Tap: UNC vs. UNF Specifics
For a 5/16-inch tap, the distinction between UNC and UNF is critical for drill bit selection:
- For a 5/16-18 UNC tap: The standard recommended tap drill size is 17/64 inch. This drill size typically yields approximately 75% thread engagement, which is widely considered the industry standard for most general-purpose applications. This percentage provides an excellent balance of strength, ease of tapping, and reduced risk of tap breakage.
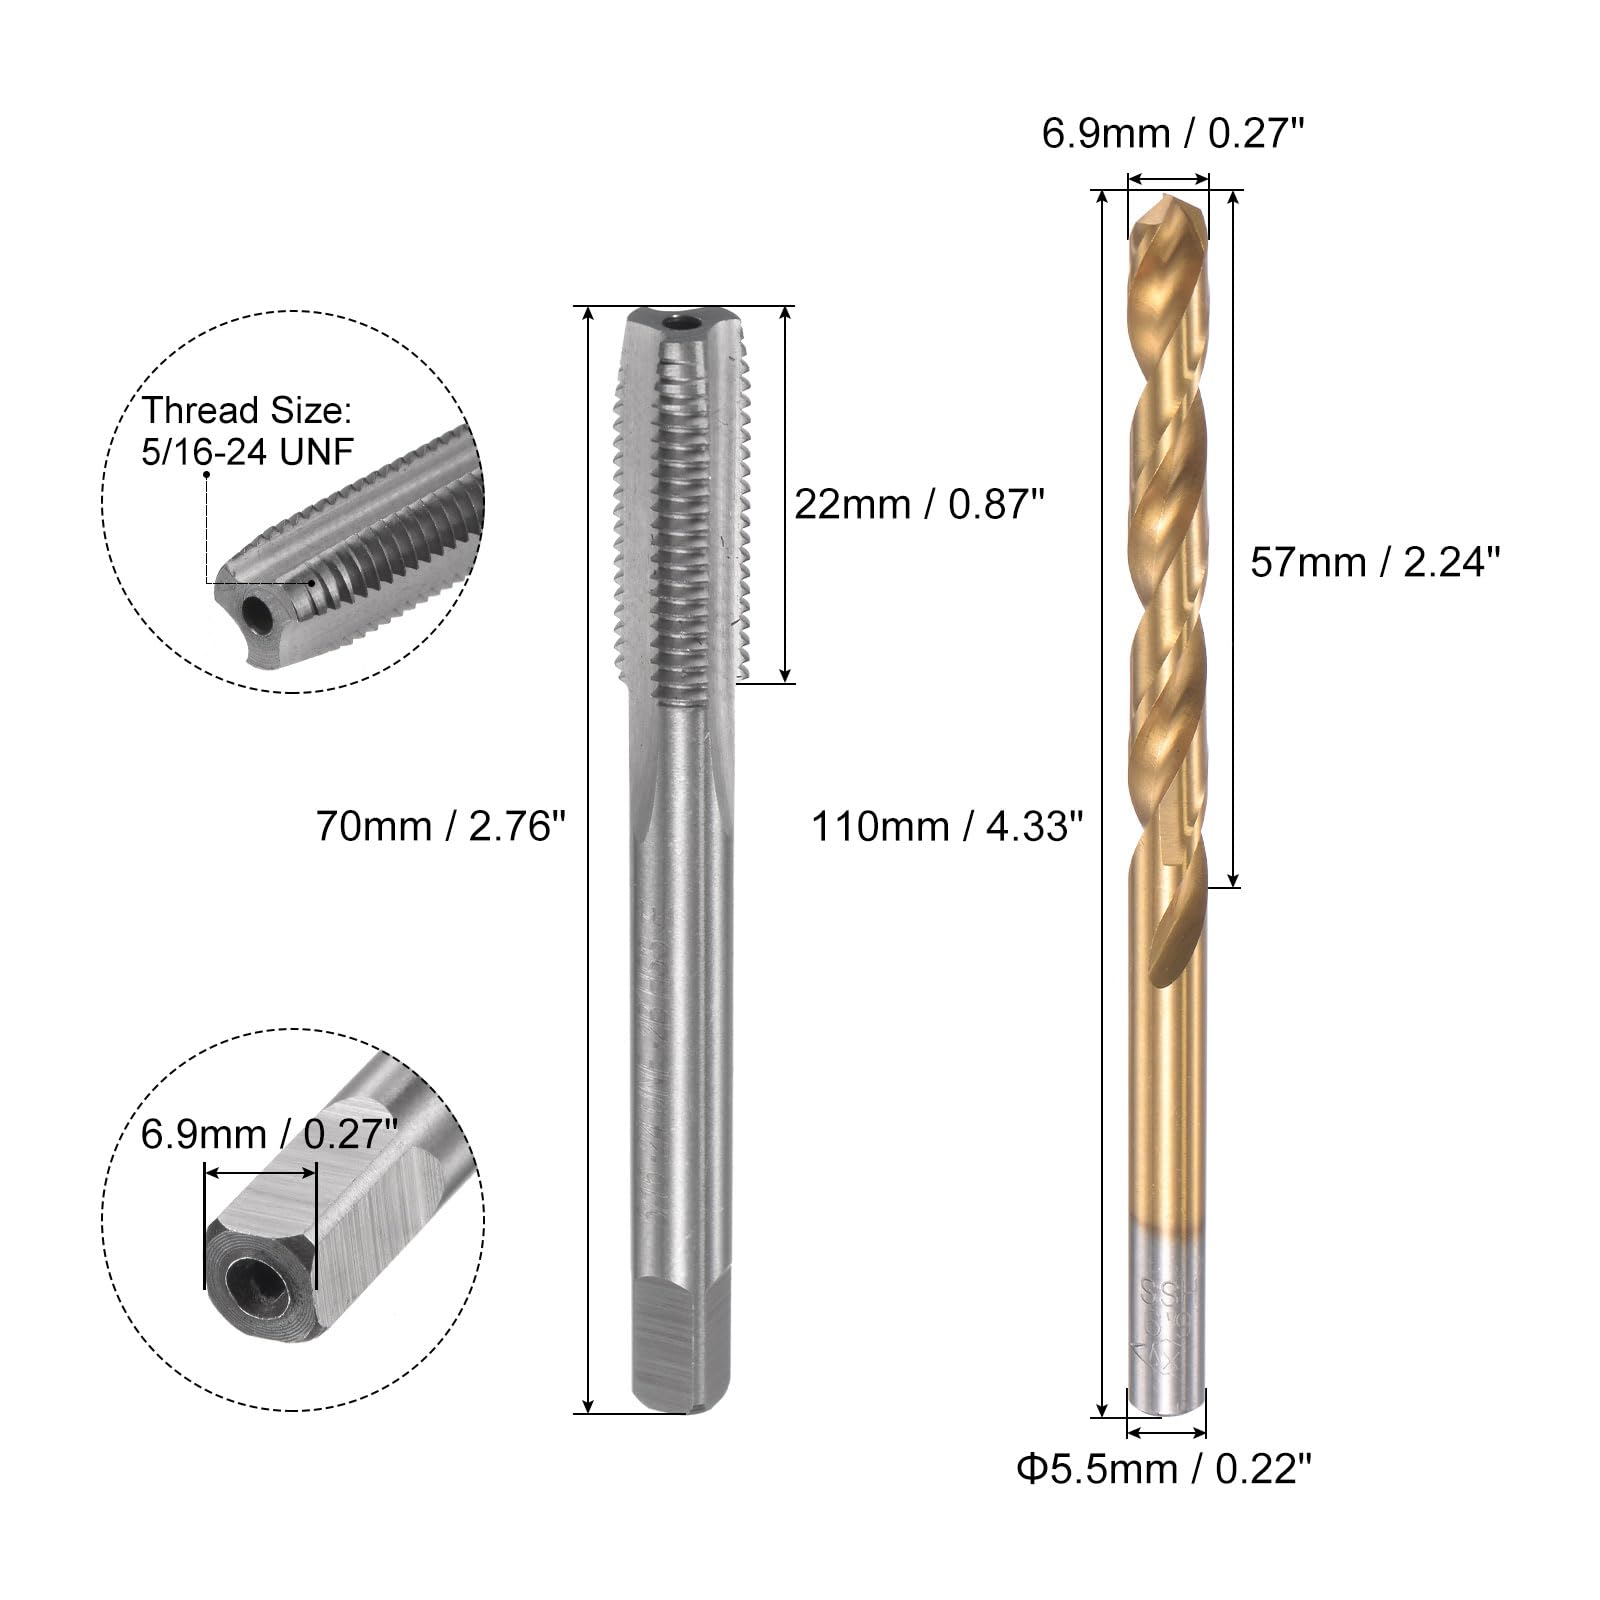
- For a 5/16-24 UNF tap: The standard recommended tap drill size is J drill (0.2770 inches or approximately 7.04 mm). Similar to the UNC recommendation, this size also aims for approximately 75% thread engagement, offering the same advantages of strength and manufacturability for finer pitch threads.
Standard Drill Bit Recommendations
While the 75% engagement rule is a good general guideline, specific drill bit sizes are often tabulated for common taps. Here’s a quick reference for the 5/16 taps:
- 5/16-18 UNC:
- Standard Tap Drill (approx. 75% engagement): 17/64″ (0.2656 inches)
- Decimal Equivalent: 0.2656 inches
- Metric Equivalent: 6.75 mm (a slightly larger hole, potentially lower engagement)
- 5/16-24 UNF:
- Standard Tap Drill (approx. 75% engagement): J Drill (0.2770 inches)
- Decimal Equivalent: 0.2770 inches
- Metric Equivalent: 7.00 mm or 7.05 mm (depending on availability, 7.00mm is slightly smaller, 7.05mm slightly larger)
It’s worth noting that if an exact fractional or letter drill bit isn’t available, a decimal equivalent that provides a slightly larger hole (e.g., aiming for 60-70% engagement) is generally preferable to one that provides a smaller hole. A slightly lower engagement results in a marginally weaker thread but significantly reduces the risk of tap breakage, especially in hard materials. Conversely, a drill bit that is too small leads to excessive material removal, increased tapping torque, and often, premature tap failure.
Calculating for Optimal Thread Engagement
For situations demanding precise control over thread engagement, or when non-standard taps are used, the tap drill size can be calculated. The basic formula for determining the tap drill diameter (TDD) for a specific percentage of thread engagement is:
TDD = Major Diameter - (1.08253 / N) * (Percentage Engagement / 100)
Where:
TDDis the Tap Drill DiameterMajor Diameteris the nominal diameter of the tap (e.g., 0.3125 inches for 5/16)Nis the Number of Threads per Inch (TPI)1.08253is a constant derived from the geometry of the unified thread form.
Let’s apply this for a 5/16-18 UNC tap aiming for 75% engagement:
TDD = 0.3125 - (1.08253 / 18) * (75 / 100)
TDD = 0.3125 - (0.06014) * 0.75
TDD = 0.3125 - 0.045105
TDD = 0.267395 inches

This calculated value, 0.267395 inches, is very close to the 17/64″ (0.2656″) drill bit. The slight difference highlights that standard drill bits are approximations, but often perfectly adequate. For a 5/16-24 UNF tap at 75% engagement:
TDD = 0.3125 - (1.08253 / 24) * (75 / 100)
TDD = 0.3125 - (0.045105) * 0.75
TDD = 0.3125 - 0.03382875
TDD = 0.27867125 inches
This value, 0.27867125 inches, is also very close to the J drill (0.2770″) recommendation. Understanding this calculation empowers engineers and machinists to make informed decisions, especially when working with specialized materials or demanding applications where thread strength is paramount.
Beyond the Bit: Essential Tapping Techniques for Success
While the correct drill bit size is foundational, it’s merely the first step. The success of a tapping operation hinges on several critical techniques that ensure thread quality, tap longevity, and operator safety. Overlooking these steps can lead to broken taps, stripped threads, or an unreliable fastener connection.
Material Considerations and Lubrication
The material being tapped significantly influences the entire process. Harder, more abrasive materials (like certain stainless steels or tool steels) generate more heat and resistance, requiring a slower tapping speed and specialized cutting fluids. Softer materials (like aluminum or brass) are easier to cut but can lead to “galling” or material adherence to the tap, especially if proper lubrication is neglected.
Choosing the correct cutting fluid is crucial. For steel, a sulfurized cutting oil or a heavy-duty tapping fluid is often recommended. For aluminum, a light cutting oil, kerosene, or even plain oil can work. Cast iron, being brittle, is often tapped dry. The lubricant reduces friction and heat, facilitates chip evacuation, and improves the tap’s cutting action, leading to cleaner threads and extending tap life. It’s applied generously and consistently throughout the tapping process.
Achieving Proper Alignment and Preventing Breakage
Misalignment is a primary cause of tap breakage. The tap must enter the pilot hole perfectly perpendicular to the surface.
- Manual Tapping: Use a tap guide or a tap wrench with a sliding T-handle to maintain squareness. Start slowly, applying even downward pressure, and visually confirm alignment from multiple angles. For through-holes, a machinist’s square can be placed against the tap to check for perpendicularity.
- Machine Tapping (Drill Press, Milling Machine): This is ideal for precision. The machine spindle ensures perfect alignment. The part should be securely clamped to prevent movement. If using a drill press, ensure the tap is aligned with the chuck, and use a floating tap holder or carefully hand-feed the tap, turning the chuck by hand to prevent overpowering the tap.
Once the tap begins cutting, applying steady, controlled pressure is essential. Avoid excessive force, which can cause the tap to bind or break. Instead, allow the tap’s cutting edges to do their work. For every one or two full turns forward, rotate the tap backward by about half a turn. This “chip breaking” action is vital, especially in ductile materials, as it clears accumulated chips from the flutes, preventing them from binding and increasing resistance.
Post-Tapping Verification and Best Practices
After the tapping operation is complete, several steps ensure the quality of the newly formed threads. Visually inspect the threads for any signs of tearing, galling, or incomplete formation. Use a thread gauge or a mating bolt to check the fit. The bolt should turn smoothly into the newly tapped hole without excessive force or play. If the bolt binds, it could indicate an issue with the tap, the pilot hole size, or chip removal during the process.
Before assembly, clean the tapped hole thoroughly to remove any remaining chips, cutting fluid residue, or burrs. Compressed air, a thread brush, or a solvent can be used for this purpose. Residual chips can impede fastener engagement, lead to premature wear, or compromise the strength of the connection. By adhering to these best practices, the integrity and reliability of the threaded connection are significantly enhanced, moving beyond simple drill bit selection to encompass a holistic approach to precision threading.
Selecting the Right Tools and Ensuring Precision
The efficacy of any technical operation, particularly one involving material removal and precise geometry like tapping, is fundamentally linked to the quality and suitability of the tools employed. Beyond just the correct drill bit and tap, other instruments play a pivotal role in ensuring accuracy and preventing costly errors.
For drilling the pilot hole, a high-quality drill press is preferable to a handheld drill, especially for critical applications. A drill press offers superior control over perpendicularity and depth, ensuring the hole is straight and consistent. If a handheld drill must be used, a drill guide or fixture is highly recommended to maintain alignment. The drill bit itself should be sharp, made of appropriate material (e.g., high-speed steel for general purpose, cobalt or carbide for harder materials), and correctly ground. A dull drill bit can wander, create an oversized or undersized hole, or generate excessive heat, compromising the subsequent tapping process.
When it comes to the tap, utilizing a tap wrench that provides a firm, balanced grip is essential. For smaller taps, a T-handle tap wrench offers good control. For larger taps, a bar-type tap wrench provides the necessary leverage. Avoid using adjustable wrenches or pliers on taps, as these can easily slip, damage the tap, or result in misalignment. A tap guide (sometimes integrated into a tap handle) can be invaluable for maintaining the tap’s perpendicularity throughout the initial turns, particularly when hand-tapping.
Measurement tools are equally critical. Calipers or a micrometer can verify the diameter of the drill bit before use, especially if there’s any doubt about its marked size or if metric-to-imperial conversions are involved. After drilling, these tools can also be used to measure the pilot hole, though internal measurements require specialized gauges for high precision. A thread gauge (pitch gauge) is indispensable for identifying the tap’s pitch (UNC vs. UNF) and for verifying the pitch of the newly cut threads.
Finally, ensuring a stable work environment is paramount. The workpiece must be securely clamped to a workbench or machine table. Any movement during drilling or tapping can lead to misaligned holes, broken tools, or injury. A well-lit workspace also allows for better visual inspection of the cutting action and chip formation, helping the operator to react to potential issues before they escalate. Integrating these tools and practices into the workflow elevates the tapping operation from a simple mechanical task to a precise engineering process, ensuring repeatable success and robust, reliable threaded connections.
aViewFromTheCave is a participant in the Amazon Services LLC Associates Program, an affiliate advertising program designed to provide a means for sites to earn advertising fees by advertising and linking to Amazon.com. Amazon, the Amazon logo, AmazonSupply, and the AmazonSupply logo are trademarks of Amazon.com, Inc. or its affiliates. As an Amazon Associate we earn affiliate commissions from qualifying purchases.