
In the world of DIY, home improvement, or even professional contracting, seemingly minor details can have significant financial repercussions. One such detail, often overlooked or underestimated, is selecting the correct pilot hole size for a screw. For the ubiquitous #8 screw, understanding the precise drill bit needed isn’t just about craftsmanship; it’s a critical component of cost-efficiency, project longevity, and ultimately, your bottom line. Whether you’re saving money on personal home repairs or aiming for profitability in a side hustle, getting this right ensures you don’t incur unnecessary expenses, wasted time, or damaged reputation.

The Financial Imperative of Proper Pilot Holes
Every successful project, whether a weekend hobby or a paid gig, hinges on a series of correct decisions. For fastening, the pilot hole stands as a gatekeeper against a cascade of potential financial pitfalls. Using a drill bit that is too small or too large for a #8 screw can transform a simple task into a costly setback, directly impacting material expenditure, tool lifespan, and the overall value of your work.
Avoiding Costly Material Damage
Imagine starting a woodworking project – perhaps a custom shelf for a client or a sturdy workbench for your own garage. You grab a #8 screw and drive it directly into a beautiful piece of oak or even a common pine board. Without a pilot hole, or with one that’s too small, the screw’s aggressive threads can exert immense pressure, leading to unsightly cracks, splits, or blowouts, particularly at the edges or in dense materials. This isn’t just an aesthetic problem; it’s a financial hit. A split board means wasted material, requiring either replacement at additional cost or time-consuming repairs that eat into your profit margins or project budget. For high-value materials, this mistake can turn a profitable endeavor into a loss. For personal projects, it means dipping into savings for a second purchase.
Preventing Tool Wear and Tear
The struggle to drive a #8 screw into an undersized pilot hole or, worse, no pilot hole at all, puts immense strain on your tools. Your power drill’s motor will work harder, consuming more battery life and increasing the risk of premature burnout. Drill bits themselves can snap or dull quickly if forced against undue resistance, requiring frequent, expensive replacements. Furthermore, the screw heads are prone to stripping when excessive torque is applied to overcome resistance, leading to frustrated attempts to extract a stuck screw. Each stripped screw isn’t just a wasted fastener; it represents a micro-cost in time and potential damage to the surrounding material as you try to remove it. Investing a few moments to drill the correct pilot hole is a proactive measure that extends the life of your power tools, drill bits, and drivers, contributing to long-term savings on equipment maintenance and replacement.
Enhancing Project Durability and Value
A properly fastened joint is a strong joint. When a #8 screw is driven into a pilot hole of the appropriate size, it threads cleanly into the material without causing internal stress or weakening the surrounding fibers. This results in a secure, stable, and durable connection that can withstand intended loads and environmental stresses over time. Conversely, a screw driven into an incorrect pilot hole might initially seem secure but can loosen prematurely, leading to structural failure or aesthetic degradation. For a professional, this means potential call-backs, warranty claims, or a damaged reputation – all of which translate directly into lost income and trust. For a DIYer, it could mean having to redo a project, spending more time and money, or facing the disappointment of a collapsing shelf or wobbly furniture. The longevity and reliability of your work are direct contributors to its inherent value, whether that value is in client satisfaction or the enduring quality of your own home.
Decoding #8 Screws and Material Considerations
To select the financially optimal drill bit, one must first understand the #8 screw itself and the characteristics of the material it will penetrate. This foundational knowledge is crucial for making informed decisions that prevent waste and maximize efficiency.
Understanding Screw Gauges and Lengths
The “#8″ in a #8 screw refers to its gauge, a standardized measure of its major diameter. A #8 screw typically has a major diameter (the widest part, including threads) of approximately 0.164 inches (or roughly 5/32″ to 3/16” visually). While the gauge defines the screw’s overall thickness, the core or shank diameter (the unthreaded portion just below the head) is what truly dictates the pilot hole size, as it’s this part that the material must accommodate without splitting, while still allowing the threads to bite firmly. The length of the screw, though not directly influencing the diameter of the pilot hole, is critical for determining the depth of the pilot hole. Drilling too shallow or too deep can compromise holding power or risk drilling completely through the material, both leading to rework and wasted resources.
Matching Bit Size to Material Type
The material into which you’re driving the #8 screw is the single most important factor in selecting your drill bit. The density, grain structure, and inherent hardness of the material dictate how much resistance the screw will encounter and how prone it is to splitting or stripping.
- Softwoods (e.g., pine, spruce, cedar): These materials are relatively forgiving. They offer less resistance, and their fibers are less likely to split. A pilot hole that is slightly smaller than the screw’s shank diameter allows the threads to create a strong grip without excessive splitting.
- Hardwoods (e.g., oak, maple, cherry): Dense and robust, hardwoods require a larger pilot hole compared to softwoods. Their tightly packed fibers are highly prone to splitting if the pilot hole is too small. The pilot hole should be very close to, or even match, the shank diameter to prevent damage.
- Composites (e.g., MDF, plywood, particleboard): These engineered materials often have varying densities and glues that can make them behave differently. Plywood might delaminate if the hole is too small, while MDF can crumble. A cautious approach, often leaning towards a slightly larger pilot hole, is advisable.
- Plastics (e.g., PVC, acrylic): Plastics can crack or melt if the screw generates too much friction. A pilot hole is essential, and often a slightly larger one can help reduce stress, especially in brittle plastics.
- Metals (e.g., aluminum, steel): For self-tapping screws in thin sheet metal, a pilot hole matching the core diameter of the screw is typically used. For through-holes where the screw simply passes to fasten something else, a clearance hole (larger than the major diameter) is needed.

Understanding these material properties isn’t just academic; it’s a practical financial skill. It means avoiding ruined materials, unnecessary trip to the hardware store, and ultimately, ensuring the enduring quality of your work.
Precision Pays: Recommended Drill Bit Sizes
Armed with an understanding of the #8 screw and various materials, we can now pinpoint the exact drill bit sizes that translate directly into cost savings and enhanced project integrity. Precision in this step minimizes costly errors and maximizes efficiency.
Softwoods and Plastics: Balancing Grip and Prevention
For softwoods like pine, cedar, or spruce, and many plastics, you want a pilot hole that’s small enough for the #8 screw’s threads to bite firmly, creating a strong joint, but large enough to prevent splitting.
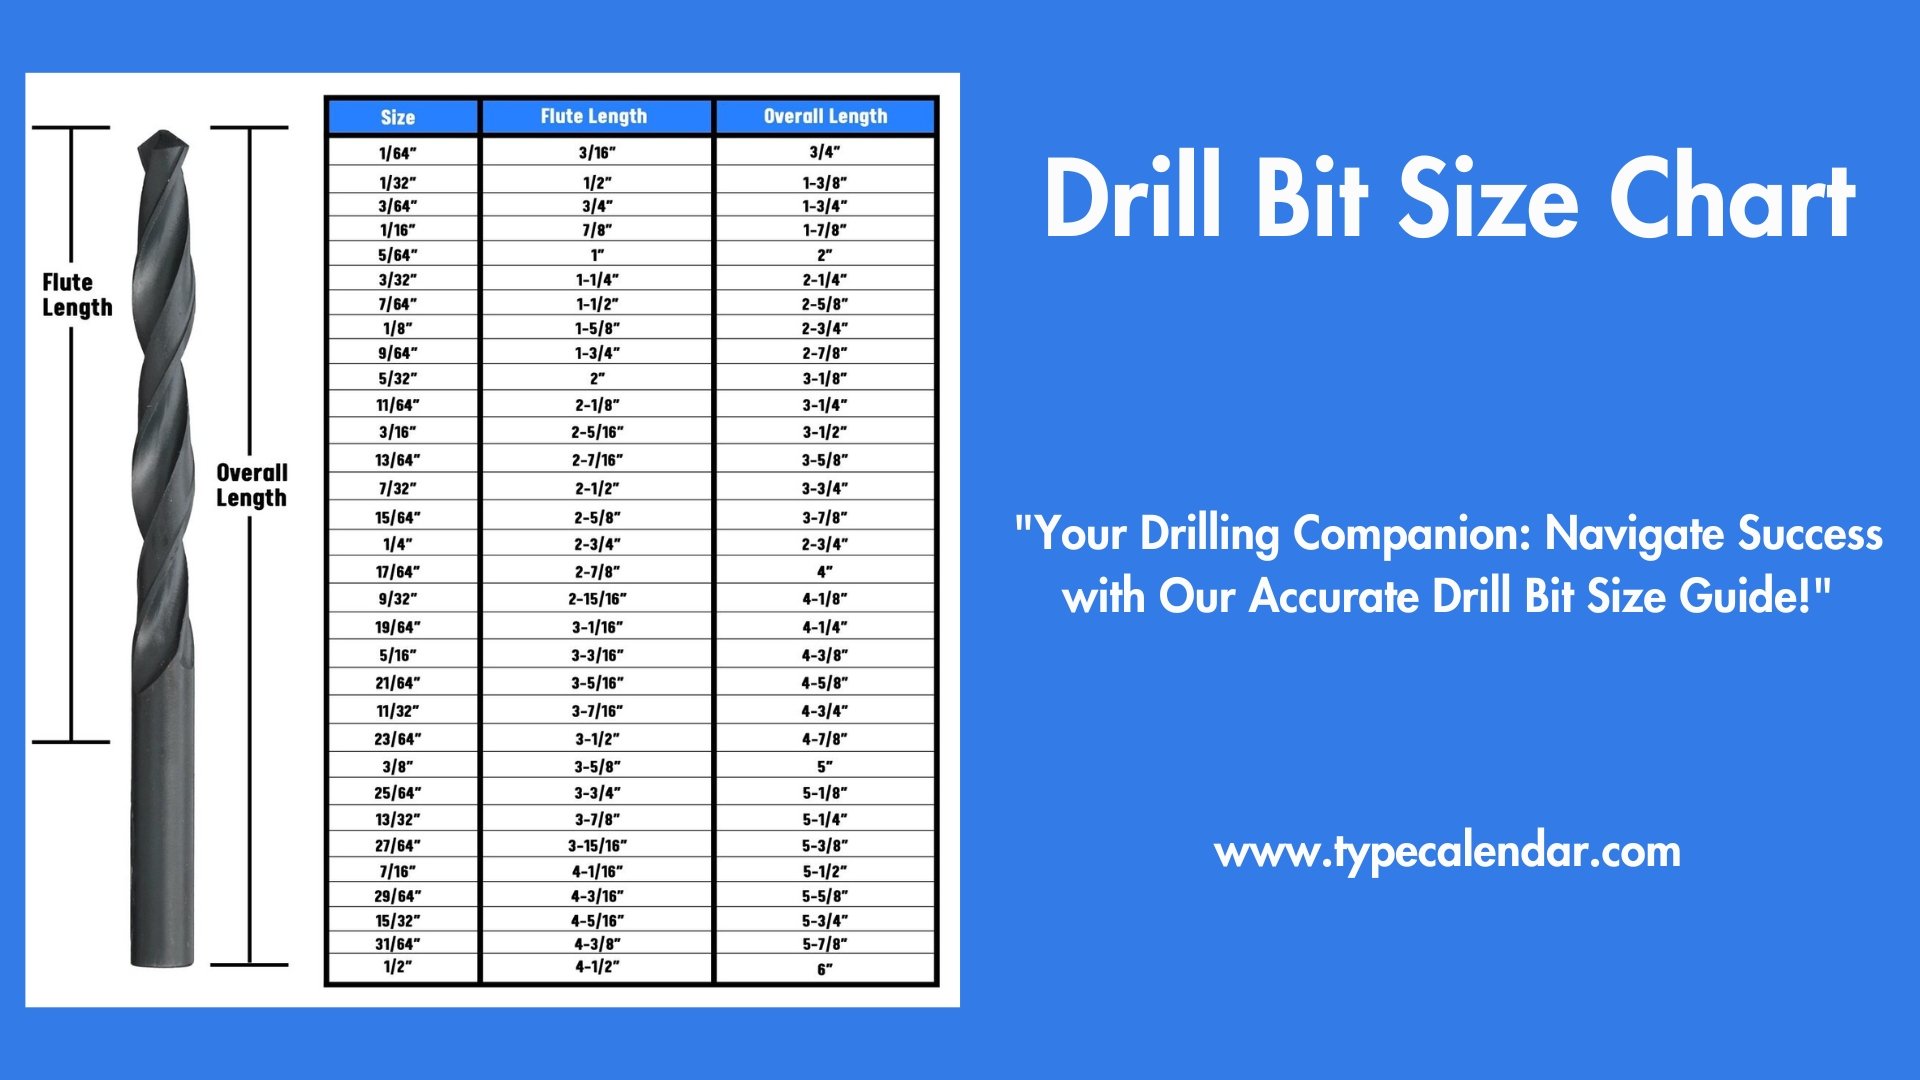
- Recommended Drill Bit Size: 7/64 inch (0.1094″) or 1/8 inch (0.125″).
- The 7/64″ bit is often ideal, as it’s slightly smaller than the screw’s core diameter, allowing for excellent thread engagement.
- For very soft woods or certain plastics, 1/8″ can be used if you find the 7/64″ still causes too much resistance or risk of stripping the screw head.
Choosing this range ensures robust fastening while safeguarding against material damage, meaning fewer re-dos and less wasted lumber or plastic, directly saving money and time.
Hardwoods and Dense Composites: Minimizing Splitting Risk
When working with dense hardwoods like oak, maple, cherry, or even pressure-treated lumber and some dense composite materials, the risk of splitting is much higher. The pilot hole must be closer to the shank diameter of the #8 screw to relieve stress.
- Recommended Drill Bit Size: 9/64 inch (0.1406″) or 5/32 inch (0.1563″).
- The 9/64″ bit is a common choice, providing enough clearance to prevent splitting while still allowing the threads to create a secure connection.
- For extremely dense or brittle hardwoods, or when working very close to an edge, a 5/32″ bit offers even more insurance against splitting, albeit with a slightly reduced grip. You’ll need to test this to balance grip versus splitting risk.
Opting for these slightly larger bits for hardwoods is a wise financial decision. It proactively prevents damage to expensive hardwoods, which can quickly erase profit margins or blow a personal project budget.
Metals: Ensuring Clean Threads and Strong Fastening
For fastening #8 self-tapping screws into thin sheet metal, or for creating a clearance hole for the screw to pass through metal before fastening into another material, the requirements change.
- For self-tapping into thin metal: The pilot hole should match the core diameter of the screw for the threads to form properly. A common size is 9/64 inch (0.1406″). Always consult the screw manufacturer’s specifications for precise pilot hole recommendations for specific metal applications, as metal type and thickness play a significant role.
- For clearance holes (where the #8 screw passes through metal to fasten something else): You need a hole larger than the screw’s major diameter to allow free passage.
- Recommended Drill Bit Size: 3/16 inch (0.1875″). This provides ample clearance for the #8 screw head and shank, ensuring easy assembly and preventing the screw from binding prematurely.
Making the right choice for metal applications means avoiding stripped threads, improperly seated fasteners, and the potential structural weaknesses that can lead to costly failures in assemblies or products.
- Recommended Drill Bit Size: 3/16 inch (0.1875″). This provides ample clearance for the #8 screw head and shank, ensuring easy assembly and preventing the screw from binding prematurely.
Beyond the Bit: Smart Practices for Financial Gain
While selecting the correct drill bit is paramount, true financial efficiency in fastening extends beyond this single decision. Integrating broader smart practices into your workflow can amplify savings and boost earning potential.
Investing in Quality Tools for Long-Term Savings
The adage “buy cheap, buy twice” holds particularly true for tools. Investing in quality drill bits, a reliable drill, and proper safety equipment might seem like an upfront expense, but it’s a financial strategy for the long run. High-quality drill bits maintain their sharpness longer, drill cleaner holes, and are less prone to breaking, reducing replacement costs and project delays. A dependable drill provides consistent power and accuracy, minimizing errors that lead to material waste. These aren’t just tools; they are assets that contribute to consistent, high-quality work, which in turn saves money on rework, extends project lifespans, and enhances your professional reputation, potentially leading to more profitable contracts or personal satisfaction.
The Efficiency of Preparedness and Planning
Time is money, especially in contracting or when balancing a side hustle with other commitments. Preparing your workspace, gathering all necessary tools and materials before starting, and clearly understanding each step of the fastening process significantly reduces wasted time. This includes making test holes in scrap material to confirm your chosen drill bit size, especially for unfamiliar materials or critical joints. A few minutes of planning and testing can prevent hours of frustration and expensive mistakes. Efficient workflow directly impacts your profitability by allowing you to complete projects faster, take on more work, or dedicate more time to value-adding tasks, while simultaneously minimizing the financial cost of avoidable errors.
Leveraging Skills for Side Hustles and Increased Earning Potential
Mastering seemingly small details, such as knowing the correct drill bit size for a #8 screw, builds a foundation of competence and professionalism. This expertise translates into reliable, high-quality work, whether you’re tackling personal home improvements to save on contractor fees or offering your skills as a handyman, custom furniture maker, or general contractor. Customers value precision and durability; they are willing to pay for peace of mind. By consistently delivering superior results through meticulous attention to detail, you enhance your personal brand, attract more clients, command better rates, and cultivate a reputation that fuels consistent income streams. Every correct pilot hole is a step towards greater financial independence and project success.
aViewFromTheCave is a participant in the Amazon Services LLC Associates Program, an affiliate advertising program designed to provide a means for sites to earn advertising fees by advertising and linking to Amazon.com. Amazon, the Amazon logo, AmazonSupply, and the AmazonSupply logo are trademarks of Amazon.com, Inc. or its affiliates. As an Amazon Associate we earn affiliate commissions from qualifying purchases.