
The realm of modern computing, particularly for tasks involving visual fidelity like gaming, video editing, or professional design, hinges significantly on efficient data management. Among the unsung heroes of this efficiency is the graphics cache. While often operating silently in the background, understanding its function, location, and optimal management can unlock smoother performance, faster load times, and a more stable user experience. Unlike more visible components like your GPU’s VRAM, the graphics cache is a dynamic, on-disk storage area, meticulously managed by your operating system and graphics drivers to streamline the delivery of visual assets.
Understanding the Graphics Cache: A Performance Cornerstone
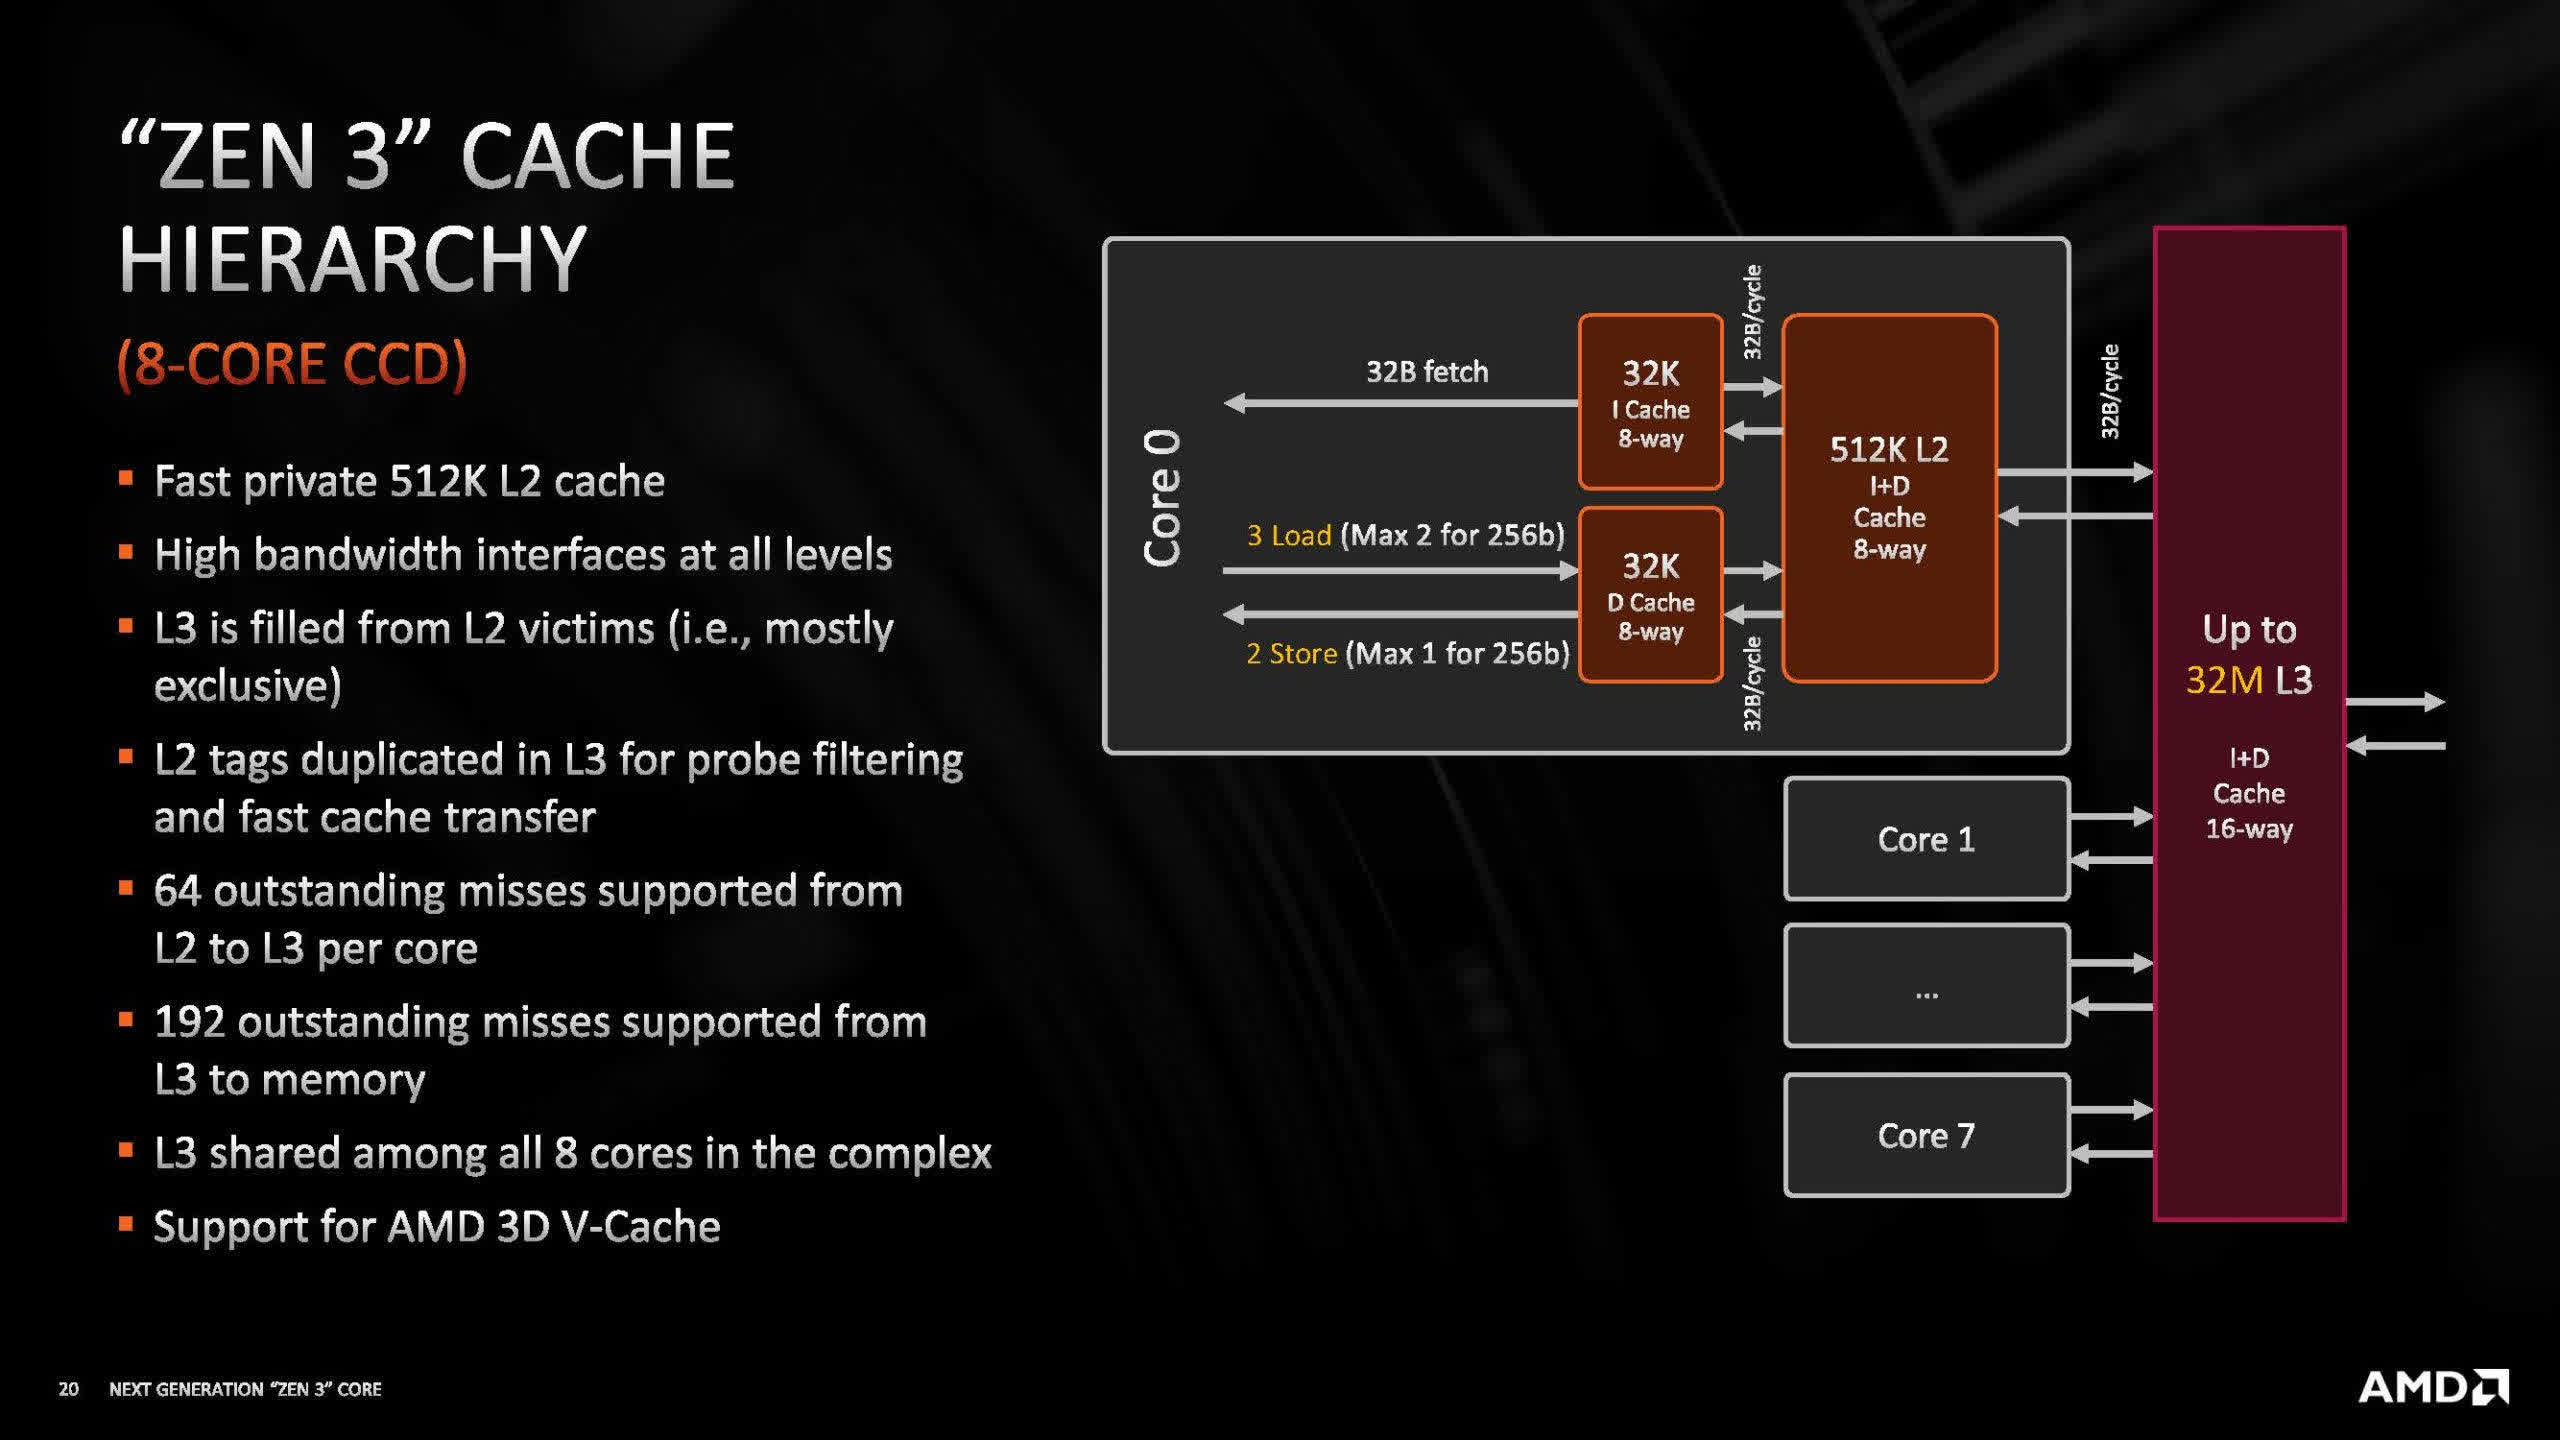
At its core, a graphics cache serves as a temporary storage facility for frequently accessed or pre-processed graphical data. Imagine a meticulously organized library where the most popular books are kept closest to the entrance for quick retrieval. The graphics cache functions similarly, storing compiled shaders, textures, and other visual elements that your system predicts it will need again soon, or has just recently used. This anticipatory storage mechanism dramatically reduces the computational load on your CPU and GPU by preventing them from having to re-render or re-compile the same assets repeatedly.
What Exactly is a Graphics Cache?
A graphics cache is a specific type of temporary storage designed to hold data relevant to graphical processing. When your GPU driver, a game, or an application needs to display a particular texture, model, or shader effect, it first checks the cache. If the required data is present (a “cache hit”), it can be loaded almost instantaneously, bypassing the need to fetch it from slower storage (like your hard drive) or to re-process it from scratch. This significantly cuts down on latency and resource usage, directly translating into smoother animations, quicker scene transitions, and a more responsive overall feel. Its existence is predicated on the principle of locality of reference—the idea that data recently accessed or frequently accessed will likely be needed again soon.
The Role of Graphics Cache in System Performance
The impact of a well-functioning graphics cache on system performance is profound, particularly in demanding applications. In gaming, it minimizes stuttering by ensuring that shaders for specific scenes or effects are ready the moment they are needed, rather than being compiled on the fly. This avoids the noticeable pauses or frame drops often associated with “shader compilation stutter.” For professional software like CAD programs or video editors, caching allows for faster loading of complex models, quicker previews of effects, and smoother manipulation of large datasets. Without an efficient cache, every time you revisit a part of a game world or an element in a design project, your system would have to perform the same calculations, leading to a frustratingly sluggish experience.
Types of Graphics Caches
While often referred to broadly as “graphics cache,” this term encompasses several specific types, each serving a slightly different purpose and managed by different system components:
- Driver-Level Shader Cache: This is perhaps the most significant. NVIDIA, AMD, and Intel graphics drivers maintain a cache (often called a “shader cache” or “disk cache”) where pre-compiled shaders are stored. When a game or application requests a shader, the driver compiles it once and saves the compiled version to disk. Future requests for that same shader can then pull the compiled version directly from the cache, saving significant CPU and GPU time. This cache is typically global for all applications using that driver.
- Application/Game-Specific Caches: Many games and graphically intensive applications also maintain their own internal caches. These might store specific game assets, textures, or even level geometry that are unique to that application. These caches are managed directly by the software itself and are often found within the game’s installation directory or your user’s application data folder.
- Browser Caches for Web Graphics: Web browsers also maintain a cache, and a portion of this is dedicated to web-based graphical elements, images, and even WebGL shaders. This ensures that websites load faster on subsequent visits, as static graphical components don’t need to be re-downloaded.
It is crucial to differentiate these caches, which reside on your storage drive (HDD or SSD), from VRAM (Video Random Access Memory). VRAM is high-speed memory physically located on your graphics card, used to store currently active textures, frame buffers, and other data directly needed by the GPU for real-time rendering. The graphics cache on disk feeds the VRAM, but they are distinct storage layers with different roles.
Locating and Assessing Your Graphics Cache
Unlike simply checking your RAM or VRAM, identifying the precise size of your graphics cache isn’t always straightforward. It’s a dynamic entity, managed automatically by your drivers and applications, and its “size” refers more to the disk space it occupies at any given moment rather than a fixed allocation.
Where is the Graphics Cache Stored?
Graphics caches are typically stored in various locations across your system, depending on their type:
- Driver-Level Cache: For NVIDIA, AMD, and Intel, the shader cache is usually located within specific subdirectories of your user profile’s
AppDatafolder or within the driver’s installation directory. For instance, NVIDIA’s cache might be found underC:ProgramDataNVIDIA CorporationNV_Cacheor within your user’sAppDataLocalNVIDIAdirectory. AMD’s cache is often underC:Users[YourUsername]AppDataLocalAMDDxCacheorDxcCache. - Application/Game-Specific Caches: These are almost always found within the game’s installation folder (e.g., a
cacheorshaderssubdirectory) or in the game’s dedicated folder within your user’sAppDataLocalorAppDataRoamingdirectories. The exact path varies greatly by developer. - Browser Caches: Browser caches are typically stored within the browser’s profile folder in your user’s
AppDataLocaldirectory.
How to View or Estimate Cache Size (Windows)
Directly viewing the exact size of a composite “graphics cache” isn’t a single action, as it’s fragmented. However, you can assess the size of individual cache components:
- NVIDIA Control Panel / AMD Radeon Software: Both NVIDIA and AMD provide settings within their respective control panels that allow you to manage the shader cache. You might see an option to set a maximum cache size (e.g., 10GB for NVIDIA, Unlimited for AMD by default) or to clear it, but often not a direct readout of its current occupied size.
- Windows Disk Cleanup: This built-in utility can be a good starting point. Search for “Disk Cleanup” in the Windows search bar, select your system drive (usually C:), and then “Clean up system files.” After scanning, look for items like “DirectX Shader Cache” or “Temporary files.” This will show you the accumulated size of certain driver-level caches.
- Manually Inspecting Folders: Navigate to the typical cache locations mentioned above (e.g.,
C:ProgramDataNVIDIA CorporationNV_CacheorC:Users[YourUsername]AppDataLocalAMDDxCache). Right-click on the cache folder and select “Properties” to view its current size on disk. Be cautious not to delete anything unless you know what you are doing. - Game-Specific Folders: For games, check their installation directories or
AppDatafolders for subfolders named “cache,” “shaders,” or “temp” and inspect their properties.
How to View or Estimate Cache Size (macOS/Linux – Brief Overview)
On macOS and Linux, the management of graphics caches is generally more abstracted from the user. Graphics drivers and the operating system are designed to handle caching intelligently and automatically. While developers might still include application-specific caches within their software bundles or user library folders, direct user interaction with or monitoring of driver-level shader caches is less common. For applications, you might find cache folders within ~/Library/Caches/ on macOS or ~/.cache/ on Linux, but these are typically general application caches rather than exclusively “graphics” caches.
Differentiating Cache Size from VRAM
This distinction is critical for understanding system performance.
- Graphics Cache (Disk): This resides on your hard drive or SSD. Its purpose is to store compiled shaders and other graphical assets persistently to avoid re-computation. Its size affects load times and stuttering by reducing the need to process data from scratch. It can grow to several gigabytes.
- VRAM (Video Random Access Memory): This is high-speed RAM located directly on your graphics card. Its purpose is to hold the data currently active and being processed by the GPU (textures, frame buffers, etc.). Its size determines how many high-resolution textures and complex scenes your GPU can handle simultaneously without offloading data to slower system RAM, which causes significant performance degradation. VRAM is measured in GB (e.g., 8GB, 12GB).
A large graphics cache on disk doesn’t mean you have more VRAM; it means your system has pre-compiled more graphical elements for quicker access.
Optimizing Your Graphics Cache for Enhanced Performance
While the graphics cache is designed for performance, there are scenarios where managing it can further enhance your system’s stability and speed. Over time, caches can become corrupted, excessively large, or filled with outdated information, leading to performance issues.
When and Why to Clear Your Graphics Cache
Clearing your graphics cache isn’t a routine maintenance task for everyone, but it can be a valuable troubleshooting step:
- Troubleshooting Graphical Glitches: Corrupted cache files can sometimes lead to visual artifacts, texture flickering, or incorrect rendering in games or applications. Clearing the cache forces the system to re-compile or re-download these assets, often resolving such issues.
- Resolving Stuttering or Performance Drops: Especially after driver updates or game patches, old cache files might conflict with new code, causing performance degradation. A fresh cache can sometimes alleviate this “shader compilation stutter.”
- Freeing Up Disk Space: While cache files are generally small individually, they can accumulate over time, potentially consuming several gigabytes of storage, particularly on systems with many games or frequently updated graphics drivers. On SSDs with limited space, this can become a factor.
- After Major Driver or Game Updates: Although drivers and games should handle cache invalidation themselves, sometimes a manual clear ensures a completely clean slate, preventing potential conflicts with old cached data.
Step-by-Step Guide to Clearing Graphics Cache (Windows)
The method for clearing varies depending on the cache type:
- NVIDIA Shader Cache:
- Open the Windows Search bar and type “Disk Cleanup.”
- Select your system drive (usually C:) and click “OK.”
- Click “Clean up system files.”
- After the scan completes, scroll down the list and check the box next to “DirectX Shader Cache.”
- Click “OK” and then “Delete Files.”
Alternatively, you can navigate toC:ProgramDataNVIDIA CorporationNV_Cacheand manually delete the contents, but ensure hidden files are shown.
- AMD Shader Cache:
- Open AMD Radeon Software.
- Navigate to the Performance tab, then Advisors.
- Select Gaming (or Graphics depending on your version).
- Look for an option to “Clear Shader Cache” or similar.
Alternatively, you can navigate toC:Users[YourUsername]AppDataLocalAMDDxCacheand manually delete the contents of that folder.
- Game-Specific Caches:
- This requires knowing the specific game’s cache location. Often, this is in the game’s installation directory (e.g.,
SteamLibrarysteamappscommonGameNamecache) or in your user’sAppDataLocalorAppDataRoamingfolder under the game’s name. - Locate the cache folder (often named
cache,shaders, ortemp). - Backup the folder first if unsure, then delete its contents. The game will recreate them as needed.
- This requires knowing the specific game’s cache location. Often, this is in the game’s installation directory (e.g.,
- Browser Caches:
- In most browsers (Chrome, Firefox, Edge), press
Ctrl+Shift+Delete(Windows) orCmd+Shift+Delete(macOS). - Select the option to clear “Cached images and files” or “Browser cache.” Ensure the time range is set to “All time.”
- In most browsers (Chrome, Firefox, Edge), press
Best Practices for Cache Management
- Don’t Over-Clear: Avoid clearing your graphics cache too frequently as it defeats its purpose. The first time a game loads after a cache clear, it will likely stutter more as shaders are re-compiled. Only clear it when experiencing specific issues or after significant updates.
- Ensure Adequate Disk Space: While a cache can grow, ensure your system drive has sufficient free space. If a cache is unable to expand, it can hinder performance or even lead to errors.
- Keep Drivers Updated: Graphics driver updates often include optimizations for cache management and shader compilation, which can improve performance and stability without manual intervention.
- Monitor Performance: Use tools like MSI Afterburner or your driver’s overlay to monitor frame rates and frame times. If you notice persistent stuttering, especially in new areas or after game updates, a cache clear might be warranted.
Potential Issues and Troubleshooting Related to Graphics Cache
While designed to improve performance, an improperly functioning or corrupted graphics cache can introduce a range of issues that degrade the user experience. Identifying and resolving these problems often involves understanding the symptoms and applying targeted troubleshooting steps.
Common Problems Caused by Corrupted or Oversized Caches
- Stuttering and Micro-Stutters: Perhaps the most common symptom. If the cache is corrupted or incomplete, the system may struggle to find or correctly use pre-compiled shaders, leading to on-the-fly compilation that causes brief pauses or hitches in gameplay.
- Crashes to Desktop or System Freezes: In severe cases, a corrupted cache can lead to application crashes, especially during scene transitions or when new graphical elements are loaded.
- Long Load Times: If the cache is not effectively storing and retrieving assets, applications and games may take longer to load as they re-process data that should have been cached.
- Graphical Artifacts and Glitches: Incorrectly cached shaders or textures can manifest as visual anomalies, such as shimmering textures, objects appearing black or transparent, or distorted geometry.
- Low Frame Rates (in specific scenarios): While not always directly linked, inefficient caching can indirectly contribute to lower average frame rates by increasing the computational burden on the CPU and GPU.
Diagnosing Cache-Related Performance Issues
Troubleshooting often involves a process of elimination:
- Isolate the Issue: Does the problem occur in one specific game/application or across multiple? If it’s isolated, it might point to an application-specific cache problem. If it’s widespread, a driver-level cache issue is more likely.
- Monitor System Performance: Use tools like HWMonitor, MSI Afterburner, or the Windows Task Manager to observe CPU, GPU, and disk activity during the performance dips. High disk activity coincident with stuttering might suggest cache retrieval issues.
- Check for Driver Updates: Always ensure your graphics drivers are up to date. Driver updates frequently address caching bugs and introduce performance enhancements.
- Perform a Cache Clear: As detailed in the previous section, systematically clearing the relevant caches (driver-level, then application-specific) is often the first and most effective troubleshooting step.
- Verify Game Files: For game-specific issues, use the game launcher (e.g., Steam, Epic Games Launcher) to verify the integrity of game files. This can repair corrupted game files, including their specific cache components.
- Reinstall Graphics Drivers: If clearing the cache doesn’t help, a clean reinstallation of your graphics drivers (using DDU – Display Driver Uninstaller – for a thorough removal) can resolve deeper driver-related corruption that affects caching.
The Impact of Cache Settings on Gaming and Professional Applications
Modern graphics drivers offer some level of control over cache behavior. For instance, NVIDIA Control Panel allows users to set the “Shader Cache Size” to a specific limit (e.g., 10GB) or to “Unlimited.” While “Unlimited” might sound appealing, it simply means the cache will grow as needed without a hard cap, potentially consuming significant disk space over time. Conversely, setting too small a limit might force the system to clear older, still-useful cached data, leading to more frequent re-compilations.
For most users, the default or “Unlimited” setting for driver-level caches is sufficient, allowing the system to manage it dynamically. However, users experiencing disk space constraints or specific performance anomalies might experiment with setting a reasonable cap, such as 10GB or 20GB, especially on SSDs. Professional applications rarely provide direct cache size controls, relying instead on the underlying operating system and driver management.
The Future of Graphics Caching and System Evolution
The landscape of computing hardware and software is constantly evolving, and with it, the strategies for efficient data management, including graphics caching. As components become faster and software more demanding, the role of intelligent caching mechanisms grows in importance.
How Modern Hardware and Software Influence Cache Design
- SSDs and NVMe Drives: The widespread adoption of Solid State Drives, particularly NVMe drives, has fundamentally changed cache design. With significantly faster read/write speeds compared to traditional HDDs, the penalty for retrieving data from disk-based caches has drastically reduced. This allows for larger and more extensive caches without a crippling performance overhead, enabling systems to pre-compile and store even more shaders and assets.
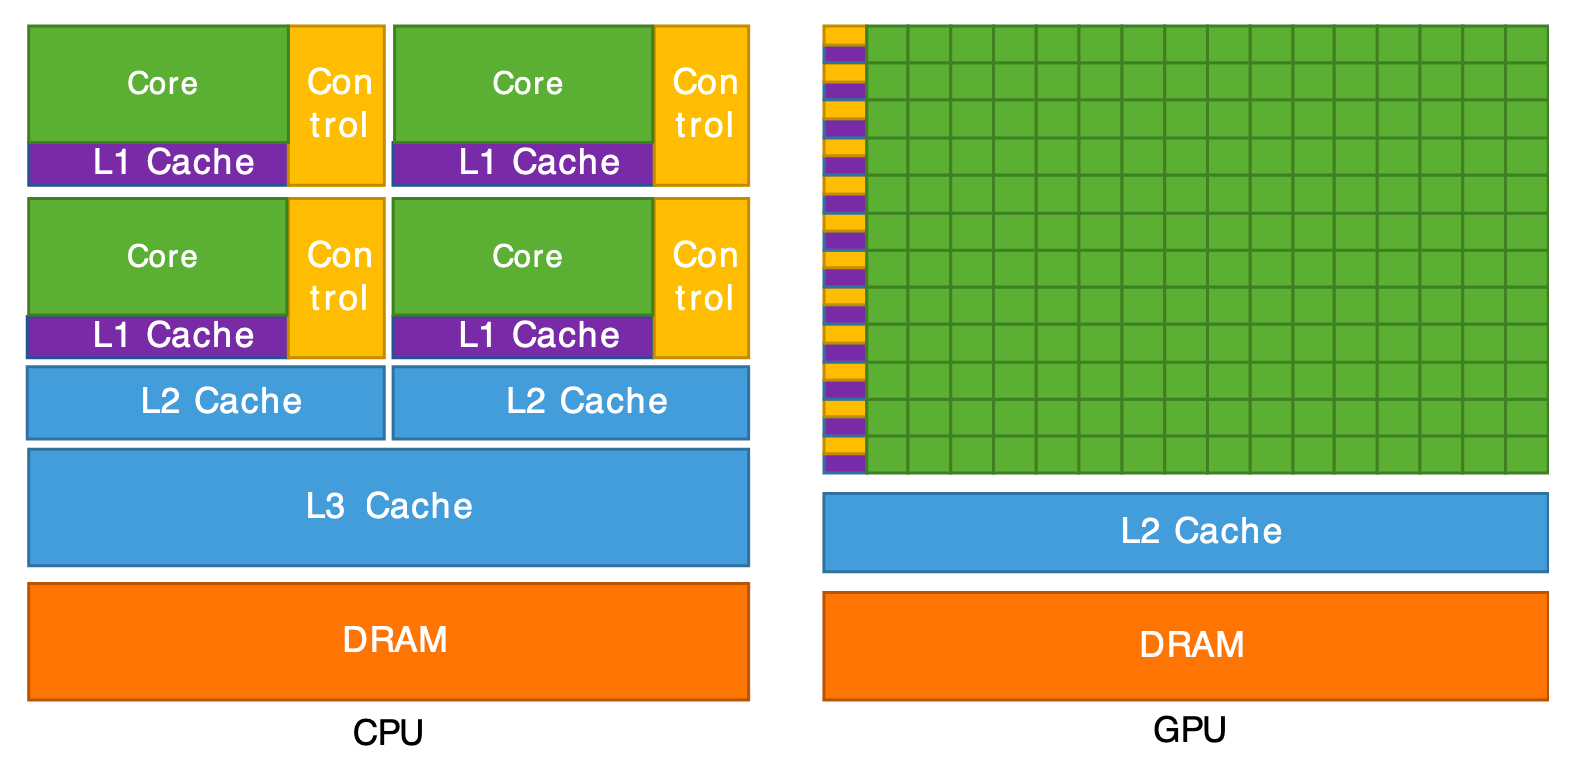
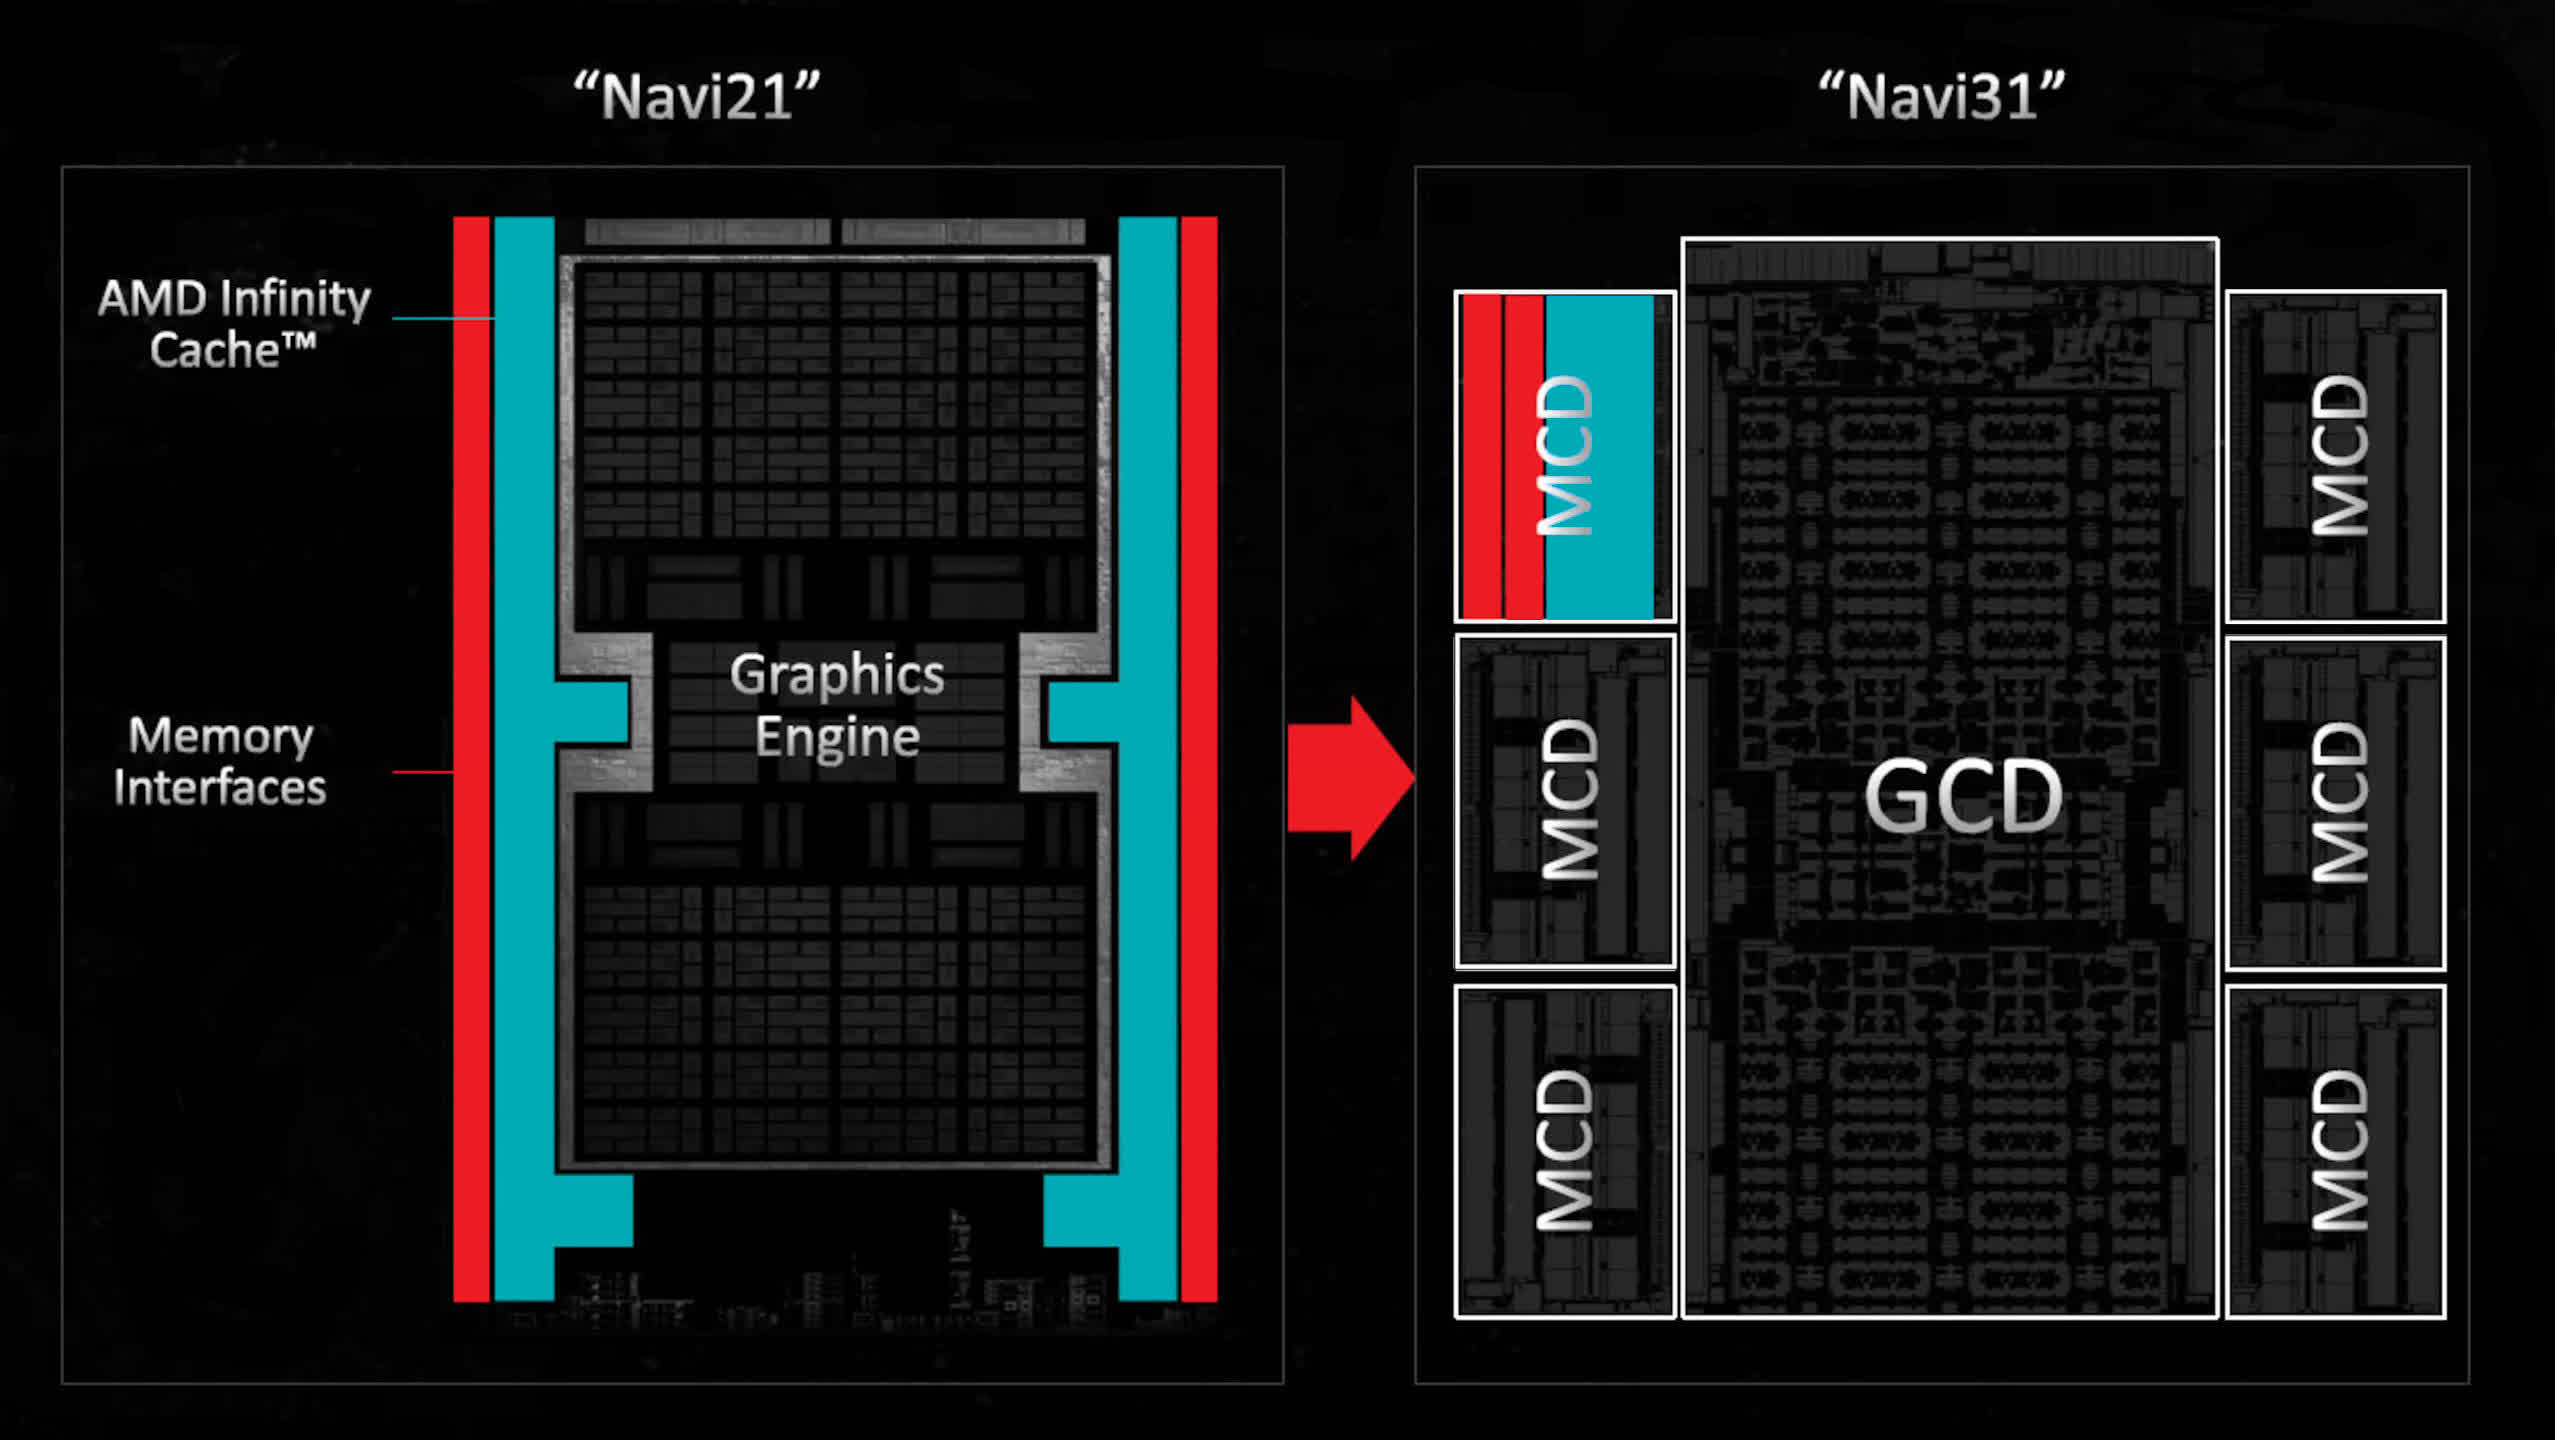
- Advanced GPU Architectures: Modern GPUs are not just faster; they are also smarter. Their architectures are designed with deeper memory hierarchies and more sophisticated instruction sets that can leverage efficient caching. This includes more complex shader compilation techniques that benefit greatly from robust disk caching.
- Operating System Improvements: Operating systems like Windows are continuously refined to better manage temporary files and system caches. Improvements in file system efficiency and background process management contribute to smoother cache operations. DirectX and Vulkan APIs also provide specific shader compilation and caching interfaces that drivers and applications utilize.
AI and Adaptive Caching
The advent of Artificial Intelligence and Machine Learning is beginning to influence cache management. Future caching algorithms could become far more adaptive and predictive:
- Predictive Caching: AI could analyze user behavior patterns, game progression, or application workflows to predict exactly which assets or shaders will be needed next, pre-loading them into the cache even before a direct request is made.
- Intelligent Cache Eviction: Instead of simply using a “Least Recently Used” (LRU) or “First In, First Out” (FIFO) approach, AI could determine which cached data is least likely to be needed again based on context, optimizing disk space usage more intelligently.
- Dynamic Sizing: AI could dynamically adjust cache sizes based on available disk space, system load, and application requirements, optimizing for both performance and resource utilization.
Maintaining Peak Performance in an Evolving Landscape
For users, keeping up with these advancements means a continuous commitment to best practices:
- Regular Driver Updates: This remains paramount. Graphics driver updates often include the latest optimizations for caching, shader compilation, and performance, ensuring your system takes full advantage of hardware and software advancements.
- Understanding System Needs: While caching is largely automatic, understanding its principles allows for informed troubleshooting and resource management, especially when dealing with performance bottlenecks.
- Adequate Storage: As caches grow in size due to higher fidelity assets and more complex shaders, ensuring you have ample, fast storage (ideally an NVMe SSD) is crucial for optimal performance.
The graphics cache, though a background player, is a critical component in the intricate dance between hardware and software that delivers the rich visual experiences we expect today. A well-managed and understood cache contributes significantly to a fast, stable, and enjoyable computing journey.
aViewFromTheCave is a participant in the Amazon Services LLC Associates Program, an affiliate advertising program designed to provide a means for sites to earn advertising fees by advertising and linking to Amazon.com. Amazon, the Amazon logo, AmazonSupply, and the AmazonSupply logo are trademarks of Amazon.com, Inc. or its affiliates. As an Amazon Associate we earn affiliate commissions from qualifying purchases.