In the world of precision gaming, where a millisecond of reaction time or a pixel-perfect aim can be the difference between victory and defeat, hardware configuration is paramount. Among the various settings tucked away in the menus of modern games, the “deadzone” is arguably the most misunderstood. While it may sound like a technical term reserved for engineers, understanding deadzones is essential for any player looking to elevate their gameplay. Whether you are navigating a competitive shooter on a console or flying a starship on a PC, your controller’s deadzone settings act as the invisible bridge between your physical inputs and your digital actions.
The Mechanics of the Controller Deadzone
At its most fundamental level, a controller deadzone—also referred to as a “stick deadzone”—is a software-defined boundary around the neutral position of an analog stick. When you take your thumb off the stick, it is supposed to return perfectly to the center. However, due to the nature of spring-loaded hardware, controllers rarely return to an absolute, mathematical zero point every single time.
How Sensors Perceive Input
Modern controllers utilize potentiometers or Hall Effect sensors to track movement. These sensors translate the physical position of the stick into coordinate data (X and Y axes) that the game engine processes. Because physical parts wear down over time, a stick might settle slightly off-center. If there were no deadzone, your character or camera would constantly drift because the game would interpret that microscopic off-center position as a deliberate movement command.
Defining the “Null” Region
The deadzone essentially tells the game to ignore all input within a specific radius of the center. If your deadzone is set to 10%, the game treats any movement of the stick that is less than 10% of its maximum travel distance as “zero.” This ensures that when your hands are off the controller, your character stands still and your camera remains static. Without this artificial buffer, gameplay would be chaotic, frustrating, and nearly impossible to control.
The Trade-off: Precision vs. Stability
The central dilemma for competitive gamers is balancing the size of the deadzone against the responsiveness of the controller. There is no “perfect” setting that applies to every player; rather, it is a matter of personal preference and hardware condition.
The Problem of High Deadzones
A large deadzone is inherently forgiving. If you have an older controller that suffers from “stick drift”—where the internal components have physically degraded to the point that the stick no longer centers at all—increasing the deadzone can mask the issue. By expanding the ignored area, you effectively tune out the faulty signal. However, the cost is a “mushy” feel. When you push the stick, there is a physical gap where your movement results in no action. This creates a sluggish delay that can be fatal in fast-paced titles like Call of Duty or Apex Legends, where twitch reflexes are required.
The Advantage of Low Deadzones
On the flip side, a low deadzone provides maximum responsiveness. In this configuration, the game reacts to the slightest nudge of the thumbstick. For high-level players, a low deadzone allows for subtle micro-adjustments in aiming, making it significantly easier to track moving targets or make precise turns. The downside, however, is that any deviation in your stick’s return-to-center functionality will be immediately apparent. With a zero or near-zero deadzone, even a tiny amount of wear on your analog stick will manifest as unwanted camera or character movement.
Identifying and Diagnosing Hardware Issues
As controller technology advances, the physical integrity of analog sticks remains a point of contention. Understanding how to interact with deadzones can help you prolong the lifespan of your peripherals and determine when it is time to invest in new gear.
Testing for Stick Drift
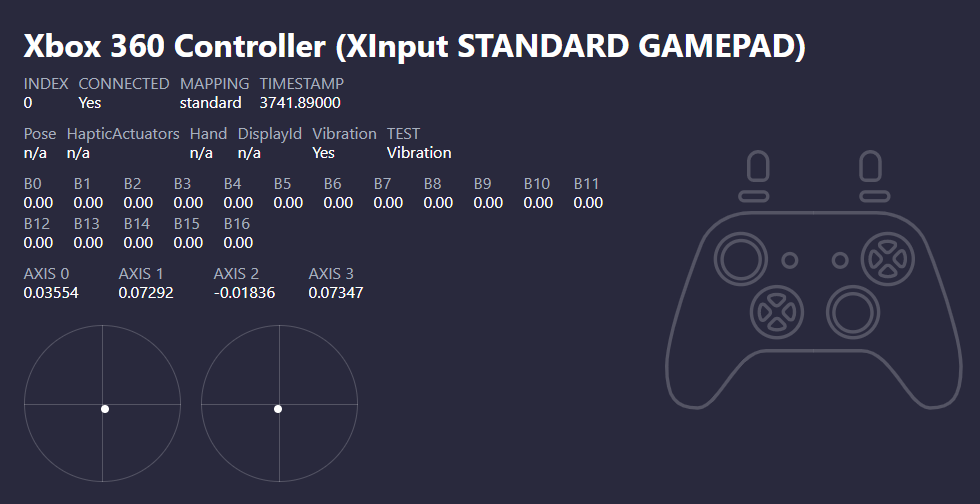
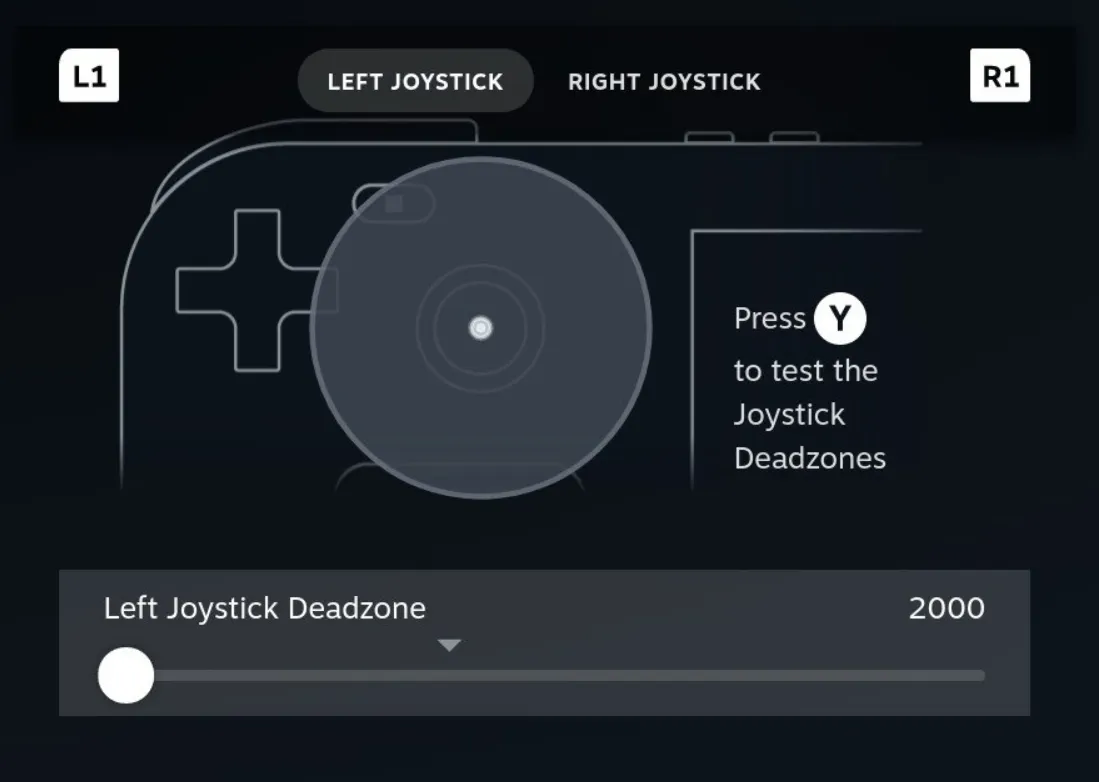
If you suspect your controller is drifting, the first step is to enter the settings menu of your console or PC and locate the controller calibration tool or an in-game deadzone visualizer. By watching the raw input data, you can see if the stick is reporting a value while it is meant to be at rest. If the input registers movement even when you aren’t touching the stick, your controller has developed drift.
Software vs. Hardware Solutions
If the drift is minor, adjusting the deadzone is a software solution that costs nothing and keeps your controller functional for longer. However, if you find yourself forced to increase the deadzone to a significant percentage (typically above 15-20%) to stop the drift, your hardware is physically failing. At this stage, no software tweak can restore the original responsiveness of the device. Professional players often cycle through controllers specifically to avoid the need for large deadzones, opting to replace them the moment their performance is compromised by physical wear.
Best Practices for Configuring Your Setup
Optimizing your deadzone is a process of trial and error. It is rarely a “set it and forget it” situation, as different games have different input curves and requirements.
Finding Your “Sweet Spot”
The ideal way to configure your deadzone is to start at the absolute minimum (usually 0% or 1-2%, depending on the game’s menu limitations). Play for a few minutes in a practice mode or firing range. If you notice your camera drifting on its own while your hands are off the controller, increase the deadzone by the smallest possible increment until the drift disappears. This method ensures you are using the smallest deadzone possible for your specific controller, thereby maintaining the highest level of responsiveness without sacrificing stability.
Game-Specific Nuances
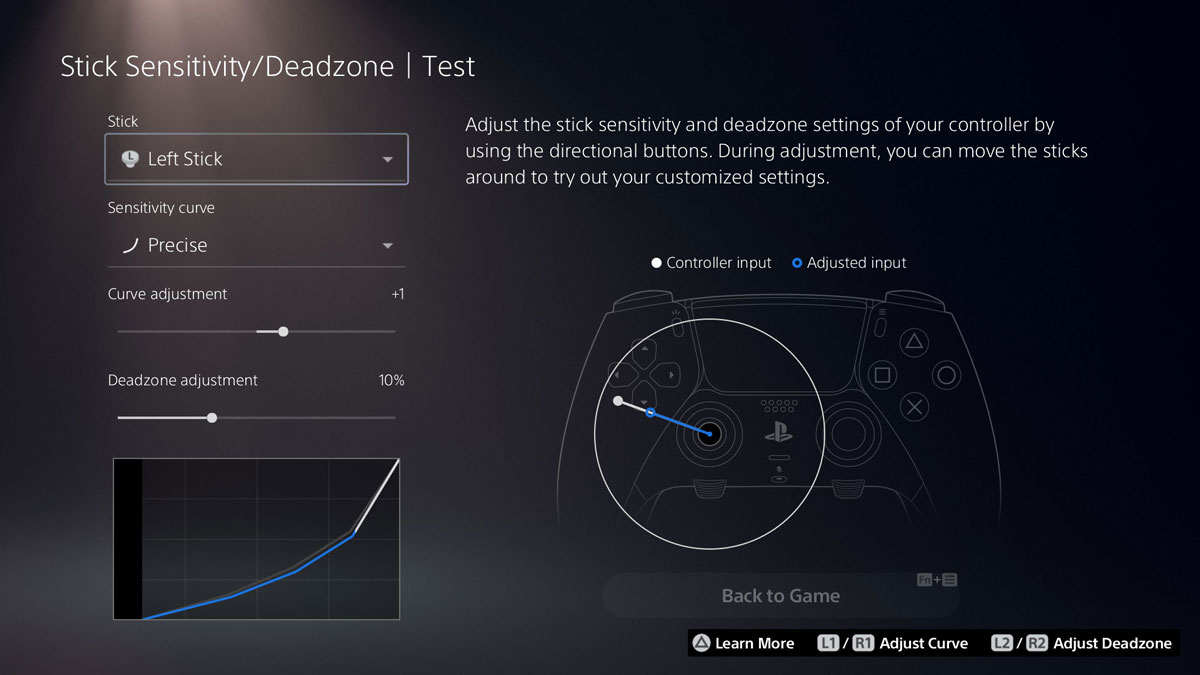
Not all games handle input logic the same way. Some titles offer “Axial” deadzones, which allow you to independently adjust the horizontal and vertical thresholds. This is particularly useful in shooters where you may want a smaller deadzone for left-right movement (to help with strafing and tracking) but a slightly larger one for up-down movement (to prevent accidental camera pitch changes when you only intend to move laterally). Always take the time to explore these advanced settings, as they provide an unparalleled level of customization that can fundamentally change how a game “feels” to play.
The Rise of Hall Effect Sensors
As you look toward the future of controller hardware, keep an eye on “Hall Effect” sensors. Unlike traditional potentiometers that use physical contact strips prone to wearing down, Hall Effect sensors use magnets to detect stick position. Because there is no physical friction, these controllers are significantly less prone to drift, allowing users to run much lower deadzones for much longer periods. If you find yourself constantly battling stick drift, transitioning to a controller featuring this technology is the most effective hardware-based solution available.
In summary, the deadzone is a vital piece of the gaming puzzle. It is the gatekeeper of your controller’s performance, acting as a safeguard against hardware inconsistencies while serving as a tool for the dedicated player to tune their experience. By understanding how these settings influence the connection between your thumb and the screen, you are no longer just a user; you are a technician, capable of refining your gear to meet the demands of the most challenging virtual arenas. Whether you are looking to fix a frustrating drift or trying to shave milliseconds off your target acquisition, mastery of the deadzone is a prerequisite for any serious gamer.
aViewFromTheCave is a participant in the Amazon Services LLC Associates Program, an affiliate advertising program designed to provide a means for sites to earn advertising fees by advertising and linking to Amazon.com. Amazon, the Amazon logo, AmazonSupply, and the AmazonSupply logo are trademarks of Amazon.com, Inc. or its affiliates. As an Amazon Associate we earn affiliate commissions from qualifying purchases.