Traveling, whether for leisure or business, is an exciting prospect filled with new experiences and opportunities. However, overlooked financial preparations can quickly turn a dream trip into a logistical nightmare. One of the most critical steps in safeguarding your finances and ensuring uninterrupted access to your funds while abroad is to notify your bank of your travel plans. For Chase cardholders, this proactive measure is essential for preventing inconvenient card blocks, avoiding potential fraud alerts, and streamlining your financial experience overseas.
In the realm of personal finance, managing your accounts effectively, especially when crossing borders, is paramount. This guide will walk you through the various methods to inform Chase of your upcoming travel, detail the crucial information you’ll need to provide, and offer a comprehensive financial checklist to ensure your trip is as seamless and stress-free as possible from a monetary perspective. By understanding and implementing these steps, you empower yourself to navigate international transactions with confidence, keeping your focus firmly on enjoying your journey rather than battling unexpected financial hurdles.
Why Notifying Chase of Your Travel Plans is Crucial for Financial Security
The modern banking system, particularly institutions like Chase, employs sophisticated fraud detection algorithms designed to protect your accounts from unauthorized activity. While incredibly effective, these systems can sometimes mistake legitimate international transactions for suspicious behavior. When your card suddenly appears to be used in a different country from your usual spending patterns, it can trigger an automatic fraud alert, leading to your card being temporarily or even permanently blocked. This is a primary reason why travel notifications are a cornerstone of smart personal finance management for travelers.
Preventing Unwanted Fraud Alerts and Card Blocks
Imagine being in a foreign country, attempting to pay for a meal or book an excursion, only to have your card declined. This frustrating scenario is precisely what a travel notification aims to prevent. By informing Chase of your travel itinerary, you essentially whitelist your expected spending locations and dates. This tells their fraud detection systems that transactions originating from these specific regions during your travel window are likely legitimate, significantly reducing the chances of your card being flagged and blocked. It’s a simple yet powerful preventive measure that saves you time, potential embarrassment, and the hassle of resolving a card block from overseas.
Ensuring Uninterrupted Access to Your Funds
Beyond preventing fraud alerts, notifying Chase ensures you maintain seamless access to your money. A blocked card means no access to funds for purchases, ATM withdrawals, or emergencies. While there are always alternative payment methods, relying solely on cash or a single backup card can be risky. Having your primary Chase card operational throughout your trip provides peace of mind and financial flexibility, allowing you to focus on your travel experiences without worrying about payment issues. This continuity of service is a key component of effective personal finance when traveling internationally.
Understanding International Transaction Fees and Card Types
While not directly tied to notifications, understanding your Chase card’s international transaction fees is an integral part of travel finance planning. Many Chase credit cards, particularly travel-oriented ones like the Chase Sapphire Preferred or Reserve, famously have no foreign transaction fees. However, some debit cards or other credit cards might impose a fee (typically around 3%) on purchases made in a foreign currency. When notifying Chase, it’s also an opportune time to clarify these details for your specific cards. Knowing these costs beforehand allows you to budget more accurately and choose the most cost-effective card for your international spending, further optimizing your personal finance strategy.
Seamless Methods to Notify Chase of Your Travel
Chase offers several convenient avenues for cardholders to submit travel notifications, ensuring flexibility and ease regardless of your preference for digital tools or direct interaction. Each method is designed to be straightforward, allowing you to quickly secure your accounts before departure.
Utilizing the Chase Online Banking Portal
For many, the most convenient way to notify Chase is through their secure online banking portal. This digital financial tool provides a user-friendly interface to manage all aspects of your account, including travel plans.
- Log In: Access your Chase online banking account at Chase.com using your username and password.
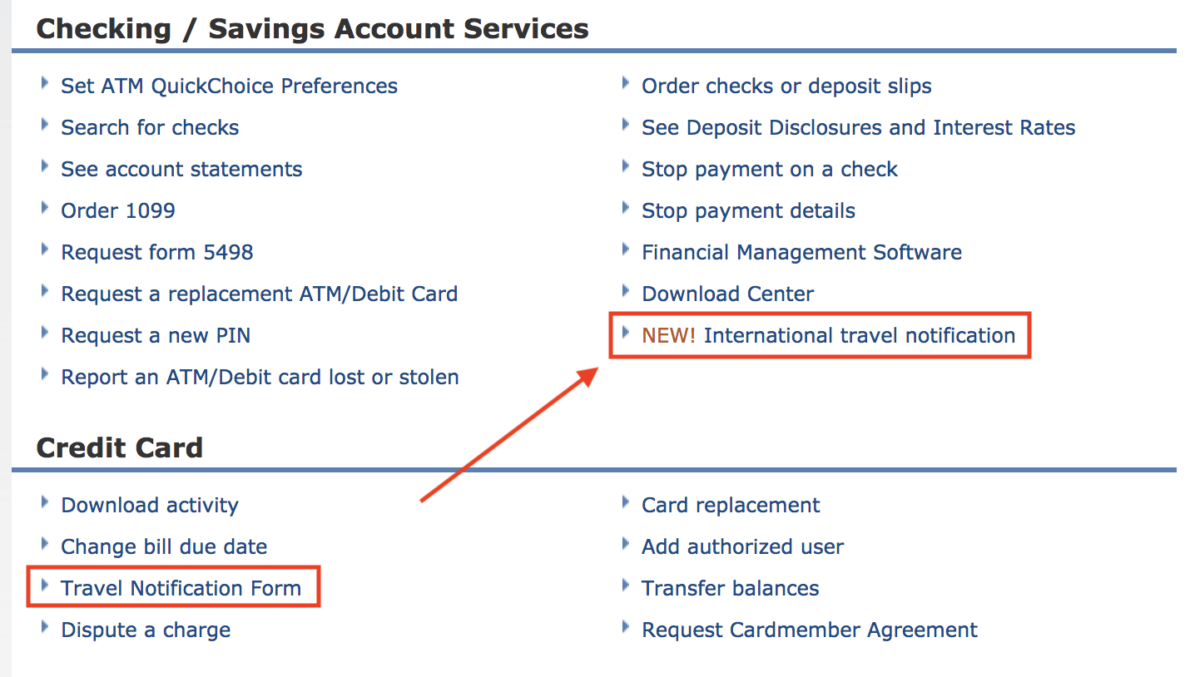
- Navigate to Customer Service: Look for a “Customer Service” or “Account Services” section. The exact path may vary slightly but typically involves finding an option related to “Travel Notifications” or “Travel Plans.”
- Submit Travel Notification: You’ll be prompted to enter your travel dates (start and end), your destination countries, and potentially select which Chase cards you’ll be using. Ensure all information is accurate.
- Confirm: Review the details and submit. You should receive a confirmation message or email.
This method is quick, available 24/7, and provides a digital record of your notification, aligning perfectly with modern digital financial management.
Leveraging the Chase Mobile App
The Chase Mobile App extends the convenience of online banking directly to your smartphone, making it an excellent financial tool for on-the-go management.
- Open the App: Log into the Chase Mobile App on your device.
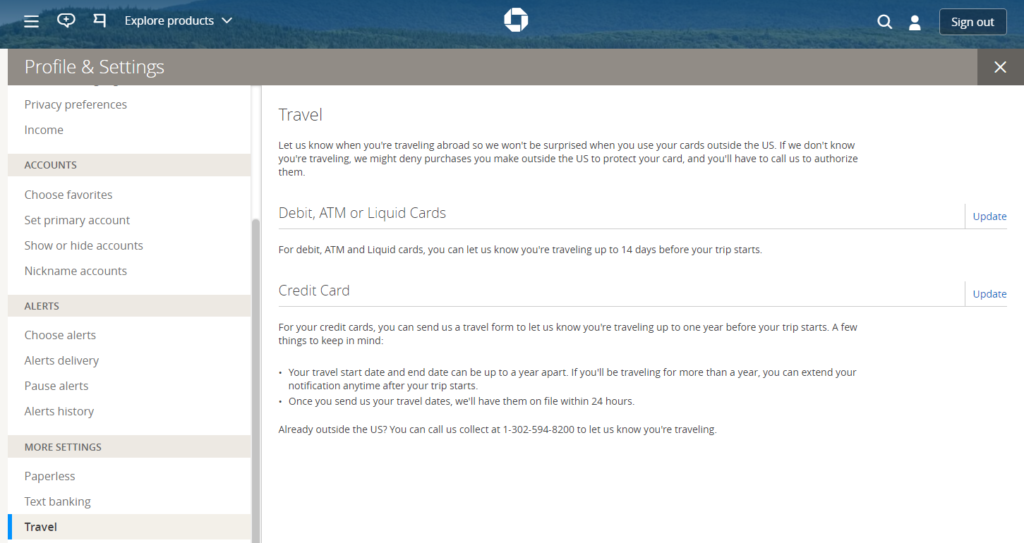
- Find Travel Settings: Navigate to the main menu (often represented by three lines or dots) and look for “Account Services,” “Manage Cards,” or a direct “Travel” option.
- Enter Details: Similar to the online portal, you’ll enter your travel dates, destinations, and select the relevant cards.
- Confirm Submission: Verify the information and submit. The app often provides immediate confirmation.
Using the mobile app is ideal for last-minute notifications or for those who prefer managing their finances via mobile devices.
Direct Communication via Phone Call
For those who prefer direct interaction or have specific questions about their travel plans and accounts, calling Chase customer service is an effective option.
- Retrieve Contact Number: Find the customer service number on the back of your Chase credit or debit card, or on the Chase website (typically 1-800-935-9935 for general inquiries, specific numbers for card types).
- Speak to a Representative: Explain that you wish to place a travel notification on your account.
- Provide Information: Be prepared to provide your account details, travel dates, and destination countries. The representative may also ask security questions to verify your identity.
- Request Confirmation: Ask for a verbal confirmation that the travel notification has been successfully placed.
While slightly more time-consuming, this method allows for personalized assistance and the opportunity to clarify any concerns directly with a Chase representative.
Essential Information to Provide and Pre-Trip Financial Checklist
To ensure your travel notification is effective and your trip’s financial aspect runs smoothly, gathering specific information and taking a few preparatory steps are critical. This falls squarely within the domain of proactive personal finance planning.
What Information to Provide for Your Notification
When contacting Chase, either digitally or by phone, be ready with the following key details:
- Accurate Travel Dates: Specify your departure date from your home country and your return date. Be precise, as the notification window is tied to these dates.
- Detailed Destination Countries: List all countries you intend to visit. If you have layovers in different countries where you might make purchases, include those too. This is crucial for avoiding issues in transit.
- Specific Chase Cards You’ll Be Using: Clearly identify which Chase credit and/or debit cards you plan to use. If you have multiple cards, ensure all relevant ones are covered by the notification.
- Best Contact Information Abroad: Provide a reliable phone number (including international dialing code if applicable) and email address where Chase can reach you in case of an emergency or suspicious activity.
Your Essential Pre-Trip Financial Checklist
Beyond the travel notification, a comprehensive financial checklist can significantly enhance your travel experience and mitigate potential issues.
- Review Account Balances and Credit Limits: Before you depart, check your account balances and available credit limits on all cards you plan to use. Ensure you have sufficient funds and credit for your anticipated expenses. Consider increasing credit limits if necessary, though this should be done well in advance.
- Understand Exchange Rates and Currency Conversion: Familiarize yourself with the exchange rates for your destination’s currency. Use online tools or apps to get a realistic idea of costs. Be aware of dynamic currency conversion (DCC) at point-of-sale terminals abroad; always choose to pay in the local currency to get the best exchange rate from Chase.
- Note Emergency Contact Information and Card Numbers: Jot down Chase’s international customer service numbers and the last four digits of your card numbers (or full numbers if stored securely elsewhere) in case your cards are lost or stolen. Store this information separately from your wallet/purse, perhaps in a secure cloud document or encrypted note.
- Set Up Travel Notifications for Other Cards/Banks: If you plan to use cards from other banks, ensure you follow their respective travel notification procedures as well. Diversifying your financial tools with proper notifications ensures multiple backup options.
- Inform Joint Account Holders: If you share accounts, make sure all account holders are aware of the travel plans and any associated financial arrangements.
- Download Banking Apps: Ensure you have the Chase Mobile App and any other banking apps installed and updated on your smartphone. This allows for easy monitoring of transactions and quick contact with your bank if needed.
- Consider a Travel Insurance Policy: While not directly a Chase function, travel insurance is a crucial financial safeguard that can cover unforeseen medical emergencies, trip cancellations, or lost luggage, protecting your overall travel investment.
During and After Your Trip: Sustaining Financial Vigilance
Your financial responsibilities don’t end once you’ve landed at your destination. Maintaining vigilance throughout your trip and conducting a post-travel financial review are integral parts of smart personal finance and travel management.
Monitoring Transactions While Abroad
Even with a travel notification in place, it’s wise to regularly monitor your Chase account activity through online banking or the mobile app.
- Daily or Bi-Daily Checks: Briefly review your transactions to ensure all charges are legitimate. This allows you to quickly spot any suspicious activity and report it to Chase immediately.
- ATM Usage Awareness: When withdrawing cash, use ATMs associated with reputable banks and be mindful of your surroundings. Report any unusual ATM behavior or skimming devices immediately.
- Receipt Keeping: Keep receipts for major purchases to reconcile with your bank statements later. This is good practice for budgeting and expense tracking.
What to Do If Your Card is Lost or Stolen
Despite all precautions, losing a card or having it stolen is a possibility. Knowing the immediate steps to take can minimize financial damage.
- Contact Chase Immediately: Use the international customer service number you noted earlier or report it through the Chase Mobile App. The sooner you report it, the better.
- Block/Cancel Card: Request Chase to immediately block or cancel the compromised card.
- Request a Replacement: Inquire about expedited card replacement options to your current location or your home address upon return.
- File a Police Report: In cases of theft, file a police report with local authorities. This can be crucial for insurance claims or disputing fraudulent charges.

Reconciling Expenses Post-Trip
Upon your return, take some time to review your entire trip’s financial activity.
- Compare Receipts with Statements: Match your saved receipts against your Chase statements to ensure all transactions are accurate and legitimate.
- Assess Foreign Transaction Fees: Verify that any expected foreign transaction fees were applied correctly, or that no fees were charged if your card offers that benefit.
- Update Budgeting Tools: Incorporate your travel expenses into your personal finance budgeting tools to get a complete picture of your spending. This reflection can also inform future travel planning and financial goals.
By adhering to these best practices before, during, and after your travels, you leverage Chase’s financial tools and services effectively, ensuring your journey is not only memorable for its adventures but also remarkably smooth from a financial perspective. Proactive planning and continuous vigilance are the hallmarks of a savvy traveler and a financially responsible individual.
aViewFromTheCave is a participant in the Amazon Services LLC Associates Program, an affiliate advertising program designed to provide a means for sites to earn advertising fees by advertising and linking to Amazon.com. Amazon, the Amazon logo, AmazonSupply, and the AmazonSupply logo are trademarks of Amazon.com, Inc. or its affiliates. As an Amazon Associate we earn affiliate commissions from qualifying purchases.