Navigating the digital landscape often involves creating numerous accounts, from social media profiles to financial apps. While signing up is usually a breeze, deciding to part ways with a service can sometimes feel like a digital labyrinth. For users of Venmo, a popular peer-to-peer payment app, the question “how do I delete my Venmo account?” isn’t just about clicking a button; it’s about understanding the technical process, ensuring data security, and managing your digital footprint effectively. This guide delves into the specifics of Venmo account deletion, strictly through the lens of technology – focusing on app functionality, data management, digital security, and user tutorials.
Preparing for Deletion: Essential Pre-Steps for a Smooth Exit
Before you initiate the final severance from your Venmo account, there are several crucial technical and data management steps to undertake. These preparations ensure a seamless process, prevent future complications, and help maintain your digital hygiene. Skipping these can lead to frustrating technical hurdles down the line.
Clearing Your Balance: Zeroing Out Funds
The most fundamental step before attempting to delete your Venmo account is to ensure your balance is exactly $0. Venmo, like most financial platforms, will not allow account closure if there are outstanding funds or negative balances. This isn’t merely a financial regulation; it’s a technical constraint built into the platform’s architecture to prevent orphaned funds or unrecoverable liabilities.
To clear a positive balance, you have two primary options:
- Transfer to Bank: The most common method is to transfer your entire Venmo balance to a linked bank account. This typically involves navigating to the “Transfer” section within the Venmo app, selecting your bank, and initiating the transfer. Be aware of standard transfer times (usually 1-3 business days for free transfers, instant for a fee) and ensure the transfer is fully processed before proceeding. From a technical standpoint, this initiates an API call to your bank’s system, requiring successful acknowledgment before Venmo can register a zero balance.
- Send to a Friend: If you have a small balance that might not meet transfer minimums or if you prefer an immediate solution, you can send the remaining funds to a trusted friend via Venmo. Ensure this transaction is completed and settled. This utilizes Venmo’s core P2P functionality to deplete your account.
For a negative balance, you must link a payment method and add funds to bring your balance to zero or positive, and then follow the steps above. The Venmo system is designed to prevent financial loose ends, and a negative balance is a technical debt that must be resolved.
Disconnecting Linked Payment Methods and Banks
Once your balance is at zero, the next critical technical step is to remove all linked financial instruments. This includes bank accounts, debit cards, and credit cards. Leaving these linked, even to a closed account, poses a minor security risk and can lead to confusion if you ever use Venmo again with a new account.
- Why it’s important: From a digital security standpoint, unlinking payment methods minimizes the potential attack surface. While a closed account theoretically shouldn’t allow transactions, best practices dictate severing all connections to sensitive financial data. It also prevents any accidental or unauthorized use should there be any lingering system glitches or if the account were somehow reactivated without your explicit consent.
- How to do it: Navigate to your Venmo settings, find the “Payment Methods” section, and individually remove each linked bank account and card. This action sends a specific request to Venmo’s backend to unlink the payment token associated with your account. Ensure each method is fully removed, and the app interface reflects this change.
Archiving Transaction History for Your Records
While Venmo retains certain data even after account closure (more on data retention later), it’s highly recommended to download your transaction history for your personal records. This is a crucial step for personal finance tracking, tax purposes, or simply maintaining a comprehensive record of your digital transactions.
- Technical access: Venmo typically allows users to download their transaction history as a CSV or Excel file through their website (not usually available in the mobile app itself). Log in to your Venmo account via a web browser, navigate to your “Statement & Taxes” or “Transaction History” section, and look for an export option.
- Data utility: This exported data contains timestamps, transaction IDs, amounts, and recipient/sender details. It’s a valuable digital asset that you should secure locally, perhaps in an encrypted folder or cloud storage, especially given that you won’t be able to access it once the account is technically deactivated.
Understanding Data Retention and Privacy Policies
Before pressing the delete button, it’s insightful to understand Venmo’s data retention policies. Deleting an account rarely means all data is instantly and permanently purged from a company’s servers. Regulatory compliance (e.g., anti-money laundering, financial reporting) often dictates that financial service providers like Venmo must retain certain transaction data and personal identification information for a specified period, even after an account is closed.
- Tech implication: When you “delete” your account, you are typically initiating an account deactivation or closure. The account becomes inaccessible to you, and new transactions cannot be made. However, some backend data related to past transactions might persist on Venmo’s servers, often pseudonymized or anonymized where possible, but still retained for legal or operational reasons.
- User responsibility: Review Venmo’s privacy policy, specifically sections related to data retention and account closure. This informs you about what data they keep, for how long, and under what conditions. This is a critical aspect of digital security and privacy awareness in the modern tech ecosystem.
The Step-by-Step Technical Process to Deactivate
Once all preparations are complete, you are ready to initiate the technical process of deactivating your Venmo account. This involves interacting directly with the Venmo platform, either through its mobile application or website, to submit your closure request.
Initiating Account Closure via the Venmo App or Website
Venmo provides a clear, though sometimes hard-to-find, path for account closure. It’s important to use the officially designated channels to ensure your request is properly logged and processed.
- Using the Venmo App (Primary Method):
- Open the Venmo app on your mobile device.
- Tap on the “☰” (three horizontal lines) or your profile icon to open the main menu.
- Navigate to “Settings” (often represented by a gear icon).
- Scroll down to “Account” or “Privacy” settings.
- Look for an option like “Close my Venmo Account,” “Deactivate Account,” or similar phrasing. It might be nested under “Help” or “Support” in some app versions.
- Follow the on-screen prompts, which will likely include confirmations and warnings.
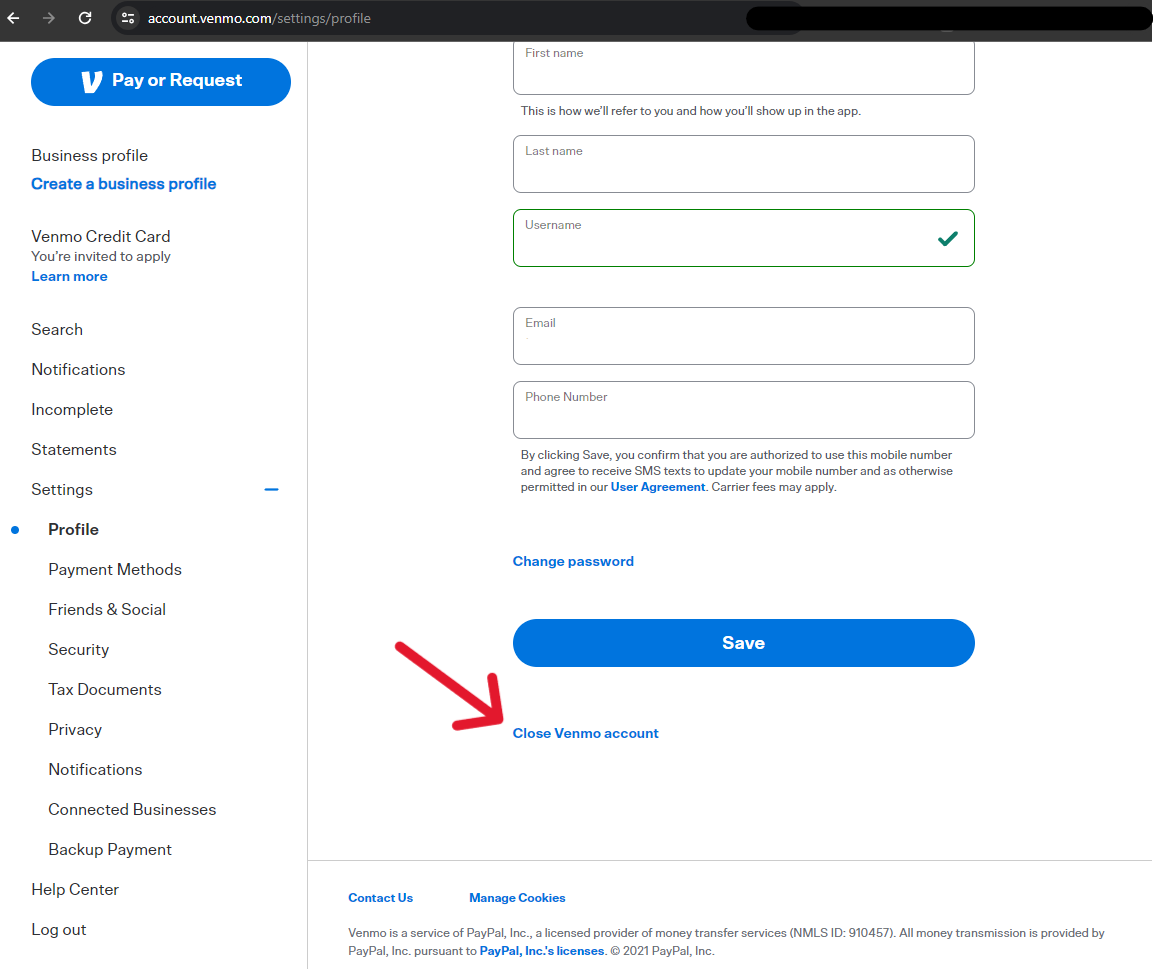
- Using the Venmo Website (Alternative Method):
- Go to the official Venmo website (venmo.com) on a desktop browser.
- Log in to your account.
- Navigate to “Settings” or “Account” information.
- Search for “Close Venmo Account” or a similar option. Sometimes, direct links to account closure forms are provided in the Help Center. You might need to contact support directly via their website if a self-service option isn’t immediately visible.
Confirming Your Identity and Intent
For security reasons, Venmo will likely require you to confirm your identity before proceeding with account closure. This is a standard security protocol for financial applications to prevent unauthorized account tampering.
- Security protocols: This usually involves re-entering your password, possibly answering security questions, or receiving a verification code via SMS to your registered phone number or email address. This multi-factor authentication ensures that the person requesting the closure is the legitimate account owner.
- Expressing intent: You might be asked to provide a reason for closing your account. While this is often optional, it helps Venmo gather user feedback. Providing an honest reason (e.g., “privacy concerns,” “no longer use the service,” “switching to another platform”) can sometimes lead to tailored offers to retain you, but it won’t prevent the closure if you’ve fulfilled all prerequisites.

What to Expect During and After the Deactivation Request
Once you submit your request, the technical process begins.
- Immediate feedback: The app or website will typically provide an immediate confirmation that your request has been received. You might also receive an email confirmation.
- Processing time: Account deactivation isn’t always instantaneous. There might be a short processing period (e.g., 24-48 hours) during which Venmo’s backend systems finalize all associated processes, such as severing remaining data links or ensuring no pending transactions somehow reactivate.
- Loss of access: Once deactivated, you will no longer be able to log in to your account, access your transaction history, or send/receive money via Venmo. Any attempts to log in will likely result in an “account closed” or “invalid credentials” message.
- Irreversibility: While some platforms offer a grace period for reactivation, Venmo account closures are generally permanent. If you wish to use Venmo again in the future, you will likely need to create an entirely new account, subject to their current terms of service and registration requirements. This is a critical point from a user experience and technical perspective: your old user ID, transaction history, and connections will not be restored.
Common Technical Roadblocks and Troubleshooting
Even with careful preparation, users can encounter technical issues during the account deletion process. Understanding these common roadblocks and how to troubleshoot them is key to a successful closure.
Dealing with Pending Transactions or Unresolved Issues
The most frequent technical barrier to account closure is a pending transaction or an unresolved issue. Venmo’s system is designed to maintain the integrity of financial transfers.
- Pending payments/requests: If you have sent or received money that is still “pending,” or if you have outstanding payment requests, the system will halt the deletion process. You must wait for all transactions to clear. This means ensuring your friends have claimed money you sent or that you have responded to all requests you’ve received.
- Unsettled bank transfers: If you initiated a transfer to your bank account, ensure it has fully posted to your bank before attempting closure. A “pending” status on a bank transfer means Venmo’s system is still actively processing it.
- Failed transactions: Resolve any failed transactions that might have left your account in a limbo state. This could involve contacting the other party or Venmo support to understand the failure’s root cause.
Addressing Security Holds or Account Restrictions
In some cases, Venmo might place a security hold or restriction on an account, which can prevent deletion. This often happens if there’s suspicious activity, a breach of terms of service, or if Venmo requires additional verification.
- Contacting support: If your account is under a hold or restriction, you cannot proceed with self-service deletion. You must contact Venmo’s customer support directly. Be prepared to provide additional documentation or information to resolve the issue.
- Compliance requirements: These holds are technical safeguards implemented by Venmo to comply with financial regulations and protect against fraud. Until these compliance checks are satisfied, the system will not allow the account to be closed.
Contacting Venmo Support for Technical Assistance
When self-service troubleshooting fails, Venmo’s customer support becomes your primary technical resource. They have access to backend systems and can manually review your account’s status.
- Methods of contact: Venmo typically offers support through in-app messaging, email, or a phone number. For account closure issues, calling them directly might yield the quickest resolution.
- Information needed: Be ready to provide your account details, a clear explanation of the issue you’re facing, and any error messages you’ve received. Having your transaction history (if downloaded) or relevant dates can also expedite the process.
- Escalation: If initial support contacts don’t resolve the issue, don’t hesitate to request escalation. Sometimes, more complex technical issues require senior support staff to intervene.
Post-Deletion: Ensuring Digital Security and Data Management
Even after your Venmo account is technically closed, the work isn’t entirely done. Implementing good post-deletion practices ensures your digital security remains robust and your data is managed effectively across all online platforms.
Verifying Account Closure
The first step post-deletion is to verify that the account has indeed been closed and is inaccessible.
- Attempt a login: A few days after initiating the closure, try logging into Venmo with your old credentials. You should receive a message indicating the account is closed or that the credentials are no longer valid. If you can still log in, the closure process was not completed, and you need to re-initiate or contact support.
- Check email confirmations: Review your email inbox for any final confirmation messages from Venmo regarding the successful closure of your account. Keep these emails for your records.
Reviewing Linked Services and Apps
In our interconnected digital world, many apps and services allow linking to payment platforms like Venmo for convenience. Post-deletion, it’s crucial to review these connections.
- Identify linked accounts: Think about any third-party apps (e.g., shopping apps, delivery services, subscription services) where you might have used Venmo as a payment method or linked it for some functionality.
- Sever connections: Log in to these third-party services and remove Venmo as a linked payment method. While Venmo’s backend closure should sever its side of the link, proactively removing it from other services adds an extra layer of digital security and tidiness. This ensures no residual data or erroneous attempts to connect occur.

Best Practices for Future Digital Account Management
Deleting an account, while a specific task, is also an opportunity to reflect on broader digital hygiene. Moving forward, apply these tech-focused best practices to manage your online accounts:
- Regular data audits: Periodically review the apps and services you use. Delete accounts for services you no longer need or trust. This reduces your digital footprint and minimizes potential data exposure.
- Strong, unique passwords: Always use strong, unique passwords for every online account. A password manager is an invaluable tech tool for this.
- Multi-factor authentication (MFA): Enable MFA on all accounts that support it, especially financial and email services. This adds a critical layer of security beyond just a password.
- Understand privacy policies: Before signing up for a new service, take a moment to understand its privacy policy and data retention practices. Being informed empowers you to make better choices about where your data resides.
- Secure data backups: Regularly back up important digital data, whether it’s transaction history, personal documents, or photos. This prevents data loss and provides peace of mind.
By diligently following these technical steps and embracing robust digital hygiene practices, deleting your Venmo account becomes a straightforward process, contributing positively to your overall digital security and data management strategy. It’s not just about removing an app; it’s about purposefully managing your presence in the digital realm.
aViewFromTheCave is a participant in the Amazon Services LLC Associates Program, an affiliate advertising program designed to provide a means for sites to earn advertising fees by advertising and linking to Amazon.com. Amazon, the Amazon logo, AmazonSupply, and the AmazonSupply logo are trademarks of Amazon.com, Inc. or its affiliates. As an Amazon Associate we earn affiliate commissions from qualifying purchases.