
In today’s digitally driven world, clear and error-free communication is paramount. Whether you’re crafting a crucial business proposal, composing an important email, or simply jotting down notes, the accuracy of your written word significantly impacts how your message is received. For many, Microsoft Word remains the go-to platform for document creation, and thankfully, it comes equipped with robust tools to ensure your writing is polished and professional. One of the most fundamental of these tools is spell check. While often built-in and readily accessible, there are instances where users might need to ensure spell check is functioning correctly, or even install additional language packs for broader coverage. This comprehensive guide will walk you through the intricacies of ensuring spell check is active and optimized within Microsoft Word, drawing parallels to the broader themes of technology, productivity, and even brand perception.
Understanding Word’s Spell Check Functionality
Microsoft Word’s spell checker is a powerful, automated tool designed to identify and suggest corrections for typographical errors, misspellings, and grammatical mistakes. It works by comparing the words in your document against an extensive internal dictionary. When it encounters a word it doesn’t recognize, it flags it, typically with a red wavy underline, prompting you to review the suggested correction. This isn’t just about catching typos; it’s about maintaining the integrity and credibility of your written content. In the realm of Tech, Word’s spell check is a prime example of how software streamlines complex tasks, making advanced functionalities accessible to everyday users. It’s a core component of word processing, enhancing Productivity by saving time and reducing the mental load associated with proofreading.
The Importance of Accurate Spelling and Grammar
Before delving into the “how-to,” it’s crucial to understand why spell check is so vital. In a professional context, documents riddled with spelling errors can undermine your credibility. It suggests a lack of attention to detail, potentially leading clients, colleagues, or employers to question the quality of your work overall. This directly ties into the concept of Brand perception. Your written communication is a direct reflection of your personal brand or your company’s brand. Consistent errors can negatively impact this perception, creating an impression of carelessness or unprofessionalism. Imagine receiving a sales pitch with multiple misspellings – would you be more inclined to trust that business? Probably not.
From a Money perspective, while not a direct financial transaction, poor writing can have indirect financial consequences. A poorly written business plan might deter investors. An unclear client communication could lead to misunderstandings, project delays, and ultimately, lost revenue. Even in personal finance, understanding investment prospectuses or insurance policies requires clear, error-free language. Word’s spell check acts as a safeguard, helping to prevent these avoidable pitfalls.
How Word’s Spell Check Works
At its core, Word’s spell checker operates on a dictionary-based system. As you type, the software analyzes each word.
- Dictionary Comparison: Each word is checked against Word’s built-in dictionaries. These dictionaries are language-specific.
- Flagging Errors: If a word isn’t found in the active dictionary or is spelled in a way that deviates significantly from common usage, it’s flagged.
- Suggestions: Word then accesses a lexicon of common misspellings and correct spellings to offer potential alternatives. These suggestions are often based on phonetic similarities or common typographical errors (e.g., transposing letters).
- Grammar Check: In addition to spelling, Word’s grammar checker analyzes sentence structure, punctuation, and common grammatical errors. This is often indicated by a blue wavy underline.
It’s important to note that the spell checker isn’t infallible. It doesn’t understand context perfectly. For instance, it might flag a correctly spelled word if it’s used incorrectly in a sentence (e.g., “their” instead of “there”). This is where human review remains essential.
Ensuring Spell Check is Active and Configured
Microsoft Word typically has spell check enabled by default. However, if you’re not seeing the familiar red wavy underlines, or if you suspect it’s not working as it should, there are several settings you can check. These steps are crucial for maintaining your Productivity and ensuring your documents are error-free.
Checking and Enabling Spell Check Options
The primary place to manage spell check settings is within Word’s Options menu. The exact path might vary slightly depending on your version of Word (e.g., Word for Microsoft 365, Word 2019, Word 2016), but the general location remains consistent.
For most recent versions of Word:
- Open Microsoft Word.
- Click on the “File” tab in the top-left corner.
- Select “Options” from the bottom of the left-hand menu.
- In the “Word Options” dialog box, click on “Proofing” from the left-hand pane.
This “Proofing” section is where you’ll find all the settings related to spell check and grammar check.
Spell Check Settings
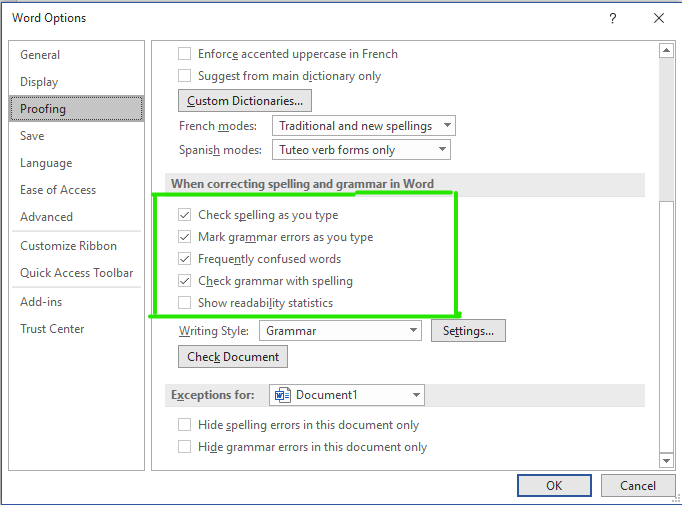
Within the “Proofing” section, you’ll see a subsection for “When correcting spelling and grammar in Word.” Ensure that the following boxes are checked:
- “Check spelling as you type”: This is the most important setting for real-time spell checking. If this is unchecked, you won’t see the red wavy underlines as you type.
- “Mark grammar errors as you type”: This enables the blue wavy underlines for grammatical suggestions.
You’ll also find options like:
- “Check grammar with spelling”: This box, when checked, bundles grammar checking with the spell check process.
- “Hide spelling errors”: This is the opposite of what you want, so ensure it’s not checked.
- “Hide grammatical errors”: Similarly, ensure this is not checked if you want grammatical feedback.
Customizing Autocorrect Options
The “Autocorrect Options” button, also found in the “Proofing” section, is another key area. This feature automatically corrects common typos and misspellings as you type.
- Click on “Autocorrect Options…”
- You’ll see several tabs:
- “AutoFormat As You Type”: Here you can control automatic formatting, but also options like “Replace text as you type.” Ensure this is checked if you want Word to automatically fix common errors.
- “AutoText”: Useful for inserting pre-defined text snippets.
- “AutoCorrect”: This tab is crucial. It lists common replacements. For example, if you type “teh,” Word will automatically change it to “the.” You can add your own frequently misspelled words and their correct spellings here. This is a powerful Productivity booster, especially if you have certain words you consistently mistype.
- “Math AutoCorrect”: For mathematical symbols.
By ensuring “Replace text as you type” is enabled and customizing the list with your personal common errors, you can significantly enhance the efficiency of your writing process. This proactive approach to error correction contributes to a polished final output, reinforcing a professional Brand image.
Installing and Managing Language Packs for Spell Check

One of the most common reasons spell check might seem “broken” or insufficient is if you’re writing in a language for which Word doesn’t have the necessary dictionaries installed or enabled. This is particularly relevant for users who work with multiple languages, a common scenario in globalized businesses and academic research. Ensuring you have the correct language support is vital for accurate Tech tools to function effectively.
Understanding Language Support in Word
Microsoft Word’s spell check, grammar check, and other proofing tools are language-dependent. Each language requires its own set of dictionaries and linguistic rules. If you’re typing in Spanish but only have English language packs installed, Word won’t be able to identify Spanish words, and thus, will flag everything as an error.
Checking Installed Languages
To see which proofing languages are installed and available on your system:
- Follow steps 1-4 from the “Checking and Enabling Spell Check Options” section above to get to the “Proofing” tab in Word Options.
- Under the “When correcting spelling and grammar in Word” section, you’ll see a dropdown menu labeled “Language.”
- Clicking this dropdown will show you the languages that Word is currently configured to use for proofing. If the language you need is not listed, or if it says “Proofing not available,” you’ll need to install it.
Installing New Language Packs
The process of installing new language packs is typically managed through your Microsoft Office or Windows settings, depending on your version.
For Microsoft 365 and newer versions of Office:
The easiest way to add language support is usually through the Microsoft Office Language Settings tool.
- Search for “Office Language Settings” in your Windows search bar and open it.
- In the “Office Language Settings” dialog box, you’ll see options for “Office display language” and “Office proofing languages.”
- Under “Office proofing languages,” click on the dropdown menu.
- If the language you need is not listed, there’s usually a button or link to “Add additional editing languages from Office.com.”
- Clicking this will typically open a web page or guide you through downloading the necessary language pack installer.
- Follow the on-screen instructions to download and install the selected language pack. This may involve running an installer program.
- Once installed, restart Microsoft Word. The new language should now appear in the “Language” dropdown on the “Proofing” tab of Word Options.
For older versions of Office:
You might need to install language packs as part of an Office update or through a separate download from Microsoft’s website. The process can vary, so it’s best to consult Microsoft’s official support documentation for your specific Office version.
Setting the Default Proofing Language
After installing a new language pack, you’ll want to ensure it’s correctly set as the default or actively selected for your documents.
- Go back to “File” > “Options” > “Proofing.”
- In the “Language” dropdown, select the desired language.
- Click the “Set as Default” button. This will make this language the primary proofing language for all new documents you create.
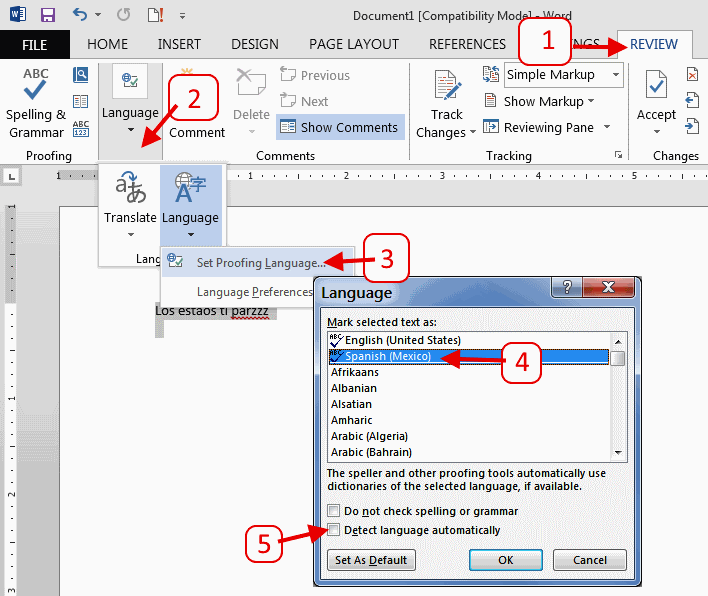
- For existing documents, you can also select specific text and then go to “Review” tab > “Language” > “Set Proofing Language.” Here, you can choose the language for the selected text and crucially, decide whether to “Do not check spelling or grammar.” Ensure this is not selected for the language you want to proofread.
Proper language configuration ensures that Word’s Tech features work as intended, enhancing Productivity by providing accurate feedback and preventing the misperception of errors, which in turn safeguards your Brand‘s integrity.
Troubleshooting Common Spell Check Issues
Even with proper configuration, you might encounter occasional hiccups with Word’s spell check. Understanding common issues and their solutions can save you considerable frustration and keep your writing workflow smooth. Effective troubleshooting is a key aspect of leveraging Tech for optimal Productivity.
Ignoring Words and Custom Dictionaries
Sometimes, Word might flag words that are actually correct, such as proper nouns, technical jargon, or specialized terms unique to your field. In these cases, you have options to manage what Word recognizes.
- “Ignore All”: When Word flags a word, you can click “Ignore All.” This tells Word to ignore this specific instance of the word and all future instances of the exact same word in the current document. Use this with caution, as you might accidentally ignore a misspelling if you’re not careful.
- “Add to Dictionary”: This is the more common and recommended approach for correct, but unrecognized, words. Clicking “Add to Dictionary” adds the word to Word’s custom dictionary. This dictionary is specific to your user profile and is used in conjunction with the main dictionaries.
- Managing Custom Dictionaries: You can manage your custom dictionaries via “File” > “Options” > “Proofing” > “Custom Dictionaries…” Here, you can add new dictionaries, remove existing ones, or edit the words within them. This is particularly useful if you have a specific set of terms that are always flagged incorrectly. For example, if you frequently write about a specific product name or a niche scientific term, adding it to your custom dictionary ensures it won’t be flagged. This proactive management contributes to a more efficient writing experience and reinforces a polished Brand presentation.
Spell Check Not Working at All
If you’ve checked all the options and still aren’t seeing any red wavy underlines, consider these possibilities:
- Document View: Ensure you are in a view that displays the content, such as “Print Layout” or “Web Layout.” Some specialized views might disable real-time proofing.
- Hidden Text: If the text you’re concerned about is formatted as hidden text, spell check might not apply. Check the paragraph settings.
- Corrupted Normal.dotm Template: The
Normal.dotmfile is Word’s default template. If it becomes corrupted, it can cause various issues, including spell check malfunctions. Renaming or deleting this file (Word will recreate it with default settings) can sometimes resolve deep-seated problems. Before doing this, it’s advisable to back it up. The location ofNormal.dotmvaries by Windows version, but it’s typically found inC:Users<YourUsername>AppDataRoamingMicrosoftTemplates. - Add-ins: Third-party add-ins can sometimes interfere with Word’s built-in functionalities. Try disabling add-ins one by one to see if the issue is resolved. You can manage add-ins via “File” > “Options” > “Add-Ins.”
Grammar Check vs. Spell Check
It’s important to differentiate between spell check (red wavy underlines) and grammar check (blue wavy underlines). If your spell check is working but grammar check isn’t, revisit the “Proofing” options and ensure “Mark grammar errors as you type” is enabled. Grammar checking is more complex and relies on sophisticated algorithms to analyze sentence structure, punctuation, and style. While highly useful, it’s also more prone to misinterpretation than simple spell checking, so always review its suggestions critically.
By diligently checking these settings and understanding how to manage Word’s dictionaries, you can ensure that your spell check functionality is robust and reliable. This attention to detail in your writing is a testament to your commitment to quality, which in turn strengthens your personal or corporate Brand. Ultimately, mastering these tools is a key step in leveraging Tech for peak Productivity and ensuring your message is always delivered with clarity and professionalism.
aViewFromTheCave is a participant in the Amazon Services LLC Associates Program, an affiliate advertising program designed to provide a means for sites to earn advertising fees by advertising and linking to Amazon.com. Amazon, the Amazon logo, AmazonSupply, and the AmazonSupply logo are trademarks of Amazon.com, Inc. or its affiliates. As an Amazon Associate we earn affiliate commissions from qualifying purchases.