
In an increasingly digital world, managing our online subscriptions and presence has become a crucial aspect of personal tech hygiene. Whether you’re seeking to reduce screen time, streamline expenses, or simply declutter your digital life, the decision to “cancel YouTube” can manifest in several ways. This guide will meticulously navigate the various facets of terminating your relationship with YouTube, from subscription cancellations for Premium and TV to the more definitive steps of hiding or deleting your YouTube channel. Understanding these processes is not just about clicking a button; it’s about reclaiming control over your digital footprint and ensuring your online experience aligns with your current needs and preferences.
Understanding “Cancelling YouTube”: Different Facets of Termination
The phrase “cancel YouTube” can be surprisingly ambiguous, as it encompasses several distinct actions, each with its own implications. Before proceeding, it’s vital to clarify which aspect of YouTube you intend to terminate. Are you looking to stop paying for an enhanced service, or are you aiming to remove your created content and online identity?
Cancelling YouTube Premium Subscription
YouTube Premium offers an ad-free viewing experience, background play, downloads, and access to YouTube Music Premium. Cancelling this subscription means reverting to the standard, ad-supported YouTube service. Your viewing habits will remain, but the premium features will cease at the end of your current billing cycle. This is often the most common form of “cancelling YouTube” when users are looking to save money or no longer find value in the ad-free experience.
Cancelling YouTube TV Subscription
Distinct from YouTube Premium, YouTube TV is a live TV streaming service that provides access to a wide range of channels, DVR capabilities, and on-demand content. Cancelling YouTube TV is akin to cancelling a traditional cable package, stopping access to its live channels and DVR recordings. This decision is typically driven by cost savings, dissatisfaction with channel lineups, or a shift to alternative live streaming providers.
Deleting or Hiding Your YouTube Channel
For creators, “cancelling YouTube” might mean managing their personal channel. YouTube provides options to either temporarily hide your channel or permanently delete it. Hiding a channel removes your videos, playlists, and channel art from public view but retains your data and allows for future restoration. Deleting, however, is a much more permanent action, removing all associated content and data irreversibly. This choice is often motivated by a desire for a fresh start, privacy concerns, or a complete exit from content creation on the platform.
Managing Your Google Account Data and YouTube History
Beyond subscriptions and channels, a more holistic approach to “cancelling YouTube” might involve managing the data YouTube collects as part of your broader Google Account. This includes your watch history, search history, and privacy settings. While not a direct “cancellation” of the service, it’s a crucial step for those aiming for a comprehensive digital declutter and enhanced privacy control.
Step-by-Step Guide to Cancelling YouTube Premium
If your goal is to stop paying for the ad-free experience and additional features, cancelling YouTube Premium is a straightforward process accessible through both web browsers and mobile applications.
Via Desktop Browser
- Access YouTube: Go to youtube.com in your web browser.
- Sign In: Ensure you are signed into the Google Account associated with your Premium subscription.
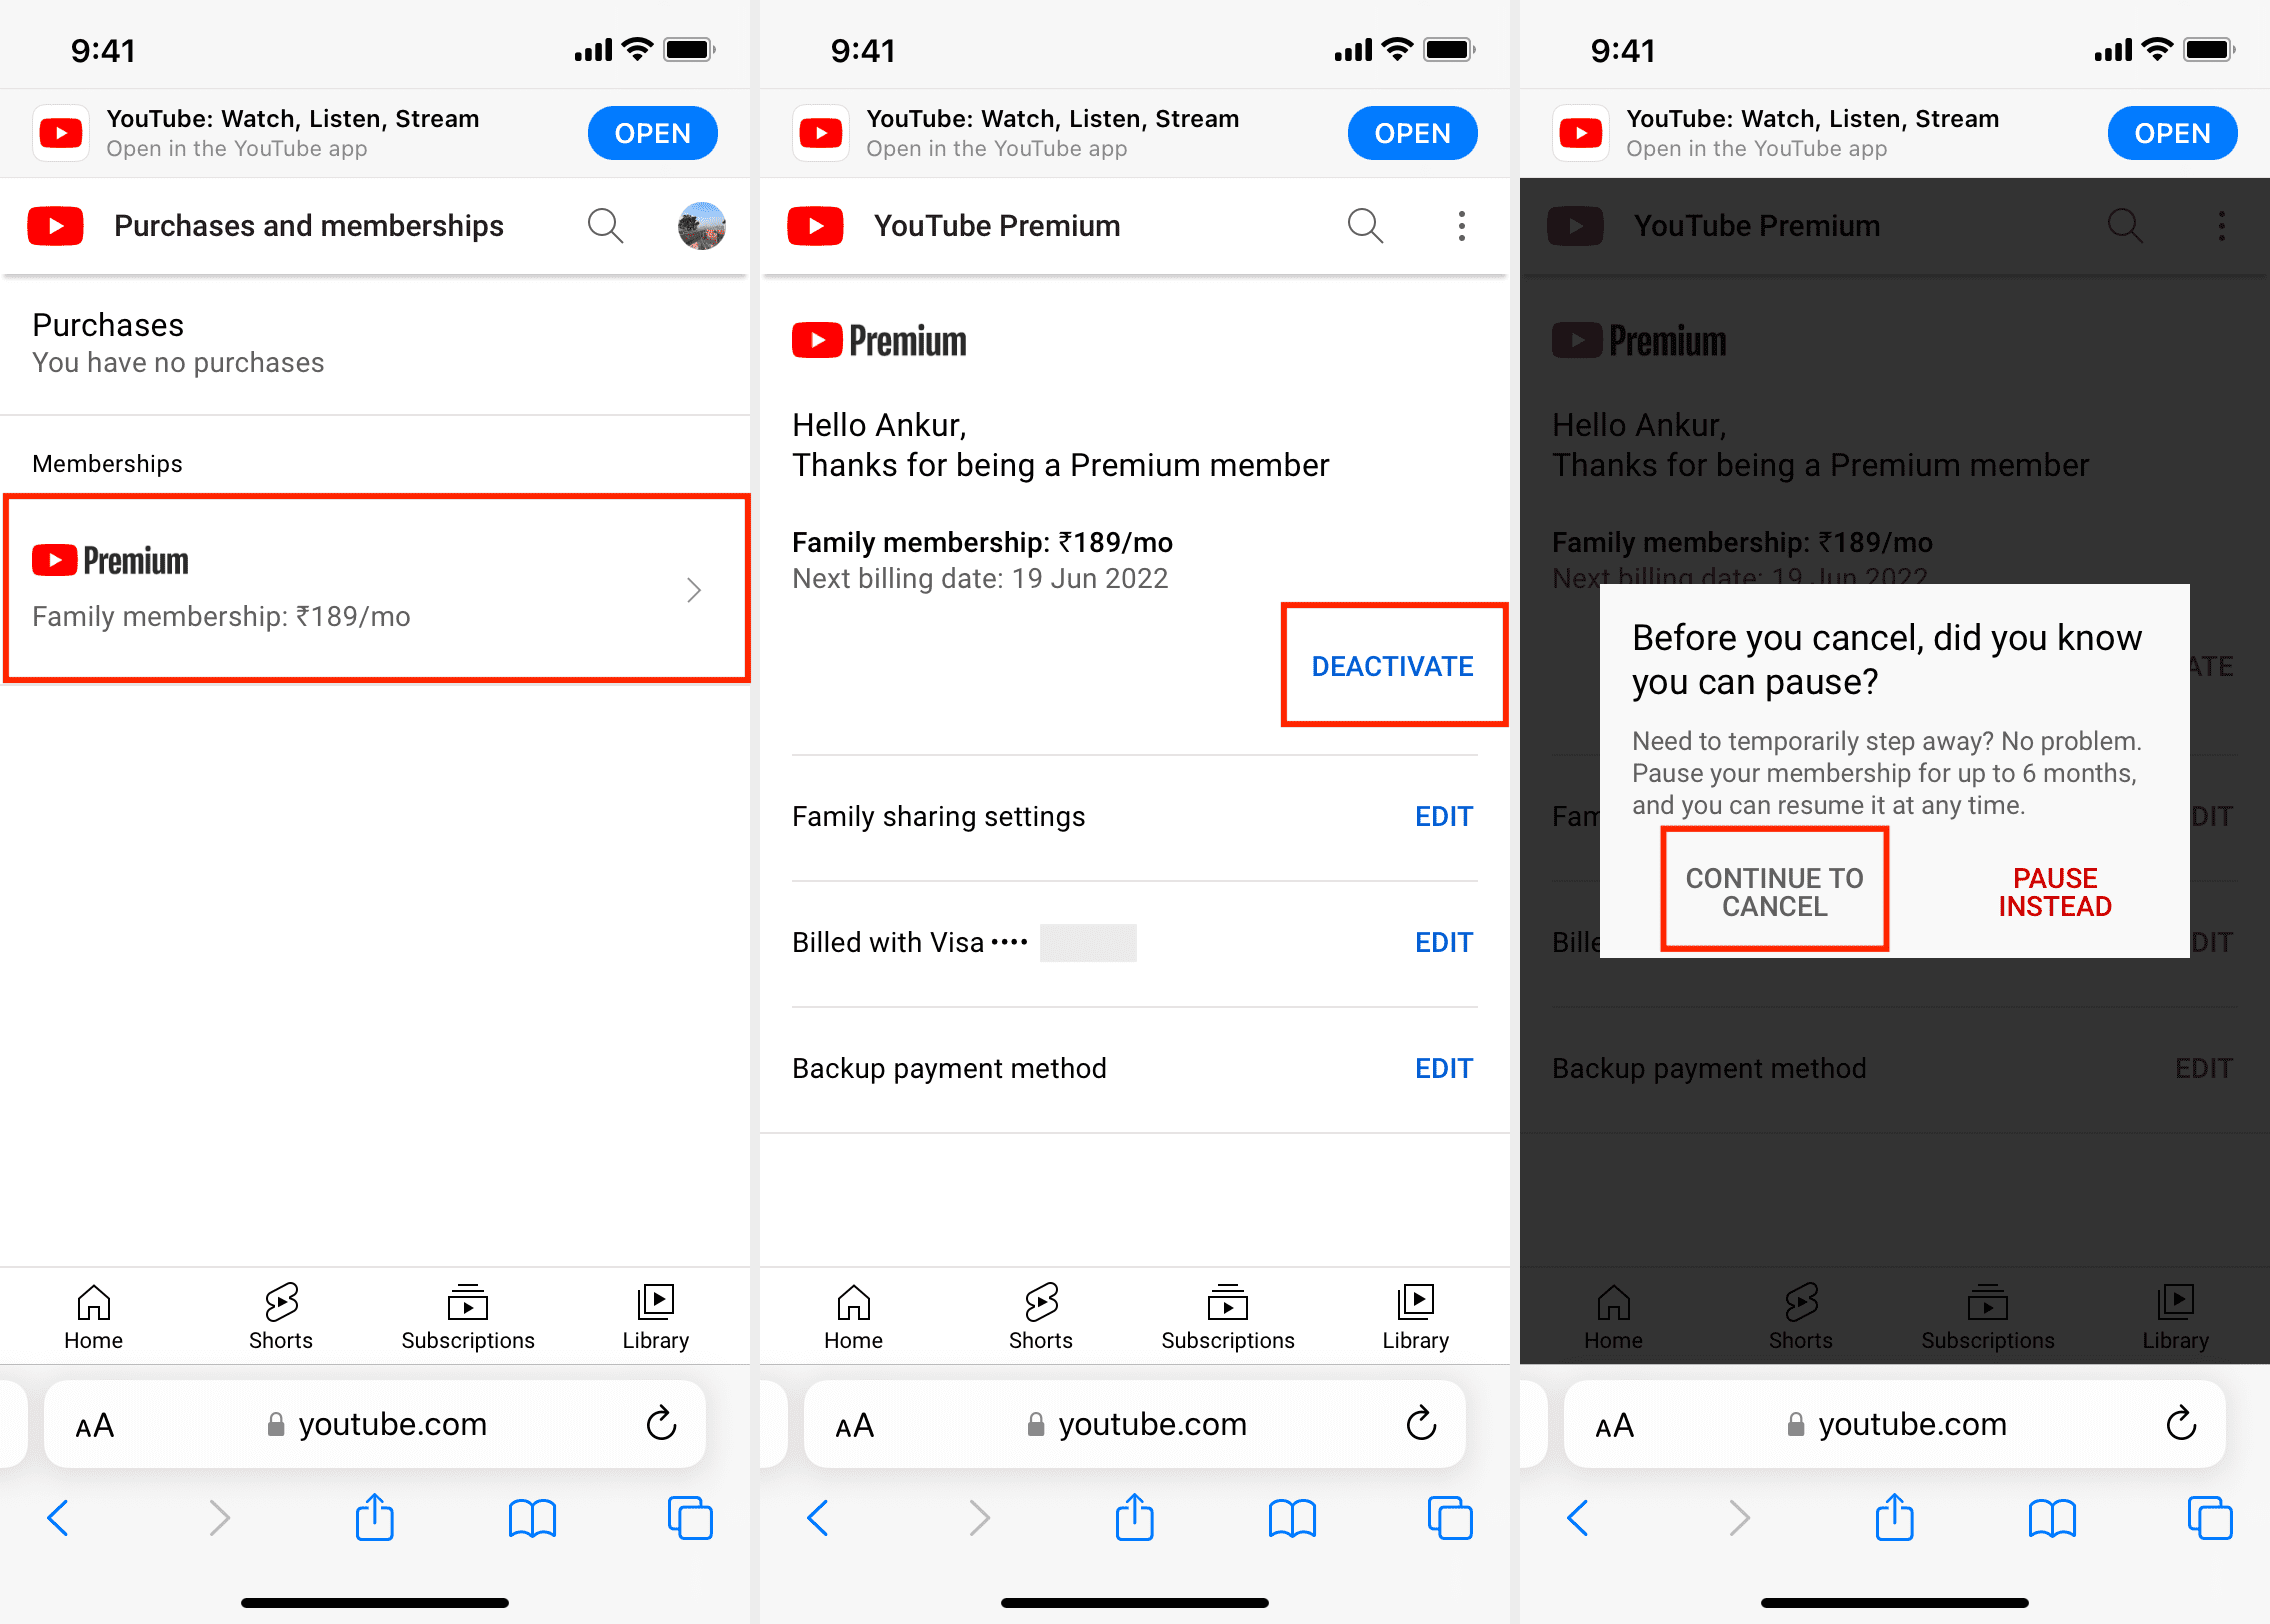
- Navigate to Purchases & Memberships: Click on your profile picture in the top right corner, then select “Purchases & memberships” from the dropdown menu.
- Locate Your Membership: Find your YouTube Premium membership under the “Memberships” section.
- Manage Membership: Click on “Manage membership.” This will typically redirect you to a Google Play subscription management page.
- Cancel Membership: On the Google Play subscriptions page, locate YouTube Premium and click “Manage,” then “Cancel subscription.” You may be asked to provide a reason for cancellation.
- Confirm Cancellation: Follow the prompts to confirm your decision.
Via Mobile App (Android/iOS)
- Open YouTube App: Launch the YouTube app on your Android or iOS device.
- Access Account: Tap on your profile picture in the top right corner.
- Go to Paid Memberships: Select “Purchases & memberships” (or “Paid memberships” on some devices).
- Select Premium: Find and tap on your YouTube Premium membership.
- Manage Subscription: Tap “Manage membership” (on Android, this may lead to Google Play Store; on iOS, it will lead to Apple Subscriptions).
- Cancel: Follow the specific prompts for your device’s app store to cancel the subscription.
- Android: In Google Play, tap “Subscriptions,” select YouTube Premium, then “Cancel subscription.”
- iOS: In iPhone/iPad Settings, go to your Apple ID, then “Subscriptions,” select YouTube Premium, then “Cancel Subscription.”
What Happens After Cancellation?
Upon cancelling YouTube Premium, your membership benefits will continue until the end of your current billing period. For instance, if you cancel halfway through a monthly cycle, you’ll still enjoy ad-free viewing for the remaining days. Once the cycle ends, your account will revert to the standard YouTube experience, meaning ads will reappear, background play will cease, and downloaded content will become inaccessible. Your watch history, subscriptions, and playlists will remain intact.
Terminating Your YouTube TV Subscription
Cancelling YouTube TV is a similar process to Premium, but it pertains to the live streaming service. You have the option to pause or cancel entirely.
Navigating the Cancellation Process
- Access YouTube TV: Go to tv.youtube.com in your web browser or open the YouTube TV app.
- Sign In: Log in with the Google Account linked to your YouTube TV subscription.
- Open Settings: Click on your profile picture in the top right, then select “Settings.”
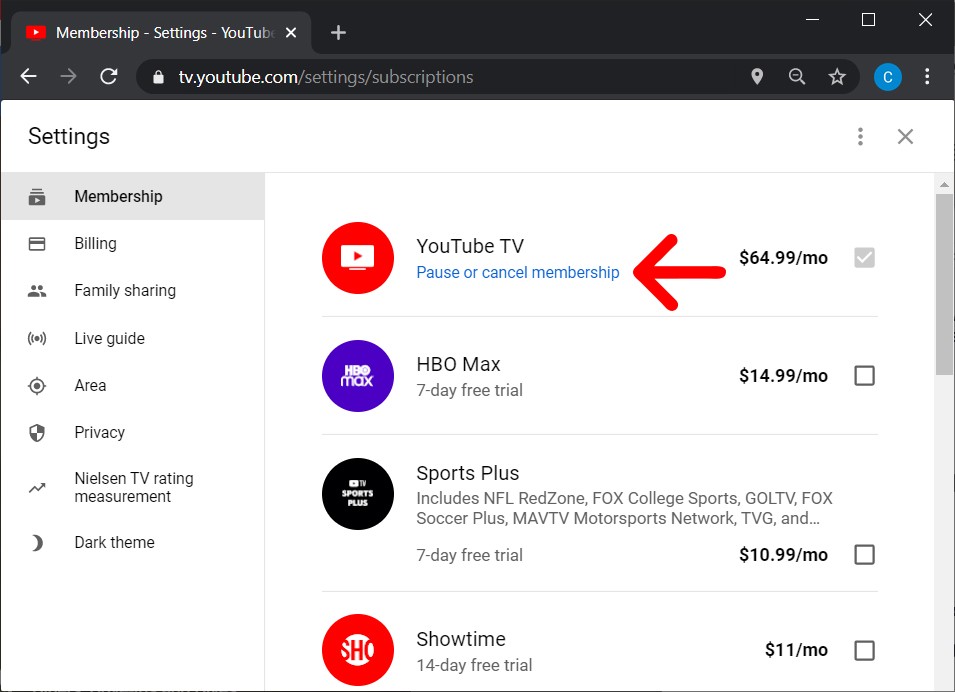
- Manage Membership: Under the “Membership” section, click on “Manage.”
- Cancel or Pause: You’ll see options to either “Pause or cancel membership.” Click on it.
- Confirm Decision: If you choose to cancel, you may be asked to confirm and provide a reason. Follow the prompts to complete the cancellation.
Pausing vs. Cancelling (and Benefits of Pausing)
YouTube TV offers a “Pause membership” option, which can be incredibly useful for those who might temporarily stop using the service (e.g., during extended travel or seasonal breaks). When paused, your membership is inactive for a chosen period (from 4 weeks up to 6 months), and you are not billed. Your recordings are saved for 21 days after the pause period ends. This can be a flexible alternative to full cancellation if you anticipate returning to the service later, saving you the hassle of re-subscribing and potentially losing promotions.
Understanding Refund Policies and Access Periods
Similar to YouTube Premium, when you cancel YouTube TV, your access to the service (including live TV and your DVR library) will continue until the end of your current billing period. YouTube TV typically does not offer prorated refunds for partial billing cycles. Therefore, it’s often advisable to cancel near the end of your billing cycle to maximize your value. Always check the current YouTube TV terms of service for the most up-to-date refund policies.
Managing Your YouTube Channel: Hiding vs. Deleting
For content creators, “cancelling YouTube” often refers to the management or removal of their channel. This is a more significant step, as it deals with created content and your public presence.
Why Hide Your Channel?
Hiding your YouTube channel is a temporary measure that can be useful for several reasons:
- Taking a Break: If you need a hiatus from content creation but don’t want to permanently lose your videos and data.
- Privacy: To remove your public persona or specific content temporarily.
- Rebranding: To prepare for a channel overhaul without having to re-upload everything later.
When hidden, your videos, playlists, subscriptions, and comments are made private and will not appear to other users. Your channel name will still show in search results, but clicking it will display a “Channel does not exist” message.
The Process of Hiding Your Channel
- Access YouTube Studio: Go to studio.youtube.com and sign in with your channel’s Google Account.
- Navigate to Settings: Click on “Settings” in the left sidebar.
- Channel Settings: Select “Channel,” then “Advanced settings.”
- Remove YouTube Content: Scroll down and click “Remove YouTube content.” You may be asked to sign in again to verify your identity.
- Hide My Content: Choose the option “I want to hide my content.”
- Confirm: Check the boxes to confirm what will be hidden and click “Hide my channel.”
Why Permanently Delete Your Channel?
Deleting your YouTube channel is an irreversible action suitable for those who:
- Want a Fresh Start: To create an entirely new channel without previous history.
- Have Privacy Concerns: To completely erase their content and associated data from the public domain.
- Are No Longer Producing Content: For creators who have decided to leave content creation on YouTube permanently.
Irreversibility: What Happens When You Delete?
Permanent deletion means:
- Content Loss: All your videos, playlists, comments, messages, subscriptions, and channel art will be permanently removed.
- Watch History Loss: Your YouTube watch and search history associated with that channel will be deleted.
- URL Unavailability: Your channel’s URL will no longer work, and the name may become available for others to use.
- Data Erasure: Google will permanently erase all data associated with that channel from their servers, making recovery impossible.
Step-by-Step Channel Deletion
- Access YouTube Studio: Go to studio.youtube.com and sign in.
- Navigate to Settings: Click “Settings” in the left sidebar.
- Channel Settings: Select “Channel,” then “Advanced settings.”
- Remove YouTube Content: Scroll down and click “Remove YouTube content.” You will need to sign in again to verify.
- Delete My Content: Choose the option “I want to permanently delete my content.”
- Confirm Deletion: Check the box to acknowledge the permanent deletion of your data and content. Click “Delete my content.”
- Enter Channel Name/Email: You may be asked to type in your channel name or email address to confirm this final, irreversible step.
Post-Cancellation Considerations and Digital Hygiene
Cancelling a YouTube service or deleting a channel is a significant step in managing your digital life, but the journey towards optimal digital hygiene doesn’t end there.
Data Retention and Privacy Implications
Even after cancelling a subscription or deleting a channel, some data might still be retained by Google in accordance with its privacy policy and legal requirements. It’s prudent to review Google’s privacy dashboard and activity controls within your Google Account. Here, you can control what data is saved, such as Web & App Activity, Location History, and YouTube History, and even set up auto-delete options for certain data types. This ensures that your efforts to “cancel YouTube” extend to the underlying data footprint.
Reviewing Connected Apps and Permissions
Many users grant third-party applications access to their YouTube or Google account for various services (e.g., video editing tools, analytics platforms, social media integrations). When you decide to “cancel YouTube” in any capacity, it’s a good practice to review these connected apps.
- Go to your Google Account: Visit myaccount.google.com.
- Security Section: Navigate to the “Security” section.
- Third-party apps with account access: Review the list and revoke access for any apps you no longer use or trust, particularly those linked to your YouTube activities. This helps prevent unauthorized access to your account and protects your data.
The Broader Picture: Digital Decluttering and Mindful Consumption
The act of cancelling YouTube can be part of a larger digital decluttering initiative. Regularly assessing your digital subscriptions, accounts, and online activities fosters a more mindful relationship with technology. Consider:
- Subscription Audits: Periodically review all your recurring subscriptions and cancel those you no longer use or value.
- Notification Management: Tame intrusive notifications that pull you back into apps you’re trying to reduce usage of.
- Screen Time Limits: Utilize built-in device tools to monitor and limit your usage of specific applications.
- Purposeful Engagement: Shift from passive consumption to active, intentional use of online platforms.
Alternatives and Re-engagement Strategies
Should you find yourself wanting to re-engage with video content or content creation after a period of “cancellation,” explore alternative platforms or approach YouTube with a new strategy. Perhaps you can consume content via RSS feeds for specific channels, or use browser extensions to block ads without a Premium subscription. For creators, starting fresh can lead to a more focused and invigorated approach to content creation, leveraging lessons learned from previous experiences.

Conclusion
Navigating the landscape of digital services requires a proactive and informed approach. “Cancelling YouTube” is not a monolithic action but a spectrum of choices, each with unique technical steps and implications for your digital life. Whether you’re opting out of a premium subscription, stepping away from live TV, or fundamentally reshaping your online presence as a creator, understanding these processes empowers you to make decisions that align with your personal goals for privacy, financial prudence, and digital wellness. By following these comprehensive guides, you can confidently manage your YouTube engagement and maintain a healthier, more controlled digital environment.
aViewFromTheCave is a participant in the Amazon Services LLC Associates Program, an affiliate advertising program designed to provide a means for sites to earn advertising fees by advertising and linking to Amazon.com. Amazon, the Amazon logo, AmazonSupply, and the AmazonSupply logo are trademarks of Amazon.com, Inc. or its affiliates. As an Amazon Associate we earn affiliate commissions from qualifying purchases.