
In an increasingly digital financial landscape, peer-to-peer (P2P) payment platforms like Venmo have become indispensable tools for managing everyday transactions. From splitting dinner bills with friends to receiving payments for a side hustle, Venmo offers a convenient and swift way to move money. However, the true utility of such platforms often culminates in the ability to seamlessly transfer those digital funds into a traditional bank account, making them accessible for broader financial needs like savings, investments, or bill payments. This process, while seemingly straightforward, involves nuances regarding speed, fees, and security that every savvy financial consumer should understand.

This comprehensive guide will demystify the process of moving money from your Venmo balance to your linked bank account, offering insights into both standard and instant transfer options, outlining associated costs, and providing best practices for financial management. By understanding these mechanisms, users can leverage Venmo not just as a casual payment app, but as an integrated component of their personal financial strategy, ensuring their funds are always where they need to be, when they need them.
Understanding Venmo and Its Role in Personal Finance
Venmo has evolved beyond a mere convenience; it’s a significant player in the realm of personal finance, bridging the gap between digital transactions and conventional banking. Its user-friendly interface and social features have made it a favorite for millions, but its core function remains rooted in facilitating financial transfers.
Venmo as a P2P Payment Platform
At its heart, Venmo is a peer-to-peer payment application. It allows individuals to send and receive money from each other with relative ease, often without incurring transaction fees for standard transfers funded by a bank account, debit card, or Venmo balance. This makes it incredibly useful for informal transactions that might otherwise involve cash, checks, or more cumbersome bank transfers. For instance, roommates can easily divide rent, friends can split the cost of a concert ticket, or small business owners can receive payments for services. The immediacy of these transactions, often credited to a Venmo balance, provides a feeling of accessible liquidity. However, this balance isn’t directly usable everywhere. While some merchants accept Venmo for purchases, most significant financial commitments still necessitate funds within a traditional bank account.
The Interplay Between Digital Wallets and Traditional Banking
The rise of digital wallets like Venmo marks a fascinating development in personal finance. These platforms exist in a symbiotic relationship with traditional banking institutions. While they offer rapid, often social, ways to transfer money, they fundamentally rely on established banking infrastructure. To fund your Venmo account or, crucially, to withdraw money from it, you must link it to a bank account or a debit card. This linkage is a testament to the enduring importance of traditional banks as the ultimate custodians of financial assets. Digital wallets enhance the user experience for day-to-day spending and sharing, but bank accounts remain the anchors for long-term savings, investments, credit, and large-scale financial operations. Understanding this interplay is key to effectively managing your funds across both digital and traditional ecosystems.
Why Transferring Funds is Essential
Maintaining a balance within a digital wallet indefinitely is rarely the optimal financial strategy. While convenient for immediate spending within the Venmo ecosystem, funds sitting in a Venmo account typically do not accrue interest, nor are they as readily available for diverse financial obligations as money in a bank account. Transferring funds from Venmo to your bank account is essential for several reasons:
- Consolidation: It allows you to consolidate your funds in one primary location, making budgeting and financial tracking simpler.
- Accessibility for Broader Needs: Money in a bank account can be used for a wider array of purposes – paying rent or mortgage, investing in stocks or retirement funds, paying credit card bills, or accessing ATMs for physical cash.
- Security and FDIC Insurance: While Venmo employs robust security measures, funds held in a bank account typically benefit from FDIC insurance (up to specified limits), offering an additional layer of protection against bank failure. While Venmo itself is not a bank, funds held in a Venmo account are generally held in pooled accounts at FDIC-insured banks, offering a similar level of pass-through FDIC insurance. However, the direct relationship with your bank provides more clarity.
- Interest Earning Potential: Many checking or savings accounts, even basic ones, offer some form of interest, no matter how small, allowing your money to grow passively over time, unlike a Venmo balance.
Ultimately, transferring funds from Venmo to your bank account is a critical step in integrating your digital transactions into a sound, comprehensive personal finance strategy.
The Standard Transfer: A Cost-Effective Approach
For most Venmo users, the standard transfer method is the default and often preferred choice due to its zero-cost nature. It’s a reliable way to move your digital funds into your traditional banking account, albeit with a slight delay.
Step-by-Step Guide to Initiating a Standard Transfer
The process of initiating a standard transfer from your Venmo balance to your linked bank account is designed to be user-friendly:
- Open the Venmo App: Launch the Venmo application on your smartphone.
- Navigate to the “Me” Tab: Tap on the single person icon, typically located at the bottom right of the screen. This will take you to your personal profile.
- Tap “Transfer Balance”: On your profile page, you will see your current Venmo balance. Below it, there should be an option labeled “Transfer Balance” or “Manage Balance.” Tap on this.
- Enter the Amount: Input the exact amount of money you wish to transfer from your Venmo balance to your bank account. Ensure you don’t exceed your current available balance.
- Select Transfer Method: You will be presented with two main options: “Instant” and “1-3 Business Days” (or similar wording indicating a standard transfer). Select the “1-3 Business Days” option.
- Confirm Destination: Verify that the correct linked bank account is selected as the destination for the transfer. If you have multiple bank accounts linked, ensure you choose the one you intend to use.
- Review and Confirm: Double-check all the details – the amount, the transfer method, and the destination account. Once satisfied, tap the “Transfer” or “Confirm” button to initiate the transfer.
You will typically receive a confirmation message within the app, and often an email notification, acknowledging your transfer request.
What to Expect: Timelines and Accessibility
The key characteristic of a standard transfer is its timeline. As the name suggests, “1-3 Business Days,” it usually takes between one and three full business days for the funds to reflect in your linked bank account.
- Business Days Defined: It’s crucial to understand that “business days” typically exclude weekends and national holidays. If you initiate a transfer on a Friday afternoon, for example, it might not be processed until Monday, and then take 1-3 business days from that point, potentially making the funds available by Wednesday or Thursday of the following week.
- Bank Processing Times: The exact timing can also depend on your specific bank’s processing times. Some banks may process incoming transfers faster than others. While Venmo initiates the transfer promptly, the final availability of funds is ultimately governed by your bank’s operational schedule.
- Accessibility: Once the funds appear in your bank account, they are fully accessible for any banking transaction – ATM withdrawals, bill payments, direct debits, or transfers to other accounts.
The standard transfer is an excellent option for non-urgent situations where saving on fees is a priority. Planning ahead is key when opting for this method to ensure funds are available when needed.
Linking Your Bank Account Securely
Before you can transfer money to your bank, you need to have a bank account linked to your Venmo profile. This is a one-time setup process that involves security protocols:
- Navigate to Settings: From your profile (Me tab), tap the “Settings” gear icon.
- Payment Methods: Select “Payment Methods.”
- Add a Bank or Card: Choose to “Add a bank or card” and then select “Bank.”
- Verification Process: Venmo typically offers two methods for linking:
- Instant Verification (Recommended): Log in directly to your bank account through a secure third-party service (like Plaid) integrated with Venmo. This is usually the fastest and most secure method.
- Manual Verification: Enter your bank’s routing number and account number. Venmo will then send two small deposits (usually less than $0.10) to your bank account. You will need to verify these amounts in the Venmo app within a few days to confirm ownership of the account.
- Security Measures: Venmo employs encryption and other security measures to protect your banking information. Always ensure you are on a secure network when linking accounts and be wary of phishing attempts.
Linking your bank account securely is a foundational step, enabling the seamless transfer of funds between your digital wallet and your traditional financial institution, laying the groundwork for effective financial management.
The Instant Transfer: Speed at a Premium
While the standard transfer offers a cost-effective solution, there are situations where time is of the essence. For these urgent needs, Venmo provides an instant transfer option, allowing users to access their funds almost immediately, albeit for a small fee.
Navigating the Instant Transfer Option
The process for initiating an instant transfer mirrors that of a standard transfer, with one crucial difference in the selection step:
- Follow Steps 1-4 from Standard Transfer: Navigate to your “Me” tab, tap “Transfer Balance,” and enter the amount you wish to transfer.
- Select “Instant”: When presented with transfer options, choose the “Instant” or “Instant Transfer” option. This is the key differentiator.
- Confirm Destination: Ensure the correct linked bank account (or eligible debit card, if you prefer that route for instant transfers) is selected as the destination.
- Review and Confirm with Fee: You will see a clear breakdown showing the transfer amount and the associated fee. After reviewing, confirm the transfer.
Once confirmed, the funds are typically available in your linked bank account within minutes, often in under 30 minutes, 24/7, including weekends and holidays. This makes it an incredibly powerful tool for unexpected expenses or time-sensitive financial obligations.
Understanding the Associated Fees
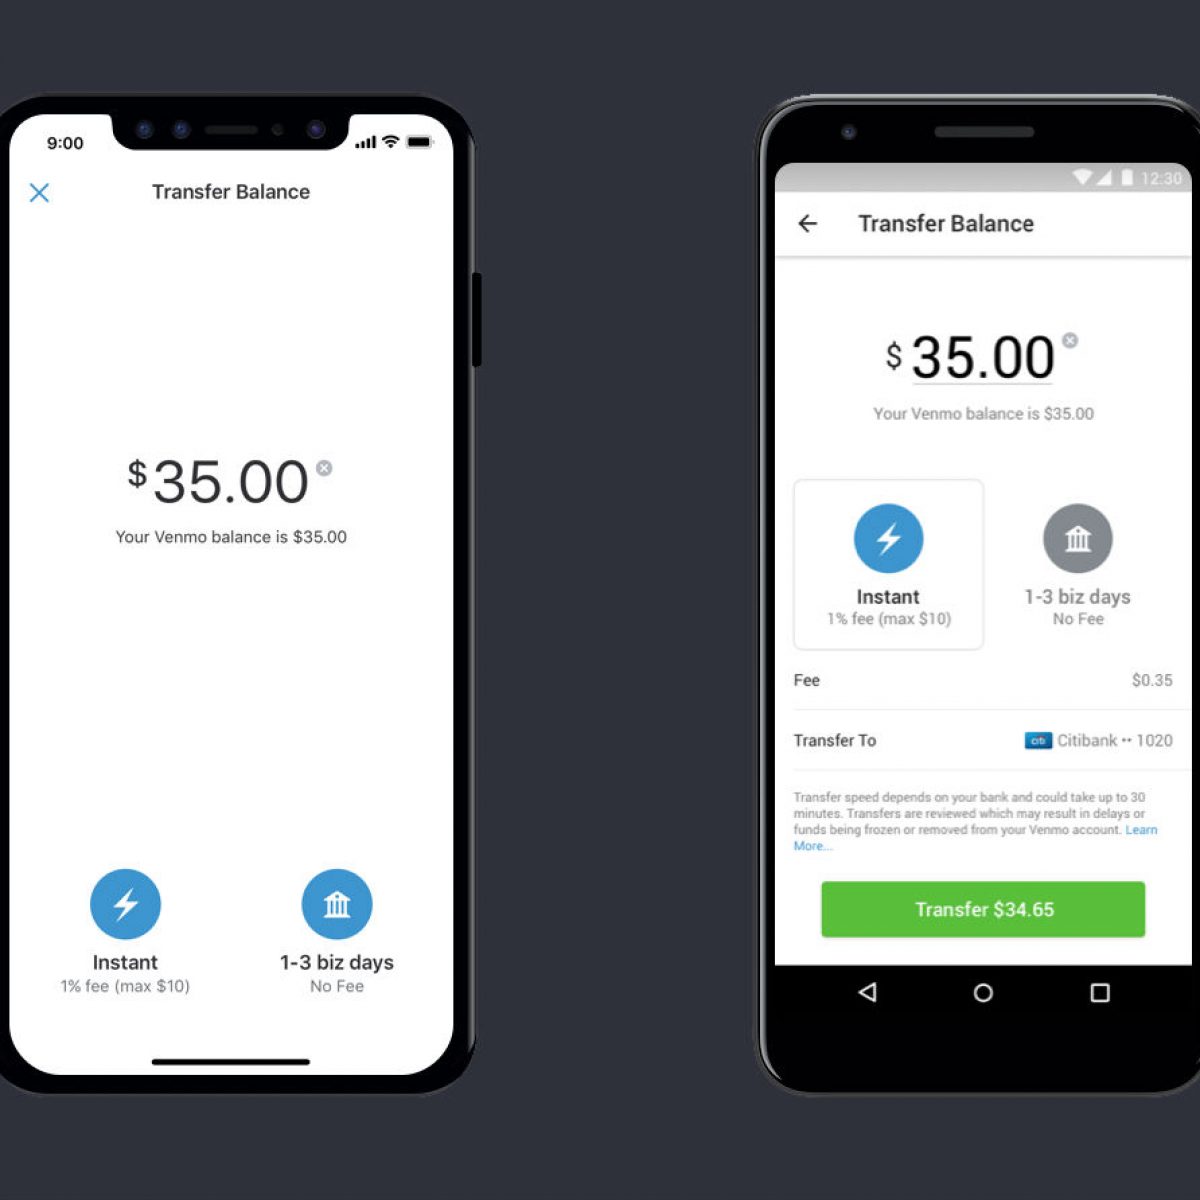
The primary trade-off for the speed of an instant transfer is the fee. Venmo charges a percentage of the transferred amount for instant transfers.
- Fee Structure: Typically, the fee is 1.75% of the transfer amount, with a minimum fee of $0.25 and a maximum fee of $25. This means that for a $100 transfer, you would pay $1.75. For a $10 transfer, you would pay $0.25 (the minimum). For a $2,000 transfer, you would pay $25 (the maximum).
- Transparency: Venmo is transparent about these fees. Before you confirm an instant transfer, the exact fee will be clearly displayed, allowing you to make an informed decision.
- Debit Card vs. Bank Account: While instant transfers primarily target bank accounts, Venmo also allows instant transfers to eligible debit cards, which typically carry the same fee structure. Using a debit card can sometimes offer an even faster path to funds, as they are often credited to the linked checking account instantly.
It’s essential to factor this fee into your financial planning. While 1.75% might seem small for lower amounts, it can add up, especially for frequent or large transfers.
When to Opt for an Instant Transfer
Deciding between a standard and an instant transfer boils down to a cost-benefit analysis driven by urgency.
- Emergency Situations: If you have an unexpected bill due, need immediate cash for an emergency, or are facing an overdraft situation, an instant transfer can be a lifesaver.
- Time-Sensitive Payments: For payments that cannot wait for 1-3 business days, such as rent due, a quick loan repayment, or a last-minute investment opportunity, the instant transfer justifies its cost.
- Avoiding Late Fees: The fee for an instant transfer is often significantly less than potential late fees on bills or penalties for missing a payment deadline.
- Convenience and Peace of Mind: Sometimes, the peace of mind of having immediate access to your funds is worth the nominal fee, even if the situation isn’t a dire emergency.
Conversely, for routine transfers or funds that aren’t immediately needed, the standard free transfer remains the more financially prudent choice. Integrating both options into your financial toolkit allows for flexibility and intelligent resource management.
Navigating Limits, Fees, and Security
Understanding the operational boundaries and security protocols of any financial tool is paramount. Venmo, like all financial platforms, operates with specific limits and implements robust security measures that users should be aware of when transferring funds.
Venmo Transfer Limits: What You Need to Know
Venmo imposes limits on the amount of money you can transfer, both on a per-transaction basis and cumulatively over a given period. These limits are in place for security reasons and to comply with financial regulations.
- Unverified Accounts: For new or unverified accounts, the transfer limits are significantly lower. This typically means a lower weekly rolling limit for transfers to your bank account.
- Verified Accounts: Once your identity is verified (usually by providing your full name, date of birth, and the last four digits of your Social Security Number), your limits will increase substantially.
- Weekly Rolling Limit: For verified accounts, there is usually a weekly rolling limit for transfers to your bank account. This limit applies to both standard and instant transfers combined. For instance, you might have a $5,000 or $10,000 weekly rolling limit, meaning you cannot transfer more than that amount from your Venmo balance to your bank account within any seven-day period.
- Per-Transaction Limit: While the weekly limit is the primary constraint, there might also be implicit per-transaction limits depending on the bank and specific account.
- Checking Your Limits: You can typically view your current transfer limits within the Venmo app by navigating to your settings or attempting a transfer that exceeds your current limit. Venmo will inform you if you are approaching or have exceeded your limit.
- Importance of Verification: Verifying your identity with Venmo is a critical step not just for increasing transfer limits but also for enhancing the overall security and legitimacy of your account. It helps prevent fraud and ensures you can fully utilize all of Venmo’s features.
Being aware of these limits helps in planning larger transfers and avoids unexpected hindrances when you need to move a significant sum.
A Comprehensive Look at Venmo’s Fee Structure
Beyond the instant transfer fee, it’s beneficial to have a broader understanding of Venmo’s fee landscape to avoid surprises.
- Standard Transfers to Bank: Free. This is Venmo’s primary cost-saver for users who can wait.
- Instant Transfers to Bank/Debit Card: 1.75% of the amount transferred, with a minimum of $0.25 and a maximum of $25. This fee is non-negotiable for instant service.
- Sending Money (Funding Sources):
- Bank Account, Debit Card, Venmo Balance: Free. This is the most common and cost-effective way to send money.
- Credit Card: 3% fee. This fee applies when you send money to another person using a linked credit card. This is to offset the processing fees credit card companies charge. It’s generally advisable to avoid using a credit card for sending money to others due to this fee, unless absolutely necessary.
- Receiving Money: Generally free for personal transactions.
- Venmo Mastercard Debit Card: No monthly fee, no ATM withdrawal fees at MoneyPass ATMs (out-of-network fees apply).
- Cash a Check: Venmo offers a “Cash a Check” feature that allows users to cash paper checks and have the funds loaded onto their Venmo balance. This service typically incurs a fee, usually a percentage of the check amount (e.g., 1% for payroll and government checks, 5% for all other checks), with specific minimums and maximums.
Understanding these fees allows users to make informed choices about how they fund their Venmo transactions and how they ultimately access their funds, optimizing for cost-efficiency.
Enhancing Financial Security During Transfers
Security is paramount when dealing with financial transactions. Venmo employs various measures, but users also play a crucial role in protecting their accounts and funds.
- Two-Factor Authentication (2FA): Enable 2FA on your Venmo account. This adds an extra layer of security, requiring a code from your phone in addition to your password when logging in from a new device.
- Strong, Unique Passwords: Use a strong, complex password that is unique to your Venmo account. Avoid easily guessable passwords and never reuse passwords across multiple services.
- Monitor Your Account: Regularly check your Venmo transaction history for any unauthorized activity. Set up notifications for transfers and payments.
- Secure Network: Only access Venmo and perform transfers on secure, trusted Wi-Fi networks. Avoid public or unsecured Wi-Fi hotspots when handling sensitive financial information.
- Phishing Scams: Be vigilant against phishing attempts. Venmo will never ask for your password or personal information via unsolicited emails or texts. Always verify the sender and the legitimacy of links before clicking.
- Linked Accounts: Ensure your linked bank account and debit card are also secure. Regularly review statements from these accounts for any discrepancies.
- PIN/Touch ID/Face ID: Utilize your phone’s biometric security features (Touch ID or Face ID) or a PIN to protect access to the Venmo app itself.
- Privacy Settings: Manage your Venmo privacy settings to control who can see your transactions. While a social app, you can choose to make transactions private to enhance personal security.
By adhering to these security best practices, users can significantly reduce the risk of fraud and ensure their money transfers are conducted safely and confidently.
Best Practices and Strategic Financial Management with Venmo
Integrating Venmo effectively into your personal finance strategy goes beyond just knowing how to send and receive money. It involves mindful management, proactive troubleshooting, and understanding its place within your broader financial goals.
Reconciling Venmo Balances with Your Budget
A common pitfall for users of digital wallets is treating the balance as “play money” or forgetting to account for it in their overall budget. This can lead to an inaccurate picture of available funds and potential overspending.
- Treat Venmo as an Extension of Your Bank Account: Mentally (and practically) consider your Venmo balance as part of your available cash. When you receive money on Venmo, factor it into your income. When you spend from Venmo, log it as an expense.
- Regular Transfers: For many, the best practice is to regularly transfer any substantial Venmo balance to their main bank account. This consolidates funds and prevents money from sitting idly in a non-interest-earning account. Set a threshold (e.g., transfer anything over $50) or schedule weekly transfers.
- Categorize Venmo Transactions: If your budgeting app allows, categorize Venmo transactions appropriately (e.g., “Dining Out,” “Utilities Split”). If your main budgeting tool doesn’t directly integrate with Venmo, manually input these transactions.
- Avoid “Floating” Money: Don’t let money “float” in your Venmo account indefinitely. It’s often better to have your money in a primary bank account where it’s either earning interest or readily available for investment and essential expenses.
By actively reconciling your Venmo balance with your budget, you ensure that this convenient tool enhances, rather than complicates, your financial clarity.
Troubleshooting Common Transfer Issues
While Venmo transfers are generally smooth, issues can occasionally arise. Knowing how to troubleshoot them can save time and frustration.
- Transfer Not Arriving (Standard Transfer):
- Check the Timeline: Confirm that the 1-3 business day window has fully passed, remembering to exclude weekends and holidays.
- Verify Destination Account: Double-check that you selected the correct linked bank account.
- Bank Processing: Sometimes, it might be your bank’s side. Check your bank statement for pending deposits or contact your bank directly.
- Instant Transfer Delay:
- Bank Eligibility: Confirm your bank supports instant transfers (most do, but some smaller institutions might have limitations).
- Network Issues: Ensure you have a stable internet connection.
- Venmo Status: Check Venmo’s official status page for any service outages.
- Contact Venmo Support: If funds haven’t arrived within an hour, reach out to Venmo support.
- Failed Transfer:
- Insufficient Funds: Ensure your Venmo balance covers the transfer amount plus any instant transfer fees.
- Account Limits: Check if you’ve exceeded your daily or weekly transfer limits.
- Bank Account Issues: Verify your linked bank account details (routing and account number) are correct and that the account is active and in good standing. An outdated or closed bank account will cause transfers to fail.
- Security Holds: Occasionally, large or unusual transfers might trigger a security review, temporarily delaying or failing the transfer.
- Contacting Support: For persistent or complex issues, always reach out to Venmo’s customer support. Provide all relevant details, including transaction IDs, dates, and amounts.
Proactive troubleshooting, coupled with timely communication, can quickly resolve most transfer-related problems, ensuring your money reaches its intended destination.

Integrating Venmo into Your Broader Financial Strategy
Venmo, when used strategically, can be a powerful component of your overall financial ecosystem. It’s not just for splitting lunch; it can be integrated into how you manage income, expenses, and even savings.
- Micro-Budgeting and Expense Splitting: Use Venmo to accurately track and split shared expenses, making it easier to stick to group budgets.
- Side Hustle Income: If you have a small side hustle (e.g., freelancing, dog walking), Venmo can be an easy way for clients to pay you. Just remember to regularly transfer these earnings to your main bank account for proper tax reporting and financial planning.
- Emergency Fund Contribution: If you receive unexpected money on Venmo, consider instantly transferring a portion to your savings account to bolster your emergency fund.
- Cash Flow Management: For those who manage multiple small income streams, Venmo can act as a temporary holding area before funds are swept into a primary checking account, offering a clear view of incoming small payments.
- Reducing Cash Dependency: By facilitating quick digital payments, Venmo can reduce your reliance on carrying physical cash, which often leads to better expense tracking.
By viewing Venmo not as an isolated app but as an integral part of your financial toolkit, you can harness its convenience to better manage your cash flow, consolidate your funds, and ultimately align your digital transactions with your overarching financial goals. The ability to seamlessly move money from your Venmo balance to your bank account is a foundational element of this integrated approach, empowering you to maintain control and flexibility over your financial resources.
aViewFromTheCave is a participant in the Amazon Services LLC Associates Program, an affiliate advertising program designed to provide a means for sites to earn advertising fees by advertising and linking to Amazon.com. Amazon, the Amazon logo, AmazonSupply, and the AmazonSupply logo are trademarks of Amazon.com, Inc. or its affiliates. As an Amazon Associate we earn affiliate commissions from qualifying purchases.