In the rapidly evolving world of personal computing, the mantra “newer is always better” is often treated as gospel. For most components, keeping software up to date is essential for security and performance. However, when it comes to Graphics Processing Units (GPUs), specifically those from NVIDIA, the latest driver release isn’t always the optimal choice for every user. Whether you are dealing with a specific bug in a new release, performance regressions in a favorite game, or compatibility issues with professional creative software, knowing how to install older NVIDIA drivers is a crucial skill for any power user or gaming enthusiast.
This guide explores the technical nuances of driver management, providing a structured approach to reverting your system to a more stable environment.
Why You Might Need to Roll Back or Install Older NVIDIA Drivers
While NVIDIA’s “Game Ready” drivers are designed to provide day-one support for the latest titles, the complexity of modern operating systems and hardware configurations means that regressions are inevitable. Understanding the “why” behind driver rollbacks is the first step in effective troubleshooting.
Stability and Bug Mitigation in New Releases
Software development is an iterative process. Occasionally, a new driver version might introduce “flickering,” “TDR” (Timeout Detection and Recovery) errors, or system crashes that weren’t present in previous iterations. For users who prioritize system uptime—such as streamers or professionals—a stable older driver is often preferable to a feature-rich but unstable newer one.
Performance Regressions in Specific Software
It is a documented phenomenon in the tech world that certain driver updates can negatively impact the frame rates of older games or the rendering speeds of specific CAD and video editing software. This usually happens when optimizations for new architectures (like Ada Lovelace or Ampere) inadvertently cause inefficiencies on older architectures (like Pascal or Maxwell). Installing the specific driver version that was current during a game’s peak optimization period can often restore lost performance.
Legacy Hardware and OS Compatibility
As hardware ages, official support eventually moves into “Legacy” status. Sometimes, the final “mainstream” driver released for a card might be less stable than a version released six months prior. Additionally, users running older versions of Windows 10 or specialized Linux distributions may find that older drivers offer better handshake protocols with the OS kernel.
Locating and Downloading the Correct Older NVIDIA Driver
NVIDIA does not make older drivers immediately obvious on their primary download page, as they prefer users to stay on the latest version for security reasons. However, they maintain a comprehensive archive for those who know where to look.
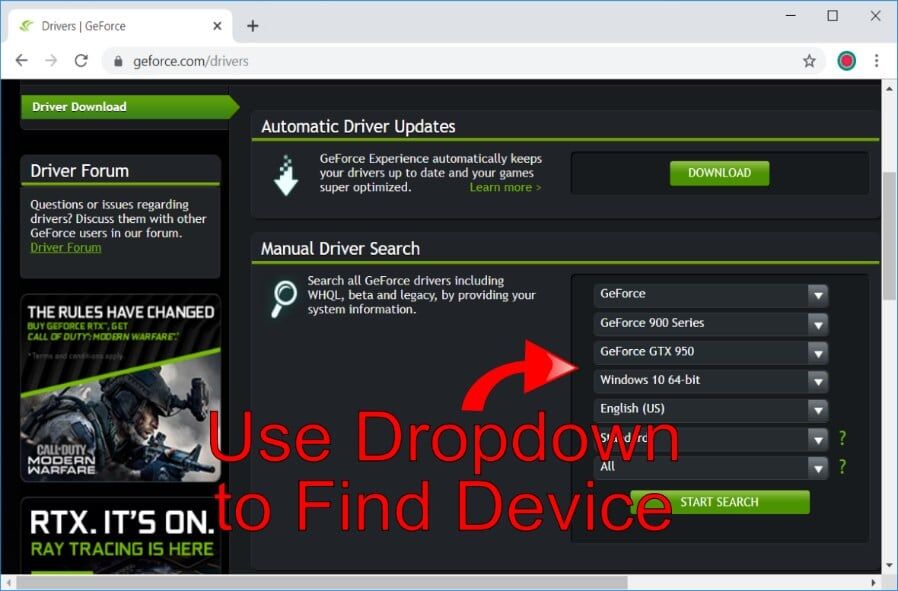
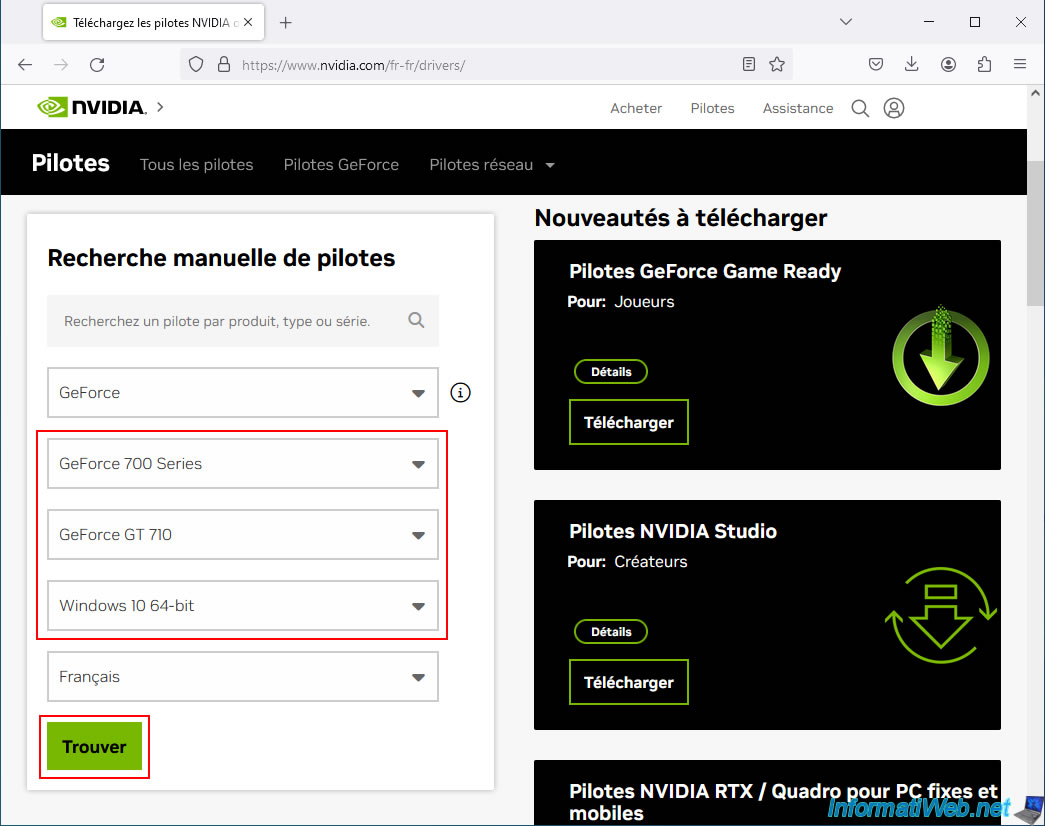
Navigating the NVIDIA Advanced Driver Search
To find older versions, you must bypass the standard “Drivers” tab and navigate to the Advanced Driver Search portal on NVIDIA’s official website. This tool allows you to filter results by product type, series, product name, operating system, and—most importantly—Windows Driver Type (Standard or DCH).
When using the advanced search, it is vital to select the correct “Language” and “Recommended/Beta” filters. For maximum stability, it is generally advised to stick to “Recommended” (WHQL) certified drivers rather than beta versions, unless a specific beta addresses a niche problem you are experiencing.
Identifying Your GPU Architecture
Before downloading, you must be certain of your GPU model. If you are unsure, you can right-click the Start button, select “Device Manager,” and expand the “Display adapters” section. Knowing whether your card belongs to the GTX 10-series (Pascal), RTX 20-series (Turing), or RTX 30/40-series (Ampere/Ada Lovelace) ensures you don’t download an incompatible package that will fail during the “Checking System Compatibility” phase of the installer.
Choosing Between Game Ready and Studio Drivers
NVIDIA offers two main branches: Game Ready Drivers (GRD) and NVIDIA Studio Drivers (SD). If your primary goal is gaming, the GRD archive is your best bet. However, if you use your PC for 3D modeling, video editing, or photography, the Studio Drivers are often a better choice for an “older” installation. Studio Drivers undergo more rigorous testing with creative applications and are released less frequently, often making them inherently more stable than their Game Ready counterparts.
Preparing Your System for a Clean Installation
Simply running an older installer over a newer one can lead to “driver cannibalization,” where files from different versions mix, leading to unpredictable system behavior. To ensure a successful rollback, a clean slate is required.
Why a Standard Uninstall Isn’t Enough
Using the “Uninstall a program” feature in the Windows Control Panel often leaves behind residual registry keys, DLL files, and temporary folders. These remnants can interfere with the older driver’s ability to communicate with the hardware. To achieve a truly clean installation, tech enthusiasts rely on specialized tools.
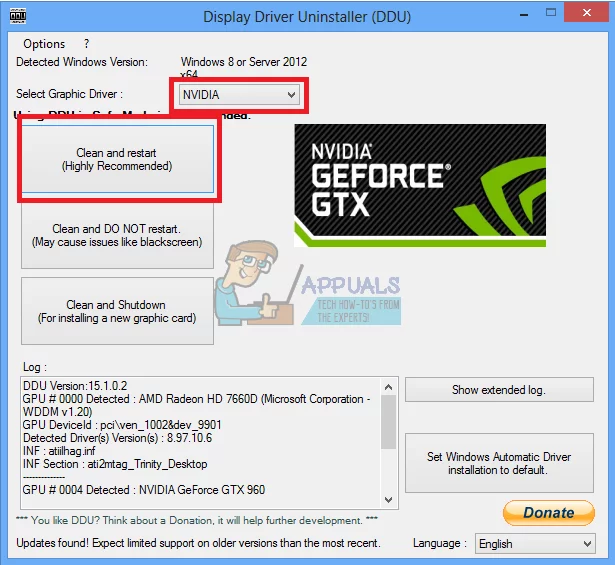
Using Display Driver Uninstaller (DDU)
Display Driver Uninstaller (DDU) is the industry-standard utility for removing graphics drivers. It is a lightweight program that scrubs every trace of NVIDIA, AMD, or Intel drivers from the system.
- Download DDU: Ensure you download it from a reputable source like Guru3D or the official Wagnardsoft site.
- Disconnect the Internet: This is a critical tech tip. If you are connected to the internet, Windows Update may automatically attempt to download and install a generic driver the moment you finish the uninstall process, thwarting your attempt to install a specific older version.
The Importance of Safe Mode
For DDU to work effectively, it should be run in Windows Safe Mode. Safe Mode loads the OS with a minimal set of drivers, ensuring that the NVIDIA driver files are not “in use” by the system. If the files are locked by the OS, DDU cannot delete them. By running the clean-up in Safe Mode, you ensure that the registry entries and system files are fully accessible for removal.
Step-by-Step Installation Guide
Once your system is cleaned and you have the desired older driver executable (.exe) ready on your desktop, you can proceed with the installation.
Running the Installer as Administrator
Right-click the downloaded NVIDIA installer and select “Run as Administrator.” The package will first extract its contents to a temporary folder (usually C:NVIDIA). After extraction, the installer will perform a system compatibility check. If you have selected the correct driver for your GPU and OS version, it will proceed to the “License Agreement.”
Custom Installation vs. Express
Never choose “Express” when installing an older driver. Always select “Custom (Advanced)” and click Next. This gives you granular control over what gets installed.
- The “Perform a Clean Installation” Box: Even if you used DDU, checking this box provides an extra layer of insurance by resetting all NVIDIA profiles to factory defaults.
- Component Selection: If you do not use a controller with built-in audio or don’t need “GeForce Experience,” you can uncheck those components here to keep your system lean and minimize potential conflict points.
Disabling Automatic Windows Driver Updates
A common frustration in the tech community is “driver overwriting.” You might successfully install an older, stable driver only to have Windows Update replace it with a newer version an hour later. To prevent this:
- Open the System window (Win + Pause/Break).
- Click on Advanced system settings.
- Go to the Hardware tab and click Device Installation Settings.
- Select “No (your device might not work as expected)” and save changes.
This prevents Windows from automatically searching for hardware drivers, leaving you in full control of your GPU software.
Troubleshooting and Post-Installation Tips
After the installation finishes, your screen may flicker or momentarily go black; this is normal as the OS hands over control to the newly installed driver. However, there are a few final steps to ensure everything is functioning correctly.
Verifying the Version Number
Once the system restarts, you should verify that the correct version is active. Right-click on your desktop and open the NVIDIA Control Panel. Click on “System Information” in the bottom left corner. The “Driver version” listed should match the version number of the older driver you downloaded. Alternatively, you can use a tool like GPU-Z for a detailed technical readout of your driver and BIOS information.
What to do if the Screen Goes Black
In rare cases, an older driver might not support a specific display protocol (like a high-refresh-rate DisplayPort setting). If your screen remains black after installation, don’t panic. Boot back into Safe Mode (which uses a generic VGA driver) and use DDU again. You may need to try a version that is slightly “less old” or check if your monitor’s firmware requires a more modern driver handshake.
Balancing Security with Older Software
From a digital security perspective, it is important to remember that driver updates often include patches for vulnerabilities. While installing an older driver is a great troubleshooting step or a solution for specific compatibility issues, you should always keep an eye on NVIDIA’s security bulletins. If you are using an older driver, ensure your other security layers—like your firewall and antivirus—are robust, as you may be missing out on GPU-level security mitigations.
By following this technical roadmap, you can regain control over your hardware’s performance and stability. Reverting to an older NVIDIA driver is not a step backward; rather, it is a strategic move to ensure that your technology serves your specific needs, rather than the other way around.
aViewFromTheCave is a participant in the Amazon Services LLC Associates Program, an affiliate advertising program designed to provide a means for sites to earn advertising fees by advertising and linking to Amazon.com. Amazon, the Amazon logo, AmazonSupply, and the AmazonSupply logo are trademarks of Amazon.com, Inc. or its affiliates. As an Amazon Associate we earn affiliate commissions from qualifying purchases.