
In today’s rapidly evolving technological landscape, the smart home is no longer a futuristic concept but a tangible reality for millions. At the forefront of this revolution is Google Nest, a suite of intelligent devices designed to enhance convenience, security, and efficiency within your living space. Whether you’re looking to automate your lighting, monitor your home remotely, or simply enjoy the ease of voice control, understanding how to install Google Nest devices is the crucial first step. This comprehensive guide will walk you through the process, demystifying the installation of various Google Nest products and integrating them seamlessly into your connected ecosystem.

The allure of a smart home lies in its ability to simplify everyday tasks and provide a greater sense of control. From adjusting your thermostat with a voice command to receiving instant alerts when motion is detected at your doorstep, Google Nest devices offer a spectrum of functionalities that can transform your home into an intelligent hub. However, the initial setup can sometimes seem daunting, especially for those new to smart home technology. Fear not, as Google has meticulously designed its Nest devices with user-friendliness in mind, ensuring that installation is an accessible process for individuals with varying levels of technical expertise.
Our journey into Google Nest installation will be structured to provide clarity and confidence. We will begin by establishing the foundational requirements for a successful setup, ensuring you have everything you need before diving into the physical installation. Subsequently, we will delve into the specific installation procedures for some of the most popular Google Nest devices, offering step-by-step guidance. Finally, we will touch upon best practices for optimizing your Nest devices and troubleshooting common issues, empowering you to make the most of your smart home investment.
Preparing for Your Google Nest Installation: The Essential Foundation
Before you can begin the exciting process of bringing your home to life with Google Nest devices, a little preparation goes a long way. This phase is crucial for a smooth and frustration-free installation, ensuring that your devices are set up correctly and function optimally from the get-go. Think of it as laying the groundwork for a robust and reliable smart home experience.
Essential Prerequisites for Smart Home Integration
The primary requirement for any Google Nest device is a stable and reliable Wi-Fi network. Without a strong internet connection, your smart devices will be unable to communicate with the Google Home app, cloud services, and each other. Ensure that your Wi-Fi router is positioned in a central location within your home and that the signal strength is adequate in the areas where you plan to install your Nest devices. If you experience dead zones or weak signals, consider investing in a Wi-Fi extender or a mesh Wi-Fi system to bolster your network coverage.
Beyond Wi-Fi, a smartphone or tablet running the latest version of the Google Home app is indispensable. This app serves as your central command center for all Google Nest devices. It’s where you’ll guide the setup process, customize device settings, create routines, and manage your smart home ecosystem. Make sure your mobile device is connected to the same Wi-Fi network you intend to use for your Nest devices during the installation process.
Power sources are, of course, a fundamental necessity. Most Google Nest devices are powered via an AC adapter that plugs into a standard wall outlet. Ensure that the intended installation locations have accessible power outlets. For devices like the Nest Doorbell, which may require direct wiring, consult the specific product manual to determine compatibility with your existing doorbell wiring. In some cases, professional electrical work might be necessary for a seamless and safe installation.
Finally, consider your existing home infrastructure. For instance, if you’re installing a Nest Thermostat, it’s beneficial to have a basic understanding of your home’s HVAC system. While the Nest Thermostat is designed to be compatible with most systems, knowing the type of wiring your current thermostat uses (e.g., 24V AC system) can help identify potential compatibility issues beforehand. Similarly, for security devices like Nest Cams, identify optimal mounting locations that provide the desired field of view and are within reach of a power source.
Understanding Your Google Account and the Google Home App
Your Google Account is the digital passport to the entire Google ecosystem, and it’s no different for your smart home. All your Nest devices will be linked to this account, allowing for centralized management and personalized experiences. Ensure you have a Google Account and that you are logged in on your mobile device.
The Google Home app is the intuitive interface that bridges the gap between you and your Nest devices. Download it from the Google Play Store (for Android) or the Apple App Store (for iOS). Once installed, open the app and follow the on-screen prompts to sign in with your Google Account. The app will then guide you through the process of adding new devices. It’s designed to be remarkably user-friendly, employing clear instructions, visual cues, and even animated guides for certain installations. Familiarize yourself with the app’s layout before you begin; understanding where to find the “Add device” option and how to navigate through different settings will significantly streamline the installation process.
Installing Popular Google Nest Devices: Step-by-Step Guidance
With your preparatory steps complete, it’s time to get hands-on and install some of the most popular Google Nest devices. Each device has its unique installation process, but the overarching principle is to leverage the Google Home app for guided setup.
Installing the Nest Thermostat: Smart Temperature Control
The Nest Thermostat revolutionized home climate control by learning your preferences and automatically adjusting the temperature to save energy and enhance comfort.
Wired Installation: The Traditional Approach
- Safety First: Turn Off Power: Before touching any wiring, always turn off the power to your HVAC system at the circuit breaker. This is a critical safety step.
- Remove Old Thermostat: Gently remove the faceplate of your old thermostat. Take a clear picture of the existing wiring connections before disconnecting any wires. This photo will serve as a crucial reference.
- Label Wires: Use the included labels to mark each wire according to its terminal connection on your old thermostat.
- Disconnect and Remove Base: Disconnect the wires from the terminals and remove the old thermostat’s base from the wall.
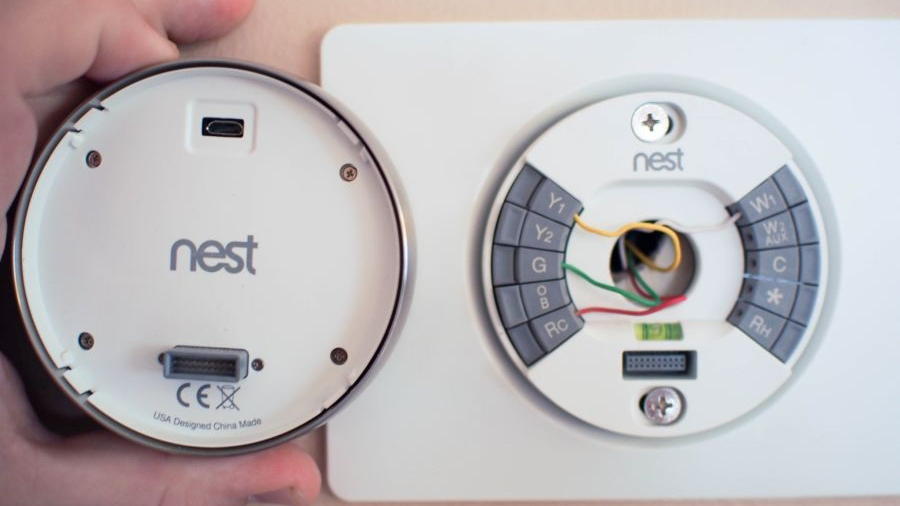
- Install Nest Base: Thread the wires through the center of the Nest base. Secure the Nest base to the wall using the provided screws and wall anchors. Ensure it’s level.
- Connect Wires: Refer to the picture you took and the labels. Connect each wire to the corresponding terminal on the Nest base. The Nest app will guide you through the specific terminal assignments for your system.
- Attach Nest Display: Once the wiring is secure, snap the Nest display onto the base.
- Restore Power: Turn the power back on to your HVAC system at the circuit breaker.
- App Setup: Open the Google Home app, tap the “+” icon, and select “Set up device” > “New device.” The app will detect your Nest Thermostat and guide you through connecting it to your Wi-Fi, configuring your HVAC system, and personalizing your temperature settings.
Battery-Powered or Remote Sensor Installation (for specific models)
Some Nest Thermostat models might offer battery-powered operation or the ability to use remote sensors for more nuanced temperature control in different rooms. The installation for these is typically simpler, often involving pairing the device with your existing Nest Thermostat through the Google Home app, following the app’s instructions for sensor placement and connection.
Installing Nest Cams: Home Security at Your Fingertips
Nest Cams provide a vigilant eye on your home, offering real-time video monitoring and motion alerts.
Indoor Nest Cam Installation
- Choose Location: Select a location that offers a good view of the area you want to monitor. Ensure it’s within reach of a power outlet.
- Mounting: Most indoor Nest Cams come with a magnetic base or a mount that can be screwed into a wall or ceiling. Use the provided template if applicable to mark screw holes.
- Power Up: Plug in the power adapter for your Nest Cam.
- App Setup: Open the Google Home app, tap the “+” icon, and select “Set up device” > “New device.” The app will guide you through connecting the camera to your Wi-Fi network, naming it, and configuring your notification preferences.
Outdoor Nest Cam Installation
- Choose Location: Identify a suitable outdoor location, considering the desired field of view and proximity to a power source. If your Nest Cam is wired, ensure it aligns with existing doorbell wiring or is near an exterior power outlet. Battery-powered models offer more flexibility.
- Mounting: Outdoor Nest Cams often come with weather-resistant mounts that require screwing into the exterior of your home. Use the included screws and wall anchors. For wired cameras, follow the instructions for connecting to your existing doorbell or a dedicated power source, ensuring all connections are weatherproof.
- Power Up: Connect the power adapter. For battery-powered models, ensure the battery is fully charged before installation.
- App Setup: Similar to the indoor camera, use the Google Home app to connect the outdoor camera to your Wi-Fi, name it, and set up your security preferences. The app will guide you through aligning the camera’s view and configuring motion detection zones.
Installing the Nest Doorbell: Welcoming Guests and Enhancing Security
The Nest Doorbell offers a smart way to see, hear, and speak to anyone at your door from anywhere.
Wired Nest Doorbell Installation
- Safety First: Turn Off Power: Crucially, turn off power to your existing doorbell at the circuit breaker.
- Remove Old Doorbell: Unscrew and remove your old doorbell button. Disconnect the wires from the back.
- Install Nest Doorbell Mount: Feed the existing doorbell wires through the center of the Nest Doorbell mounting plate. Secure the plate to your doorframe or wall using the provided screws.
- Connect Wires: Connect the wires to the terminals on the back of the Nest Doorbell. The Google Home app will provide specific guidance on terminal connections.
- Attach Nest Doorbell: Snap the Nest Doorbell onto the mounting plate.
- Restore Power: Turn the power back on to your doorbell at the circuit breaker.
- App Setup: Open the Google Home app, tap the “+” icon, and select “Set up device” > “New device.” Follow the app’s instructions to connect the Nest Doorbell to your Wi-Fi, configure chime settings, and personalize your alerts.
Battery-Powered Nest Doorbell Installation
- Charge Battery: Ensure the battery in your Nest Doorbell is fully charged.
- Mounting: Attach the mounting plate to your doorframe or wall using the provided screws.
- Attach Nest Doorbell: Snap the Nest Doorbell onto the mounting plate.
- App Setup: Open the Google Home app and follow the guided setup process to connect the doorbell to your Wi-Fi, name it, and configure its settings.
Optimizing Your Google Nest Ecosystem and Troubleshooting Common Issues
Once your Google Nest devices are installed and connected, the real magic of a smart home begins. Optimizing their performance and knowing how to address common hiccups will ensure a seamless and enjoyable experience.
Creating Routines and Automations for Enhanced Convenience
The Google Home app allows you to create “Routines,” which are custom commands that trigger multiple actions with a single voice command or at a scheduled time. For example, you could create a “Good Morning” routine that turns on your lights, adjusts your Nest Thermostat to a comfortable temperature, and reads you the day’s weather forecast. Similarly, a “Goodnight” routine could dim your lights, lock your doors (if you have a compatible smart lock), and set your thermostat for sleep.
Explore the “Routines” section within the Google Home app to set up custom triggers based on time, voice commands, or even the presence of certain devices. This is where you truly unlock the potential of your interconnected smart home, making everyday life more efficient and convenient. Experiment with different combinations to find what works best for your lifestyle.
Managing Device Settings and Customizing Your Smart Home
Each Nest device offers a range of customizable settings within the Google Home app. For your Nest Thermostat, you can fine-tune temperature schedules, energy-saving preferences, and even set up eco-temps when you’re away. Nest Cams allow you to adjust motion sensitivity, create specific detection zones to avoid false alerts, and choose the video quality. The Nest Doorbell lets you customize chime types, motion alert sensitivity, and even pre-set quick responses for when you can’t answer the door immediately.
Regularly review these settings to ensure your devices are functioning as intended and meeting your specific needs. The app provides a centralized dashboard for managing all your Nest devices, making it easy to monitor their status and update their configurations.

Troubleshooting Common Installation and Connectivity Issues
While Google Nest devices are designed for ease of use, occasional issues can arise. The most common problems typically relate to Wi-Fi connectivity.
- No Wi-Fi Connection: Ensure your Wi-Fi network is functioning correctly and that the password entered in the Google Home app is accurate. Try rebooting your router and modem. If the issue persists, move your Nest device closer to the router or consider a Wi-Fi extender.
- Device Not Detected by App: Make sure your smartphone or tablet is connected to the same Wi-Fi network as the Nest device you are trying to install. Try restarting the Google Home app and the Nest device itself.
- Intermittent Connectivity: This can often be a sign of a weak Wi-Fi signal. Check the signal strength in the area where the device is located. Reduce interference by moving the device away from other electronics.
- Thermostat Not Working Properly: Double-check that the power to your HVAC system is restored and that the wiring connections to the Nest Thermostat are secure and correctly matched. Refer to the Nest Thermostat compatibility checker on Google’s website if you suspect an issue with your HVAC system.
For more persistent issues, Google’s support website offers extensive troubleshooting guides, FAQs, and community forums where you can find solutions or ask for help. Remember to have your device model and any error messages readily available when seeking support.
In conclusion, installing Google Nest devices is an achievable and rewarding endeavor that opens the door to a more connected and intelligent home. By carefully preparing your environment, following the step-by-step guidance for each device, and understanding how to optimize and troubleshoot your setup, you can confidently build a smart home that enhances your comfort, security, and overall quality of life. The journey into smart home technology with Google Nest is one of continuous learning and customization, offering a dynamic platform that evolves with your needs.
aViewFromTheCave is a participant in the Amazon Services LLC Associates Program, an affiliate advertising program designed to provide a means for sites to earn advertising fees by advertising and linking to Amazon.com. Amazon, the Amazon logo, AmazonSupply, and the AmazonSupply logo are trademarks of Amazon.com, Inc. or its affiliates. As an Amazon Associate we earn affiliate commissions from qualifying purchases.