CUDA, NVIDIA’s parallel computing platform and application programming interface (API) model, has revolutionized the landscape of high-performance computing. From accelerating complex scientific simulations and machine learning model training to powering demanding graphical applications, CUDA enables developers to harness the immense power of NVIDIA GPUs for general-purpose computing. This guide will walk you through the intricate process of installing CUDA, ensuring you have a smooth and successful setup, whether you’re a seasoned developer diving into deep learning or a tech enthusiast looking to optimize your system for demanding tasks.
The decision to install CUDA often stems from a need to leverage GPU acceleration for computationally intensive workloads. In the realm of technology, particularly with the rapid advancements in Artificial Intelligence and Machine Learning, CUDA has become almost indispensable. It’s the bedrock upon which many cutting-edge AI tools and applications are built. Understanding how to install and configure it correctly is the first crucial step in unlocking this powerful capability.
While the “Tech” category of our website broadly covers software, AI tools, and tutorials, the installation of CUDA touches upon several aspects. It’s a technical process that requires attention to detail, akin to setting up a new software application but with a deeper understanding of hardware compatibility and driver dependencies. It also indirectly relates to “Money” if you consider that efficient GPU computation can lead to faster model development, quicker analysis of data, and potentially reduced cloud computing costs. For businesses, efficient use of CUDA can translate into a competitive edge and faster time-to-market for AI-driven products.
Prerequisites for a Successful CUDA Installation
Before embarking on the installation journey, it’s essential to ensure your system is adequately prepared. This foundational step will prevent common pitfalls and ensure a seamless experience.
Hardware Compatibility: The NVIDIA GPU is Key
The most critical prerequisite for CUDA is having an NVIDIA-manufactured Graphics Processing Unit (GPU). CUDA is proprietary to NVIDIA and will not function with GPUs from other manufacturers like AMD or Intel.
- Check Your GPU Model: The first step is to identify the specific NVIDIA GPU model you have installed in your system. You can typically find this information in your operating system’s device manager or system information tools. For Windows, this is usually under “Display adapters” in Device Manager. On Linux, you can use commands like
lspci | grep -i nvidiaornvidia-smi. - CUDA Compute Capability: Different NVIDIA GPUs have varying levels of support for CUDA features, determined by their “Compute Capability.” Newer GPUs generally have higher compute capabilities, offering more advanced features and better performance. While most modern NVIDIA GPUs support CUDA, it’s good to be aware of your GPU’s compute capability, especially if you’re working with older hardware or specific software that requires a minimum compute capability. You can find a comprehensive list of NVIDIA GPUs and their compute capabilities on the official NVIDIA CUDA documentation website.
Software Environment: Drivers and Operating System
Beyond the hardware, your software environment plays a pivotal role. A clean and compatible software setup is crucial.
- NVIDIA Graphics Drivers: CUDA requires specific NVIDIA graphics drivers to be installed. These drivers are the interface between your operating system and your GPU. It’s paramount to install drivers that are compatible with the CUDA Toolkit version you intend to install. Often, the CUDA Toolkit installer will prompt you to install drivers, but it’s generally a good practice to download the latest stable drivers directly from the NVIDIA website beforehand.
- Version Compatibility: Pay close attention to the driver version recommended by the CUDA Toolkit release notes. Installing a driver that is too old or too new can lead to conflicts and prevent CUDA from functioning correctly.
- Clean Installation: When installing new drivers, it’s often recommended to perform a “clean installation.” This option removes any previous driver files and configurations, preventing potential conflicts.
- Operating System Support: CUDA Toolkits are released with support for specific versions of Windows, Linux distributions (like Ubuntu, CentOS, Fedora), and macOS. Ensure your operating system version is listed as supported by the CUDA Toolkit version you plan to download. You can find this information in the CUDA Toolkit release notes.
- Compiler Compatibility: CUDA code is typically compiled using the NVIDIA NVCC compiler, which often relies on a host compiler (like GCC on Linux or MSVC on Windows) to pre-process and compile parts of the code. Ensure you have a compatible version of your host compiler installed. The CUDA Toolkit release notes will specify the supported compiler versions. For instance, if the CUDA Toolkit requires GCC 9.x, installing GCC 10.x might cause issues.
System Resources: Disk Space and Memory
While not as critical as hardware and driver compatibility, ensuring sufficient system resources will make the installation process smoother.
- Disk Space: The CUDA Toolkit can be quite large, often several gigabytes. Ensure you have ample free disk space on the drive where you intend to install it.
- RAM: While CUDA primarily utilizes GPU memory (VRAM), having sufficient system RAM is important for the overall operation of your system, especially when running complex applications that leverage CUDA.
The Installation Process: Step-by-Step Guide
With your system prepped, let’s move on to the actual installation of the CUDA Toolkit. The process can vary slightly depending on your operating system, but the core steps remain consistent.
Downloading the CUDA Toolkit
The first step is to download the correct CUDA Toolkit installer from the official NVIDIA developer website.
- Visit the NVIDIA CUDA Toolkit Archive: Navigate to the NVIDIA CUDA Toolkit Archive. This page hosts previous versions of the toolkit, which is often necessary for compatibility with specific software libraries or frameworks.
- Select Your Desired Version: Choose the CUDA Toolkit version that best suits your needs. If you’re starting with a new project and have no specific dependencies, the latest stable release is usually a good choice. However, if you’re following a tutorial or using a library that specifies a particular CUDA version (e.g., CUDA 11.x or CUDA 10.2), select that version.
- Choose Your Operating System and Architecture: On the selected version’s page, you’ll need to specify your operating system (Windows, Linux, macOS), your OS version, and your system architecture (e.g., x86_64).
- Select Installation Type: NVIDIA typically offers several installation options:
- Network Installer: Downloads necessary components during the installation process. This is smaller to download initially but requires an internet connection throughout.
- Local Installer (Debian/RPM/exe): Downloads all necessary components in a single package. This is larger to download but allows for offline installation.
- Runtime vs. Development: You might see options for just the runtime libraries (needed to run CUDA applications) or the full development toolkit (including compilers, libraries, and samples, needed to develop CUDA applications). For most users who plan to develop or experiment, the full development toolkit is recommended.
- Download the Installer: Click the download button for your chosen installation type.
Installing the CUDA Toolkit
Once you have the installer downloaded, proceed with the installation.
For Windows Users:
- Run the Installer: Double-click the downloaded
.exefile. You may need administrator privileges. - License Agreement: Accept the NVIDIA software license agreement.
- Installation Options: You’ll be presented with installation options.
- Express Installation: This is the simplest option, installing the CUDA Toolkit with default settings. It will often try to install or update your NVIDIA drivers as well.
- Custom Installation: This option allows you to choose which components to install. It’s recommended to select “Custom” if you already have the desired NVIDIA drivers installed and want to avoid overwriting them, or if you want to install specific components like the samples.
- Component Selection (Custom): If you choose Custom, you’ll see a list of components. Ensure “CUDA” is checked. You can choose whether to install the Visual Studio Integration (if you use Visual Studio), the Nsight development tools, and importantly, decide whether to install the new drivers or use your existing ones. If you have already installed compatible drivers, it’s often safer to deselect the driver installation option.
- Installation Directory: Choose the installation directory. The default location is usually fine.
- Begin Installation: Click “Next” or “Install” to begin the installation. This process can take some time.
- Completion: Once finished, you’ll receive a completion message.
For Linux Users:
Linux installations often involve using the terminal. The exact commands can vary slightly based on the installer type (.run, .deb, .rpm). We’ll focus on the .run file, which is a common and versatile method.
- Open a Terminal: Navigate to the directory where you downloaded the CUDA Toolkit installer (
.runfile). - Grant Execution Permissions: Make the installer executable:
bash

chmod +x cuda_<version>_<os>_<arch>.run
(Replace<version>,<os>,<arch>with your specific file name.) - Run the Installer: Execute the installer:
bash

sudo ./cuda_<version>_<os>_<arch>.run
(You’ll be prompted for your administrator password.) - License Agreement: Accept the license agreement by typing
accept. - Installation Options: The installer will present several prompts:
- Driver Installation: It will ask if you want to install the NVIDIA driver. If you have already installed compatible drivers, it’s generally recommended to answer ‘no’ here to avoid conflicts. If you haven’t installed drivers, or are unsure, you can let it install them.
- CUDA Toolkit: You’ll be prompted to install the CUDA Toolkit. Answer ‘yes’.
- CUDA Samples: Installing the samples is highly recommended as they provide excellent examples of how to use CUDA and can be used to verify your installation. Answer ‘yes’.
- Other Components: You might be asked about installing other components like Nsight.
- Installation Paths: Confirm the installation paths for the toolkit and samples.
- Continue Installation: The installation will proceed.
Post-Installation Configuration
After the main installation is complete, some crucial post-installation steps ensure CUDA is accessible from your command line and development environments.
Setting Environment Variables
For both Windows and Linux, you need to configure environment variables so that your system can find the CUDA executables and libraries.
- Windows:
- The CUDA installer usually adds the necessary paths to your system’s
PATHenvironment variable automatically. You can verify this by opening a Command Prompt or PowerShell and typingnvcc --version. If it shows the CUDA compiler version, thePATHis likely set correctly. - If it doesn’t work, you can manually add the CUDA
bindirectory to yourPATH. Go to “System Properties” -> “Advanced” -> “Environment Variables,” and edit thePathvariable for both your user and the system. Add the path to your CUDAbindirectory (e.g.,C:Program FilesNVIDIA GPU Computing ToolkitCUDAv11.8bin).
- The CUDA installer usually adds the necessary paths to your system’s
- Linux:
- You typically need to add CUDA’s
binandlib64directories to yourPATHandLD_LIBRARY_PATHrespectively. Open your shell’s configuration file (e.g.,~/.bashrc,~/.zshrc) and add the following lines:
bash

export PATH=/usr/local/cuda-<version>/bin${PATH:+:${PATH}}

export LD_LIBRARY_PATH=/usr/local/cuda-<version>/lib64${LD_LIBRARY_PATH:+:${LD_LIBRARY_PATH}}
Replace<version>with your CUDA version (e.g.,v11.8). - After saving the file, either close and reopen your terminal or run
source ~/.bashrc(or your respective shell configuration file) to apply the changes.
- You typically need to add CUDA’s
Verifying the Installation
A successful installation is confirmed by being able to compile and run CUDA programs.
-
Check CUDA Compiler Version: Open a terminal or command prompt and run:
nvcc --versionThis command should output the CUDA compiler version, indicating that
nvccis recognized. -
Compile and Run CUDA Samples: If you installed the CUDA samples, navigate to the samples directory. For example, on Linux, this might be
/usr/local/cuda/samples.- Navigate to a Sample: Go into one of the sample directories, e.g.,
cd /usr/local/cuda/samples/1_Utilities/deviceQuery. - Compile the Sample:
- Linux: Use
make. - Windows: Open the Visual Studio solution file for the sample and build it.
- Linux: Use
- Run the Sample: Execute the compiled program (e.g.,
./deviceQueryon Linux, or run from the build directory on Windows).
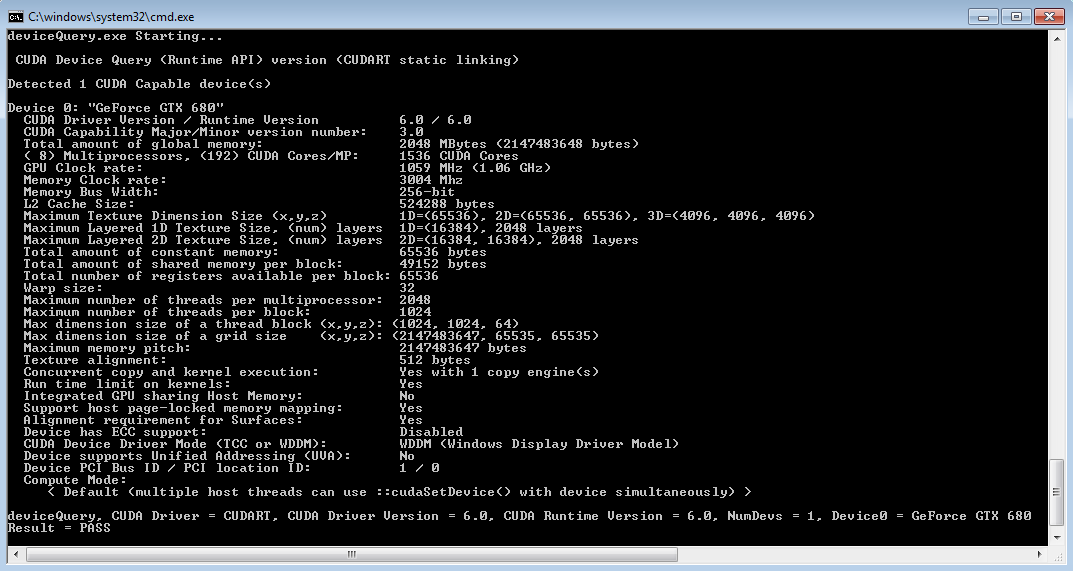
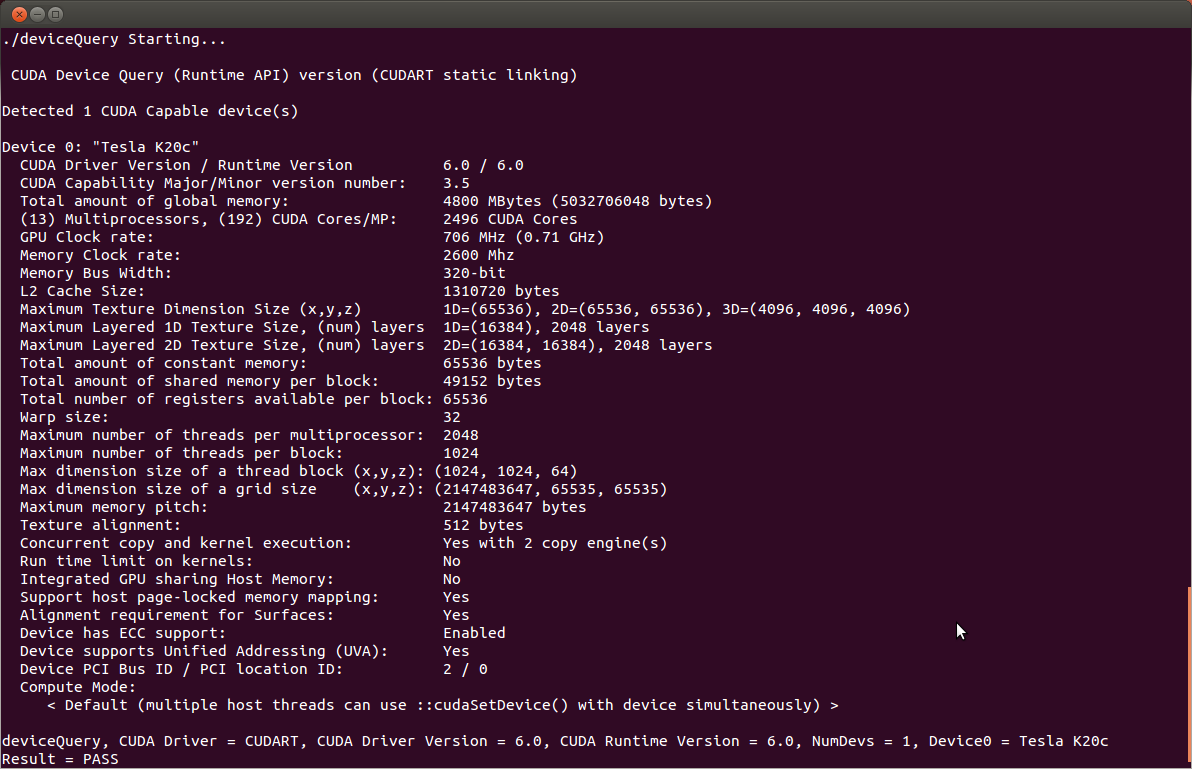
The
deviceQuerysample is a fundamental test. If it runs successfully, it will list your NVIDIA GPU(s) and their CUDA capabilities. IfdeviceQueryfails with errors related to CUDA drivers or libraries, it indicates a problem with your installation or driver setup. - Navigate to a Sample: Go into one of the sample directories, e.g.,
Troubleshooting Common Installation Issues
Even with careful preparation, installation issues can arise. Here are some common problems and their solutions.
Driver Conflicts
- Issue: CUDA installation fails, or applications crash after installation, reporting driver errors.
- Solution: This is often due to incompatible or conflicting NVIDIA drivers. Ensure you have installed the exact driver version recommended by the CUDA Toolkit release notes. Perform a clean installation of the drivers using the NVIDIA driver installer’s “clean installation” option. On Linux, sometimes older drivers need to be purged before installing new ones.
Compiler Not Found
- Issue:
nvcccommand is not recognized, or compilation fails with errors indicating the host compiler is not found. - Solution: Verify that your host compiler (GCC, MSVC) is installed and that its
bindirectory is correctly added to your system’sPATHenvironment variable. Double-check the CUDA Toolkit release notes for the exact supported compiler versions.
CUDA Runtime Errors
- Issue: Applications compile successfully but crash at runtime with CUDA errors (e.g., “CUDA error: invalid device function”).
- Solution: This can indicate that the CUDA Toolkit version is incompatible with your GPU’s compute capability, or that the incorrect CUDA libraries are being linked. Ensure your GPU supports the CUDA version you’ve installed, and that your development environment is configured to use the correct CUDA Toolkit installation.
Permission Denied Errors (Linux)
- Issue: You encounter “Permission denied” errors when trying to execute the installer or compiled samples.
- Solution: Ensure you are running commands with
sudowhen necessary (for installing the toolkit and running system-level operations). For running samples, ensure your user has execute permissions on the compiled binaries.
Multiple CUDA Versions
- Issue: You need to work with different projects that require different CUDA versions.
- Solution: While it’s possible to install multiple CUDA versions side-by-side, managing them requires careful attention to environment variables. You’ll need to switch your
PATHandLD_LIBRARY_PATHto point to the desired CUDA installation’sbinandlib64directories before compiling or running applications specific to that version. Tools likecondaor virtual environments can also help manage CUDA dependencies for Python-based projects.
Conclusion: Unleashing GPU Power
Installing CUDA is a vital step for anyone looking to leverage the incredible parallel processing power of NVIDIA GPUs. By understanding the prerequisites, following the step-by-step installation process diligently, and being prepared to troubleshoot common issues, you can successfully set up your system for high-performance computing. Whether you’re pushing the boundaries of AI research, optimizing scientific simulations, or developing graphically intensive applications, a well-configured CUDA installation is your gateway to unlocking unprecedented computational capabilities. Remember to consult the official NVIDIA CUDA documentation for the most up-to-date information and specific release notes relevant to your chosen CUDA Toolkit version. Happy computing!
aViewFromTheCave is a participant in the Amazon Services LLC Associates Program, an affiliate advertising program designed to provide a means for sites to earn advertising fees by advertising and linking to Amazon.com. Amazon, the Amazon logo, AmazonSupply, and the AmazonSupply logo are trademarks of Amazon.com, Inc. or its affiliates. As an Amazon Associate we earn affiliate commissions from qualifying purchases.