In an era where our homes are becoming increasingly intelligent, the Nest Learning Thermostat stands out as a beacon of smart home innovation, seamlessly blending cutting-edge technology with practical energy management. Far more than just a device to control your heating and cooling, the Nest Learning Thermostat is an intuitive, AI-powered system designed to learn your preferences, optimize energy usage, and provide unparalleled comfort, all while potentially saving you a significant amount on your utility bills. This guide will walk you through the process of installing this revolutionary piece of technology, transforming your home into a more efficient, comfortable, and intelligent living space. Whether you’re a seasoned DIY enthusiast or new to home improvement projects, this step-by-step guide will demystify the installation process, ensuring a smooth transition from your traditional thermostat to the smart future of climate control. We’ll delve into the practicalities of installation, highlight the technological prowess embedded within the device, and touch upon the financial benefits that make this upgrade a truly wise investment for any modern homeowner.

The Smart Home Upgrade: Why Choose a Nest Learning Thermostat?
The decision to install a smart thermostat, particularly a Nest Learning Thermostat, goes beyond mere convenience; it’s a strategic embrace of modern technology to enhance your home’s efficiency and comfort. In a world increasingly focused on sustainability and digital integration, a device like the Nest Learning Thermostat represents a significant leap forward in residential climate control. It’s an investment that pays dividends not just in comfort, but also in your wallet and the environment. Understanding the multifaceted benefits of this device is crucial before embarking on the installation journey.
Unpacking the Benefits: Tech and Financial Smartness
At its core, the Nest Learning Thermostat is a marvel of Tech innovation. Unlike traditional thermostats that require manual adjustments or rigid programming, the Nest learns from your habits. Within a week of use, its sophisticated algorithms begin to understand when you prefer your home warmer or cooler, detecting patterns in your presence and preferences. This “learning” capability, powered by advanced AI, eliminates the need for complex programming, adapting seamlessly to your lifestyle. Features like Auto-Schedule, which creates a personalized temperature schedule, and Auto-Away, which uses built-in sensors and your phone’s location to know when you’re out and automatically turns down the heat or AC, are testaments to its intelligent design. Furthermore, the Nest thermostat integrates flawlessly with a broader Tech ecosystem, communicating with other smart home devices such as Google Assistant, Amazon Alexa, and various smart lighting systems, creating a truly interconnected living environment. Its sleek, minimalist Brand design also ensures it’s not just a utility, but an aesthetic enhancement to your home’s interior.
From a Money perspective, the Nest Learning Thermostat is an undisputed champion of energy savings. By intelligently managing your heating and cooling, it actively works to reduce your energy consumption. Nest’s own data and independent studies suggest that homeowners can save an average of 10-12% on heating and 15% on cooling costs annually. These savings aren’t just theoretical; the thermostat provides an Energy History feature accessible via the Nest app, allowing you to track your energy usage over time and understand the impact of your adjustments. This transparency empowers you to make more informed decisions about your energy consumption. Over the lifespan of the device, these cumulative savings can easily offset the initial purchase cost, making it a sound financial investment. Moreover, many utility companies offer rebates or incentives for installing smart thermostats, further sweetening the deal and accelerating your return on investment. It’s not just about spending less; it’s about smart spending that contributes to a more sustainable future.
Is Your Home Ready? Compatibility and Preparation
Before you begin the physical installation, it’s vital to ensure your home and existing HVAC system are compatible with the Nest Learning Thermostat. This preliminary check prevents potential frustrations and ensures a smooth installation process. The Nest Learning Thermostat is designed to work with most 24V heating and cooling systems, including gas, electric, forced air, heat pump, radiant, oil, hot water, and solar systems. However, systems that require specific high-voltage wiring, proprietary communication protocols, or have complex multi-zone setups might require professional installation or may not be directly compatible without additional accessories.
The best way to check compatibility is by using Nest’s online compatibility checker, typically found on Google Nest’s official website. You’ll be asked to input the letters on your current thermostat’s wiring, which will give you an immediate assessment. It’s also crucial to identify if your current setup uses a “C” wire (common wire). While the Nest Learning Thermostat can often operate without a C wire by ‘power sharing’ from other wires, a C wire provides continuous power, ensuring optimal performance and reliability, especially for systems with complex demands or Wi-Fi intensive usage. If your system lacks a C wire and you experience power issues post-installation, a Nest Power Connector or professional C-wire installation might be necessary.
Beyond compatibility, gather your tools:
- Screwdrivers: Philips and flathead.
- Wire Strippers: If your existing wires are frayed or too short.
- Pencil: For marking drill holes.
- Drill: With appropriate drill bits for wall anchors (if needed).
- Pliers: For bending wires.
- Small level: For ensuring the Nest base is straight.
- Camera: Your smartphone camera is essential for photographing your existing wiring.
Finally, prepare your workspace. Ensure good lighting, and clear any obstacles around your existing thermostat. This preparation stage is often overlooked but is fundamental for a hassle-free installation.
Step-by-Step Installation: From Old to Smart
The installation process for the Nest Learning Thermostat is remarkably user-friendly, designed with the average homeowner in mind. By following these steps carefully, you can confidently replace your old thermostat and usher in a new era of smart climate control. Remember to prioritize safety and take your time at each stage.
Safety First: Powering Down and Initial Assessment
The absolute first and most critical step in any electrical installation is to cut the power to your HVAC system. Locate your circuit breaker panel, usually in a utility closet, basement, or garage. Identify the breaker labeled for your furnace, air handler, or heating/cooling system and flip it to the “off” position. Do not rely solely on turning off your thermostat; you must ensure no power is flowing to the wiring. You can use a non-contact voltage tester to confirm the power is off at the thermostat wires before proceeding. This step is non-negotiable for your safety and to prevent damage to your HVAC system or the new Nest device.
With the power off, return to your old thermostat. Carefully remove its cover. This usually involves gently pulling it straight off or unlatching it. Once the cover is off, you’ll see the wiring connected to various terminals. This is where your smartphone camera becomes invaluable. Take a clear, well-lit photo of the wiring connections before you touch anything. This picture serves as your reference, especially if you encounter any confusion during the Nest installation or need to revert to the old setup. Note the letters on each terminal and the corresponding wire colors. This initial assessment helps you understand your system’s current configuration.
Disconnecting Your Old Thermostat
Once you have documented the wiring, it’s time to disconnect your old thermostat. Most thermostats have small buttons or screws that hold the wires in place. Use a small screwdriver to release each wire from its terminal. As you disconnect each wire, if possible, gently tape it to the wall so it doesn’t fall back into the wall cavity. Nest provides small, adhesive labels with common terminal names (R, G, Y, W, C, etc.). It’s highly recommended to label each wire with the corresponding letter from your old thermostat’s terminal as you disconnect it. This meticulous labeling is paramount for correct wiring of the Nest base. After all wires are disconnected, unscrew the old thermostat’s base plate from the wall and carefully remove it, making sure no wires slip back into the wall.
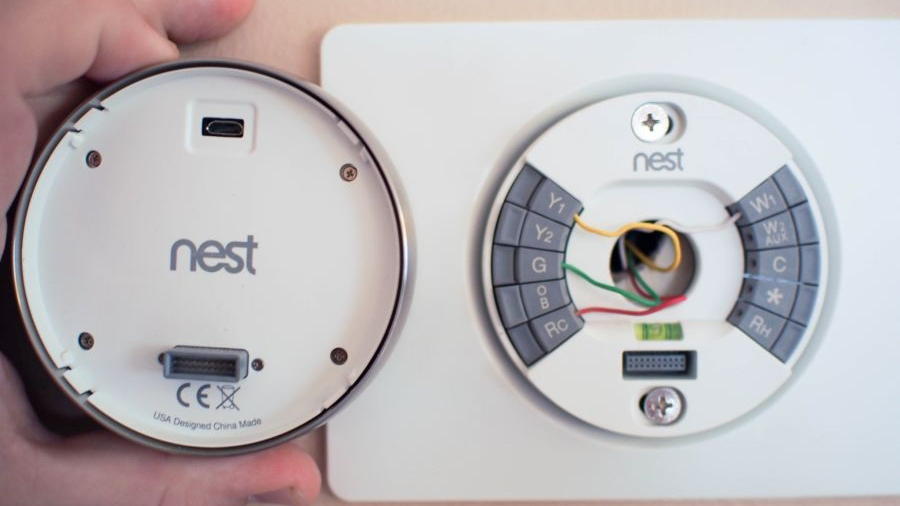
Mounting the Nest Base Plate
With the old thermostat removed, you’ll be left with a bundle of wires protruding from the wall. The Nest Learning Thermostat comes with a base plate and, often, an optional trim plate. The trim plate is useful if your old thermostat left a significant paint gap or unsightly holes, providing a cleaner look. If you use the trim plate, mount it first.
Next, hold the Nest base plate against the wall, feeding the wires through the central opening. Use a small level to ensure the base plate is perfectly straight. Mark the drill holes with a pencil. If your old thermostat holes align, you might be able to reuse them; otherwise, you’ll need to drill new holes. For drywall, insert the provided wall anchors before screwing the base plate in. Secure the Nest base plate firmly to the wall using the provided screws. Ensure it is snug and stable, as this is the foundation for your new smart thermostat.
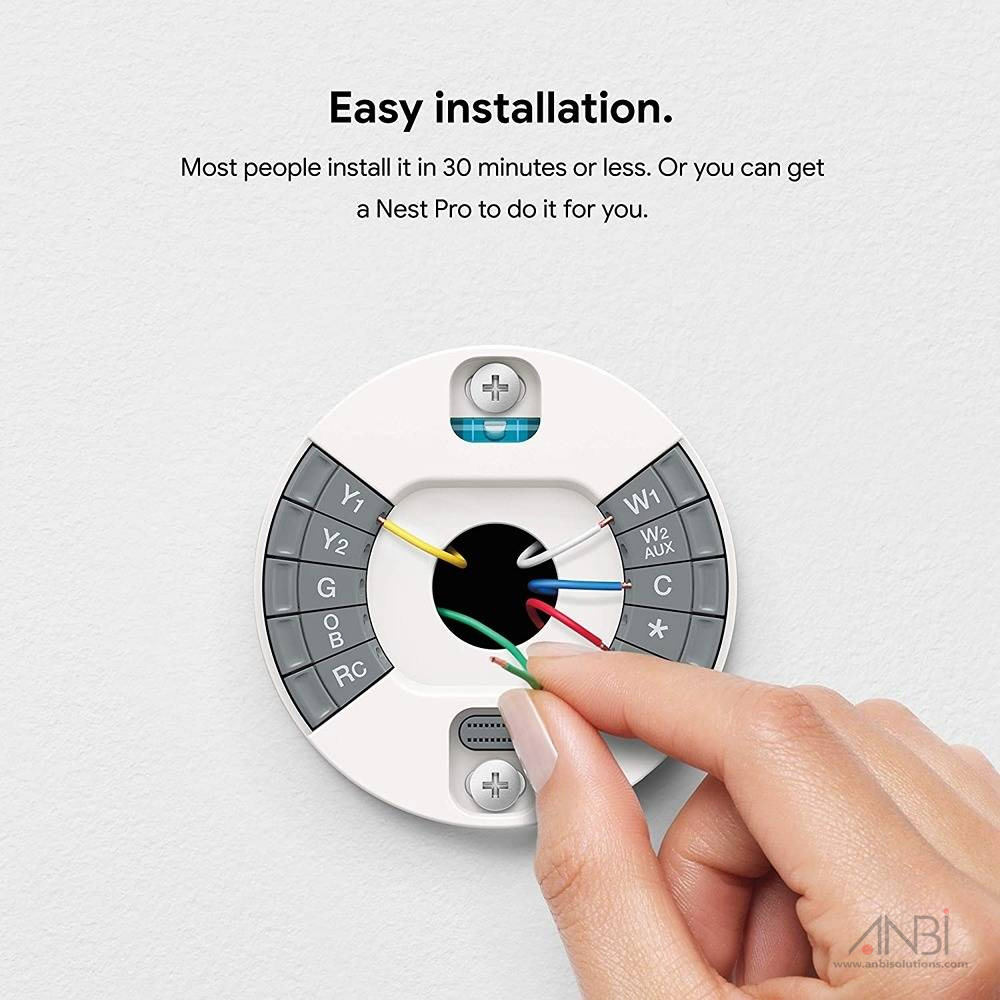
Wiring Your Nest Thermostat
This is arguably the most critical step. Refer back to the photo you took and the labels you applied to each wire. The Nest base has clearly marked terminals, designed to be intuitive.
- R or Rc (Red): This is the power wire. Connect your R or Rc wire to the R terminal on the Nest base. If you have both R and Rc, Nest’s base is designed to accept either into a single R terminal.
- G (Green): Controls the fan. Connect to the G terminal.
- Y or Y1 (Yellow): Controls cooling. Connect to the Y1 terminal. If you have a Y2, that would go into the Y2 terminal.
- W or W1 (White): Controls heating. Connect to the W1 terminal. If you have a W2, that would go into the W2 terminal.
- C (Blue or Black, sometimes others): The common wire. This provides continuous 24V power to the thermostat. If you have a C wire, connect it to the C terminal. As mentioned earlier, while Nest can often work without a C wire, connecting it ensures optimal performance, especially for Wi-Fi and display intensity.
- O/B (Orange or Blue): For heat pumps. Connect to the O/B terminal.
- Aux/E (Brown or White): For auxiliary or emergency heat. Connect to the Aux/E terminal.
To connect a wire, press down on the corresponding terminal button on the Nest base, insert the stripped end of the wire fully into the hole until it clicks, and then release the button. Gently tug on each wire to ensure it is securely seated. Ensure no bare copper is exposed outside the terminal, as this can cause shorts. Neatly tuck any excess wire back into the wall cavity to prevent interference when you attach the display.
Attaching the Nest Display
Once all the wires are securely connected to the base, the final step in the physical installation is to attach the Nest display. The display unit simply clicks onto the base plate. Align the display with the base, ensuring the connectors are properly lined up, and press firmly until you hear and feel a click. The Nest logo should be right-side up. Once attached, it should power on automatically, indicating that the installation has been successful and power is restored. If it doesn’t power on, immediately recheck the power at the circuit breaker and your wiring connections.
Powering Up and Smart Configuration
With the physical installation complete, the real magic begins as you configure your Nest Learning Thermostat and unlock its intelligent features. This stage connects your device to your home network and initiates its learning process, transforming it from a simple thermostat into a personalized climate control assistant.
Initial Setup and Wi-Fi Connection
Upon powering on, your Nest Learning Thermostat will guide you through an initial setup wizard on its display. You’ll need to select your language, location, and connect to your home’s Wi-Fi network. This Wi-Fi connection is crucial as it allows the Nest thermostat to access software updates, retrieve local weather information, communicate with the Nest app on your smartphone, and integrate with other smart home devices. Enter your Wi-Fi network name and password carefully. If you encounter issues, ensure your Wi-Fi signal is strong enough at the thermostat’s location.
Next, the thermostat will ask you to confirm your HVAC system type (e.g., forced air, radiant) and the wires you’ve connected. It’s vital to accurately confirm this information so Nest can operate your system correctly and efficiently. The device will then perform a quick system test, cycling your heating and cooling to ensure everything is working as expected. Follow the on-screen prompts for these tests. This part of the setup also involves setting your initial temperature preferences, which serve as the baseline for Nest’s learning algorithm.
The Learning Process: Unleashing Nest’s AI
The “Learning” in Nest Learning Thermostat isn’t just marketing; it’s a core Tech feature that sets it apart. Once the initial setup is complete, the thermostat begins observing your habits. For the first week or so, actively adjust the temperature to your comfort whenever you feel the need. Turn it up when you’re cold, down when you’re warm. Nest’s advanced algorithms will record these adjustments, noting the time of day and your activity patterns. It identifies trends and preferences, automatically building a personalized temperature schedule (Auto-Schedule) within a few days.
Furthermore, Nest utilizes its built-in motion sensors and algorithms to detect when your home is empty. Through its Auto-Away feature, it intelligently switches to an energy-saving temperature, preventing you from heating or cooling an empty house. This is a prime example of how Tech directly translates into Money savings without any manual intervention. The “Leaf” icon on the display indicates when you’re at an energy-saving temperature, providing visual feedback on your efficiency. The more consistently you interact with it in the first few weeks, the faster and more accurately it will learn your routines, optimizing both comfort and energy consumption.
Integrating with Your Smart Home Ecosystem
One of the significant advantages of the Nest Learning Thermostat is its capability to act as a central hub for your home’s climate within a larger smart home ecosystem. Through the Nest app (which is now integrated into the Google Home app), you gain remote control over your thermostat from anywhere in the world. Forgot to turn down the heat before leaving for vacation? No problem, a few taps on your smartphone can rectify it. This remote accessibility is a huge convenience and a key Tech benefit.
Beyond remote control, Nest integrates seamlessly with other smart home platforms and devices. If you have Google Assistant or Amazon Alexa, you can control your thermostat with voice commands (“Hey Google, set the temperature to 72 degrees”). It can also communicate with other Nest products, like Nest Protect smoke and carbon monoxide alarms (e.g., if carbon monoxide is detected, it can turn off your furnace). This interconnectedness enhances both safety and convenience, creating a truly automated and responsive living environment. Exploring the “Works with Nest” (now part of the “Works with Google Home”) ecosystem can unlock even more potential, allowing for sophisticated automations and personalized routines that respond to your presence, schedule, and even local weather conditions. This deep integration is a cornerstone of the modern smart home experience.
Troubleshooting and Maximizing Your Nest Investment
Even with the most straightforward installation, occasional hiccups can occur. Understanding common issues and how to resolve them, along with strategies to fully leverage your Nest Learning Thermostat, ensures you get the most out of your smart home investment.
Common Installation Hurdles and Solutions
While Nest installation is generally smooth, some issues might arise:
- Nest Not Powering On:
- Check the circuit breaker: Ensure power is fully restored to your HVAC system.
- Verify C wire: If you don’t have a C wire, the Nest might not get enough power. It tries to “power share” from other wires, but some systems (especially older ones or those with complex zones) might not provide enough. In this case, consider installing a Nest Power Connector or hiring an electrician to install a C wire.
- Check wiring connections: Re-examine each wire on the Nest base. Ensure they are fully inserted and make good contact. No bare copper should be exposed.
- HVAC fuse: Your HVAC system might have a low-voltage fuse (often 3A or 5A car fuse) that could have blown if wires shorted during installation. Consult your furnace or air handler manual to locate and check/replace it.
- Wi-Fi Connection Issues:
- Incorrect password: Double-check your Wi-Fi password.
- Signal strength: If your thermostat is far from your router, the signal might be weak. Consider a Wi-Fi extender.
- Router compatibility: Ensure your router supports 2.4 GHz Wi-Fi (Nest doesn’t support 5 GHz).
- Firewall settings: Rarely, strict firewall settings might block Nest’s connection.
- System Not Heating/Cooling Correctly:
- Wiring verification: Re-verify all wire connections against your original photo and Nest’s instructions.
- System settings: During the initial setup, you tell Nest about your HVAC system. If you selected the wrong type (e.g., heat pump instead of conventional), it will operate incorrectly. Go into the Nest settings (Settings > Equipment) to review and correct.
- Fan issues: If only the fan works, check the ‘G’ wire. If heating/cooling doesn’t work, check ‘W’ and ‘Y’ wires respectively.
- “No power to R” error: This usually indicates a problem with the main power wire (R) or the HVAC system itself. Refer to power troubleshooting steps above.
For persistent issues, Nest’s online support resources, community forums, and customer service are excellent avenues for further assistance.
Beyond Installation: Leveraging Nest for Savings and Comfort
Installing your Nest Learning Thermostat is just the first step. To truly maximize your Money savings and comfort, proactive engagement with its Tech features is key.
- Monitor Energy History: Regularly check the Energy History feature in the Nest/Google Home app. It provides detailed reports on your heating and cooling usage, explaining why you used more or less energy on certain days. This insight is invaluable for understanding your patterns and finding opportunities for further savings.
- Utilize Eco Temperatures: Nest’s “Eco Temperatures” are preset energy-saving temperatures. You can adjust these to be more aggressive for greater savings. Activating Eco Mode manually when you leave for an extended period ensures maximum efficiency.
- Embrace the Learning: Trust the Nest’s learning process. While you can manually override the schedule, try to let it learn your preferences. The more consistent you are with your adjustments initially, the smarter it becomes.
- Explore Smart Home Integrations: Connect your Nest with other smart devices. For example, use geofencing with your smartphone to automatically switch to Eco Mode when you leave and back to comfort settings when you return. Integrate with smart vents to fine-tune temperatures in individual rooms.
- Software Updates: Nest regularly releases software updates that introduce new features, improve performance, and enhance security. Ensure your Nest is connected to Wi-Fi so it can automatically download and install these updates, keeping your device at the forefront of smart home technology.
- Seasonal Adjustments: As seasons change, review your Nest’s schedule and make minor adjustments. While it learns, significant seasonal shifts might require a little guidance initially.
By actively engaging with these features, you transform your Nest from a passive device into an active partner in your home’s energy management and comfort strategy.
The Long-Term Value: A Smart Investment
The Nest Learning Thermostat is more than just a gadget; it’s a strategic investment in your home’s future. From a Money perspective, the cumulative energy savings over its lifespan can often surpass its initial cost, making it a financially sound upgrade. Furthermore, installing smart home devices like Nest can subtly increase your home’s appeal and value, especially for tech-savvy buyers, positioning it as a modern, efficient, and desirable property.
From a Tech standpoint, you’re not just buying a thermostat; you’re investing in a constantly evolving platform. Regular software updates ensure your device stays current with the latest innovations in AI, energy management, and smart home integration. This longevity and adaptability mean your investment continues to deliver value years down the line. The Nest Brand has established itself as a leader in intuitive design and reliable smart home technology, providing peace of mind in your purchase.
In conclusion, installing a Nest Learning Thermostat is a straightforward process that yields significant rewards. By following the steps outlined in this guide, you empower yourself to embrace a smarter, more energy-efficient, and supremely comfortable living experience. This is an upgrade that truly pays for itself, both in tangible savings and in the invaluable convenience and peace of mind that come with a truly intelligent home. Welcome to the future of climate control; enjoy your new Nest Learning Thermostat!
aViewFromTheCave is a participant in the Amazon Services LLC Associates Program, an affiliate advertising program designed to provide a means for sites to earn advertising fees by advertising and linking to Amazon.com. Amazon, the Amazon logo, AmazonSupply, and the AmazonSupply logo are trademarks of Amazon.com, Inc. or its affiliates. As an Amazon Associate we earn affiliate commissions from qualifying purchases.