In the modern digital landscape, printers remain an indispensable tool for homes and businesses alike. From important documents and vibrant photos to creative projects, a reliable printer ensures our digital creations can take tangible form. HP printers, renowned for their user-friendliness and quality output, are a common fixture in many environments. However, even the most intuitive technology requires a bit of hands-on maintenance, and few tasks are as frequent and essential as replacing an ink cartridge. This seemingly simple procedure, when done correctly, ensures optimal print quality, extends your printer’s lifespan, and avoids frustrating technical glitches. This comprehensive guide will walk you through every step of installing an ink cartridge in your HP printer, from initial preparation to post-installation troubleshooting, ensuring a seamless experience and flawless prints.

Proper ink cartridge installation isn’t just about getting your printer to work; it’s about maintaining print quality, optimizing ink usage, and safeguarding your investment in the device itself. A poorly installed cartridge can lead to streaks, faded prints, error messages, and even damage to the printer’s delicate internal mechanisms. Beyond the immediate task, understanding the nuances of printer maintenance connects directly to our overarching themes of technology, brand integrity, and financial prudence. We’ll delve into how this routine task impacts everything from your digital productivity to your personal finance, ensuring you get the most out of your HP printing experience.
The Essential Pre-Installation Checklist: Setting the Stage for Success
Before you even think about opening your printer, a little preparation goes a long way. This initial phase is crucial for a smooth installation process, preventing common errors, and ensuring you have everything you need at hand. Rushing this stage often leads to frustration and potential issues down the line.
Identifying Your HP Printer Model and Cartridge Type
The first and most critical step is to accurately identify your specific HP printer model. HP produces a vast array of printers, from compact deskjets to robust laserjets and all-in-ones, and each model typically uses a specific series of ink cartridges. Installing the wrong cartridge is not only futile but can also damage your printer.
- Locating the Model Number: Your printer’s model number is usually printed on the front, top, or back of the device. It might also be found on a sticker inside the cartridge access door or on the original packaging. Common prefixes include “DeskJet,” “OfficeJet,” “Envy,” “LaserJet,” and “Photosmart,” followed by a series of numbers (e.g., HP OfficeJet Pro 9015, HP Envy 6055).
- Matching Cartridge Numbers: Once you have your model number, cross-reference it with the cartridge number. The correct ink cartridge number (e.g., HP 61, HP 952, HP 305) is usually printed on the old cartridge itself, on the printer’s access door, in the user manual, or on HP’s official website. It’s imperative that the new cartridges you’ve purchased match these numbers precisely. Some printers use both black and tri-color cartridges, while others use individual color cartridges (cyan, magenta, yellow). Be sure to purchase the correct configuration.
Gathering Your Supplies: New Cartridges and Cleaning Tools
With the correct cartridge identified, it’s time to gather everything you’ll need. This usually includes:
- New Ink Cartridges: Ensure they are genuine HP cartridges or reputable third-party alternatives (a topic we’ll explore later regarding quality and cost). Check the expiration date if provided, as old ink can dry out or clog nozzles.
- Lint-Free Cloth or Paper Towels: Useful for wiping away any spilled ink or cleaning contact points.
- Gloves (Optional but Recommended): Ink can be messy, and gloves will protect your hands from stains.
- Flashlight (Optional): Can be helpful for seeing into darker areas of the printer’s interior.
- User Manual: Keep your printer’s manual handy. While this guide is comprehensive, your specific model’s manual might offer unique insights or illustrations for cartridge installation.
Safety First: Powering Down and Positioning Your Printer
Before you start poking around inside your printer, take these crucial safety steps:
- Power Off and Unplug: Always turn off your printer using its power button and, more importantly, unplug it from the wall outlet. This prevents electrical hazards and also ensures the print carriage remains stationary when you open the access door, preventing it from moving unexpectedly and causing injury or damage.
- Position for Access: Place your printer on a stable, flat surface where you have good lighting and easy access to all sides, especially the top or front where the cartridge access door is located. Clear any clutter from around the printer to give yourself ample working space. This focus on safety and preparation underscores the Tech aspect of responsible device management and ensures a Brand-consistent user experience by preventing avoidable issues.
Step-by-Step Guide to Cartridge Replacement: Precision and Care
With preparations complete, you’re ready to tackle the core task of replacing your ink cartridges. Follow these steps meticulously to ensure a successful installation.
Accessing the Cartridge Bay
This is often the first point of interaction with the printer’s internal components.
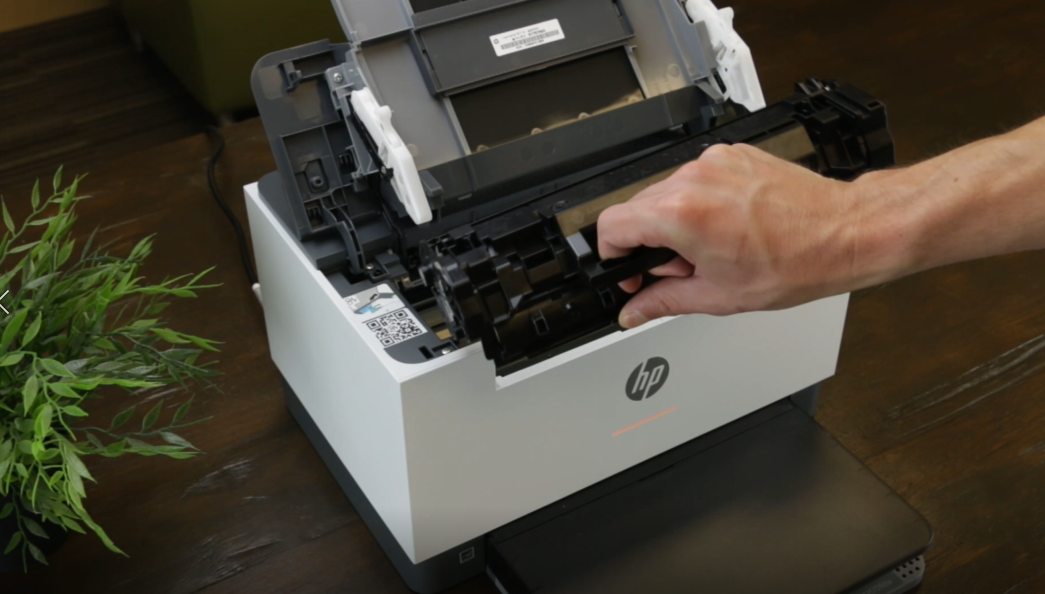
- Locate the Access Door: On most HP printers, the ink cartridge access door is located on the front or top of the printer. It might be a small flap or a larger cover that lifts open.
- Open the Door: Gently open the access door. Depending on your model, the print carriage (the component that holds the ink cartridges) might automatically move to the center of the printer, positioning the cartridges for easy access. If it doesn’t move automatically, do not force it. Consult your manual for instructions on manually moving the carriage or look for a specific button or sequence of presses to initiate carriage movement. Wait for the carriage to come to a complete stop before proceeding.
Removing the Empty Cartridges Safely
Removing the old cartridge is as important as inserting the new one, as improper removal can leave residue or damage the carriage.
- Identify Empty Cartridge: Your printer’s display or software might indicate which cartridge is low or empty. Physically, you’ll see the cartridges seated in their respective slots.
- Press to Release: Most HP cartridges are held in place by a simple latching mechanism. Gently press down on the back of the cartridge until it clicks or pops up slightly. For some models, you might need to push a small tab or lever to release it.
- Pull Out: Once released, carefully pull the cartridge straight out of its slot towards you. Avoid tilting or wiggling it excessively.
- Dispose Responsibly: Place the empty cartridge on a paper towel. Consider recycling your old cartridges; many office supply stores and HP itself offer recycling programs. This aligns with environmental Tech trends and reinforces positive Brand association.
Preparing Your New Ink Cartridges
New cartridges come with protective features that must be removed before installation.
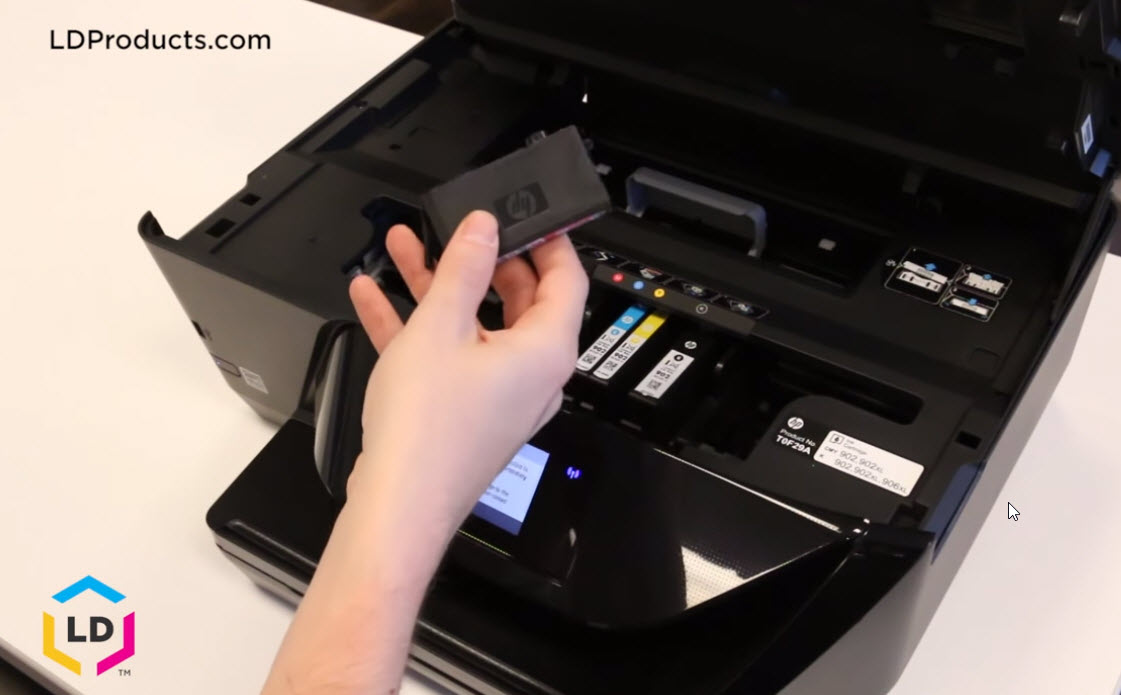
- Unpack: Carefully remove the new cartridge from its packaging. Avoid touching the electrical contacts (the copper-colored strips) or the ink nozzles (the small opening where ink comes out). Oils from your skin can interfere with electrical connections or clog the nozzles, leading to print quality issues.
- Remove Protective Tape/Clip: New cartridges typically have a small piece of plastic tape or a clip covering the ink nozzles and/or vent. This tape must be removed before installation. It usually has a pull tab. Be careful not to tear the tape, but remove it completely. Do not remove any other labels or stickers from the cartridge. These are often for identification or airflow. Leaving the tape on will prevent ink from flowing, leading to blank prints or error messages.
Inserting New Cartridges: Precision and Care
This is the moment of truth. Accuracy here ensures proper function.
- Match Slot and Color: Each cartridge slot is typically color-coded or labeled (e.g., “Black,” “Cyan,” “Magenta,” “Yellow”). Ensure you are inserting the correct color cartridge into its corresponding slot.
- Align and Slide In: Hold the new cartridge with the nozzles facing the printer and the electrical contacts facing towards the back of the carriage (or as indicated by arrows on the cartridge/printer). Slide the cartridge into its designated slot at a slight upward angle (often around 30-45 degrees), following any guides or rails in the carriage.
- Push to Click: Gently push the cartridge firmly into the slot until it clicks into place. You should feel a distinct click, indicating it’s securely latched. Do not force it; if it doesn’t click, remove it and re-align, ensuring no packaging material is obstructing the path.
- Repeat for All Cartridges: If you are replacing multiple cartridges, repeat the process for each one.
Securing the Printer and Initializing
Once all new cartridges are in place, the final steps of installation.
- Close the Access Door: Gently close the ink cartridge access door until it latches securely.
- Power On: Plug your printer back into the wall outlet and press the power button to turn it on.
- Initialization: The printer will typically go through an initialization process. This may involve the print carriage moving back and forth, and the printer displaying messages like “Initializing,” “Calibrating,” or “Preparing.” This process allows the printer to recognize the new cartridges and prepare them for printing. Wait for this process to complete entirely before attempting to print.
Post-Installation Procedures and Troubleshooting: Ensuring Flawless Prints
Installing new cartridges is only part of the journey. To guarantee optimal print quality and address potential hiccups, these final steps are crucial.
Running an Alignment Page for Optimal Quality
One of the most important post-installation steps for many HP printers is running an alignment page.
- Why Alignment Matters: Over time, or with new cartridge installations, the printhead might become slightly misaligned. This can result in blurry text, jagged lines, or inaccurate color reproduction. An alignment process ensures that the printhead fires ink precisely onto the paper, leading to sharp, clear output.
- Initiating Alignment: Your printer’s control panel or software will usually prompt you to print an alignment page after installing new cartridges. If not, you can typically initiate it from the printer’s menu (look for “Tools,” “Maintenance,” “Print Quality,” or “Align Cartridges”).
- Follow On-Screen Instructions: The printer will print a test page with various patterns. You’ll then typically be instructed to place this page on the scanner glass (if your printer has a scanner) for the printer to scan and automatically adjust the printhead. Some older models might require you to visually inspect the patterns and select the best one from the control panel. Always complete the alignment process as instructed.
Common Issues and Quick Fixes (Cartridge Not Recognized, Streaks, Fades)
Even with careful installation, you might encounter issues. Here are common problems and their solutions:
- Cartridge Not Recognized:
- Cause: Often due to improper seating, protective tape still on, or dirty electrical contacts.
- Fix: Turn off the printer, unplug it, open the access door. Remove the suspect cartridge. Gently wipe the copper electrical contacts on the cartridge and inside the printer carriage with a lint-free cloth or cotton swab slightly dampened with distilled water. Ensure all protective tape is removed. Reinsert the cartridge firmly until it clicks. Close the door, plug in, and power on.
- Poor Print Quality (Streaks, Fades, Missing Colors):
- Cause: Clogged print nozzles, low ink (even in new cartridges sometimes), or printhead misalignment.
- Fix:
- Run Cleaning Cycle: From your printer’s control panel or software, run a “Clean Printhead” or “Clean Cartridges” utility. This forces ink through the nozzles to clear clogs. You might need to run it 2-3 times.
- Check Ink Levels: Verify the printer software reports full ink levels for the new cartridges.
- Perform Alignment: If not already done, run an alignment process.
- Inspect Nozzles (Carefully): If issues persist, gently remove the cartridge and visually inspect the nozzle plate. If there’s dried ink, very carefully dab it with a slightly damp lint-free cloth. Do not rub aggressively.
- Error Messages:
- Cause: A wide range of issues, often related to cartridges (wrong type, not recognized, empty) or internal printer problems.
- Fix: Note the exact error code or message. Consult your printer’s manual or HP’s support website for that specific error. Often, a simple power cycle (turning off, unplugging for 60 seconds, plugging back in, and turning on) can resolve temporary glitches.
Understanding Error Messages
HP printers are designed to communicate issues through a combination of display messages, flashing lights, and error codes. Rather than guessing, always refer to your printer’s user manual or the HP support website for a definitive explanation of any specific error message. This pro-active approach to troubleshooting not only saves time but also prevents potential damage from incorrect remedial actions. Recognizing that these messages are part of the Tech interface helps users navigate their printer’s condition more effectively.
Maximizing Your Printer’s Performance and Lifespan: A Holistic Approach
Beyond the mechanics of cartridge installation, understanding the broader context of ink and printer maintenance is key to long-term satisfaction and smart financial decisions. This section connects the practical task to the larger themes of Technology, Brand, and Money.
Genuine HP Ink vs. Third-Party Alternatives: The Quality-Cost Debate
This is one of the most persistent debates in the printing world, directly impacting both performance and finances.
- Genuine HP Ink:
- Pros: Designed specifically for HP printers, ensuring optimal compatibility, consistent print quality (sharp text, vibrant colors), and reliability. Reduces the risk of clogs, leaks, and printer damage. HP often ties its printer warranty to the use of genuine ink.
- Cons: Generally more expensive per page than third-party options.
- Third-Party/Refilled Cartridges:
- Pros: Significantly cheaper, offering substantial short-term savings.
- Cons: Variable quality and reliability. Can lead to inconsistent print quality (fading, streaks, inaccurate colors), printer errors (cartridge not recognized), potential leaks, and even clogs that can damage the printhead (which can be costly to replace). Using non-HP ink might void parts of your printer’s warranty. The “cheap” option can quickly become the “expensive” option if it leads to printhead replacement or printer failure.
Connecting to Brand and Money: HP, as a Brand, heavily emphasizes the use of genuine ink, citing extensive research and development to ensure perfect synergy between ink and printer. From a Money perspective, while third-party inks offer tempting upfront savings, the potential for reduced printer lifespan, wasted paper due to poor prints, and the cost of repairs can quickly negate those initial savings. For critical documents or high-quality photo printing, genuine ink is often the safer and more reliable choice. For casual, less critical printing, third-party options might be considered, but with a full awareness of the potential trade-offs.
Ink Cartridge Maintenance and Storage Tips
Proper handling and storage can significantly impact your ink’s longevity and performance, directly affecting your Money by reducing waste.
- Store Properly: Keep new, unopened ink cartridges sealed in their original packaging until ready for use. Store them in a cool, dry place, away from direct sunlight or extreme temperatures. Heat can cause ink to dry out, while cold can make it more viscous, affecting flow.
- Don’t Over-Stock: While buying in bulk might seem financially appealing, ink does have a shelf life. Purchase only what you anticipate using within a reasonable timeframe (e.g., 6-12 months) to avoid dried-out cartridges.
- Regular Printing: Even if you don’t print often, try to print at least one full-color page per week or every couple of weeks. This helps prevent ink from drying and clogging the print nozzles, which is a common cause of poor print quality and printhead damage.
- Cleanliness: Always handle cartridges with care. Avoid touching the electrical contacts or nozzles. If ink spills, clean it immediately with a damp cloth to prevent it from drying and causing blockages or damaging internal components.
The Environmental Impact of Ink Cartridges: Recycling and Sustainability
In an age increasingly focused on sustainability, the environmental impact of technology, including ink cartridges, cannot be overlooked.
- Waste Reduction: Millions of ink cartridges are discarded globally each year, contributing to landfill waste. Many cartridges are made from plastics that can take hundreds of years to decompose.
- Recycling Programs: HP, as a leading Brand, has invested significantly in recycling initiatives. They often offer free return labels or drop-off points for their empty cartridges. Many office supply retailers also have collection bins for empty cartridges, regardless of brand. Participating in these programs helps divert plastic and electronic waste from landfills.
- Refill vs. Recycle: While refilling cartridges can seem environmentally friendly, the quality can be inconsistent, and the process itself isn’t always efficient or sustainable for every type of cartridge. Recycling through established programs ensures that materials are properly processed and reused in new products, often closing the loop on resource consumption. This aspect strongly ties into evolving Tech and societal values around sustainability.
Conclusion: Mastering Your HP Printing Experience
Installing an ink cartridge in your HP printer is a foundational skill for any user, bridging the gap between digital convenience and tangible output. By meticulously following the steps outlined in this guide – from careful preparation and precise installation to diligent post-installation checks and troubleshooting – you can ensure your printer operates at its peak performance, delivering the crisp, vibrant prints you expect from the HP brand.
However, the journey doesn’t end with a successful cartridge swap. Understanding the broader ecosystem of printing, including the critical choice between genuine and third-party inks, the financial implications of maintenance, and the imperative of environmentally responsible disposal, transforms a routine task into an informed decision-making process. By embracing these best practices, you not only safeguard your technological investment but also contribute to a more sustainable consumption model. Whether you prioritize unparalleled print quality, cost-effectiveness, or ecological responsibility, mastering the art of ink cartridge installation and maintenance is your first step towards a consistently reliable and satisfying HP printing experience. This comprehensive approach empowers you to leverage your printer as a seamless, efficient tool in your daily tech repertoire, supporting your productivity and creative endeavors for years to come.
aViewFromTheCave is a participant in the Amazon Services LLC Associates Program, an affiliate advertising program designed to provide a means for sites to earn advertising fees by advertising and linking to Amazon.com. Amazon, the Amazon logo, AmazonSupply, and the AmazonSupply logo are trademarks of Amazon.com, Inc. or its affiliates. As an Amazon Associate we earn affiliate commissions from qualifying purchases.