Embarking on a fresh installation of Windows 11 can feel like a significant undertaking, but it’s often the most effective way to revitalize your PC, resolve persistent software issues, and ensure you’re starting with a clean slate. Whether you’re upgrading from an older version of Windows, experiencing performance degradation, or simply want to optimize your system, a clean install is a powerful solution. This comprehensive guide will walk you through the entire process, from preparing your files to the final configuration, ensuring a smooth and successful transition to a pristine Windows 11 experience. We’ll cover everything you need to know, making this technical process accessible and manageable.
Understanding the Benefits of a Fresh Windows 11 Install
Before diving into the “how-to,” it’s crucial to understand why a fresh installation is often the preferred method for upgrading or troubleshooting your operating system. Unlike a standard upgrade, which overlays the new OS on top of your existing one, a clean install wipes the drive and starts from scratch. This has several key advantages.
Resolving Deep-Seated Software Glitches and Performance Bottlenecks
Over time, your Windows installation can accumulate a considerable amount of digital “clutter.” This can include leftover files from uninstalled programs, fragmented registry entries, temporary files that never get cleared, and even corrupted system files. While Windows has built-in tools to manage this, they aren’t always foolproof. A fresh install effectively eliminates all of this accumulated baggage. It removes all traces of previous operating systems, applications, and user data, leaving you with a virgin environment. This can resolve frustrating issues such as:
- Slow boot times and overall sluggish performance: A cluttered system struggles to load applications and perform everyday tasks efficiently.
- Frequent crashes and blue screen errors: Corrupted system files or conflicting software can lead to instability.
- Application errors and compatibility issues: Old settings or remnants of previous software can interfere with new installations.
- Unexplained hardware recognition problems: Sometimes, a fresh OS install can re-establish proper communication between your hardware and the operating system.
By starting anew, you’re essentially giving your PC a performance boost and a chance to run optimally, free from the ghosts of past software installations.
Ensuring Optimal System Stability and Security
A clean installation of Windows 11 also provides an opportunity to ensure your system is as stable and secure as possible. You’ll be installing the latest version of Windows directly, which often includes the most recent security patches and performance optimizations from Microsoft. This minimizes the risk of encountering vulnerabilities that might be present in older, unpatched versions of the operating system or applications.
Furthermore, it forces you to re-evaluate the software you reinstall. This is a great chance to declutter and only bring back essential applications, potentially removing outdated or less secure programs. This mindful approach to software installation contributes to a more robust and secure digital environment.
Preparing for Your Windows 11 Fresh Install
A successful clean install hinges on thorough preparation. Skipping this stage can lead to data loss or an incomplete setup. Dedicate ample time to this crucial phase.
Backing Up Your Essential Data
This is arguably the most critical step. A fresh installation will erase everything on the drive where Windows is installed (typically your C: drive). Therefore, you must back up all your important personal files. This includes documents, photos, videos, music, and any other data you don’t want to lose.
There are several robust backup methods available:
- External Hard Drive or SSD: This is a straightforward and reliable method. Copy your essential folders directly to an external storage device. Ensure the drive has enough capacity for all your data.
- Cloud Storage Services: Services like OneDrive, Google Drive, Dropbox, or iCloud offer convenient ways to store your files online. You can often configure them to automatically sync important folders.
- Network Attached Storage (NAS): For those with a home network and a desire for centralized storage, a NAS device is an excellent option.
- USB Flash Drives: For smaller amounts of data, USB flash drives can be a quick and easy solution.
Pro Tip: Before you start the installation, double-check that your backup is complete and accessible. Consider performing a test restore of a few files to ensure everything is working correctly.
Creating Windows 11 Installation Media
To perform a clean install, you’ll need a bootable Windows 11 installation media. Microsoft provides a free tool called the “Media Creation Tool” for this purpose.
- Download the Media Creation Tool: Visit the official Microsoft website and search for “Download Windows 11.” You’ll find a link to download the Media Creation Tool.
- Run the Tool: Execute the downloaded file. Accept the license terms.
- Select “Create installation media (USB flash drive, DVD, or ISO file) for another PC.” Click “Next.”
- Choose Language, Edition, and Architecture: By default, the tool will select the recommended options for your PC. If you need to install a different version, uncheck “Use the recommended options for this PC” and make your selections. For most users, the default options are appropriate.
- Select Media Type: You have two primary options:
- USB flash drive: This is the most common and recommended method. You’ll need a USB drive with at least 8GB of storage. The tool will format the drive, so ensure it doesn’t contain any important data.
- ISO file: This creates an ISO disk image file that you can later burn to a DVD or use with virtual machine software.
- Follow the Prompts: The tool will download the necessary Windows 11 files and create your bootable media. This process can take some time depending on your internet speed.
Gathering Necessary Drivers and Software
While Windows 11 generally includes a broad range of drivers, it’s a good idea to have essential drivers readily available, especially for your network adapter (Wi-Fi or Ethernet). If Windows doesn’t automatically recognize your network hardware after installation, you won’t be able to download other drivers or software.
- Network Drivers: Visit your motherboard manufacturer’s website (for desktops) or your laptop manufacturer’s support page. Download the latest drivers for your specific model’s Wi-Fi and Ethernet controllers. Save these drivers to a separate USB drive or a cloud storage location that you can access from another device.
- Other Essential Drivers: Consider downloading drivers for your graphics card, audio, and chipset as well. While Windows Update might install them later, having them pre-downloaded can speed up the post-installation setup.
- Essential Software: Make a list of the applications you regularly use (e.g., web browser, office suite, media player, antivirus if not using Windows Security). Having these installers ready will allow you to get back to productivity quickly.
Checking Windows 11 System Requirements

Before you begin, ensure your computer meets the minimum system requirements for Windows 11. This is particularly important if you’re upgrading from an older PC. Key requirements include:
- Processor: 1 GHz or faster with 2 or more cores on a compatible 64-bit processor or System on a Chip (SoC).
- RAM: 4 GB or more.
- Storage: 64 GB or larger storage device.
- System Firmware: UEFI, Secure Boot capable.
- TPM: Trusted Platform Module (TPM) version 2.0.
- Graphics Card: Compatible with DirectX 12 or later with WDDM 2.0 driver.
- Display: High definition (720p) display that is greater than 9” diagonally, 8 bits per color channel.
You can use Microsoft’s PC Health Check app to verify your system’s compatibility.
Performing the Fresh Installation of Windows 11
With your preparations complete, you’re ready to begin the installation process. This involves booting from your installation media and following the on-screen prompts.
Booting from the Installation Media
- Insert the USB drive or DVD containing your Windows 11 installation media into your computer.
- Restart your computer.
- Access the Boot Menu or BIOS/UEFI Settings: As your computer restarts, you’ll need to press a specific key to enter the boot menu or BIOS/UEFI settings. This key varies depending on your computer’s manufacturer but is commonly one of the following:
F2,F10,F12,Del, orEsc. Watch the screen closely during the startup process; it usually indicates which key to press. - Change the Boot Order: In the BIOS/UEFI settings, navigate to the “Boot” or “Boot Order” section. You need to set your USB drive or DVD drive as the primary boot device. This tells your computer to load the operating system from the installation media rather than your hard drive.
- Save Changes and Exit: Once you’ve set the boot order, save your changes and exit the BIOS/UEFI. Your computer will restart again.
- Press Any Key to Boot: You should see a message like “Press any key to boot from CD or DVD…” or “Press any key to boot from USB…”. Press any key immediately to proceed with booting from your installation media.
The Installation Wizard
Once the installation media boots successfully, you’ll be greeted by the Windows 11 setup wizard.
- Language and Regional Settings: Select your preferred language, time and currency format, and keyboard or input method. Click “Next.”
- Install Now: Click the prominent “Install now” button.
- Product Key: If you have a Windows 11 product key, enter it here. If you’re reinstalling Windows on a computer that was previously activated with a digital license, you can click “I don’t have a product key.” Windows will automatically activate later when it connects to the internet.
- Select Operating System: If your installation media contains multiple editions of Windows 11 (e.g., Home, Pro), choose the edition you want to install and that you have a license for. Click “Next.”
- Accept License Terms: Read the Microsoft Software License Terms and check the box to accept them. Click “Next.”
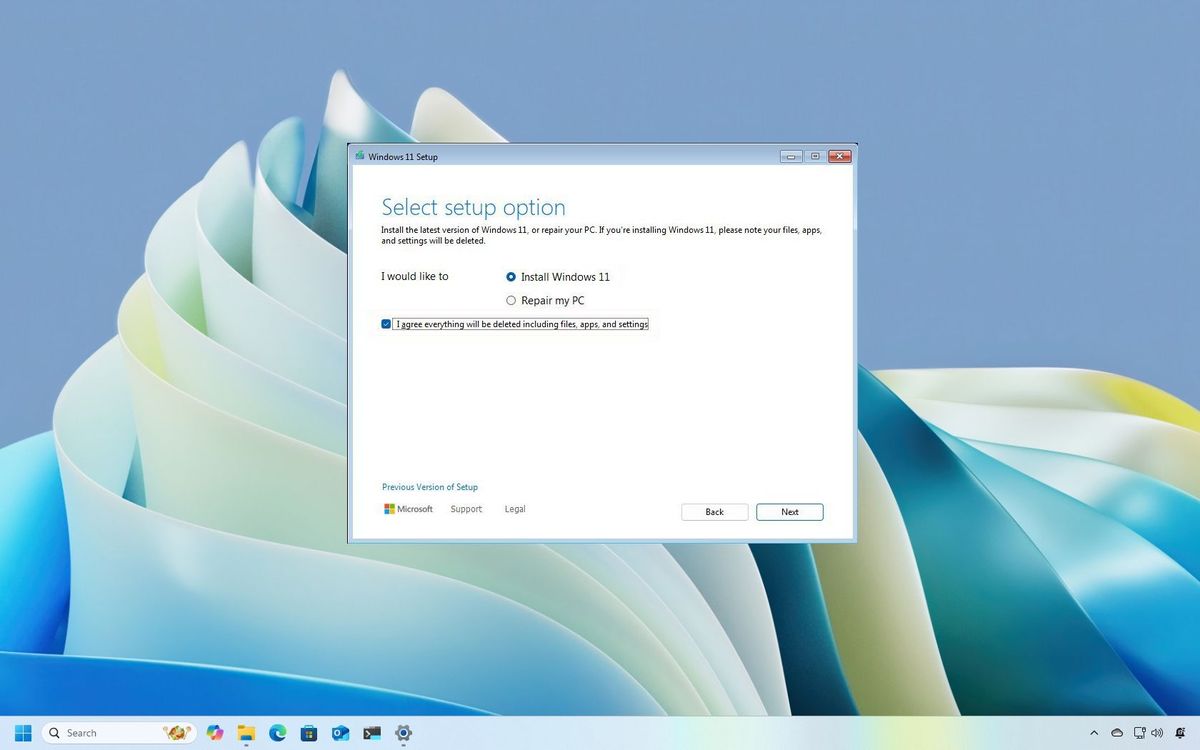
- Choose Installation Type: This is where you select the clean install option. Choose “Custom: Install Windows only (advanced).”
Partitioning and Formatting the Drive
This is the step where data on your selected drive will be erased.
- Select the Drive for Installation: You’ll see a list of all drives and partitions on your computer. Carefully select the drive where you want to install Windows 11. This is usually your primary drive, often labeled as “Drive 0.”
- Delete Existing Partitions: To ensure a truly clean install, it’s recommended to delete any existing partitions on the target drive. Select each partition on Drive 0 and click “Delete.” Be absolutely certain you have selected the correct drive, as this action is irreversible and will erase all data on that drive.
- Create a New Partition (Optional but Recommended): After deleting partitions, you’ll have unallocated space. Select this “Unallocated Space” and click “New.” Windows will automatically suggest a partition size. You can accept the default or adjust it if you want to create multiple partitions (though for a simple setup, one large partition is often sufficient).
- Format the Partition: Select the newly created partition and click “Format.” This prepares the drive for the installation.
- Install Windows: With the partition formatted, select it and click “Next.” The Windows 11 installation process will now begin, copying files and installing the operating system. This will take some time, and your computer will restart several times.
Important Note: If you are installing Windows 11 on a secondary drive or a drive that does not contain your existing Windows installation, be extremely careful to select the correct drive to format. Always back up data from any drive you are not certain about.
Post-Installation Configuration and Setup
Once Windows 11 has finished installing, you’ll go through the initial setup experience (Out-of-Box Experience or OOBE). This is where you’ll configure your basic settings and personalize your experience.
Initial Setup and Account Configuration
- Region and Keyboard Layout: Confirm your region and keyboard layout.
- Network Connection: Connect to your Wi-Fi network or plug in an Ethernet cable. This is crucial for the next steps.
- Name Your Device: Give your PC a descriptive name.
- Sign In with Your Microsoft Account: You’ll be prompted to sign in with your Microsoft account. This links your PC to services like OneDrive, the Microsoft Store, and settings synchronization. If you prefer a local account, you might need to disconnect from the internet temporarily during this step or look for the “Offline account” option (which may be less prominent).
- Set Up a PIN: For easier and more secure sign-in, set up a PIN.
- Privacy Settings: Review and configure your privacy settings, including location services, diagnostic data, and personalized advertising.
- Choose Your Experience (Optional): Microsoft may ask about how you plan to use your PC (e.g., Gaming, School, Creativity). This can tailor some default app suggestions.
- OneDrive Setup: Configure how you want OneDrive to sync your files.
Installing Drivers and Updates
After the initial setup, your system might feel a bit basic. The next crucial steps are to ensure all your hardware is functioning correctly and your system is up-to-date.
- Windows Update: The first thing to do is run Windows Update. Go to
Settings > Windows Updateand click “Check for updates.” Install all available updates. This will often install many of the necessary drivers automatically. - Install Downloaded Drivers: If you pre-downloaded drivers, now is the time to install them. Start with your network drivers if they weren’t automatically detected. Then, install drivers for your graphics card, audio, chipset, and any other specific hardware components.
- Device Manager: Open Device Manager (
Search for "Device Manager"in the Start Menu). Look for any devices with a yellow exclamation mark, indicating a driver issue. Right-click on these devices and select “Update driver” to have Windows search online, or manually point it to the drivers you downloaded. - Restart Your PC: After installing drivers and significant Windows updates, it’s always a good practice to restart your computer.
Reinstalling Your Favorite Software
With your system stable and drivers installed, you can now reinstall your essential applications.
- Productivity Software: Install your preferred office suite, email client, and any other tools you use for work or personal projects.
- Web Browsers: Reinstall your favorite web browsers (Chrome, Firefox, Edge, etc.).
- Media Players and Software: Install your preferred music and video players, photo editing software, and any other media-related applications.
- Gaming: If you’re a gamer, now is the time to download your game launchers (Steam, Epic Games Store, etc.) and reinstall your favorite titles. Be prepared for potentially large download sizes.
- Security Software: If you use a third-party antivirus or security suite, install it now. If you’re relying on Windows Security, ensure it’s enabled and up-to-date.
By carefully following these steps, you’ll have successfully performed a fresh installation of Windows 11, enjoying a fast, stable, and optimized computing experience. Remember to keep your system updated and back up your data regularly to maintain a healthy digital environment.
aViewFromTheCave is a participant in the Amazon Services LLC Associates Program, an affiliate advertising program designed to provide a means for sites to earn advertising fees by advertising and linking to Amazon.com. Amazon, the Amazon logo, AmazonSupply, and the AmazonSupply logo are trademarks of Amazon.com, Inc. or its affiliates. As an Amazon Associate we earn affiliate commissions from qualifying purchases.