
In today’s digitally driven world, a reliable printer is an indispensable tool for many, whether for personal use at home, professional tasks in a home office, or even in larger business environments. From printing important documents and photos to signing up for services that require physical copies, the ability to communicate seamlessly between your computer and your printer is paramount. However, this communication isn’t automatic. It relies on a crucial piece of software: the printer driver.
You might have just unboxed a brand-new printer, or perhaps you’ve recently upgraded your operating system, and now you’re faced with the question: “How do I install drivers for my printer?” This guide is designed to demystify the process, providing you with clear, step-by-step instructions and troubleshooting tips to get your printer up and running smoothly. We’ll cover everything from the initial steps of locating the correct drivers to advanced installation techniques and common pitfalls to avoid.
Understanding Printer Drivers: The Essential Software Bridge
Before diving into the installation process, it’s vital to understand what a printer driver actually is and why it’s so important. Think of a printer driver as a translator. Your computer speaks a digital language, and your printer speaks a language of ink, toner, and paper. The driver acts as the intermediary, translating the commands from your computer into instructions that your printer can understand and execute.
Without the correct driver, your computer won’t know how to send print jobs, control print quality, manage ink levels, or even recognize that a printer is connected. This can lead to a range of frustrating issues, from printers not responding at all to garbled text and incorrect formatting.
Why Do Drivers Need Installation?
Drivers are hardware-specific software. This means that a driver designed for a Canon Pixma model will not work for an HP LaserJet, and vice-versa. Each printer, even within the same brand, has unique components and functionalities that require a tailored set of instructions for your operating system to control.
Furthermore, operating systems like Windows and macOS are constantly evolving. New versions often introduce changes to how hardware communicates. Consequently, manufacturers regularly update their printer drivers to ensure compatibility with the latest operating systems and to fix bugs or introduce new features. This is why sometimes, even if your printer once worked, you might need to reinstall or update its driver after an OS update.
Finding and Downloading the Correct Printer Drivers
The first and arguably most critical step in installing your printer driver is ensuring you have the correct one. Using the wrong driver can cause compatibility issues, prevent your printer from functioning, or even lead to system instability.
1. Identify Your Printer Model and Operating System
Before you begin searching, you need two key pieces of information:
-
Your Printer’s Exact Model Number: This is usually found on the front, top, or back of the printer. It might look something like “HP DeskJet 3755,” “Canon PIXMA TS5320,” or “Epson EcoTank ET-4850.” Be precise; even a slight variation in the model number can mean a different driver.
-
Your Operating System and Version: This is crucial. Are you using Windows 10, Windows 11, macOS Monterey, or a different version? You’ll also need to know if your system is 32-bit or 64-bit.
- On Windows: You can find this information by right-clicking “This PC” (or “My Computer”) and selecting “Properties.” Look for “System type” under the “System” section.
- On macOS: Click the Apple menu in the top-left corner, then select “About This Mac.”
2. Visit the Manufacturer’s Official Website
The most reliable and secure place to download printer drivers is directly from the manufacturer’s support website. Avoid third-party driver download sites, as these can sometimes bundle unwanted software or distribute outdated or even malicious drivers.
Navigate to the support or downloads section of the manufacturer’s website. Common manufacturers include:
- HP: support.hp.com
- Canon: canon.com/support
- Epson: epson.com/support
- Brother: support.brother.com
- Lexmark: lexmark.com/en_us/support
Once you’re on the support page, you’ll typically see a search bar or a category for “Drivers & Software.” Enter your printer’s model number. The website should then present you with a list of available downloads for your specific model.
3. Select and Download the Correct Driver Package
After entering your model, the website will likely detect your operating system automatically or ask you to select it.
- Driver vs. Software Suite: You’ll often see two main types of downloads: a basic “driver” and a more comprehensive “software suite” or “full package.”
- The driver is the essential software that allows your computer to communicate with the printer.
- The software suite typically includes the driver plus additional utilities for scanning, ink level monitoring, maintenance, and other printer-specific functions. For most users, downloading the full package is recommended as it provides the most functionality.
- Driver Type: Sometimes, you might see different driver versions (e.g., “PCL6,” “PostScript”). For most home and office users, the default or recommended driver is sufficient. If you have specific professional needs (like graphic design), you might research these different types further.
- Download: Click the download button for the appropriate driver package for your operating system. The file will typically be an
.exefile for Windows or a.dmgfile for macOS. Save it to a location you can easily find, like your Downloads folder or Desktop.
Installing Printer Drivers: Step-by-Step Installation Process
Once you have successfully downloaded the correct driver package, it’s time to install it. The process is generally straightforward, but it’s essential to follow the prompts carefully.
1. Prepare for Installation
Before running the installer:
- Connect Your Printer (or Don’t): Some installers will prompt you to connect your printer via USB or set it up on your network during the installation process. Others will instruct you to connect it after the software is installed. Read the initial screens of the installer carefully for instructions. In most modern installations, it’s best to not connect the printer until the software specifically tells you to.
- Close Other Applications: It’s good practice to close any unnecessary applications running on your computer to prevent potential conflicts and ensure a smooth installation.
- Administrator Privileges: Ensure you are logged into your computer with an administrator account, as driver installations often require elevated permissions.
2. Run the Installer
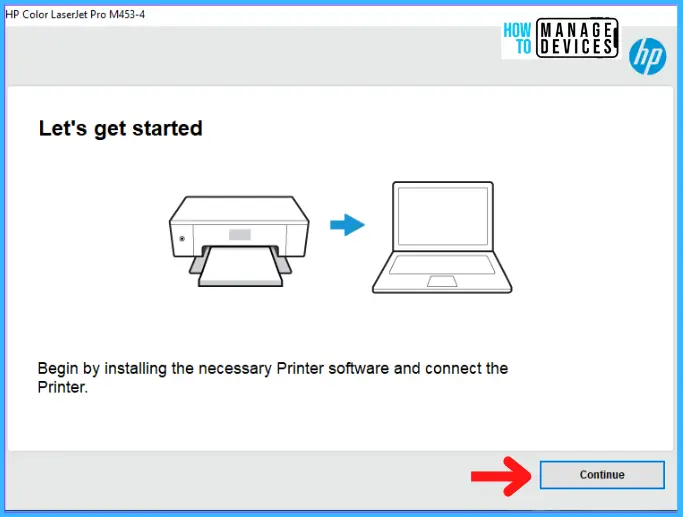
Locate the downloaded driver file and double-click it to start the installation wizard.
- Windows (.exe): Double-click the
.exefile. You may see a User Account Control prompt asking if you want to allow the app to make changes to your device; click “Yes.” - macOS (.dmg): Double-click the
.dmgfile. This will mount a virtual disk. Open this virtual disk and double-click the installer package (.pkgfile) within it. You may need to agree to license agreements and enter your macOS user password.
3. Follow the On-Screen Prompts
The installer wizard will guide you through the process. Common steps include:
- Welcome Screen: Read any introductory information and click “Next” or “Continue.”
- License Agreement: You’ll need to accept the terms and conditions of the software license.
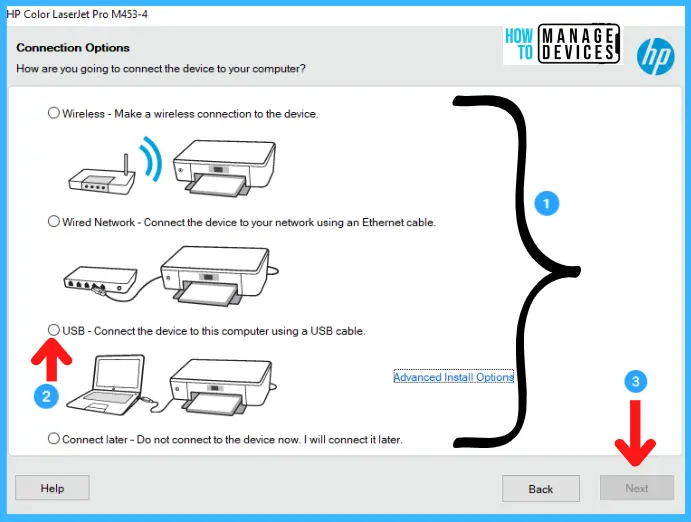
- Connection Type: The installer will ask how your printer is connected. Options typically include:
- USB: Connect the printer directly to your computer with a USB cable.
- Network (Wireless/Wi-Fi): Connect the printer to your home or office network. The installer will help you find it on the network.
- Network (Ethernet/Wired): Connect the printer to your router or network switch with an Ethernet cable.
- Printer Detection: The software will attempt to find your printer.
- If installing via USB, it will prompt you to connect the cable when it’s ready.
- If installing via network, it will scan your network for the printer. Make sure your printer is powered on and connected to the same network as your computer.
- Component Selection (Optional): Some installers allow you to choose which components (e.g., scanner software, utility tools) you want to install. Unless you have a specific reason not to, installing all recommended components is usually best.
- Installation Progress: The wizard will show a progress bar as it installs the driver and software.
- Completion: Once the installation is finished, you’ll usually see a confirmation screen. It might offer to print a test page or launch the printer utility. It’s highly recommended to print a test page to confirm that everything is working correctly.
4. Operating System’s Built-in Driver Installation (Windows/macOS)
Modern operating systems often have a vast library of built-in drivers that can automatically detect and install basic functionality for many printers.
- Windows: When you connect a new printer via USB, Windows often attempts to find and install a compatible driver automatically. You might see a notification indicating that a device is being set up. If it succeeds, you can usually start printing immediately.
- macOS: Similar to Windows, macOS has a robust system for automatically detecting and configuring printers. You can also manually add printers through System Settings > Printers & Scanners by clicking the “Add Printer, Scanner, or Fax” button. macOS will then try to find your printer and assign a suitable driver.
While automatic installation is convenient, it may not always install the full suite of software or the most up-to-date driver. Therefore, manually downloading from the manufacturer’s website is often preferred for complete functionality and the latest features.
Troubleshooting Common Printer Driver Issues
Even with careful installation, you might encounter problems. Here are some common issues and how to resolve them:
1. Printer Not Detected or Offline
- Check Connections: Ensure your USB cable is securely plugged into both the printer and the computer, or that your network cable is properly connected. For wireless printers, verify that the Wi-Fi is enabled on the printer and that it’s connected to the correct network.
- Restart Devices: Try restarting your printer, your computer, and your router. This simple step can resolve many temporary network or communication glitches.
- Check Printer Status: Is the printer powered on? Are there any error lights or messages on the printer’s display panel? Consult your printer’s manual for error code explanations.
- Verify Network Settings: If using a network printer, ensure your computer is on the same network as the printer.
2. “Driver is Unavailable” or “Printer Not Responding” Errors
- Reinstall the Driver: The most common fix is to uninstall the existing driver and reinstall the latest version from the manufacturer’s website.
- On Windows: Go to Settings > Apps > Apps & features. Find your printer’s software, click it, and select “Uninstall.” Then, go to Settings > Bluetooth & devices > Printers & scanners, select your printer, and click “Remove device.” Finally, download and run the fresh driver installer.
- On macOS: Go to System Settings > Printers & Scanners. Select your printer, click the “-” button to remove it. Then, download and run the new installer.
- Run the Troubleshooter (Windows): Windows has a built-in printer troubleshooter. Go to Settings > System > Troubleshoot > Other troubleshooters and run the “Printer” troubleshooter.
- Update Operating System: Ensure your operating system is up to date. Sometimes, OS updates include fixes that improve hardware compatibility.
3. Print Jobs Stuck in Queue
- Restart Print Spooler (Windows): The Print Spooler service manages print jobs.
- Press
Windows Key + R, typeservices.msc, and press Enter. - Scroll down to “Print Spooler,” right-click it, and select “Restart.”
- Press
- Cancel Stuck Jobs: You can manually cancel jobs stuck in the queue. In Windows, go to Settings > Bluetooth & devices > Printers & scanners, select your printer, and click “Open print queue.” Then, click the “Cancel all documents” option.
4. Incorrect or Poor Print Quality
- Check Driver Settings: Open the printer properties (usually accessible from the print dialog or the Printers & Scanners settings) and ensure that settings like paper size, print quality (draft, normal, best), and color are configured correctly.
- Update Firmware: Some printers have firmware that can be updated. Check the manufacturer’s support website for firmware updates specific to your model.
- Clean Print Heads: Many printers have a maintenance utility accessible through the driver software that allows you to clean the print heads, which can resolve issues with faded or streaky prints.
Maintaining Your Printer Drivers: Best Practices
Keeping your printer drivers up-to-date is crucial for optimal performance, security, and compatibility.
1. Regular Updates
- Check Manufacturer Websites Periodically: Make it a habit to check the printer manufacturer’s support website every few months for new driver releases.
- Subscribe to Notifications: Some manufacturers offer email notifications for driver updates for your specific models.
2. Understand Driver vs. Firmware
While drivers are software installed on your computer, firmware is software embedded within the printer itself. Both can impact printer performance. Always check the manufacturer’s site for both driver and firmware updates.
3. Keep a Backup
For critical setups, consider keeping a copy of the latest stable driver installer file for your printer in a safe place (e.g., an external hard drive or cloud storage). This can be invaluable if you encounter issues after an OS upgrade or need to reinstall drivers on a new computer.

Conclusion
Installing printer drivers might seem like a technical hurdle, but by understanding its purpose and following these steps, you can ensure a smooth and successful setup. Always prioritize downloading drivers from the manufacturer’s official website to guarantee authenticity and security. With the correct driver installed, your printer will transform from a static piece of hardware into a fully functional extension of your digital workflow, ready to bring your digital creations to life on paper. Should you encounter any issues, remember that the troubleshooting steps outlined above are designed to help you resolve most common problems, allowing you to get back to printing without further frustration.
aViewFromTheCave is a participant in the Amazon Services LLC Associates Program, an affiliate advertising program designed to provide a means for sites to earn advertising fees by advertising and linking to Amazon.com. Amazon, the Amazon logo, AmazonSupply, and the AmazonSupply logo are trademarks of Amazon.com, Inc. or its affiliates. As an Amazon Associate we earn affiliate commissions from qualifying purchases.