
In an increasingly digital world, the convenience of managing finances from the palm of your hand has become not just a luxury, but a fundamental expectation. The landscape of digital payments is constantly evolving, with mobile wallets and online payment platforms leading the charge towards a cashless future. Among the most prominent players are PayPal, a pioneer in online payment solutions, and Google Pay, a robust mobile payment and digital wallet service offered by Google. Individually, they offer significant advantages; together, their integration creates a powerful, flexible, and secure ecosystem for managing your transactions.

This guide delves into the technical intricacies and user-centric benefits of connecting your PayPal account with Google Pay. We will explore why this synergy enhances your digital payment experience, provide a detailed, step-by-step tutorial for integration, and discuss how to effectively leverage this combined power for various transactions, all while maintaining robust digital security. For anyone seeking to streamline their digital spending and optimize their mobile payment capabilities, understanding how to add PayPal to Google Pay is an essential step towards achieving a truly seamless financial interaction.
Understanding the Ecosystem: PayPal and Google Pay
Before diving into the integration process, it’s crucial to understand the individual strengths and complementary nature of PayPal and Google Pay. Each platform brings unique features to the table, and their combined utility can significantly enhance a user’s digital payment flexibility.
The Power of PayPal: Global Reach and Versatility
PayPal has long been a titan in the realm of online payments, established as a trusted method for transactions across the globe. Its strength lies in its widespread acceptance, facilitating millions of transactions daily for both individuals and businesses. PayPal acts as a secure intermediary between your bank accounts, credit cards, and online merchants, allowing you to make purchases without directly exposing your financial details to every vendor. Key features include:
- Global Accessibility: Accepted in over 200 countries and regions, supporting transactions in multiple currencies.
- Security: Employs advanced encryption and fraud prevention technologies, offering buyer and seller protection programs.
- Versatility: Supports online purchases, peer-to-peer payments, invoicing, and even some in-store transactions through QR codes or partnerships.
- Ease of Use: Simple interface for sending and receiving money, managing subscriptions, and tracking transaction history.
For many, PayPal is the go-to platform for e-commerce, international transfers, and managing online subscriptions, making its integration into other payment systems highly desirable.
Google Pay: The Android and Web Payment Hub
Google Pay (formerly Android Pay and Google Wallet) is Google’s comprehensive digital wallet and online payment system. It’s designed to simplify payments across various touchpoints, from physical retail stores to online platforms and within apps. Google Pay leverages the power of Near Field Communication (NFC) for contactless payments in stores and integrates deeply with the Google ecosystem, offering convenience and speed. Its core attributes include:
- Contactless Payments: Allows users to pay in stores by simply tapping their Android smartphone or smartwatch on a compatible payment terminal.
- Online and In-App Purchases: Streamlines checkout processes on websites and within mobile applications that support Google Pay.
- Digital Wallet: Stores credit, debit, loyalty cards, and even event tickets, reducing the need for a physical wallet.
- Security Features: Tokenization of card details, requiring PIN, pattern, fingerprint, or facial recognition for transactions.
Google Pay excels in providing a unified, secure, and fast payment experience, particularly for Android users, but its web integration extends its utility to any browser.
Why Integrate? Synergizing Digital Wallets
The decision to add PayPal to Google Pay stems from a desire for enhanced convenience, expanded payment options, and a more centralized digital financial experience. While both platforms are powerful individually, their integration unlocks several synergistic benefits:
- Expanded Funding Sources: By linking PayPal, you gain access to all the funding sources connected to your PayPal account (bank accounts, credit cards, PayPal balance) directly through Google Pay. This means you don’t need to add each individual card to Google Pay separately if they’re already linked to PayPal.
- Simplified In-Store Payments: One of the primary advantages is the ability to use your PayPal balance or linked funding sources for in-store purchases via Google Pay’s NFC tap-to-pay functionality. This bridges a gap, bringing PayPal’s online versatility into the physical retail space through Google Pay.
- Consolidated Management: For users who frequently use both services, linking them streamlines financial management. You can access your PayPal funds and make Google Pay transactions from a single interface, reducing the need to switch between apps.
- Global Payment Flexibility: Whether you’re paying online at a PayPal-exclusive merchant or tapping to pay at a Google Pay-enabled terminal abroad, your integrated digital wallet ensures you have a readily available and secure payment method.
The integration effectively combines PayPal’s vast online reach and diverse funding options with Google Pay’s seamless in-store and in-app payment capabilities, creating a truly robust digital wallet solution.
Step-by-Step Guide: Adding PayPal to Google Pay
The process of connecting your PayPal account to Google Pay is straightforward, designed to be user-friendly and secure. There are primarily two methods: via the Google Pay mobile app or through your Google Account settings on a web browser.
Prerequisites for a Smooth Integration
Before you begin, ensure you have the following:
- An Active Google Account: Essential for accessing Google Pay.
- An Active PayPal Account: Make sure it’s verified and in good standing.
- A Google Pay Compatible Device (for mobile app method): An Android smartphone running Android Lollipop (5.0) or higher with NFC capabilities, or a compatible smartwatch.
- Internet Connection: Required for the setup process.
- Updated Apps: Ensure both your Google Pay app and potentially your PayPal app are updated to their latest versions.
The Mobile App Method (Google Pay App)
This is the most common and arguably the most convenient method for most users.
- Open the Google Pay App: Locate and launch the Google Pay application on your Android smartphone. If you don’t have it, download it from the Google Play Store.
- Navigate to Payment Methods: From the main screen, look for a “Payment methods,” “Add a payment method,” or a similar option. This is often represented by a card icon or a “+” symbol.
- Select “Add PayPal”: Within the payment methods section, you should see an option to add various types of cards or payment services. Select “PayPal” from the list.
- Log In to PayPal: You will be redirected to a secure PayPal login page. Enter your PayPal email address and password, then tap “Log In.”
- Authorize Google Pay: PayPal will then ask you to authorize Google Pay to link to your account. Review the permissions requested (e.g., viewing balance, making payments) and tap “Agree & Connect” or a similar confirmation button.
- Verify (If Required): Depending on your PayPal account security settings, you might be prompted to verify your identity. This could involve receiving a code via SMS or email, or answering security questions. Follow the on-screen instructions.
- Set Up Default Funding Source (Optional): Once linked, Google Pay may ask you to select a default funding source from your PayPal account (e.g., PayPal balance, a specific bank account or card linked to PayPal) for Google Pay transactions. You can usually change this later.
- Confirmation: You should receive a confirmation message that PayPal has been successfully added to your Google Pay account. Your PayPal account will now appear alongside your other payment methods in Google Pay.
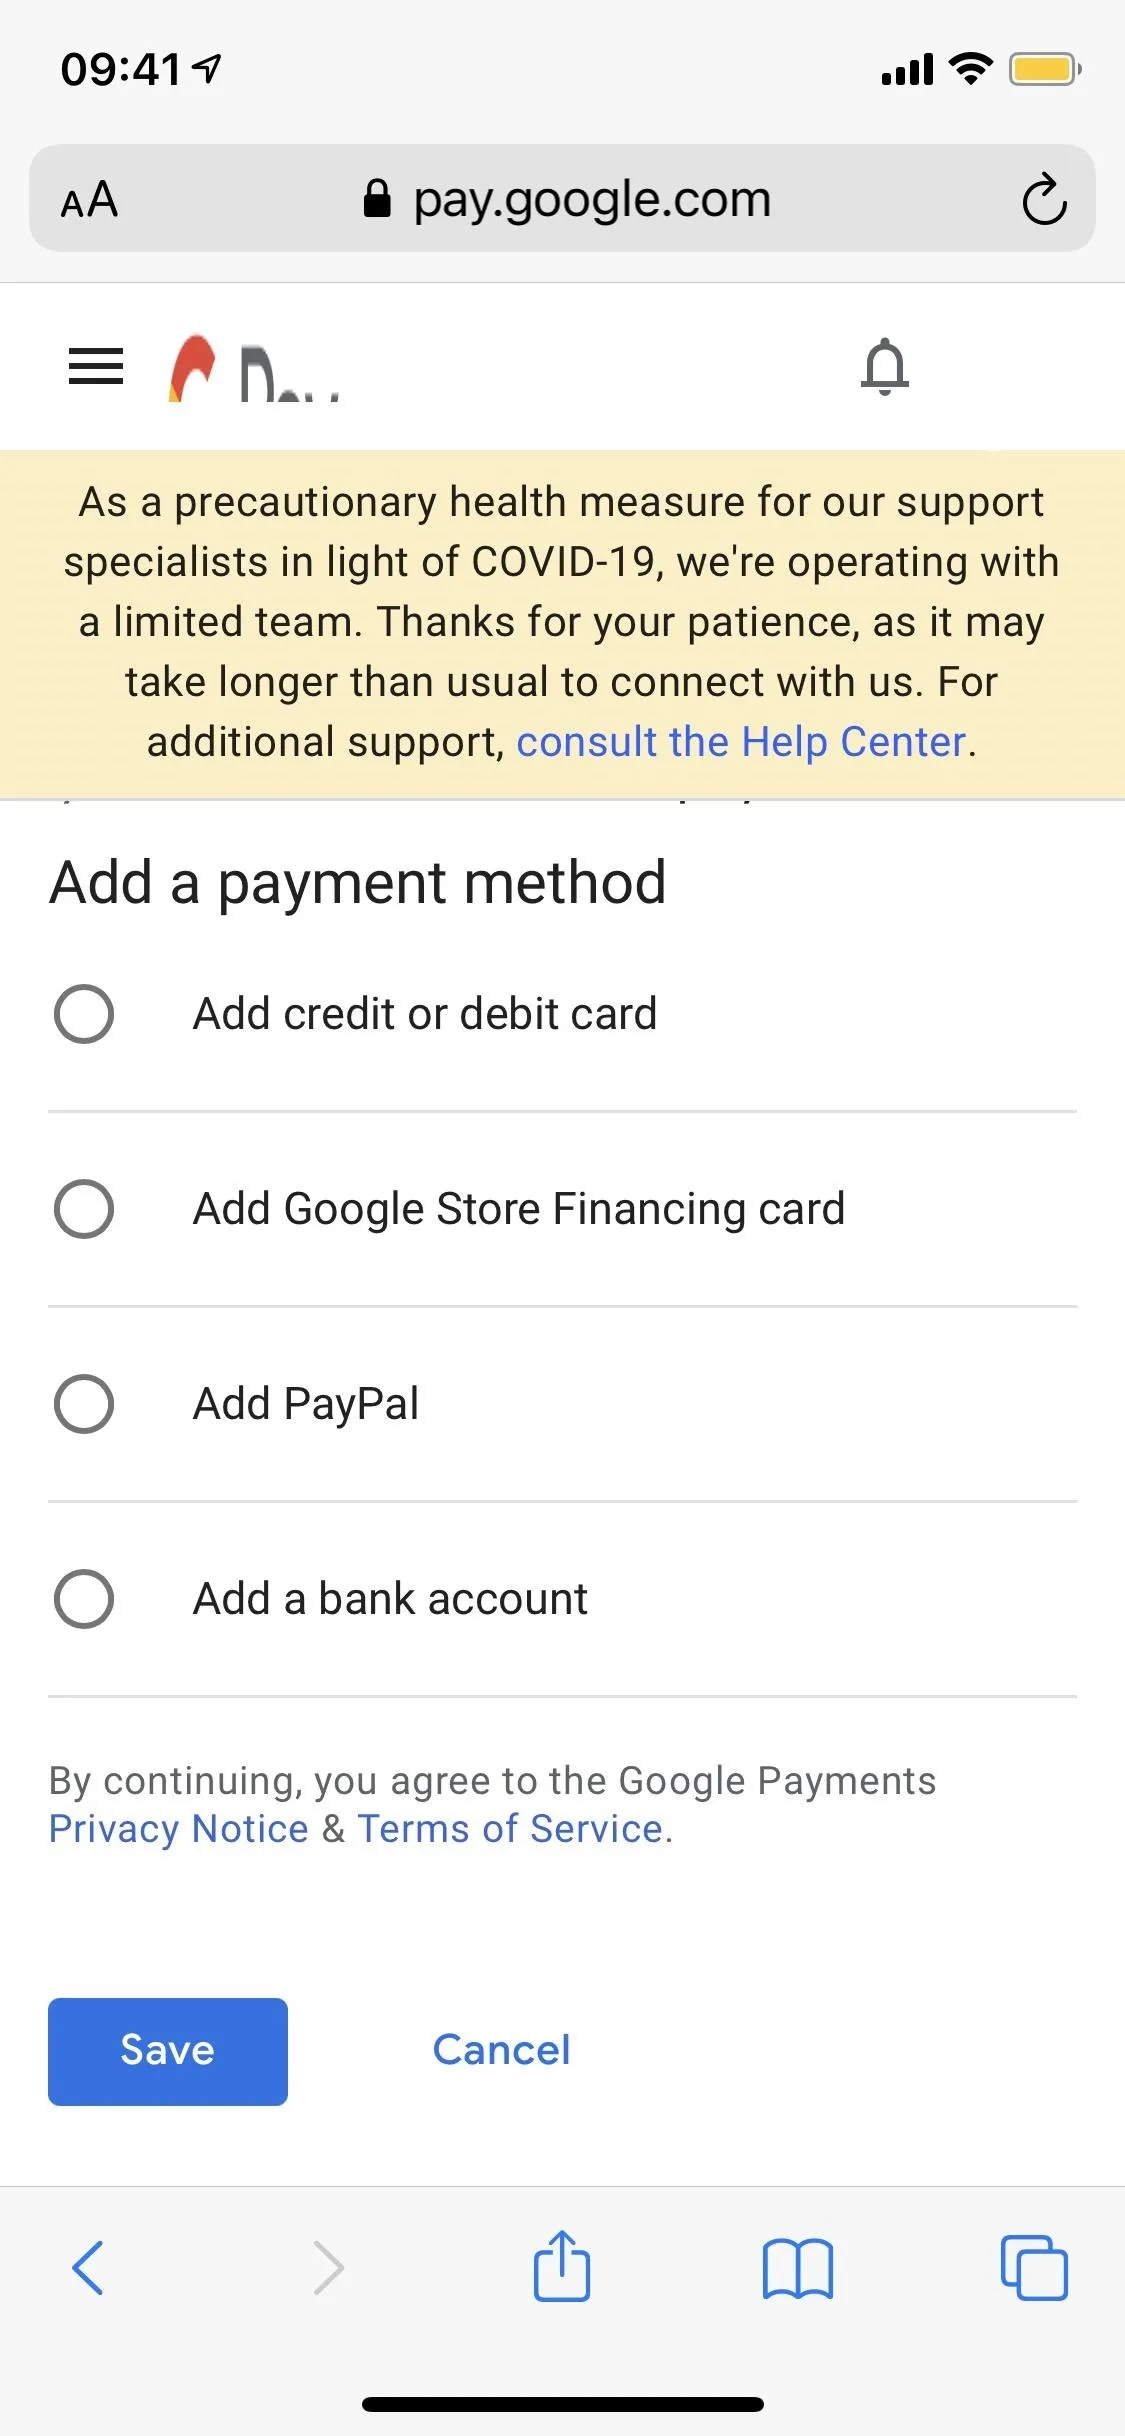
The Web Browser Method (Google Account)
For those who prefer a desktop interface or are setting up Google Pay on a new device, linking via your Google Account settings is an alternative.
- Go to Google Pay Website: Open a web browser on your computer or mobile device and navigate to
pay.google.com. - Sign In: Log in with your Google Account credentials.
- Access Payment Methods: On the left-hand navigation pane, click on “Payment methods.”
- Add Payment Method: Click on the “Add a payment method” button.
- Choose PayPal: From the options, select “PayPal.”
- Log In to PayPal and Authorize: Similar to the mobile app method, you will be redirected to PayPal’s secure login page. Enter your credentials, then authorize the connection between PayPal and Google Pay.
- Verify and Confirm: Complete any required verification steps and confirm the linkage. Your PayPal account will then be listed under your Google Pay payment methods.
Verifying Your PayPal Account
In some instances, after linking, Google Pay might require an additional verification step for your PayPal account, or PayPal itself might issue a small temporary charge to ensure the account’s validity. This is a standard security measure. Ensure that your PayPal account is fully verified and linked to a confirmed bank account or credit card for the smoothest experience. If a temporary charge occurs, you’ll need to confirm its amount in your PayPal transaction history or bank statement, usually within a few days.
Leveraging Your Integrated Digital Wallet
Once PayPal is successfully added to Google Pay, you unlock a new level of flexibility and convenience in your digital transactions. Understanding how to utilize this integration across various payment scenarios is key to maximizing its benefits.
Making In-Store Purchases with Google Pay and PayPal
One of the most significant advantages of this integration is the ability to use your PayPal funds for contactless payments in physical stores.
- Check for Google Pay Acceptance: Look for the Google Pay or contactless payment symbol at the checkout terminal.
- Wake Your Device: Unlock your Android phone or smartwatch. You don’t always need to open the Google Pay app.
- Select PayPal (If Not Default): If you have multiple payment methods in Google Pay, quickly swipe through them to select PayPal as your preferred payment method for that transaction. If PayPal is set as your default, this step is unnecessary.
- Tap to Pay: Hold the back of your phone or smartwatch near the contactless payment reader until you see a checkmark or confirmation on your device screen.
- Authentication: For larger transactions or enhanced security, you might be prompted for your phone’s PIN, pattern, fingerprint, or facial recognition to authorize the payment.
This effectively extends PayPal’s utility beyond online shopping into everyday brick-and-mortar retail, powered by Google Pay’s robust NFC technology.
Online Shopping: Speed and Security
The integration also streamlines online purchases on websites and within apps that support Google Pay.
- Choose Google Pay at Checkout: When shopping online, select “Google Pay” as your payment method.
- Select PayPal: In the Google Pay pop-up or window, choose your linked PayPal account as the funding source.
- Confirm Purchase: Review the transaction details and confirm the purchase.
This eliminates the need to manually enter PayPal login details every time, offering a faster and more secure checkout experience by leveraging Google Pay’s encrypted transaction protocols. Your financial details remain tokenized, adding an extra layer of protection.
Peer-to-Peer Payments and Sending Money
While Google Pay and PayPal both offer peer-to-peer (P2P) payment functionalities, the integration primarily focuses on using PayPal as a funding source for general transactions rather than directly merging their P2P networks.
- Google Pay’s Send Money: You can use your PayPal-linked funds to send money to other Google Pay users if PayPal is selected as the funding source within the Google Pay app’s “Send or Request” feature.
- PayPal’s Send Money: For direct PayPal-to-PayPal transfers, you would still typically use the dedicated PayPal app or website.
The integration simplifies the funding aspect, ensuring your PayPal balance is readily available for various types of transfers and payments through Google Pay.
Managing Your Connected Accounts
Maintaining awareness and control over your linked accounts is crucial.
- View Transactions: Both Google Pay and PayPal apps provide comprehensive transaction histories. You can review all payments made through the integrated system within Google Pay, and details of the funding source (PayPal) will also appear in your PayPal transaction log.
- Change Default Funding: Within the Google Pay app, you can easily change your default payment method at any time, switching between PayPal, credit cards, or debit cards as needed.
- Remove PayPal: Should you wish to unlink your PayPal account from Google Pay, simply navigate to the “Payment methods” section in your Google Pay app or
pay.google.com, select your PayPal account, and choose the option to “Remove” or “Delete” it.
Regularly reviewing your transaction history in both applications helps in monitoring spending and quickly identifying any unauthorized activity.
Security and Troubleshooting: Ensuring a Safe Experience
The marriage of PayPal and Google Pay brings together two platforms renowned for their robust security measures. However, understanding these features and knowing how to troubleshoot common issues is vital for a consistently secure and smooth experience.
Enhanced Security Features
The integrated system benefits from the layered security protocols of both services:
- Tokenization: When you add a payment method (including PayPal) to Google Pay, your actual account numbers are not stored on your device or shared with merchants. Instead, a unique encrypted number (token) is used for each transaction, significantly reducing the risk of fraud if merchant data is compromised.
- Device Security: Google Pay requires your phone to be unlocked and often demands biometric authentication (fingerprint, face recognition) or a PIN/pattern for transactions, especially for larger amounts. This ensures that even if your phone is lost or stolen, unauthorized payments are difficult to make.
- PayPal’s Fraud Protection: PayPal’s inherent buyer and seller protection policies extend to transactions made via Google Pay using your PayPal account. This includes monitoring for suspicious activity and offering recourse in cases of unauthorized transactions.
- Account Monitoring: Both Google and PayPal continuously monitor accounts for unusual activity. You’ll receive notifications for transactions, adding an extra layer of real-time security.
- Remote Wipe/Lock: If your device is lost or stolen, Google’s “Find My Device” feature allows you to remotely lock or wipe your phone, protecting your Google Pay data.
These combined measures create a formidable defense against digital payment threats, offering peace of mind to users.
Common Issues and Solutions
While the integration process is generally smooth, users might occasionally encounter minor hurdles.
- PayPal Not Appearing in Google Pay:
- Solution: Ensure both apps are updated. Try restarting your device. Double-check that your Google Pay app is linked to the correct Google Account and that your PayPal account is active and verified. Sometimes, removing and re-adding PayPal can resolve a glitch.
- Transaction Declined:
- Solution: Check your PayPal balance if you’re using it as the funding source. Verify that the linked bank account or card in PayPal has sufficient funds or isn’t expired. Ensure the merchant accepts Google Pay and that their terminal is functioning correctly. Your bank or PayPal might have flagged the transaction for security reasons; check your PayPal account for any alerts.
- Verification Problems:
- Solution: If PayPal or Google Pay requests verification, follow the instructions precisely. This often involves confirming a code sent to your phone or email. Ensure your contact details in both accounts are up to date.
- NFC Issues for In-Store Payments:
- Solution: Ensure NFC is enabled in your phone’s settings. Make sure your phone’s back is directly over the payment terminal’s NFC reader. Remove any thick phone cases that might interfere with the NFC signal.
- App Glitches:
- Solution: Clear the cache and data for both the Google Pay and PayPal apps in your phone’s settings. If persistent, try uninstalling and reinstalling the apps (ensure you remember your login credentials).
For more complex issues, reaching out to the customer support teams of Google Pay or PayPal is always recommended. They have specialized tools and knowledge to diagnose and resolve specific problems.
Maintaining Digital Wallet Hygiene
Beyond troubleshooting, proactive measures can significantly enhance your digital wallet security:
- Strong, Unique Passwords: Use complex passwords for both your Google and PayPal accounts, preferably with a password manager.
- Two-Factor Authentication (2FA): Enable 2FA on both accounts for an essential layer of security.
- Regular Software Updates: Keep your operating system and all apps updated to benefit from the latest security patches.
- Be Wary of Phishing: Always verify the sender of emails or messages that claim to be from PayPal or Google Pay before clicking links or providing information.
- Monitor Account Activity: Regularly review your transaction history in both apps to catch any unauthorized charges promptly.
By adhering to these best practices, you can enjoy the full convenience of your integrated digital wallet with confidence.

Conclusion
The ability to add PayPal to Google Pay represents a significant leap forward in creating a truly integrated and flexible digital payment experience. By seamlessly combining PayPal’s vast online reach and versatile funding options with Google Pay’s effortless in-store and in-app payment capabilities, users gain a powerful tool for managing their finances in the modern world. This integration not only expands your payment possibilities but also centralizes your digital transactions, simplifying financial management and enhancing convenience.
From quick tap-to-pay purchases at your local coffee shop to secure online shopping across global e-commerce platforms, the linked ecosystem ensures your funds are accessible and protected. With robust security measures underlying both platforms, and a clear understanding of how to manage and troubleshoot your integrated accounts, users can navigate the digital payment landscape with unparalleled confidence. Embracing this synergy means moving closer to a future where your digital wallet is truly comprehensive, always ready, and perfectly tailored to your evolving financial needs. Take the step today to connect your accounts and unlock the full potential of a unified digital payment experience.
aViewFromTheCave is a participant in the Amazon Services LLC Associates Program, an affiliate advertising program designed to provide a means for sites to earn advertising fees by advertising and linking to Amazon.com. Amazon, the Amazon logo, AmazonSupply, and the AmazonSupply logo are trademarks of Amazon.com, Inc. or its affiliates. As an Amazon Associate we earn affiliate commissions from qualifying purchases.