In an era defined by rapid technological advancements, our laptops serve as indispensable tools for work, creativity, communication, and entertainment. Yet, even the most capable machines can eventually succumb to the demands of modern software and multitasking, leading to frustrating slowdowns, stuttering applications, and an overall sluggish user experience. Before you consider shelling out for a brand-new device, there’s a highly effective, often overlooked, and remarkably cost-efficient upgrade that can breathe new life into your existing laptop: increasing its Random Access Memory (RAM).
This guide, stemming from our core expertise in Tech tutorials and productivity enhancements, will walk you through the entire process of installing more RAM. We’ll cover everything from diagnosing performance issues and understanding compatibility to the step-by-step physical installation. We’ll also touch upon the Money-saving aspects of this upgrade and how choosing reputable Brand components can ensure long-term reliability and performance. Prepare to unlock a significant boost in your laptop’s speed and responsiveness, transforming a lagging machine into a productive powerhouse once more.
Why Upgrade Your Laptop’s RAM? The Performance Edge
The decision to upgrade your laptop’s RAM isn’t just about adding more numbers to a spec sheet; it’s about fundamentally enhancing your machine’s ability to perform. RAM acts as your computer’s short-term memory, allowing it to quickly access data needed by currently running programs. When your RAM is insufficient, your laptop constantly has to swap data to and from slower storage drives (like SSDs or HDDs), a process known as “paging” or “swapping,” which creates bottlenecks and dramatically slows down your system.
Identifying RAM Deficiencies: Is Your Laptop Crying for More Memory?
How do you know if a RAM upgrade is what your laptop truly needs? Look for these common symptoms:
- Persistent Slowdowns and Freezes: Your laptop feels sluggish even with only a few applications open. Opening new tabs in your browser or switching between programs takes an unusually long time.
- Stuttering or Crashing Applications: Programs that used to run smoothly now frequently lag, freeze, or crash, especially resource-intensive ones like video editors, graphic design software, or modern games.
- Poor Multitasking Performance: If you juggle multiple browser tabs, email clients, word processors, and communication apps simultaneously, and your laptop struggles to keep up, it’s a strong indicator of insufficient RAM.
- “Out of Memory” Errors: While less common with modern operating systems, older systems or extremely demanding workloads might still trigger explicit “out of memory” warnings.
- High Disk Usage (Paging File): If you open Task Manager (Ctrl+Shift+Esc on Windows, Activity Monitor on macOS) and notice your disk usage spiking whenever your RAM usage is high, it means your system is heavily relying on the page file, indicating a RAM bottleneck.
These aren’t just minor annoyances; they’re direct productivity killers. Addressing them through a RAM upgrade can save you countless hours of waiting and frustration, a clear benefit from both a Tech and Productivity perspective.
The Tangible Benefits of More RAM: From Smooth Multitasking to Enhanced Gaming
Once you’ve bumped up your RAM, you’ll immediately notice several improvements:
- Smoother Multitasking: Switching between applications becomes instantaneous. You can run dozens of browser tabs, a video editor, a communication app, and a spreadsheet program all at once without a hitch.
- Faster Application Loading and Responsiveness: Programs will launch quicker and respond more snappily as more of their essential data can be held in fast RAM rather than slow storage.
- Improved Gaming Performance: While the GPU is paramount for gaming, sufficient RAM prevents stuttering and texture loading delays, especially in open-world games or titles with high-resolution assets.
- Enhanced Productivity for Professional Software: For users of demanding applications like Adobe Photoshop, Premiere Pro, AutoCAD, or virtual machines, more RAM directly translates to faster rendering, smoother previews, and the ability to handle larger, more complex projects.
- Better Web Browsing Experience: Modern web browsers are notorious RAM hogs. More RAM means you can keep many tabs open without performance degradation.
Cost-Effectiveness vs. New Laptop: A Smart Financial Decision
From a Money perspective, a RAM upgrade is often one of the most financially astute decisions you can make for an aging laptop. Compared to the hundreds or even thousands of dollars required to purchase a new laptop, a RAM upgrade typically costs between $50 and $150. This small investment can extend the usable life of your current machine by several years, providing an excellent Return on Investment (ROI) and delaying a much larger expenditure.
Moreover, if your laptop has a relatively modern processor (Intel Core i5/i7/i9 or AMD Ryzen 5/7/9 from the last 5-7 years) and an SSD, a RAM upgrade is likely the most impactful performance boost you can get for the price, transforming your existing hardware into something that feels significantly newer without breaking the bank. This aligns perfectly with smart personal finance and getting the most value out of your technology investments.
Before You Begin: Crucial Preparations and Compatibility Checks
Before you even think about opening your laptop, thorough preparation is paramount. Rushing this stage can lead to incompatible purchases, wasted time, and potential damage to your system. This phase is heavily focused on Tech specifics and ensuring a seamless upgrade.
Determining Your Current RAM and Laptop Specifications
The first step is to understand what kind of RAM your laptop currently uses and what its maximum capacity is.
-
Check Current RAM (Windows):
- Right-click on the Taskbar and select “Task Manager.”
- Go to the “Performance” tab and select “Memory.”
- You’ll see your current RAM amount, speed, and how many slots are used. For example, “8 GB DDR4 2666MHz (2 of 4 slots).”
- Alternatively, type “dxdiag” in the Windows search bar and press Enter. The “System” tab will show your current RAM.
- For more detailed information, use a third-party tool like CPU-Z, which provides exhaustive details about your RAM, including type, size, speed, and even the manufacturer.
-
Check Current RAM (macOS):
- Click the Apple menu in the top-left corner and select “About This Mac.”
- The “Overview” tab shows your installed memory. For slot details, you might need to go to “System Report…” > “Memory.”
- Be aware that many newer MacBook models have RAM soldered directly to the motherboard, making upgrades impossible.
-
Consult Your Laptop Manufacturer’s Documentation: This is the most reliable source for your laptop’s maximum RAM capacity and the specific type of RAM it supports. Visit the support section of your laptop’s Brand website (e.g., Dell, HP, Lenovo, ASUS, Acer) and search for your exact model number. Look for specifications or an upgrade guide. This documentation will tell you:
- The maximum amount of RAM your laptop can handle (e.g., 16GB, 32GB).
- The number of RAM slots available (e.g., 1, 2).
- The specific RAM generation (DDR3, DDR4, DDR5) and often the compatible speeds (e.g., 2400MHz, 3200MHz).
- Whether the RAM is SO-DIMM (Small Outline Dual In-line Memory Module), which is the standard for laptops.
-
Use Online RAM Configurator Tools: Websites like Crucial.com or Kingston.com offer “memory finders.” You simply enter your laptop’s manufacturer, product line, and model number, and they will tell you exactly what RAM is compatible and available for your system. This is an excellent way to ensure you’re getting the right part.
Understanding RAM Types: DDR3, DDR4, DDR5, and SO-DIMM
RAM isn’t a one-size-fits-all component. Laptops use SO-DIMM modules, which are smaller than the DIMMs used in desktop computers. Beyond that, the generation matters:
- DDR3: Older standard, found in laptops manufactured roughly before 2014-2015.
- DDR4: The most common standard for laptops made between 2015 and 2021-2022.
- DDR5: The newest standard, found in high-end and recent laptops (typically from 2022 onwards).
You absolutely must match the RAM generation. You cannot install DDR4 RAM in a laptop designed for DDR3, and vice-versa, as the physical connectors are different.
Max RAM Capacity and Slot Availability: Knowing Your Limits
Your laptop’s motherboard has a limit to how much RAM it can address. If your laptop supports a maximum of 16GB of RAM and has two slots, you could install two 8GB modules (8GB x 2 = 16GB). If it only has one slot, you’re limited to a single 16GB module (if supported). Knowing these limits prevents overspending on RAM you can’t use or purchasing modules that exceed your system’s capabilities.
Choosing the Right RAM Modules: Speed, Latency, and Brand Reputation
Once you know the type and capacity, you’ll need to consider speed (MHz) and latency (CL or CAS Latency).
- Speed: Aim to match or exceed the speed of your existing RAM, or choose the fastest speed your laptop and CPU officially support. While you can often mix different speeds, the RAM will always operate at the speed of the slowest module installed. For optimal performance, it’s best to buy a matched pair or a single module with the same speed as your existing one.
- Latency: Lower CL numbers are generally better, indicating faster response times. For most users, matching the CL of existing RAM is sufficient, but don’t obsess over minute differences unless you’re a serious enthusiast.
- Brand Reputation: Stick with well-known and reputable Brands in the RAM market. Companies like Crucial, Kingston, Corsair, Samsung, G.Skill, and Hynix are known for their reliability, compatibility, and often offer excellent warranties. Purchasing from established brands minimizes compatibility issues and ensures you’re getting quality components, a key consideration for long-term system stability.

Essential Tools and Safety Precautions
Before you power down your laptop, gather these items:
- Small Phillips-head Screwdriver: Most laptops use small Phillips screws. A magnetic tip is a bonus.
- Plastic Pry Tool (optional but recommended): Helps gently separate plastic clips and panels without scratching. Guitar picks can work in a pinch.
- Anti-static Wrist Strap (highly recommended): Static electricity is the silent killer of electronic components. An anti-static strap, connected to a grounded metal object, dissipates any static charge from your body, protecting sensitive components like RAM.
- Clean, Well-Lit Workspace: A tidy area prevents losing tiny screws and allows you to see what you’re doing clearly.
- A Small Container: To hold screws safely.
Safety First: Always work with your laptop completely powered off and unplugged from the wall charger. Remove the battery if it’s external or easily removable. If the battery is internal, disconnect it from the motherboard after opening the laptop, if possible, following your laptop’s service manual. This prevents accidental short circuits and electric shocks.
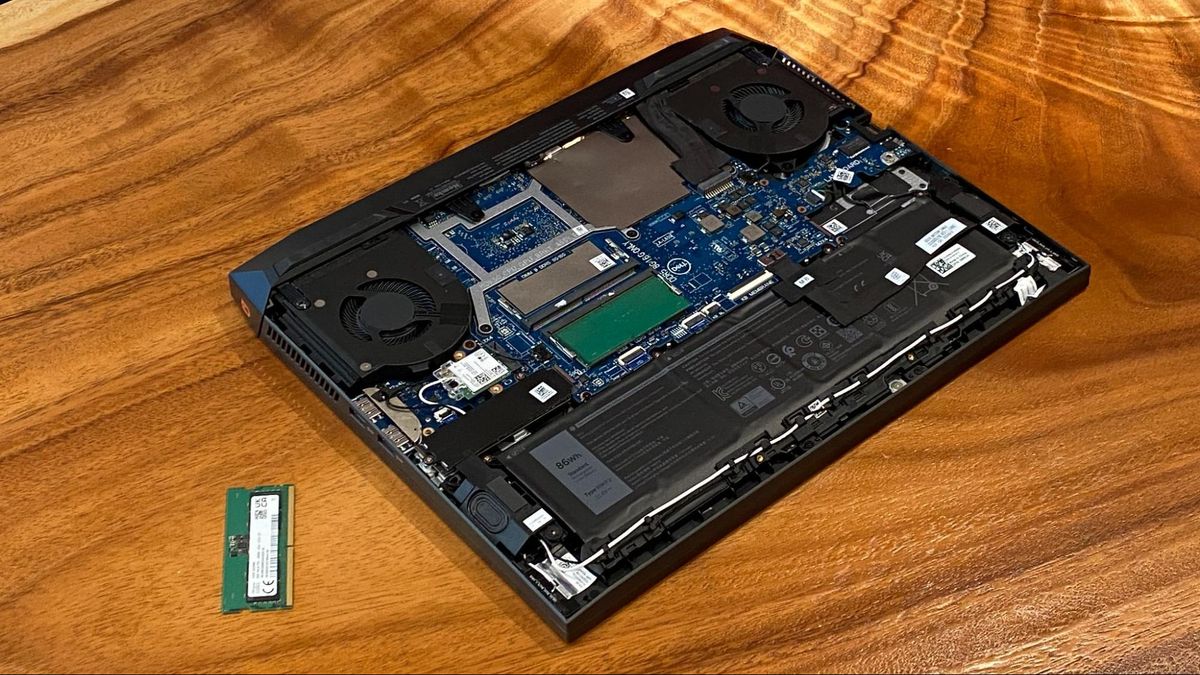
Step-by-Step Guide: Installing New RAM in Your Laptop
Now that you’re prepared, it’s time for the hands-on part of the upgrade. This is where the Tech tutorial aspect comes alive, guiding you through each physical action.
1. Power Down and Disconnect
Ensure your laptop is completely powered off, not just in sleep or hibernation mode. Disconnect the power adapter and remove any peripherals (USB drives, external mouse, etc.). If your laptop has an easily removable battery, take it out.
2. Accessing the RAM Slots
This is often the trickiest part, as laptop designs vary widely.
- Look for an Access Panel: Many older laptops and some newer budget models have a dedicated small panel on the underside, usually secured by 1-2 screws, marked with a RAM or memory icon.
- Removing the Entire Bottom Panel: More common in modern ultrabooks and gaming laptops, you might need to remove all visible screws from the bottom of the laptop and then carefully pry open the entire bottom case. Be gentle with plastic clips and use your plastic pry tool.
- Consult Your Manual/Online Resources: If you’re unsure, refer to your laptop’s service manual or search for “[Your Laptop Model] RAM upgrade” on YouTube for visual guides.
- Ground Yourself: Once the case is open, if you’re not wearing an anti-static wrist strap, touch an unpainted metal surface on the laptop’s chassis to discharge any static electricity from your body.
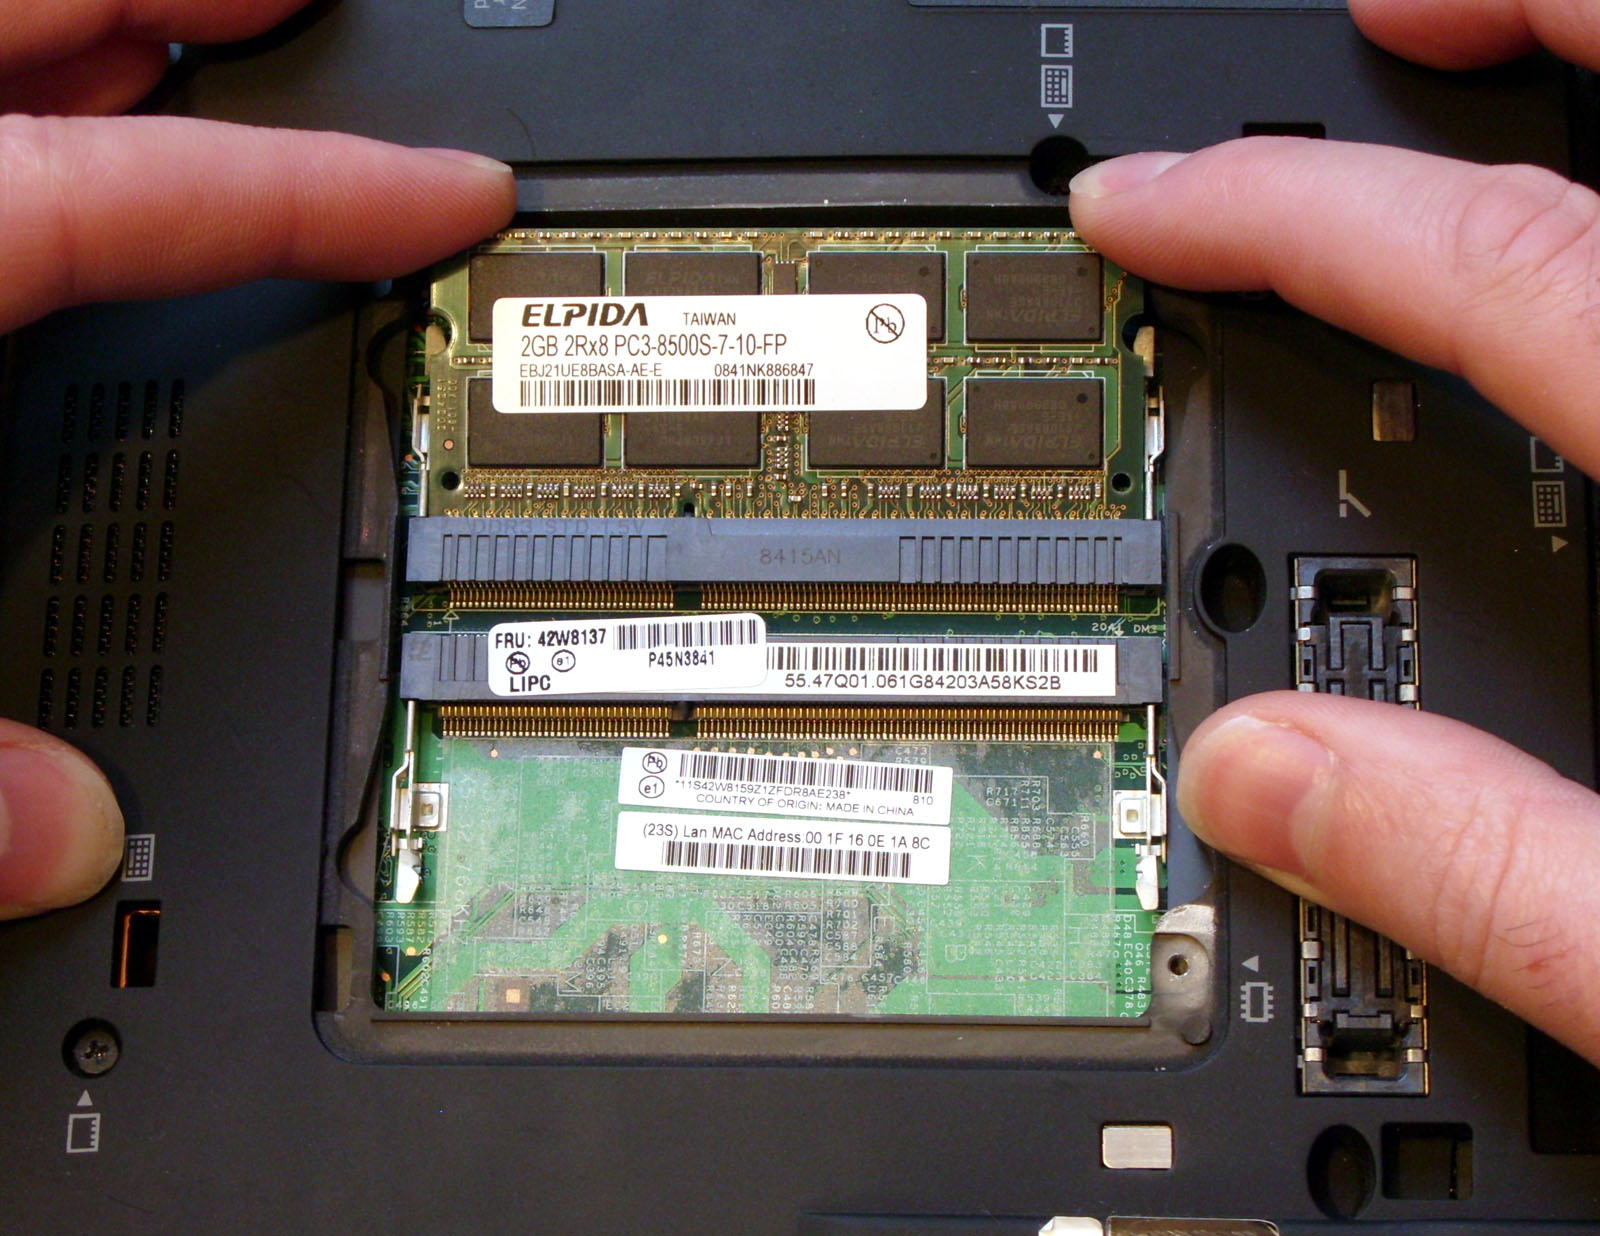
3. Removing Old RAM (If Applicable)
If you’re replacing existing RAM modules:
- Locate the Module: RAM modules are usually held in place by two small metal or plastic clips on either side.
- Release the Clips: Gently push the clips outwards away from the module. The RAM stick should pop up at an angle.
- Remove the Module: Once angled, you can gently slide the module out of its slot. Hold it by the edges, avoiding touching the gold connectors. Place it in an anti-static bag if you plan to reuse or store it.
4. Installing New RAM
Installing the new RAM is essentially the reverse of removal.
- Align the Notch: Look closely at the new RAM module and the RAM slot. There’s a small notch (key) on the gold connector edge of the RAM module that must align perfectly with a corresponding bump in the RAM slot. This ensures it’s inserted in the correct orientation. Never force a RAM module.
- Insert at an Angle: Hold the RAM module by its edges and insert it into the slot at a 45-degree angle, pushing firmly but gently until the gold connectors are almost fully hidden, and only the top edge of the module is visible above the clips.
- Push Down to Lock: Once seated, push the module down flat towards the motherboard. You should hear and feel the two side clips snap into place, securing the module horizontally. Double-check that both clips are firmly engaged.
- Repeat for Additional Slots: If installing multiple modules, repeat the process for any remaining empty slots.
5. Reassembling Your Laptop
- Reconnect Battery (If Disconnected): If you disconnected the internal battery, carefully reconnect its cable to the motherboard.
- Replace the Back Panel: Carefully align the bottom case or access panel and gently press it into place, ensuring all clips engage correctly.
- Replace Screws: Secure all the screws you removed, making sure not to overtighten them.
6. First Boot and Verification
- Power On: Reconnect your power adapter (and external battery, if applicable). Power on your laptop.
- Initial Boot: The first boot after a RAM upgrade might take slightly longer than usual as the system registers the new hardware. Don’t panic if you see a blank screen for a few extra seconds.
- Verify Installation: Once Windows or macOS loads:
- Windows: Open Task Manager (Ctrl+Shift+Esc), go to the “Performance” tab, and select “Memory.” Verify that the total amount of RAM listed matches your new total (e.g., 16 GB).
- macOS: Go to Apple menu > “About This Mac” and confirm the displayed memory.
- BIOS/UEFI: For advanced users, you can enter your laptop’s BIOS/UEFI settings (usually by pressing F2, Del, or Esc repeatedly during boot) to verify the RAM amount before the OS loads.
If the RAM amount is incorrect or the laptop fails to boot, power it down, re-open it, and carefully re-seat the RAM modules, ensuring they are firmly clipped in. Sometimes, simply taking them out and putting them back in correctly solves the issue.
Optimizing Your System After the Upgrade
Congratulations! You’ve successfully upgraded your laptop’s RAM. But the journey doesn’t end there. A few post-upgrade steps can ensure you’re getting the absolute best out of your enhanced system, tying into broader Tech maintenance and Productivity principles.
Monitoring Performance and Enjoying the Boost
Take some time to use your laptop as you normally would. Open those demanding applications, multitask with numerous browser tabs, and see the difference. You should notice a significant improvement in responsiveness and fluidity. Continue to monitor your system’s performance using Task Manager or Activity Monitor; you’ll likely see your RAM usage being much more comfortably within limits, with less reliance on virtual memory.
Software Updates and Driver Checks
While RAM upgrades rarely require specific driver updates, it’s always good practice to ensure your operating system and all device drivers are up-to-date. Occasionally, a system firmware (BIOS/UEFI) update might be available that offers improved memory compatibility or performance. Check your laptop manufacturer’s Brand support website for any recommended updates.
General Maintenance Tips for Sustained Performance
To maintain the snappy performance your new RAM provides, adopt these general tips:
- Keep Your OS Lean: Regularly uninstall unused programs and files.
- Manage Startup Programs: Prevent unnecessary applications from launching with your operating system, which can consume RAM from the get-go.
- Regular Software Updates: Keep your OS and applications updated to benefit from performance improvements and security patches.
- Antivirus and Malware Protection: Ensure your system is free from malicious software that can hog resources.
Conclusion
Upgrading your laptop’s RAM is a powerful and accessible way to extend its lifespan, significantly boost its performance, and save you money in the long run. By following this comprehensive Tech guide, you’ve not only enhanced your device but also gained valuable insight into its inner workings. You’ve transformed a potentially sluggish machine into a highly responsive, multitasking powerhouse, all for a fraction of the cost of a new laptop—a testament to smart Money management and leveraging the value of established Brand components. Embrace the renewed speed and productivity, and enjoy your revitalized laptop!
aViewFromTheCave is a participant in the Amazon Services LLC Associates Program, an affiliate advertising program designed to provide a means for sites to earn advertising fees by advertising and linking to Amazon.com. Amazon, the Amazon logo, AmazonSupply, and the AmazonSupply logo are trademarks of Amazon.com, Inc. or its affiliates. As an Amazon Associate we earn affiliate commissions from qualifying purchases.