
In the ever-evolving landscape of digital technology, where data is king and information reigns supreme, having ample storage space is not just a luxury—it’s often a necessity. Whether you’re a gamer hoarding a vast library of titles, a content creator managing enormous video files, a professional safeguarding critical work documents, or simply a casual user whose digital footprint continues to grow, the need for more storage is almost inevitable. While Solid State Drives (SSDs) have revolutionized speed and responsiveness, Hard Disk Drives (HDDs) continue to hold a vital place in the tech ecosystem, offering unparalleled capacity at a fraction of the cost. Learning how to install an HDD empowers you to take control of your computer’s capabilities, extending its lifespan and enhancing its utility. This comprehensive guide will walk you through every step of installing an internal HDD, transforming your system into a more robust and capable machine.
Preparing for Your Storage Upgrade: Why and What You Need
Before diving into the physical installation, it’s crucial to understand why you might choose an HDD, what types are available, and what essential preparations you need to make. This foundational knowledge ensures a smooth process and optimal results, aligning with best practices in Tech and even making smart Money decisions.
The Enduring Relevance of Hard Disk Drives (HDDs)
Despite the rise of lightning-fast SSDs, HDDs remain incredibly relevant for several key reasons, primarily centering on their superior cost-per-gigabyte ratio. For mass storage, archival purposes, and scenarios where sheer capacity trumps raw speed, HDDs are the undisputed champions.
- Mass Storage: HDDs are ideal for storing large volumes of data such as vast game libraries, high-resolution video projects, extensive photo collections, or system backups. If you need terabytes of storage without breaking the bank, an HDD is your best bet.
- Cost-Effectiveness: When it comes to price per gigabyte, HDDs significantly outperform SSDs. This makes them an excellent choice for users on a budget or those looking to expand storage dramatically without a massive investment, a clear win for Money management in tech.
- Backup Solutions: Many users employ HDDs as reliable backup drives, either internally as a secondary drive or externally. Their large capacities allow for comprehensive system images and data archives, crucial for digital security and peace of mind.
- Specific Workloads: For tasks that involve sequential read/write operations of large files, such as video editing archives or data warehousing, HDDs perform admirably. While an SSD might handle the active project, the finished work often finds its home on an HDD.
When considering an HDD, you’ll primarily encounter SATA (Serial ATA) drives for modern systems. These come in two main form factors: 3.5-inch for desktop computers and 2.5-inch for laptops (though 2.5-inch HDDs are less common in modern laptops, often replaced by SSDs). Understanding these nuances is a core part of effective Tech management.
Essential Tools and Pre-Installation Checks
Proper preparation is half the battle. Gathering the necessary tools and conducting thorough pre-installation checks will prevent frustration and potential damage, ensuring a successful upgrade and protecting your investment.
-
Tools You’ll Need:
- Phillips Head Screwdriver: Most PC cases and drive mounts use Phillips head screws. A magnetic tip can be very helpful for preventing dropped screws.
- Anti-Static Wrist Strap: Crucial for preventing electrostatic discharge (ESD), which can permanently damage sensitive computer components. Ground yourself to an unpainted metal surface of your PC case while wearing it. This is a fundamental aspect of responsible Tech maintenance.
- Flashlight (Optional but Recommended): For illuminating cramped or dark areas inside the PC case.
- Zip Ties or Velcro Cable Ties (Optional): For neat cable management, which not only improves aesthetics but also airflow, contributing to system longevity and a professional-looking setup (a subtle nod to Brand if you’re showcasing your build).
- User Manuals: Your PC case and motherboard manuals can provide specific instructions for drive bay locations and SATA port configurations.
-
Pre-Installation Checks:
- Compatibility: Ensure your motherboard has available SATA data ports and that your power supply unit (PSU) has available SATA power connectors. Most modern motherboards and PSUs support SATA III (6 Gbps), which is standard for HDDs.
- Physical Space: Verify your PC case has an available 3.5-inch (or 2.5-inch with adapter) drive bay. Some cases have tool-less designs, while others require screws and brackets.
- Power Supply Capacity: While HDDs don’t consume a huge amount of power, ensure your PSU has enough wattage to support the new drive, especially if you have many other components.
- Data Backup: This is perhaps the most critical step. Before undertaking any hardware changes, always back up your essential data. While installing an HDD is generally safe, unexpected issues can occur. Backing up your data to an external drive or cloud service safeguards your important files and provides peace of mind. This emphasizes Digital Security as a core part of Tech responsibility and protects your personal or professional Money investment in data.
The Physical Installation: Integrating Your New Drive
With preparations complete, you’re ready to physically integrate the new HDD into your system. This section details the hands-on steps, focusing on safety and precision to ensure your hardware is properly connected.
Safety First: Powering Down and Opening the PC Case
Working inside a computer requires careful attention to safety to prevent injury to yourself and damage to your components. This step is non-negotiable for any hardware upgrade.
- Power Down Completely:
- Save all your work and close all applications.
- Perform a proper shutdown of your operating system.
- Once the computer is off, unplug the power cable from the wall outlet and the back of your PC.
- Press and hold the power button on your PC for 5-10 seconds to drain any residual power from the system’s capacitors.
- Ground Yourself:
- Wear your anti-static wrist strap and attach its clip to an unpainted metal part of your PC case. This continuously grounds you, preventing ESD that could fry sensitive electronics. If you don’t have a wrist strap, frequently touch an unpainted metal part of your case to discharge static electricity before touching any internal components.
- Position Your PC:
- Lay your PC case on its side on a clean, flat, and stable surface. Good lighting will be helpful here.
- Open the PC Case:
- Most desktop cases have thumb screws or standard Phillips head screws on the rear that hold the side panels in place. Unscrew these, then carefully slide or lift off the side panel(s) to expose the interior. Typically, you’ll need to remove the left-side panel (when looking at the front of the PC) to access the motherboard and drive bays.
Mounting the Hard Drive into a Drive Bay
Once the case is open, the next step is to secure your new HDD in an available drive bay. Modern cases often feature user-friendly, tool-less designs, but some may require screws and brackets.
- Locate an Empty Drive Bay:
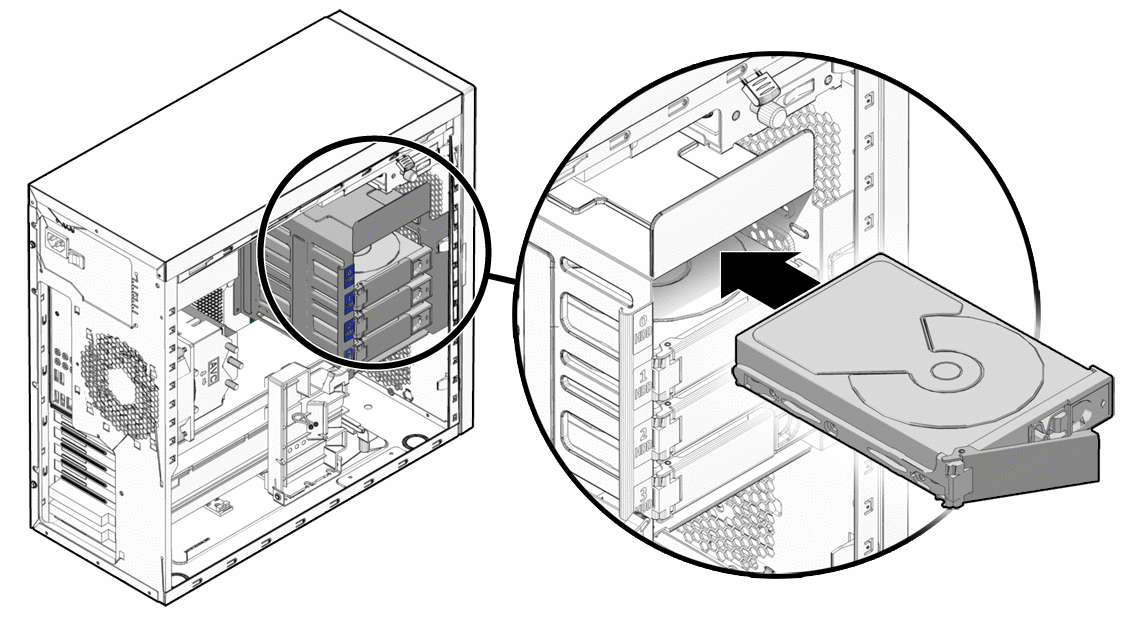
- Internal HDDs typically mount in 3.5-inch drive bays. These are usually cages or slots located at the front or bottom of your PC case. If you have a 2.5-inch HDD, you’ll likely need a 3.5-inch adapter bracket to mount it securely in a desktop bay.
- Insert the Drive:
- Tool-less Bays: If your case has a tool-less design, it might involve a plastic tray or lever mechanism. Slide the HDD into the bay until it clicks into place or the lever secures it. Ensure the SATA data and power ports are facing towards the interior of the case, accessible for cable connection.
- Screw-in Bays: If your case requires screws, carefully slide the HDD into the bay. Align the screw holes on the side of the HDD with the corresponding holes in the drive bay or mounting bracket. Secure the drive with the appropriate screws (often specialized fine-thread screws provided with your case or HDD). Typically, two screws on each side are sufficient to hold it firmly. Ensure the drive is snug and doesn’t wobble, as vibrations can contribute to noise and potential wear over time.
- Consider Airflow:
- When choosing a drive bay, try to select one that doesn’t obstruct airflow from your front intake fans to other components. Proper airflow is crucial for maintaining optimal system temperatures, a key aspect of long-term Tech performance.
Connecting Data and Power Cables
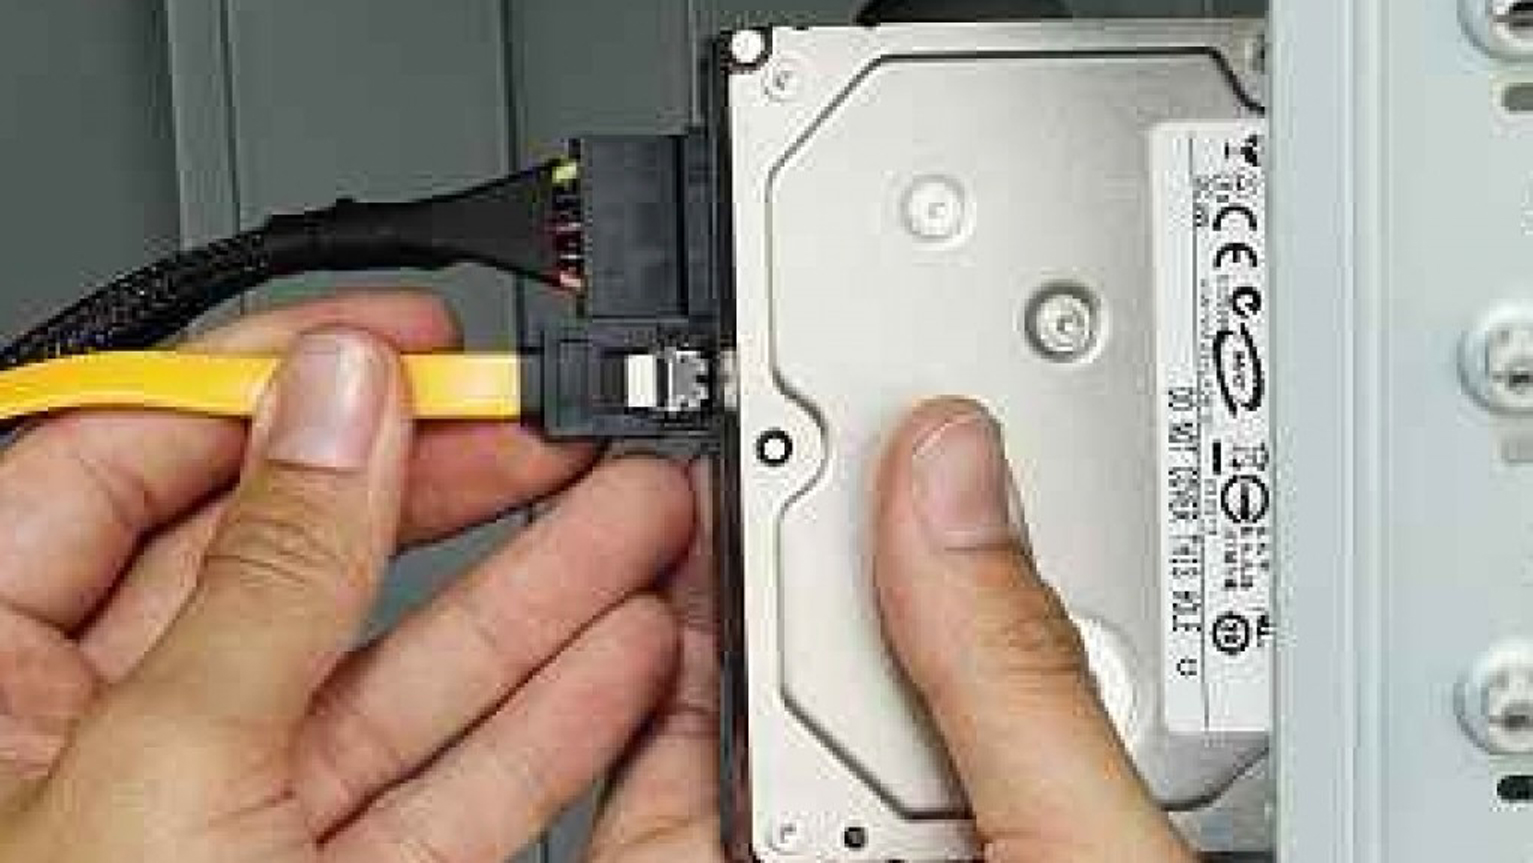
With the HDD physically mounted, the final step in the physical installation is to connect the necessary cables that provide power and allow data transfer.
- Connect the SATA Data Cable:
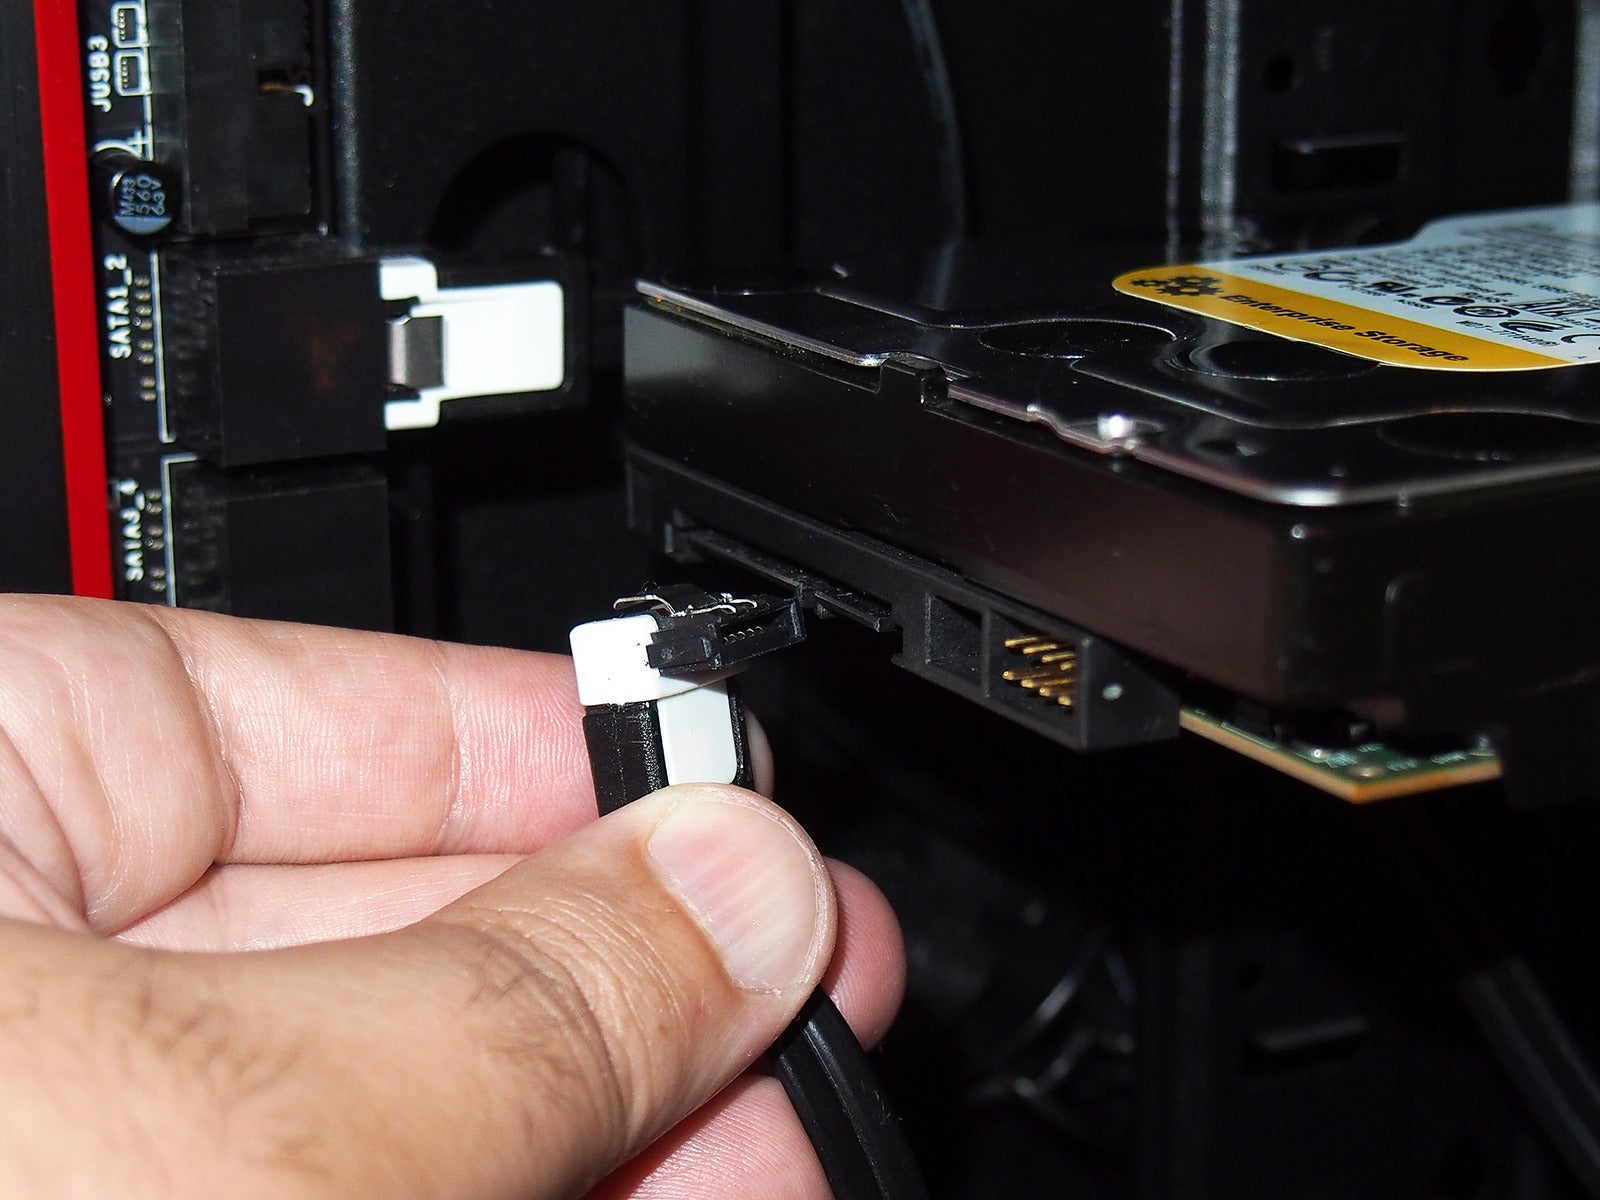
- Take one end of a SATA data cable (usually red, black, or blue, with a distinctive L-shaped connector) and gently plug it into the corresponding port on the back of your new HDD. It’s designed to fit only one way.
- Connect the other end of the SATA data cable to an available SATA port on your motherboard. Motherboard SATA ports are typically labeled (e.g., SATA0, SATA1, SATA2). It’s generally good practice to use the lowest numbered available port.
- Connect the SATA Power Cable:
- Locate an available SATA power connector from your power supply unit (PSU). These are wider, flat L-shaped connectors.
- Gently push the SATA power connector into the corresponding port on the back of your new HDD. Again, it’s keyed to fit only one way. Do not force it.
- Cable Management (Optional but Recommended):
- Once both cables are securely connected, take a moment to manage them neatly. Use zip ties or Velcro straps to bundle cables together and route them along the case’s edges or behind the motherboard tray if your case allows. Good cable management improves airflow, makes future maintenance easier, and gives your build a cleaner, more professional appearance – reinforcing a positive Brand image for your system.
Software Configuration: Bringing Your Drive Online
After the physical installation, your computer needs to recognize and prepare the new HDD for use. This involves a few software-related steps, from checking the BIOS/UEFI to formatting the drive within your operating system. This is where your Tech understanding shifts from hardware to software.
BIOS/UEFI Verification and Initial Setup
The first software step is to ensure your computer’s firmware—the BIOS (Basic Input/Output System) or its modern successor, UEFI (Unified Extensible Firmware Interface)—detects the newly installed HDD.
- Reassemble and Power On:
- Carefully replace the side panel(s) of your PC case.
- Reconnect all peripherals (monitor, keyboard, mouse) and the power cable.
- Power on your computer.
- Enter BIOS/UEFI:
- As your computer starts, repeatedly press the designated key to enter BIOS/UEFI setup. Common keys include
Del,F2,F10, orF12. The specific key is usually displayed on the screen during startup or can be found in your motherboard manual.
- As your computer starts, repeatedly press the designated key to enter BIOS/UEFI setup. Common keys include
- Verify Drive Detection:
- Navigate through the BIOS/UEFI menus. Look for sections like “Storage Configuration,” “SATA Configuration,” “Boot Devices,” or “Main.” You should see your new HDD listed among the detected drives. If it’s not detected, double-check your data and power cable connections and ensure the drive is securely seated.
- Ensure the SATA controller mode is set to AHCI (Advanced Host Controller Interface) for optimal performance and compatibility with modern operating systems.
- Exit and Save Changes:
- Once you’ve confirmed the drive is detected, save any changes you might have made (though usually none are needed if the drive is just being added) and exit BIOS/UEFI. Your computer will then boot into your operating system.
Initializing, Partitioning, and Formatting Your New HDD
Even after detection, a brand-new HDD isn’t immediately usable. It needs to be initialized, partitioned, and formatted by your operating system. This is a critical process for preparing the drive for data storage.
- Access Disk Management (Windows):
- In Windows, right-click on the Start button (or press
Win + X) and select “Disk Management.” - You might be immediately prompted to initialize the new disk. If not, look for a disk marked “Unknown,” “Not Initialized,” or showing unallocated space.
- In Windows, right-click on the Start button (or press
- Initialize the Disk:
- Right-click on the new disk (the one with unallocated space) and select “Initialize Disk.”
- You’ll be asked to choose a partition style:
- MBR (Master Boot Record): Older standard, supports drives up to 2TB. If your HDD is larger than 2TB, MBR will only recognize the first 2TB.
- GPT (GUID Partition Table): Modern standard, supports drives larger than 2TB and is generally recommended for all new drives, especially with UEFI systems.
- Choose GPT unless you have a specific reason to use MBR (e.g., compatibility with a very old system). Click “OK.”
- Create a New Simple Volume (Partitioning and Formatting):
- After initialization, the disk will show “Unallocated” space. Right-click on this unallocated space and select “New Simple Volume…”
- Follow the New Simple Volume Wizard:
- Specify Volume Size: You can use the entire disk for one partition or create multiple smaller partitions. For most users, using the maximum available space for a single partition is simplest.
- Assign Drive Letter: Choose an available letter (e.g., D:, E:, F:) for your new drive.
- Format Partition:
- File System: For Windows, choose NTFS (New Technology File System). If you plan to use the drive with macOS or Linux, consider their native file systems (APFS/HFS+ for macOS, Ext4 for Linux) or exFAT for cross-platform compatibility, though NTFS is standard for Windows use.
- Allocation unit size: Leave this at “Default.”
- Volume label: Give your drive a descriptive name (e.g., “Data Drive,” “Game Storage”).
- Perform a “Quick Format” (it’s much faster).
- Click “Next” and then “Finish.” Windows will format the drive, and it will then appear in “This PC” (or “My Computer”) as a usable storage device.
- For macOS users, you would use “Disk Utility” and choose “Erase” to format the drive, typically selecting APFS or Mac OS Extended (Journaled). Linux users would use tools like
GPartedorfdisk/mkfs.
Post-Installation Considerations: Drivers and Data Management
Once formatted, your new HDD is ready for action. While modern operating systems usually handle HDD drivers automatically, there are still a few considerations to optimize its use and ensure long-term data integrity.
- Driver Installation: For modern SATA HDDs, specific drivers are rarely needed; the operating system’s built-in drivers and your motherboard’s chipset drivers are usually sufficient. Ensure your motherboard chipset drivers are up to date by visiting your motherboard manufacturer’s website. This ensures optimal communication between your CPU, motherboard, and the new drive, a crucial part of Tech performance.
- Data Migration and Organization:
- Now you can start transferring files to your new drive. If you’re moving large game installations, media libraries, or project files, plan your data migration.
- Consider creating a logical folder structure on your new drive. Good organization enhances productivity and allows for faster file retrieval, contributing to a more efficient digital workflow. This attention to detail can even subtly reflect on your personal Brand of efficiency.
- If you’re using the HDD for backups, configure your backup software (Windows Backup, Mac Time Machine, or third-party solutions) to utilize the new drive. This is paramount for Digital Security and protecting valuable data that might be linked to your Money or professional livelihood.
Troubleshooting Common Issues and Optimizing Performance
Even with careful installation, you might encounter minor hiccups. Knowing how to troubleshoot common issues and optimize your HDD’s performance will ensure you get the most out of your upgrade and extend the life of your investment.
What If It Doesn’t Work? Common Problems and Solutions
If your new HDD isn’t behaving as expected, don’t panic. Most issues are minor and easily resolvable with systematic troubleshooting.
- Drive Not Detected in BIOS/UEFI or OS:
- Check Cables: The most common culprit. Ensure both the SATA data and power cables are securely connected at both ends (HDD, motherboard, and PSU). Try swapping cables with known working ones or using different SATA ports on the motherboard and different power connectors from the PSU.
- Power Supply: Verify your PSU has enough wattage and that the SATA power connector is properly seated.
- Drive Itself: If possible, test the drive in another computer to rule out a faulty drive. If it fails there too, it might be dead on arrival, and you’ll need to contact the retailer or manufacturer for a replacement.
- BIOS Settings: Ensure the SATA controller mode is set to AHCI.
- Drive Detected but Not Showing in “This PC” (Windows):
- This usually means the drive hasn’t been initialized, partitioned, or formatted. Go back to Disk Management and follow the steps outlined in the “Initializing, Partitioning, and Formatting” section.
- Slow Performance:
- Cable Issues: A faulty SATA data cable can cause performance degradation. Try replacing it.
- Fragmentation: HDDs can become fragmented over time, especially if you frequently write and delete large files. Use the Windows “Optimize Drives” tool (or equivalent for other OS) to defragment your HDD. (Note: Do not defragment SSDs).
- SATA Port Speed: Ensure the drive is connected to a SATA III (6 Gbps) port on your motherboard for optimal speed, not an older SATA II (3 Gbps) port if available.
- Aging Drive: Older HDDs naturally slow down with age.
- Clicking or Grinding Noises:
- These are usually signs of impending mechanical failure. Back up your data immediately and prepare to replace the drive. RMA (Return Merchandise Authorization) if it’s under warranty. This is a critical Tech alert that can save you significant Money and stress from data loss.
Maximizing the Lifespan and Efficiency of Your HDD
Beyond troubleshooting, proactive measures can significantly extend the life and optimize the performance of your HDD.
- Regular Defragmentation (for HDDs only): As mentioned, defragmenting an HDD organizes scattered data, allowing the read/write heads to access files more efficiently. Schedule regular defragmentation (e.g., monthly) using your OS’s built-in tools.
- Monitor Drive Health: Utilize SMART (Self-Monitoring, Analysis and Reporting Technology) tools to monitor your HDD’s health. Utilities like CrystalDiskInfo (Windows) can read SMART data and warn you of potential failures before they occur. This proactive Tech monitoring is essential for data integrity.
- Proper Shutdowns: Always shut down your computer properly. Abrupt power cuts can cause the HDD’s read/write heads to crash onto the platters, potentially causing damage and data corruption.
- Temperature Management: Ensure good airflow within your PC case. Excessive heat can degrade an HDD’s lifespan. Good cable management and case fans play a crucial role.
- Strategic Use: Leverage your HDD for what it does best: mass storage of large, less frequently accessed files, backups, and archives. Keep your operating system and frequently used applications on a faster SSD if you have one, reserving the HDD for its strengths. This optimizes your entire system’s performance, a smart Tech strategy.
- Regular Backups: Reinforcing this point: no matter how well you maintain your drive, hardware can fail. Regular backups to another drive or cloud service are your ultimate safeguard against data loss, protecting your Money investments in data and maintaining your Digital Security and personal Brand reputation for reliability.
Installing an HDD might seem daunting at first, but by following these detailed steps, you’ll find it’s a straightforward process that offers substantial rewards. From the initial preparations to the final software configurations and ongoing maintenance, each step empowers you with greater control over your digital domain. Expanding your storage capacity not only future-proofs your system but also opens up new possibilities for your digital life, whether it’s for creative projects, extensive gaming, or critical professional work. Embrace this valuable Tech skill, secure your data, and optimize your system for years to come.
aViewFromTheCave is a participant in the Amazon Services LLC Associates Program, an affiliate advertising program designed to provide a means for sites to earn advertising fees by advertising and linking to Amazon.com. Amazon, the Amazon logo, AmazonSupply, and the AmazonSupply logo are trademarks of Amazon.com, Inc. or its affiliates. As an Amazon Associate we earn affiliate commissions from qualifying purchases.