In the fast-evolving landscape of technology, version control systems have become the bedrock of modern software development. Among them, Git stands preeminent, serving as the essential tool that empowers developers, data scientists, and anyone working with code to manage changes, collaborate seamlessly, and maintain the integrity of their projects. For the vast number of professionals operating within the Windows ecosystem, understanding how to properly install and configure Git is not just a convenience, but a fundamental skill that underpins productivity, fosters innovation, and ultimately contributes to both personal and organizational success.
This guide will walk you through a detailed, step-by-step process for installing Git on your Windows machine, ensuring you have a robust and fully functional setup. Beyond mere installation, we’ll delve into the foundational role Git plays in modern tech trends, discuss crucial configuration steps, and offer insights to maximize your Git experience. Whether you’re a budding programmer, an experienced developer looking to streamline your workflow, or a tech enthusiast keen on understanding core development tools, mastering Git on Windows is a gateway to more efficient, collaborative, and secure coding practices. Embracing this powerful tool aligns perfectly with staying ahead in technology, refining your professional brand through meticulous project management, and optimizing the “money” aspect of your work by preventing costly errors and enhancing output.
Preparing for Your Git Installation
Before diving into the installation process, it’s crucial to understand why Git is so vital and what preliminary steps you might need to take. This section lays the groundwork, ensuring you appreciate the tool’s significance and are ready for a smooth setup.
Understanding Git’s Role in Modern Development
Git is a distributed version control system (DVCS) designed to handle everything from small to very large projects with speed and efficiency. Unlike older, centralized systems (like SVN or CVS) where a single server holds the complete history of a project, Git allows every developer to have a full copy of the repository locally. This distributed nature offers several profound advantages:
- Robust Collaboration: Teams can work on different features independently, and Git provides powerful tools for merging their changes back together. This is a cornerstone of agile development and a critical component of most tech company workflows.
- Offline Work Capability: Because each developer has a full copy of the repository, they can commit changes, review history, and manage branches even without an internet connection. Changes are synchronized when connectivity is restored.
- Speed and Performance: Git is incredibly fast, especially when performing operations like branching, merging, and comparing versions, as most operations are performed locally.
- Data Integrity: Git uses cryptographic hashing (SHA-1) to ensure that the repository’s history is tamper-proof. Every change, commit, and file is tracked meticulously, making it virtually impossible to lose work or introduce unwanted alterations unnoticed.
- Branching and Merging: One of Git’s most celebrated features is its lightweight branching model. Developers can create new branches to experiment with features, fix bugs, or prototype new ideas without affecting the main codebase. Once work is complete and tested, these branches can be seamlessly merged back. This flexibility is a game-changer for project management and significantly reduces the risk associated with introducing new code.
In the context of “Tech Trends,” Git is indispensable. It’s the backbone of platforms like GitHub, GitLab, and Bitbucket, which foster open-source collaboration, continuous integration/continuous deployment (CI/CD) pipelines, and modern DevOps practices. For individuals, proficiency in Git enhances their “Personal Branding” as competent developers, making them more attractive to employers and collaborators. For businesses, adopting Git translates directly into improved team “Productivity,” reduced development cycles, and fewer costly mistakes, indirectly impacting the “Money” aspect by optimizing resource allocation and project delivery.
System Requirements and Prerequisites
Before you download the installer, ensure your Windows system meets the basic requirements:
- Operating System: Git for Windows is compatible with most modern Windows versions, including Windows 7, 8, 8.1, 10, and 11 (both 32-bit and 64-bit editions).
- Administrator Privileges: You will need administrator rights on your machine to install software. If you’re on a corporate machine, you might need to contact your IT department.
- Internet Connection: A stable internet connection is required to download the installer file.
- Disk Space: Git itself is relatively small, requiring only a few hundred megabytes, but ensure you have sufficient free space for the installation and your future repositories.
Choosing Your Installation Method (Official Installer)
While there are alternative ways to install Git on Windows (like using Windows Subsystem for Linux (WSL), Scoop, or Chocolatey), the most straightforward and recommended method for most users is to use the official standalone installer package provided by the Git for Windows project. This installer bundles Git, Git Bash (a powerful Unix-like terminal), and Git GUI (a graphical user interface for Git operations), offering a comprehensive suite of tools. This guide will focus on this official installer to ensure a consistent and reliable experience.
Step-by-Step Installation of Git for Windows
This section provides a detailed walkthrough of the installation process using the official Git for Windows installer. Follow these steps carefully to ensure a successful setup.
Downloading the Git for Windows Installer
- Visit the Official Website: Open your web browser and navigate to the official Git for Windows website: git-scm.com/download/win.
- Select Your Version: The website will usually auto-detect your operating system and suggest the appropriate download. However, you can manually choose between the 32-bit and 64-bit installer. For most modern systems, the 64-bit installer is the correct choice. Click the download link (e.g., “64-bit Git for Windows Setup”).
- Save the File: Your browser will prompt you to save the
.exefile. Choose a location on your hard drive where you can easily find it, such as your “Downloads” folder.
Running the Installer and Initial Setup
- Locate the Installer: Once the download is complete, navigate to the folder where you saved the installer file (e.g.,
Git-2.xx.x-64-bit.exe). - Run as Administrator: Right-click on the installer
.exefile and select “Run as administrator.” This ensures the installer has the necessary permissions to make system-level changes. - User Account Control (UAC): If prompted by User Account Control, click “Yes” to allow the app to make changes to your device.
- Git License: The first screen will display the GNU General Public License. Read through it if you wish, then click “Next” to proceed.
- Select Destination Location: The installer will suggest a default installation directory (e.g.,
C:Program FilesGit). It’s generally recommended to stick with the default unless you have a specific reason to change it. Click “Next.”
Configuring Installation Components
This step allows you to select which components of Git for Windows you want to install.
- Select Components: You’ll see a list of components. The default selections are usually sufficient for most users and often recommended:
- Git Bash Here: Adds an option to the right-click context menu in Windows Explorer to open Git Bash at the current directory. Highly recommended.
- Git GUI Here: Adds an option to the right-click context menu to open Git GUI. Useful for those who prefer a graphical interface.
- Git LFS (Large File Support): Essential if you’ll be working with large binary files (e.g., game assets, large datasets) in your Git repositories.
- Associate .git* configuration files with the default text editor: Recommended for easy editing of Git config files.
- Associate .sh files to be run with Bash: Recommended for running shell scripts directly.
- Check daily for Git for Windows updates: Recommended to keep your Git installation secure and up-to-date with the latest features and bug fixes, aligning with “Digital Security” best practices for software.
Click “Next.”
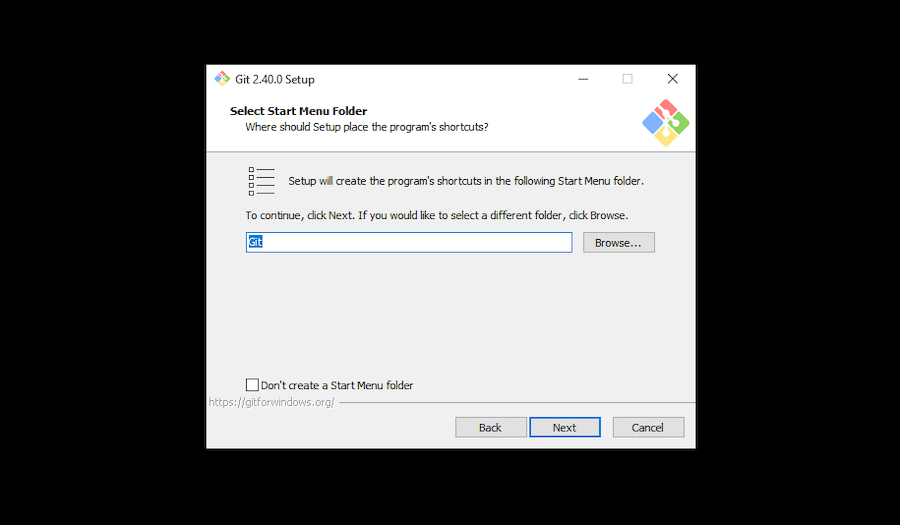
- Select Start Menu Folder: The installer will suggest a name for the Start Menu folder (e.g., “Git”). You can keep the default or rename it. Click “Next.”
Setting Up Your Default Editor and PATH Environment
These are crucial configuration steps that impact how you interact with Git and which tools it uses.
- Choosing the Default Editor: Git needs a text editor for tasks like writing commit messages or resolving merge conflicts. The default is Vim, which can be challenging for new users. You can choose another editor from the dropdown list. Popular choices include:
- Visual Studio Code: If you have VS Code installed, this is an excellent, user-friendly option.
- Notepad++: Another popular lightweight editor for Windows.
- Sublime Text: A powerful and widely used editor.
Select your preferred editor and click “Next.”
- Adjusting Your PATH Environment: This is perhaps the most important decision during installation. The PATH environment variable dictates which directories Windows searches for executable programs when you type a command. You have three main options:
- “Use Git from Git Bash only” (Default): This is the safest option but limits Git commands to Git Bash. You won’t be able to use Git from the standard Windows Command Prompt (cmd.exe) or PowerShell.
- “Git from the command line and also from 3rd-party software” (Recommended): This option adds Git to your PATH, making it available from Git Bash, the Windows Command Prompt, PowerShell, and any third-party applications (like IDEs) that integrate with Git. This is generally the recommended choice for most developers as it provides maximum flexibility and aligns with typical “Productivity” workflows.
- “Use Git and optional Unix tools from the Command Prompt”: This option adds Git and a set of Unix tools (like
ls,grep,find) to your PATH, which might override existing Windows commands. This can sometimes lead to unexpected behavior if you’re not familiar with Unix commands. It’s generally not recommended for beginners.
Choose “Git from the command line and also from 3rd-party software” and click “Next.”
Configuring Line Ending Conversions
Line endings can be a source of frustration when collaborating across different operating systems (Windows uses CRLF, Unix/Linux/macOS use LF). This setting helps Git manage this automatically.
- Configuring Line Endings: You have three options:
- “Checkout Windows-style, commit Unix-style line endings” (Recommended): This is the default and generally the recommended option. It converts LF to CRLF when checking out files on Windows (so your Windows editors see native line endings) and converts CRLF to LF when committing (so the repository always stores Unix-style LF line endings). This minimizes cross-platform issues.
- “Checkout as-is, commit Unix-style line endings”: This keeps line endings as they are when checking out but converts them to LF upon commit. This can lead to mixed line endings in your working directory if you’re not careful.
- “Checkout as-is, commit as-is”: Git will not perform any line ending conversions. This is only recommended if you’re an advanced user who fully understands the implications and has a specific reason for this behavior.
Select “Checkout Windows-style, commit Unix-style line endings” and click “Next.”
Choosing Your Terminal Emulator
This setting determines which terminal Git Bash uses.
- Choosing the Terminal Emulator:
- “Use MinTTY (the default terminal of MSYS2)” (Recommended): MinTTY provides a more feature-rich and Unix-like experience, including better copy-pasting, color support, and resizing. It’s the default and generally recommended for Git Bash.
- “Use Windows’ default console window”: This uses the standard
cmd.exeor PowerShell console window. While functional, it lacks some of the advantages of MinTTY for Git Bash specific operations.
Choose “Use MinTTY (the default terminal of MSYS2)” and click “Next.”
Advanced Options and Credential Management
These final options enhance convenience and performance.

- Extra Options:
- “Enable file system caching”: This improves performance for certain Git operations, especially on large repositories. Recommended.
- “Enable Git Credential Manager”: This is highly recommended. It securely stores your Git credentials (usernames and passwords/tokens) so you don’t have to enter them repeatedly when interacting with remote repositories (like GitHub or GitLab). This significantly boosts “Productivity” and provides a layer of “Digital Security” by reducing manual credential handling.
- “Enable symbolic links”: Allows Git to handle symbolic links. Useful if your projects use them, but might require administrator privileges for their creation. Keep enabled if unsure.
Check the boxes for recommended options and click “Next.”
- Configuring Experimental Options:
- You might see experimental options (e.g., pseudo console for Git Bash). These are typically not recommended for general users unless you have a specific need and understand their implications. It’s usually safe to leave them unchecked.
Click “Install.”
- You might see experimental options (e.g., pseudo console for Git Bash). These are typically not recommended for general users unless you have a specific need and understand their implications. It’s usually safe to leave them unchecked.
Completing the Installation
The installer will now proceed to extract and set up all the chosen components. This process may take a few minutes.
- Installation Progress: A progress bar will indicate the installation status.
- Finish: Once the installation is complete, you’ll see a “Completing the Git Setup Wizard” screen.
- You might have options to “Launch Git Bash” or “View Release Notes.” You can check “Launch Git Bash” to immediately open the terminal and verify the installation.
Click “Finish.”
- You might have options to “Launch Git Bash” or “View Release Notes.” You can check “Launch Git Bash” to immediately open the terminal and verify the installation.
Congratulations! Git is now installed on your Windows machine.
Post-Installation: Verification and Initial Configuration
After the installation wizard completes, it’s essential to verify that Git is correctly installed and then perform some initial configuration steps to personalize your setup.
Verifying Your Git Installation
To confirm Git is correctly installed and accessible from your chosen command-line environment:
- Open a Terminal:
- If you selected “Launch Git Bash” at the end of the installation, Git Bash will already be open.
- Alternatively, open the Git Bash application from your Start Menu.
- If you chose to add Git to your system PATH, you can also open the Windows Command Prompt (cmd.exe) or PowerShell (search for them in the Start Menu).
- Run the Version Command: In the opened terminal, type the following command and press Enter:
bash

git --version
- Expected Output: If Git is installed correctly, you should see output similar to this, indicating the version number:
git version 2.39.0.windows.2
(The version number will vary based on the installer you downloaded.) If you receive an error like “git is not recognized as an internal or external command,” it indicates an issue with your PATH environment variable, which we will touch upon in the troubleshooting section.
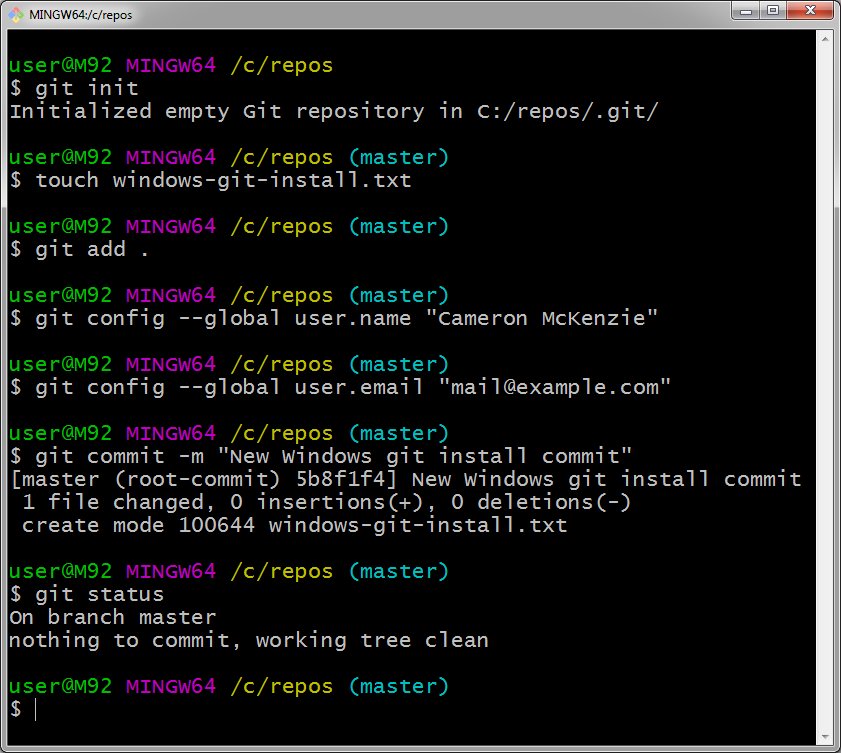
Essential Git Global Configuration
Before you start using Git for your projects, you should configure your user name and email globally. These details are attached to every commit you make, serving as your identity within the Git history. This is crucial for collaboration and maintaining a clear audit trail, aligning with “Digital Security” principles through proper attribution.
- Set Your User Name: In the same terminal where you verified the installation, type the following command, replacing
"Your Name"with your actual name:
bash

git config --global user.name "Your Name"
For example:git config --global user.name "Jane Doe" - Set Your User Email: Next, configure your email address. It’s recommended to use the same email associated with your Git hosting service (e.g., GitHub, GitLab).
bash

git config --global user.email "your_email@example.com"
For example:git config --global user.email "jane.doe@example.com" - Verify Configuration: You can verify these settings by listing your global Git configuration:
bash

git config --global --list
You should seeuser.nameanduser.emaillisted among other settings.
Exploring Git Bash and Basic Commands
Git Bash provides a powerful command-line interface with a Unix-like environment on Windows, making it ideal for interacting with Git and other developer tools.
To get a feel for Git Bash and how Git works, try a few basic commands:
- Initialize a new repository: Navigate to a new, empty folder using
cd(e.g.,cd ~/Documents/my_project) and then type:
bash

git init
This creates a new, empty Git repository in the current directory. - Check status:
bash

git status
This shows the current state of your working directory and staging area. - Add a file (after creating one in the folder):
bash

git add .
This stages all changes in the current directory for the next commit. - Commit changes:
bash

git commit -m "Initial commit"
This records the staged changes to the repository history with a descriptive message.
These brief initial interactions demonstrate that Git is operational and ready to manage your code, directly enhancing your “Productivity” as a developer by providing robust version control capabilities.
Maximizing Your Git Experience on Windows
Installing Git is just the first step. To truly leverage its power and integrate it seamlessly into your development workflow, consider the following best practices and integrations.
Integrating Git with Popular IDEs and Tools
While Git Bash is incredibly powerful, most developers prefer to interact with Git directly from their Integrated Development Environments (IDEs) or specialized Git GUI tools. The “Tech” landscape offers a rich ecosystem of “Apps” and “Tools” that integrate with Git to streamline your workflow:
- Visual Studio Code (VS Code): VS Code has excellent built-in Git integration. You can commit, pull, push, branch, and merge directly from its Source Control view, offering a highly visual and intuitive experience.
- IntelliJ IDEA / WebStorm / PyCharm (JetBrains IDEs): JetBrains IDEs offer comprehensive Git integration, allowing you to perform almost all Git operations without leaving the editor.
- Sublime Text / Atom: These text editors also offer various packages and plugins to add robust Git functionality.
- Git GUI Tools: For those who prefer a purely graphical approach, dedicated Git GUI clients like GitKraken, SourceTree, and TortoiseGit provide visual representations of your repository history, branches, and changes, simplifying complex operations. These tools can be particularly useful for visualizing history and understanding branching strategies.
Using these integrations enhances “Productivity” significantly by making Git actions easily accessible and intuitive within your primary development environment.
Troubleshooting Common Installation Issues
Even with a detailed guide, issues can occasionally arise. Here are some common problems and their solutions:
- “Git command not found” or “‘git’ is not recognized…”: This is almost always an issue with the system’s PATH environment variable.
- Solution: During installation, ensure you selected “Git from the command line and also from 3rd-party software.” If you didn’t, you can manually add the Git
bindirectory (e.g.,C:Program FilesGitcmd) to your system’s PATH. You’ll need to restart any open command prompts or PowerShell windows after modifying the PATH.
- Solution: During installation, ensure you selected “Git from the command line and also from 3rd-party software.” If you didn’t, you can manually add the Git
- Permissions Errors during Installation: If the installer fails with permissions errors.
- Solution: Ensure you ran the installer as an administrator by right-clicking the
.exeand selecting “Run as administrator.”
- Solution: Ensure you ran the installer as an administrator by right-clicking the
- Installer Hangs or Fails to Complete:
- Solution: Try re-downloading the installer to rule out a corrupted file. Temporarily disable any aggressive antivirus software that might be interfering, then try running the installer again.
- Issues with MinTTY (Git Bash Terminal): If Git Bash doesn’t launch or has display issues.
- Solution: Check your system’s graphics drivers. Ensure MinTTY is the selected terminal during installation. You can also try adjusting its compatibility settings.
- Line Ending Problems: Files appearing with strange characters or line breaks when moving between Windows and Linux/macOS.
- Solution: Re-check your Git configuration for
core.autocrlf. The recommended global setting isgit config --global core.autocrlf inputortrue(which corresponds to “Checkout Windows-style, commit Unix-style line endings”).
- Solution: Re-check your Git configuration for
Best Practices for Git Usage (Beyond Installation)
Once Git is installed and configured, adopting good practices will significantly improve your workflow and project quality, contributing to your professional “Brand” and avoiding costly mistakes (“Money”).
- Commit Often, Commit Small: Make frequent, atomic commits. Each commit should represent a single logical change. This makes it easier to track history, revert specific changes, and understand the evolution of your codebase.
- Write Meaningful Commit Messages: A good commit message clearly explains what was changed and why. Follow conventions (e.g., imperative mood, summary line, blank line, detailed body). This is invaluable for future you and your collaborators.
- Master Branching: Embrace Git’s branching model. Work on new features or bug fixes in dedicated branches, keeping your
mainormasterbranch clean and stable. Merge branches back only after they are thoroughly tested. - Pull Regularly: If you’re working in a team, frequently
git pullfrom the remote repository to get the latest changes from your teammates. This minimizes merge conflicts. - Use a
.gitignorefile: Prevent unwanted files (e.g., temporary files, build artifacts, IDE configuration) from being committed to your repository by listing them in a.gitignorefile. - Understand
git resetandgit revert: Learn the difference betweengit reset(rewriting history) andgit revert(creating a new commit to undo previous changes) to safely manage your commit history.
Adhering to these practices is not just about technical proficiency; it’s about fostering a culture of collaboration, transparency, and quality that benefits any “Tech” project, enhancing both individual and team “Productivity” and ensuring “Digital Security” through a robust, traceable history.
Conclusion
Installing Git on Windows is a foundational step for anyone engaging in software development, data science, or any field that benefits from rigorous version control. By following this comprehensive guide, you’ve not only successfully set up a crucial “Tech” tool but also configured it to ensure optimal performance and seamless integration into your workflow.
Git’s ability to track changes, facilitate collaboration, and enable agile development methodologies makes it an indispensable asset in today’s digital economy. Its installation on Windows opens up a world of possibilities, from contributing to open-source projects to managing complex enterprise applications. The meticulous steps we’ve covered, from choosing the right installer options to setting up your user credentials, are designed to give you a solid, secure, and highly productive environment.
Remember that installation is merely the beginning of your Git journey. Continual learning and application of its vast capabilities will empower you to navigate codebases with confidence, collaborate effectively with teams, and ultimately contribute to more robust, high-quality software solutions. Embrace Git, and you embrace a key pillar of modern technological advancement, positioning yourself for greater success in your professional endeavors and enhancing your overall value in the market.
aViewFromTheCave is a participant in the Amazon Services LLC Associates Program, an affiliate advertising program designed to provide a means for sites to earn advertising fees by advertising and linking to Amazon.com. Amazon, the Amazon logo, AmazonSupply, and the AmazonSupply logo are trademarks of Amazon.com, Inc. or its affiliates. As an Amazon Associate we earn affiliate commissions from qualifying purchases.