In the diverse ecosystem of Linux distributions, software distribution has historically been a point of friction. From Debian’s .deb packages to Fedora’s .rpm files, the fragmentation of package formats often forced developers to build multiple versions of the same application. However, the emergence of universal package formats has revolutionized this landscape. Among these, AppImage stands out for its simplicity and “run-anywhere” philosophy.
Unlike traditional installation methods that scatter files across your system directories, AppImage offers a portable, self-contained solution. This guide explores the technical architecture of AppImages, provides detailed instructions on how to execute them, and discusses how to manage these files effectively within a professional Linux environment.

1. Understanding the AppImage Architecture
To use AppImage effectively, one must first understand what differentiates it from traditional package managers like apt, dnf, or pacman. AppImage is not a package manager; rather, it is a format for distributing portable software on Linux without needing superuser permissions to install the application.
The “One App, One File” Philosophy
The core concept of AppImage is “one app = one file.” Every AppImage contains the application and all the dependencies (libraries, icons, and runtimes) required for it to run that are not expected to be part of the target base systems. This eliminates the “dependency hell” that many Linux users encounter when a specific software version requires a library version that conflicts with the rest of the system.
How it Works: FUSE and Mounting
Technically, an AppImage is an ISO 9660 file system with an embedded ELF executable. When you run an AppImage, it uses FUSE (Filesystem in Userspace) to mount the compressed filesystem content temporarily. This allows the system to treat the single file as a directory of executable code and assets. Once the application is closed, the virtual mount point is removed, leaving no trace on the system’s core directories like /usr/bin or /lib.
Why Use AppImage Over Snap or Flatpak?
While Snap and Flatpak are popular, AppImage offers distinct advantages in specific tech workflows. It does not require a background daemon (like snapd), it doesn’t necessitate a complex sandboxing setup by default, and it is truly portable. You can carry an AppImage on a USB drive and run it on a CentOS workstation, an Ubuntu laptop, or an Arch Linux gaming rig without any modification.
2. Step-by-Step: How to Run AppImage Files
Because AppImages are not “installed” in the traditional sense, the process of running them involves preparing the file for execution. There are two primary ways to do this: via the Graphical User Interface (GUI) or the Command Line Interface (CLI).
Method 1: Using the Graphical User Interface
For users who prefer a desktop environment (GNOME, KDE Plasma, XFCE), the process is intuitive:
- Download the File: Obtain the
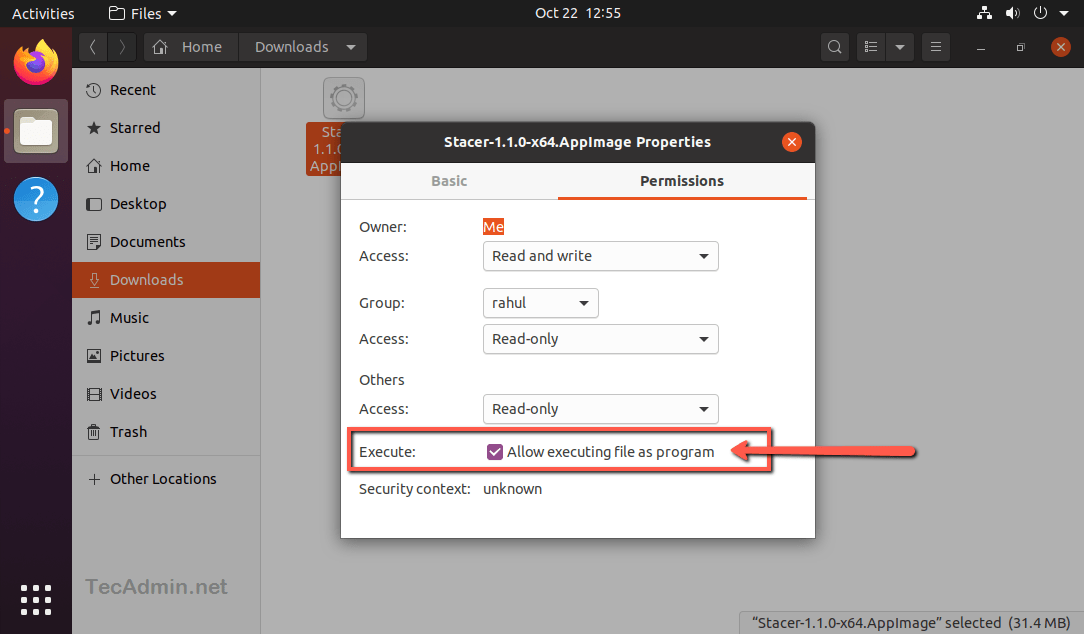
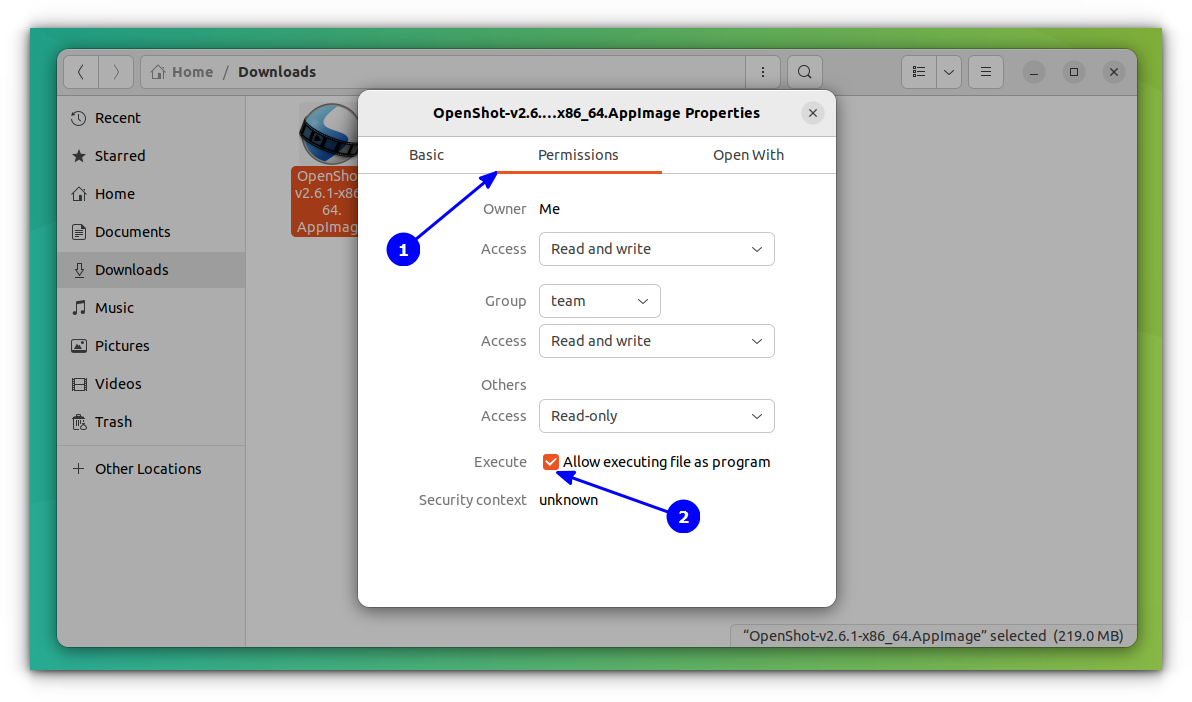
.AppImagefile from the official developer website or a repository like GitHub. - Open Properties: Right-click the downloaded file in your file manager (Nautilus, Dolphin, or Thunar).
- Adjust Permissions: Navigate to the “Permissions” tab. Look for a checkbox that says “Allow executing file as program” or “Is executable.” Check it.
- Run: Close the dialog and double-click the file. The application will launch immediately.
Method 2: Using the Terminal (CLI)
The terminal offers more control and is often necessary for debugging. To run an AppImage via CLI, follow these commands:
- Navigate to the folder: Use
cd ~/Downloads(or wherever your file is located). - Grant Execution Rights: Type
chmod +x filename.AppImage. Thechmod +xcommand tells the Linux kernel that this file is allowed to run as a binary. - Execute: Type
./filename.AppImage.
Handling the FUSE Requirement
On newer distributions, particularly Ubuntu 22.04 and later, the libfuse2 library (required for older AppImage formats) is not installed by default because these systems have transitioned to FUSE3. If your AppImage fails to launch, you may need to install the legacy library:
sudo apt update
sudo apt install libfuse2
This is a common technical hurdle for users moving to modern LTS releases, and resolving it ensures backward compatibility with the vast majority of AppImages available today.
3. Integrating AppImages into the Desktop Environment
One of the few criticisms of AppImage is that, because they aren’t installed to /usr/share/applications, they don’t automatically appear in your application menu or “Start” menu. Furthermore, they don’t have automatic file associations. Fortunately, there are professional tools to bridge this gap.
Manual Integration via .desktop Files
For those who want to keep their system “lean,” you can manually create a desktop entry. You create a small text file in ~/.local/share/applications/ named appname.desktop. The content usually looks like this:
[Desktop Entry]
Name=MyApp
Exec=/home/user/Applications/myapp.AppImage
Icon=/home/user/Icons/myapp-icon.png
Type=Application
Categories=Development;
Once saved, the application will appear in your system’s app launcher alongside native software.
Using AppImageLauncher
For a more automated experience, AppImageLauncher is the industry-standard tool. Once installed, it intercepts the action of opening an AppImage file. It asks if you would like to “Integrate and run.” If you accept, it moves the file to a central directory (usually ~/Applications), creates the necessary desktop entries, and even manages updates and uninstallation. This provides a “native-like” experience while maintaining the benefits of the AppImage format.
Managing Updates with AppImageUpdate
Unlike apt upgrade, AppImages do not update automatically through system repositories. However, many AppImages support binary delta updates via a tool called AppImageUpdate. This tool checks the internal signature of the file, downloads only the changed bits (saving bandwidth), and creates a new version of the file, keeping your software current without a full re-download.
4. Advanced Usage: Security and Troubleshooting
As with any software downloaded from the internet, security is a paramount concern in tech management. Because AppImages run with the same permissions as your user, it is vital to source them from trusted developers.
Sandboxing with Firejail
If you are running an AppImage that requires an extra layer of security (such as a web browser or a chat app), you can use Firejail. Firejail is a SUID program that reduces the risk of security breaches by restricting the running environment of untrusted applications using Linux namespaces and seccomp-bpf.
To run an AppImage in a sandbox, you would use:
firejail --appimage ./your-app.AppImage
Common Troubleshooting Steps
If an AppImage refuses to open even after chmod +x, the most effective way to diagnose the issue is to run it via the terminal. The output will usually reveal a missing library (shared object file). Common missing dependencies include:
libnss3libatk1.0-0libsecret-1-0
Installing these through your system’s package manager usually resolves the issue.
Extracting AppImage Contents
Occasionally, a developer might want to inspect the contents of an AppImage or modify a specific configuration file inside the compressed image. You can do this by running:
./appname.AppImage --appimage-extract
This creates a folder named squashfs-root, containing the entire filesystem of the application. This is an invaluable feature for technical audits or custom environment configurations.
5. The Role of AppImage in the Modern Tech Stack
The shift toward containerization and microservices in the enterprise world is mirrored in the desktop world by formats like AppImage. It represents a move away from centralized, rigid distribution models toward a decentralized, developer-centric model.
Benefits for Developers
For software engineers, AppImage simplifies the CI/CD pipeline. Instead of maintaining separate build targets for Ubuntu, Fedora, and OpenSUSE, a single AppImage build can target the “oldest still supported” distribution (like an older Ubuntu LTS), and it will technically be forward-compatible with newer releases. This drastically reduces the overhead of supporting the Linux desktop.
Impact on Digital Sovereignty and Portability
In a world increasingly dominated by “Software as a Service” (SaaS) and cloud-dependent applications, AppImage preserves the ability to run software offline and independently. Since the file contains everything it needs, it serves as a form of digital preservation. A version of an image editor in AppImage format will likely still run ten years from now on a modern kernel, whereas a native package might have broken due to shifting library dependencies.
Conclusion
AppImage has cemented its place as an essential tool in the Linux professional’s toolkit. By offering a balance between the stability of static binaries and the convenience of modern desktop integration, it solves many of the historical headaches associated with Linux software management. Whether you are a developer looking to distribute your latest AI tool or a power user seeking to try the newest apps without cluttering your system, mastering the AppImage format is a vital step in navigating the modern Linux landscape. By following the permission-setting and integration steps outlined above, you can ensure a seamless, secure, and highly portable software experience.
aViewFromTheCave is a participant in the Amazon Services LLC Associates Program, an affiliate advertising program designed to provide a means for sites to earn advertising fees by advertising and linking to Amazon.com. Amazon, the Amazon logo, AmazonSupply, and the AmazonSupply logo are trademarks of Amazon.com, Inc. or its affiliates. As an Amazon Associate we earn affiliate commissions from qualifying purchases.