In an increasingly connected world, enhancing home security and convenience has become a top priority for many homeowners. The smart doorbell camera stands out as a quintessential gadget in this endeavor, offering peace of mind through constant surveillance and instant communication right at your doorstep. Among the myriad options available, the Ring doorbell camera has solidified its position as a market leader, known for its user-friendly interface, robust features, and seamless integration into the smart home ecosystem. Far from being a complex tech installation reserved for professionals, setting up a Ring doorbell is a surprisingly straightforward DIY project, empowering you to take control of your home’s front-line defense.
This comprehensive tutorial will guide you through every step of installing your Ring doorbell camera, from choosing the right model for your home to configuring its advanced features in the Ring app. We’ll delve into the necessary preparations, the physical installation process, and the crucial software setup, ensuring a smooth and successful deployment. By the end of this guide, you’ll not only have a fully operational Ring doorbell safeguarding your home but also a deeper understanding of how this innovative technology contributes to a safer, smarter living environment. Whether you’re a seasoned tech enthusiast or new to the world of smart home devices, this guide is designed to make your Ring doorbell installation experience efficient, informative, and ultimately, rewarding.
Preparing for Installation: Choosing Your Ring Model and Gathering Essentials
Before you even think about drilling holes or connecting wires, a well-prepared start is crucial for a smooth Ring doorbell installation. This initial phase involves understanding the different Ring models available and ensuring you have all the necessary tools and prerequisites in place. Ignoring these preliminary steps can lead to frustration, delays, or even an incorrect setup.
Understanding Ring Doorbell Models: Wired vs. Wireless
Ring offers a diverse range of doorbell cameras, each designed to cater to different home setups and user preferences. The primary distinction lies between wired and wireless (battery-powered) models, with several iterations within each category offering varying features and price points.
- Battery-Powered Ring Doorbells (e.g., Ring Video Doorbell, Ring Video Doorbell 3, 4, Plus): These are the most flexible and easiest to install. They operate on a rechargeable battery pack, meaning they don’t require existing doorbell wiring. This makes them ideal for homes without an existing doorbell, or for renters who can’t modify wiring. While incredibly convenient, the trade-off is the need to periodically recharge the battery (typically every few weeks to months, depending on usage). Some battery models can also be hardwired to an existing doorbell system for continuous charging, eliminating the need for battery swaps.
- Wired Ring Doorbells (e.g., Ring Video Doorbell Pro, Pro 2, Elite): These models connect directly to your home’s existing doorbell wiring (typically 8-24 VAC). They draw continuous power, meaning you never have to worry about recharging. Wired models often offer advanced features like pre-roll video, higher resolution, and more sophisticated motion detection, as they have a constant power source to leverage. The installation can be slightly more involved due to electrical connections, but it’s still well within the capabilities of a DIYer. The Ring Elite, a premium option, uses Power over Ethernet (PoE) for both power and internet, offering the most stable connection but requiring professional-grade network wiring.
Your choice should consider your home’s existing setup (do you have existing doorbell wiring?), your comfort level with basic electrical work, and the specific features you prioritize (e.g., battery life vs. continuous recording, advanced motion detection). For this guide, we will cover both general installation principles, with specific notes for wired connections where applicable.
Essential Tools and Prerequisites for a Seamless Setup
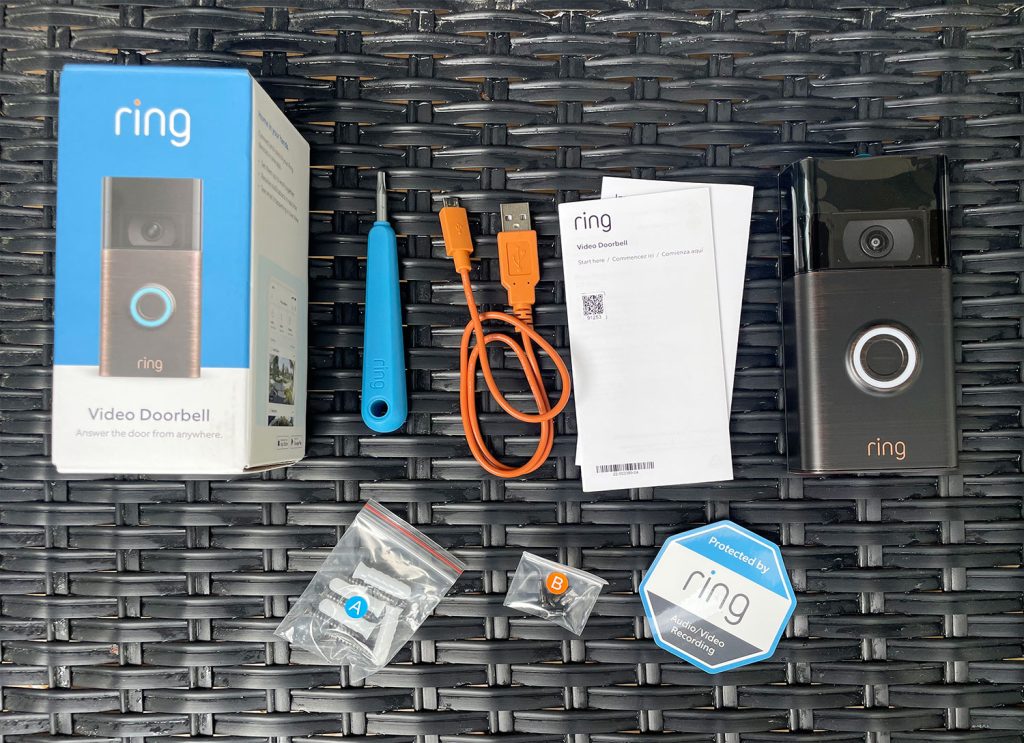
Once you’ve chosen your Ring model, it’s time to gather everything you’ll need. Most Ring doorbells come with the necessary mounting hardware and even some basic tools, but having your own toolkit ready will make the process smoother.
- The Ring Doorbell Kit: Naturally, your Ring doorbell camera itself, along with its included mounting bracket, screws, anchors, and a mini-level (often included).
- A Power Drill with Drill Bits: Essential for creating pilot holes for the mounting screws. Ensure you have bits suitable for both wood and masonry (if drilling into stucco, brick, or concrete).
- Screwdriver: A Phillips head screwdriver is typically all you’ll need. Some kits include a specialized security screwdriver for the final security screws.
- Level: While Ring often provides a small stick-on level, a larger, more accurate level can ensure your doorbell is perfectly straight.
- Pencil: For marking drill holes.
- Measuring Tape: To help with precise placement.
- Safety Glasses: Always recommended when drilling.
- Bypass Kit/Jumper Cable (for wired models): This small wire is crucial for bypassing your indoor chime, which is often required for wired Ring doorbells to receive consistent power. It usually comes included with wired models.
- Existing Doorbell Wires (for wired models): Ensure your existing doorbell transformer meets Ring’s voltage requirements (typically 8-24 VAC). You can usually find this information on the transformer itself, often located near your chime unit or electrical panel.
- Wi-Fi Network: A strong, stable 2.4 GHz Wi-Fi network (or 5 GHz for some newer models) is non-negotiable. Your Ring doorbell needs to connect to the internet to function. Test your Wi-Fi signal strength at your doorbell’s intended location using your smartphone.
- Smartphone or Tablet: You’ll need this to download the Ring app, create an account, and complete the digital setup of your doorbell.
- Optional but Recommended: A voltage tester (for wired installations) to confirm power is off, and some electrical tape for securing connections.
Having this checklist ticked off before you begin will streamline your installation, allowing you to focus on the task at hand rather than scrambling for missing items.
The Physical Installation: Mounting and Wiring Your Ring Doorbell
With your preparations complete, it’s time to move on to the physical installation of your Ring doorbell. This segment covers the crucial steps of removing your old doorbell (if applicable), accurately positioning your new Ring device, securely mounting it, and handling the electrical connections for wired models.
Disconnecting Your Old Doorbell and Marking Placement
The first step for most installations, especially if you’re replacing an existing doorbell, is to safely remove the old unit.
- Cut the Power: This is arguably the most critical step for wired installations. Locate your home’s circuit breaker box and switch off the power to your doorbell transformer. This is usually labeled “doorbell,” “chime,” or sometimes it’s on the same circuit as your indoor lights. If you’re unsure, switch off the main breaker to the entire house, though this is less convenient. Verify the power is off by pressing your existing doorbell button – the chime should not sound. For battery-powered Ring doorbells being installed where no old doorbell exists, this step is unnecessary.
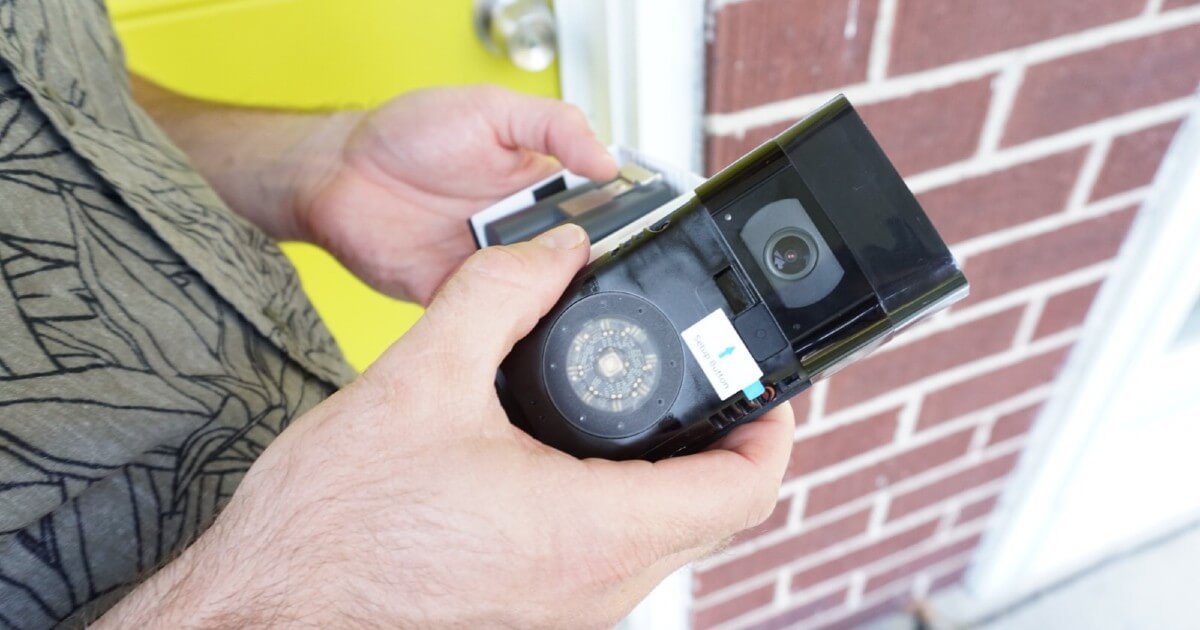
- Remove the Old Doorbell: Carefully unscrew and disconnect your existing doorbell button. For wired doorbells, you’ll see two small wires connected to the back. Gently unhook these wires, ensuring they don’t fall back into the wall. If they’re stiff, you can tape them to the wall temporarily.
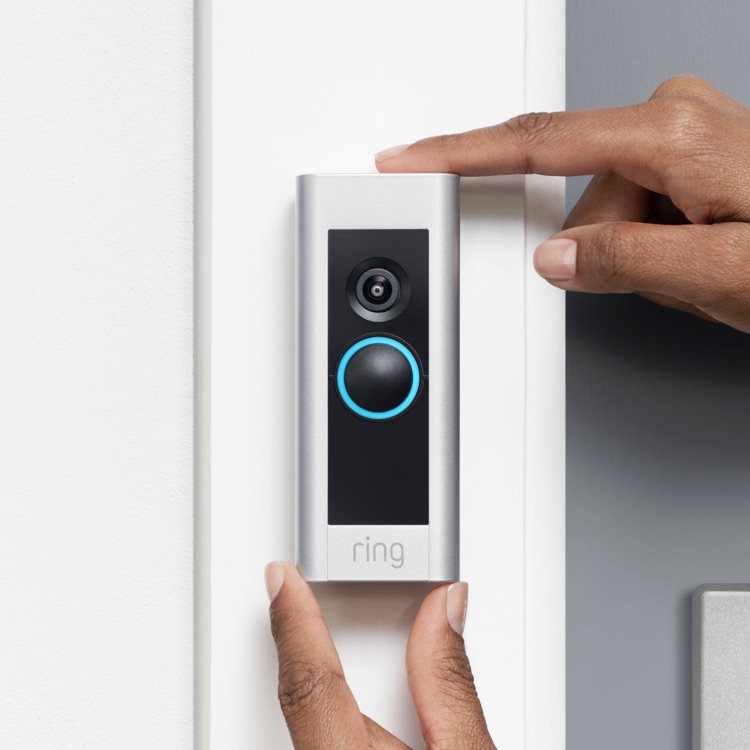
- Position the Ring Doorbell: Hold your Ring mounting bracket against the wall where you intend to install it. The ideal height for a Ring doorbell is approximately 48 inches (1.2 meters) from the ground, allowing for optimal facial recognition and package detection. However, you might adjust this based on your specific porch layout or if you’re using a wedge kit (often included or sold separately) to angle the camera for a better view. Use a pencil to mark the drill holes through the bracket. Use your level to ensure the bracket is perfectly straight before marking.
Mounting the Bracket and Drilling Holes
Once your placement is marked, it’s time to secure the mounting bracket.
- Drill Pilot Holes: Using your power drill and the appropriate drill bit for your wall material (wood, stucco, brick, concrete), drill pilot holes at the marks you made. If drilling into masonry, insert the plastic anchors (provided with your Ring kit) into the pilot holes, gently tapping them flush with a hammer if needed. These anchors provide a secure grip for the screws.
- Attach the Mounting Bracket: Align the mounting bracket with the pilot holes. Secure it firmly to the wall using the screws provided by Ring. Ensure it’s snug and doesn’t wobble. If you’re using a wedge or corner kit, install that first according to its instructions, then attach the main mounting bracket to the kit.
Wiring the Doorbell (Wired Models Only) or Inserting Battery (Battery Models Only)
This is where the paths diverge slightly based on your Ring model.
For Wired Ring Doorbells (e.g., Ring Pro, Pro 2):
- Connect the Wires: Take the two wires from your existing doorbell system and loop one around each of the two screws on the back of your Ring doorbell unit. It doesn’t matter which wire connects to which screw – they are not polarity-sensitive. Tighten the screws securely to hold the wires in place. Ensure there’s no bare wire touching anything other than its designated screw terminal.
- Install the Chime Bypass Kit: For most wired Ring doorbells, you’ll need to install a “Chime Kit” or “Pro Power Kit” at your indoor chime unit. This device regulates power to your Ring doorbell and bypasses the mechanical chime. Head to your indoor chime unit (usually a small box on your wall). Open the cover. You’ll typically see “FRONT” and “TRANS” terminals. Follow the specific instructions provided with your Ring Chime Kit to connect it to these terminals. This usually involves removing the existing wires, attaching the kit, and then reattaching the wires to the kit. Do NOT skip this step, as it’s essential for proper operation and can prevent damage to your doorbell or transformer.
- Tuck Wires: Gently push any excess wiring back into the wall cavity, ensuring it doesn’t interfere with the doorbell seating flush against the bracket.
For Battery-Powered Ring Doorbells (e.g., Ring Video Doorbell, Ring 3, 4):
- Charge the Battery: If your battery pack isn’t already charged, connect it to a power source using the provided USB cable. The indicator light will change (e.g., green) when fully charged. This can take several hours, so it’s a good idea to do this beforehand.
- Insert the Battery: Once charged, slide the battery pack into the bottom of your Ring doorbell unit until it clicks into place. For models that can be hardwired for continuous charging, you would also connect the existing doorbell wires to the appropriate terminals on the Ring doorbell at this stage, similar to the wired models, but ensuring the battery is also inserted.
Securing the Ring Doorbell to the Bracket
The final step in the physical installation is to attach your Ring doorbell securely to its mounting bracket.
- Align and Attach: Carefully align the Ring doorbell unit with the mounting bracket on the wall. Gently push it into place. You should feel it click or snap securely onto the bracket.
- Insert Security Screws: Once the doorbell is seated, use the small security screw(s) provided in your kit (and the specialized screwdriver, if included) to fasten the doorbell to the bottom of the mounting bracket. This prevents theft and ensures the doorbell remains firmly attached.
- Restore Power: If you disconnected power earlier, return to your circuit breaker box and switch the power back on. Your Ring doorbell should now power up. For wired models, you’ll often see a light ring illuminate on the doorbell, indicating it’s receiving power and ready for setup.
With the physical installation complete, your Ring doorbell is now a fixture on your home. The next crucial phase is to bring it to life through the Ring app.
Bringing Your Ring Doorbell to Life: App Setup and Configuration
The physical installation is only half the battle. The true power and intelligence of your Ring doorbell come alive through the Ring app, which allows you to connect it to your Wi-Fi, customize settings, and interact with visitors. This digital setup is straightforward but requires careful attention to detail for optimal performance.
Downloading the Ring App and Creating an Account
The journey begins with your smartphone or tablet.
- Download the Ring App: Navigate to your device’s app store (Apple App Store for iOS or Google Play Store for Android). Search for “Ring – Always Home” and download the official app.
- Create/Log In to Your Account:
- New Users: Open the app and tap “Create Account.” Follow the on-screen prompts to enter your personal details (name, email, password) and agree to Ring’s terms of service. You’ll likely need to verify your email address.
- Existing Users: If you already have Ring devices, simply log in with your existing credentials.
- Set Up a Location: Ring often asks you to set up a “Location” for your devices. This is important for organizing multiple Ring devices and ensuring accurate address for emergency services if you subscribe to a monitoring plan. Enter your home address when prompted.
Adding Your Device and Connecting to Wi-Fi
This is the core of the digital setup, linking your physical doorbell to your home network and your Ring account.
- Initiate Device Setup: In the Ring app, tap the “Set Up a Device” button (usually a plus icon or prominently displayed).
- Select Your Device Type: Choose “Doorbells” from the list of device categories.
- Scan the QR Code: The app will instruct you to scan the QR code located on your Ring doorbell. This code can usually be found on the back of the device, on the quick start guide, or on the packaging. Hold your phone camera over the QR code until the app recognizes it. If you can’t scan it, you can manually enter the 5-digit PIN that’s also usually found near the QR code.
- Name Your Device: Give your doorbell a descriptive name (e.g., “Front Door,” “Main Entrance”). This helps identify it, especially if you have multiple Ring devices.
- Enter Setup Mode: The app will guide you to put your Ring doorbell into setup mode. For most models, this involves pressing and holding the small button on the side or back of the doorbell for a few seconds until the light ring on the front starts to spin or flash blue. This indicates it’s broadcasting a temporary Wi-Fi network.
- Connect to Ring’s Temporary Wi-Fi: Your phone will temporarily disconnect from your home Wi-Fi and connect to the Ring device’s private network (e.g., “Ring-XXXXXX”). Follow the app’s instructions to complete this step. This allows your phone to communicate directly with the doorbell.
- Connect to Your Home Wi-Fi: Once connected to the Ring network, the app will ask you to select your home Wi-Fi network from a list and enter its password. Choose your network and input the correct password. Ensure you select the correct 2.4 GHz or 5 GHz band if your router supports both and your doorbell model is compatible. A strong Wi-Fi connection is critical for reliable performance.
- Finalizing Connection: The Ring doorbell will attempt to connect to your home Wi-Fi. The light ring will usually flash or spin in different colors, then turn solid blue once successfully connected. Your phone will then reconnect to your home Wi-Fi.
Customizing Motion Settings, Alerts, and Privacy
With your doorbell connected, it’s time to tailor its operation to your specific needs and preferences.
- Motion Detection Settings:
- Motion Zones: Define specific areas within the camera’s field of view that you want to monitor for motion. This helps reduce unwanted alerts from traffic, pets, or trees. Draw custom zones in the app.
- Motion Sensitivity: Adjust how sensitive the motion sensor is. Lower sensitivity reduces false alarms, while higher sensitivity ensures you don’t miss anything.
- People Only Mode: Many Ring doorbells offer this feature, which uses AI to distinguish between people and other motion sources, significantly cutting down on irrelevant notifications.
- Alert Preferences:
- Push Notifications: Decide whether you want immediate push notifications to your phone for doorbell presses, motion alerts, or both.
- Chime Settings: If you have an indoor chime, you can adjust its type (mechanical or digital) and volume within the app. You can also enable “Ring Chime” notifications on your phone or other Echo devices.
- Privacy Settings:
- Privacy Zones: Mask off areas within the camera’s view that you do not want to record, protecting neighbors’ property or public spaces from surveillance.
- Audio Streaming and Recording: You can enable or disable two-way audio and audio recording based on your preferences and local regulations.
- Linked Devices: If you have other Ring cameras or an Amazon Alexa-enabled device, you can link your doorbell to them. For example, motion on your doorbell can trigger recording on another camera, or Alexa can announce when someone is at the door.
- Firmware Updates: Always ensure your Ring doorbell’s firmware is up to date. The app usually prompts you, or you can check manually in the device settings. Updates often bring new features, performance improvements, and security patches.
By meticulously configuring these settings, you ensure that your Ring doorbell camera operates effectively, providing the security and convenience you expect without overwhelming you with unnecessary alerts.
Maximizing Your Ring Experience: Testing, Troubleshooting, and Advanced Features
Once your Ring doorbell is physically installed and digitally configured, the final steps involve testing its functionality, understanding how to troubleshoot common issues, and exploring advanced features that elevate your home security and smart home integration.
Testing Your Ring Doorbell’s Functionality
Thorough testing ensures everything is working as expected before you rely on your new security guardian.
- Test the Doorbell Button: Press the button on your Ring doorbell.
- Your indoor chime should ring (if configured and wired correctly).
- You should receive a “someone’s at your front door” notification on your phone.
- The Ring app should open to a live view of your doorstep.
- Verify that two-way audio works by speaking into your phone and listening through the doorbell’s speaker, and vice-versa.
- Test Motion Detection: Walk in front of your doorbell camera within the motion zones you defined.
- You should receive a “motion detected” notification on your phone.
- Verify that video recording is triggered (requires a Ring Protect plan).
- Check if the camera accurately detects motion only within your specified zones. Adjust sensitivity if you’re getting too many or too few alerts.
- Check Live View: Open the Ring app and tap on your doorbell device. Ensure you can consistently access a clear, real-time video feed from your doorbell camera. This confirms a strong Wi-Fi connection and proper device operation.
- Night Vision: Test the camera after dark to ensure the infrared night vision is functioning correctly, providing clear black-and-white images in low light conditions.
Common Troubleshooting Tips for Ring Doorbell Issues
Despite best efforts, you might encounter minor hiccups. Here are solutions to common problems:
- No Power (Wired Models):
- Check Circuit Breaker: Ensure the power to your doorbell transformer is on.
- Verify Wiring: Double-check that wires are securely connected to the doorbell and that the Chime Kit is correctly installed at your indoor chime.
- Transformer Voltage: Confirm your transformer meets Ring’s voltage requirements (usually 8-24 VAC). An underpowered transformer can lead to intermittent issues.
- Poor Wi-Fi Connection:
- Router Proximity: Your doorbell might be too far from your Wi-Fi router. Consider a Wi-Fi extender or mesh system to boost signal strength near the doorbell.
- Interference: Other electronic devices or building materials can interfere with Wi-Fi. Try repositioning your router or the doorbell if possible.
- Ring App Tools: Use the “Device Health” section in the Ring app to check your doorbell’s RSSI (Received Signal Strength Indicator). A value closer to 0 (e.g., -40 to -60) is better.
- Frequent False Motion Alerts:
- Adjust Motion Zones: Refine your custom motion zones to exclude areas with high traffic, moving trees, or sunlight glares.
- Decrease Sensitivity: Lower the motion sensitivity in the app settings.
- People Only Mode: Enable “People Only” detection if your model supports it to filter out non-human motion.
- Battery Draining Too Quickly (Battery Models):
- Motion Frequency: High motion detection frequency and long recording times will drain the battery faster. Adjust motion settings.
- Live View Usage: Frequent use of Live View consumes significant battery power.
- Cold Weather: Extreme cold can reduce battery performance. Consider a wired connection if this is a persistent issue.
- Chime Not Ringing (Wired Models):
- Chime Kit Installation: Recheck the installation of the Chime Kit at your indoor chime unit.
- Chime Type Setting: In the Ring app, ensure you’ve selected the correct chime type (mechanical or digital).
For more complex issues, Ring’s customer support and online knowledge base are excellent resources.
Enhancing Your Smart Home: Ring Protect and Integrations
To truly unlock the full potential of your Ring doorbell and integrate it seamlessly into your smart home, consider these advanced options:
- Ring Protect Plan: This optional subscription service is highly recommended for maximizing your doorbell’s security features.
- Video Recording: Without Ring Protect, you can only view Live View and receive notifications. The plan enables cloud storage of all motion-activated and doorbell-triggered video recordings, allowing you to review, download, and share them later.
- Snapshot Capture: Periodically takes still images between motion events, providing a more complete timeline of activity.
- People Only Mode & Rich Notifications: Often enhanced or exclusively available with the plan.
- Extended Warranty: Some plans offer an extended warranty for your Ring devices.
- Smart Home Integrations:
- Amazon Alexa: Ring devices integrate seamlessly with Amazon Alexa. You can ask Alexa to show you the live feed from your doorbell on an Echo Show or Fire TV, or have Alexa announce when someone rings the doorbell or motion is detected.
- Other Smart Home Platforms: While Ring is primarily aligned with Amazon, its open API allows for integration with various third-party smart home platforms and services through IFTTT (If This Then That) or other hubs, expanding its functionality within your broader smart home ecosystem.
- Privacy Best Practices: Regularly review your Ring device’s privacy settings. Be mindful of camera placement to avoid inadvertently recording private areas of neighbors’ properties. Familiarize yourself with local privacy laws regarding outdoor surveillance.
By leveraging these advanced features and integrations, your Ring doorbell camera transcends being just a simple notification device. It becomes a vital component of a robust, intelligent home security system, offering unparalleled convenience, advanced monitoring capabilities, and crucial peace of mind. The self-installation of your Ring doorbell camera is more than just a tech project; it’s an investment in the safety and smart evolution of your home.
aViewFromTheCave is a participant in the Amazon Services LLC Associates Program, an affiliate advertising program designed to provide a means for sites to earn advertising fees by advertising and linking to Amazon.com. Amazon, the Amazon logo, AmazonSupply, and the AmazonSupply logo are trademarks of Amazon.com, Inc. or its affiliates. As an Amazon Associate we earn affiliate commissions from qualifying purchases.