
Ubuntu, a popular and user-friendly Linux distribution, has emerged as a formidable alternative to proprietary operating systems like Windows and macOS. For tech enthusiasts, developers, and everyday users seeking enhanced security, customization, and a vibrant open-source ecosystem, installing Ubuntu is often the gateway to a new computing experience. This comprehensive guide will walk you through every essential step of installing Ubuntu, ensuring a smooth transition or integration into your existing system. From preparing your hardware to navigating the installation wizard and optimizing your post-installation setup, we’ll cover everything you need to know to confidently embark on your Ubuntu journey.
1. Why Choose Ubuntu? Setting the Stage for Your Linux Journey
In an era defined by rapid technological advancements and increasing concerns over digital privacy, understanding your operating system choices is more critical than ever. Ubuntu stands out as a robust, secure, and highly customizable platform that caters to a diverse range of users. Whether you’re a seasoned developer, a digital security advocate, or simply looking for a fresh computing experience, Ubuntu offers compelling advantages that make it a top contender in the operating system landscape.
1.1. The Appeal of Ubuntu: Open Source, Security, Customization
Ubuntu’s fundamental strength lies in its open-source nature. This means its source code is freely available, fostering a global community of developers who continuously contribute to its improvement, security, and innovation. This collaborative model not only drives rapid development but also ensures transparency and reduces vulnerabilities often associated with closed-source systems. For users, this translates into a highly secure environment, often less susceptible to malware and viruses common on other platforms.
Beyond security, Ubuntu offers unparalleled customization. The GNOME desktop environment, Ubuntu’s default, is intuitive and aesthetically pleasing, yet it allows for extensive personalization. From themes and icons to widgets and desktop layouts, users can tailor their system to perfectly match their workflow and aesthetic preferences. This level of control, combined with a vast repository of free and open-source software, makes Ubuntu a powerful tool for productivity, creativity, and exploration. For those deeply immersed in technology trends, understanding and leveraging open-source solutions like Ubuntu is key to staying at the forefront of digital innovation.
1.2. Preparing for Installation: Essential Pre-requisites
Before diving into the installation process, meticulous preparation is key to a hassle-free experience. Skipping these crucial preliminary steps can lead to data loss, compatibility issues, or a stalled installation. Think of it as laying a solid foundation before building a house – a little effort upfront saves a lot of trouble later.
First and foremost, you’ll need a computer with an internet connection. While Ubuntu can be installed offline, many initial setup and update processes benefit greatly from network access. You’ll also need a USB flash drive (at least 8GB recommended) to create your bootable installation media. This drive will house the Ubuntu installer. Finally, it’s prudent to consider your hardware specifications. While Ubuntu is remarkably lightweight and can run on older machines, newer versions naturally benefit from modern processors, ample RAM (4GB minimum, 8GB or more recommended), and sufficient disk space (25GB minimum, 100GB or more for comfortable usage). Ensuring your system meets these basic requirements will ensure a smooth and responsive Ubuntu experience.
2. Getting Started: Preparing Your System for Ubuntu
The preparation phase is arguably as important as the installation itself. It involves safeguarding your existing data and creating the necessary installation media. Taking these steps diligently will prevent potential headaches and ensure that your transition to or alongside Ubuntu is as seamless as possible. This section details the critical actions you need to take before you even touch the installer.
2.1. Back Up Your Data: A Crucial First Step
This cannot be stressed enough: back up all your important data before proceeding with any operating system installation or modification. Whether you plan to completely replace your current OS or set up a dual-boot system, there’s always a remote risk of data loss. This risk significantly increases if you are unfamiliar with disk partitioning or encounter unexpected errors.
Consider backing up documents, photos, videos, music, and any other critical files to an external hard drive, a cloud storage service (like Google Drive, Dropbox, or OneDrive), or another computer. Verify that your backups are accessible and complete. This step provides an invaluable safety net, allowing you to proceed with confidence, knowing that your precious information is secure, regardless of what happens during the installation. For those who prioritize digital security and productivity, a robust backup strategy is a non-negotiable part of their tech toolkit.
2.2. Downloading the Ubuntu ISO Image
The next step is to obtain the Ubuntu operating system itself. Ubuntu is distributed as an ISO image file, which is a complete snapshot of the operating system that can be burned to a disk or written to a USB drive.
- Visit the Official Ubuntu Website: Open your web browser and navigate to
ubuntu.com/download. - Choose Your Version: Ubuntu offers several versions, including the latest Long Term Support (LTS) release and intermediate releases. LTS versions are recommended for most users as they receive five years of security and maintenance updates, offering greater stability. Non-LTS releases offer newer features but have shorter support cycles. For this guide, we’ll assume you’re downloading the latest LTS desktop version.
- Initiate Download: Click on the “Download” button for the desired version. The ISO file is typically several gigabytes in size, so the download time will vary depending on your internet connection speed.
- Verify the Download (Optional but Recommended): After the download completes, it’s good practice to verify the integrity of the ISO file. This ensures that the file wasn’t corrupted during the download process. Ubuntu provides checksums (MD5, SHA256) on their download page. You can use a tool (like
certutil -hashfile [path_to_iso] SHA256on Windows orsha256sum [path_to_iso]on Linux/macOS) to compare the checksum of your downloaded file with the one provided by Ubuntu.
2.3. Creating a Bootable USB Drive: Your Installation Media
Once you have the Ubuntu ISO file, you need to “burn” or “write” it to a USB flash drive to make it bootable. This transforms your USB drive into an installer from which your computer can start up.
For Windows Users:
The most popular and reliable tool is Rufus.
- Download Rufus: Go to
rufus.ieand download the latest portable version. - Insert USB Drive: Plug your USB flash drive into your computer.
- Launch Rufus: Run the Rufus executable.
- Configure Rufus:
- Device: Select your USB drive from the dropdown menu (ensure it’s the correct one to avoid accidentally formatting another drive!).
- Boot selection: Click “SELECT” and browse to your downloaded Ubuntu ISO file.
- Partition scheme: Usually, Rufus will automatically detect the correct scheme (GPT for UEFI, MBR for BIOS). If unsure, GPT is generally preferred for newer systems.
- File system and Cluster size: Leave these at their default settings.
- Volume label: You can leave it as default or name it “Ubuntu Live”.
- Start Creation: Click “START.” Rufus will warn you that all data on the USB drive will be destroyed. Confirm to proceed.
- Wait for Completion: The process can take several minutes. Once complete, Rufus will show a “READY” status. You can then close Rufus and safely remove your USB drive.
For macOS and Linux Users:
Balena Etcher is an excellent cross-platform tool that simplifies this process.
- Download Balena Etcher: Go to
balena.io/etcherand download the version for your operating system. - Install/Launch Etcher: Install it if required, then launch the application.
- Select Image: Click “Flash from file” and choose your downloaded Ubuntu ISO.
- Select Target: Click “Select target” and choose your USB drive. Again, ensure you select the correct drive.
- Flash!: Click “Flash!” You may be prompted for your administrator password. Etcher will then write the image to the USB drive and verify it.
- Wait for Completion: Once finished, Etcher will notify you, and you can safely eject the USB drive.
With your bootable USB drive ready, you’re now fully prepared to initiate the Ubuntu installation.
3. The Installation Process: A Step-by-Step Walkthrough
This is where the magic happens. Booting from your newly created USB drive will launch the Ubuntu installer, guiding you through the configuration of your new operating system. This section provides a detailed, step-by-step walkthrough of each stage, paying particular attention to the critical decision of disk partitioning.
3.1. Booting from the Installation Media
First, ensure your computer is turned off. Insert the bootable Ubuntu USB drive into an available USB port. Now, turn on your computer and immediately press the appropriate key to enter your computer’s BIOS/UEFI settings or the boot menu. This key varies by manufacturer but commonly includes F2, F10, F12, DEL, or ESC. Consult your computer’s manual or look for an on-screen prompt during startup.
Once in the BIOS/UEFI settings or boot menu, you need to set your computer to boot from the USB drive. Look for a “Boot Order” or “Boot Priority” section and move your USB drive to the top of the list. Save your changes and exit. Your computer should then restart and boot from the Ubuntu USB drive, presenting you with the Ubuntu GRUB menu.
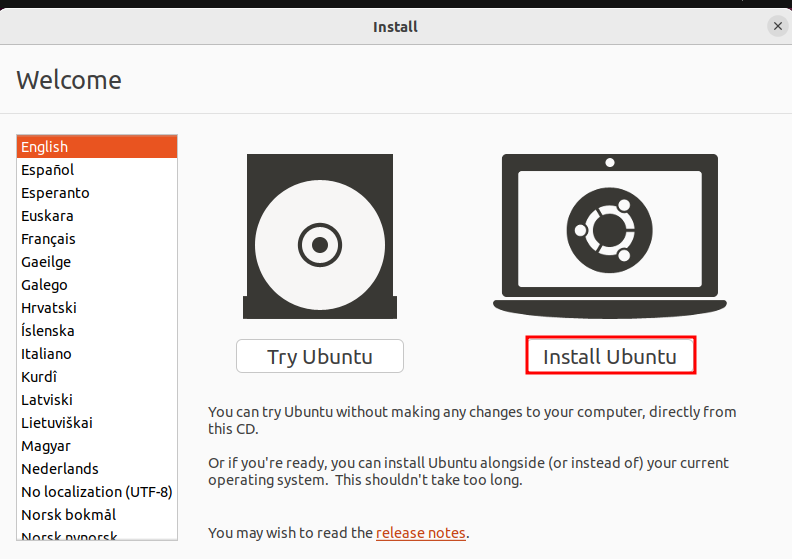
From the GRUB menu, select “Try or Install Ubuntu.” This will load the Ubuntu desktop environment in a live session. You’ll see a graphical desktop, and a small installer window will appear, offering you the choice to “Try Ubuntu” or “Install Ubuntu.” While “Try Ubuntu” allows you to explore the OS without making changes to your hard drive, we’ll proceed directly with “Install Ubuntu.”
3.2. Navigating the Ubuntu Installer: Initial Setup
Once you click “Install Ubuntu,” the installer wizard will guide you through several initial configuration steps:
- Choose Your Language: Select your preferred language for the installation process and the Ubuntu system itself. Click “Continue.”
- Keyboard Layout: The installer will attempt to detect your keyboard layout. You can test it in the provided text field. If it’s incorrect, select your layout manually from the list. Click “Continue.”
- Network Connection: Connect to a Wi-Fi network if you have one. This allows the installer to download updates and third-party software during installation, potentially saving time later. If you don’t have Wi-Fi or prefer to install offline, you can skip this step. Click “Continue.”
- Updates and Other Software: This screen offers important choices:
- Normal installation: Recommended for most users. It installs a web browser, office suite, games, and media players.
- Minimal installation: Installs only a web browser and basic utilities. You can install other software later.
- Download updates while installing Ubuntu: Highly recommended if you have an internet connection. This ensures your system is up-to-date from the start.
- Install third-party software for graphics and Wi-Fi hardware and additional media formats: Strongly recommended. This installs proprietary drivers and codecs that might be necessary for your hardware (especially NVIDIA/AMD graphics cards and some Wi-Fi adapters) and for playing various media files. Check this box.
Click “Continue.”
3.3. Crucial Decision: Choosing Your Installation Type (Partitioning Explained)
This is the most critical step of the installation process, as it dictates how Ubuntu will interact with your hard drive. Take your time here and ensure you understand each option.
3.3.1. Erase Disk and Install Ubuntu

- Description: This option will wipe your entire hard drive, deleting all existing operating systems (like Windows or macOS) and data, and then install Ubuntu as the sole operating system.
- When to use: Choose this if you want a fresh start with Ubuntu, are dedicating the entire computer to Ubuntu, or are installing on a new hard drive.
- Warning: This will destroy all data on the selected disk. Only proceed if you are absolutely sure you have backed up everything important or the disk contains no valuable data.
3.3.2. Install Ubuntu Alongside Windows (Dual Boot)
- Description: This option detects an existing Windows installation and offers to shrink its partition to create space for Ubuntu. You’ll get a slider to choose how much space to allocate to each OS.
- When to use: Ideal if you want to keep Windows and have Ubuntu as a secondary operating system. When you boot your computer, you’ll be presented with a menu to choose which OS to load.
- Prerequisites: Ensure you have enough free, unallocated space on your hard drive. It’s often recommended to shrink your Windows partition before starting the Ubuntu installer using Windows’ own Disk Management tool for better safety and control.
3.3.3. Something Else: Manual Partitioning for Advanced Users
- Description: This option gives you complete control over disk partitioning. You can create, delete, and resize partitions manually.
- When to use:
- If you’re installing Ubuntu alongside another Linux distribution.
- If you want a highly customized partition layout (e.g., separate
/home,/var,/tmppartitions). - If you’re creating a complex dual-boot or multi-boot setup.
- If the automatic “Install alongside Windows” option doesn’t work or doesn’t give you enough control.
- Recommended Partitions for Manual Setup:
- Root Partition (
/): This is where the operating system files will reside. Typically formatted asext4. A minimum of 20-30GB is recommended; 50GB or more is ideal. - Swap Area: Used as virtual memory when your RAM is full. The size usually depends on your RAM: 2GB if you have 4GB RAM, 4GB if you have 8GB RAM, or 0 if you have 16GB+ RAM and don’t plan to hibernate. Choose “swap area” as the use as.
- Home Partition (
/home): (Optional but highly recommended) This stores all your personal files and user configurations. Keeping it separate makes reinstalling Ubuntu easier without losing your data. Format asext4. Allocate the majority of your remaining disk space here.
- Root Partition (
- Steps for Manual Partitioning:
- Select “Something else” and click “Continue.”
- You’ll see a list of your disk drives and partitions.
- Identify free space or existing partitions you wish to modify.
- Select the free space and click the
+button to create new partitions. - For each new partition, specify its size, choose “Primary” or “Logical” (usually Primary for root/home), set the “Use as” (e.g., Ext4 journaling file system, swap area), and select the “Mount point” (e.g.,
/,/home). - Once you’ve defined your partitions, double-check everything, especially the mount points and sizes.
- Select the device for boot loader installation (usually
/dev/sdaor the primary drive where Ubuntu is being installed). - Click “Install Now.” The installer will show a summary of the changes to be made. Confirm to proceed.
3.4. Finalizing the Installation: User Creation and Localization
After the partitioning is confirmed, the installation will begin in the background. Meanwhile, you’ll be prompted for a few more details:
- Where Are You? (Time Zone): Click on your location on the world map or search for your city. This sets your system’s time zone. Click “Continue.”
- Who Are You? (User Creation): This is where you create your primary user account.
- Your name: Enter your full name.
- Your computer’s name: This is how your computer will appear on a network. A default is usually generated, but you can change it.
- Pick a username: This is your login name. It’s usually a lowercase version of your name.
- Choose a password: Create a strong password. Re-enter it to confirm.
- Require my password to log in: Recommended for security.
- Log in automatically: Convenient but less secure.
Click “Continue.”
The installation will then proceed, copying files and configuring the system. This can take anywhere from 15 minutes to an hour, depending on your system’s speed and whether you chose to download updates during installation. Once complete, you will see a message prompting you to “Restart Now.” Remove your USB drive when prompted, and press Enter. Your computer will reboot, and you should be greeted by the Ubuntu login screen or a GRUB menu (if you dual-booted), allowing you to select Ubuntu.
4. Post-Installation Essentials: Optimizing Your New Ubuntu System
Congratulations! You’ve successfully installed Ubuntu. However, the journey doesn’t end there. To ensure your new operating system is secure, performs optimally, and caters to your specific needs, a few crucial post-installation steps are highly recommended. These actions will set the foundation for a robust and enjoyable Ubuntu experience, bringing your system up to speed with the latest digital security patches and essential software.
4.1. First Boot and System Updates
Upon your first login to Ubuntu, the first and most critical task is to ensure your system is fully updated. Even if you opted to download updates during installation, new patches might have been released in the interim.
- Open Software Updater: You’ll likely see a notification for available updates. If not, open the “Software Updater” application from the applications menu (usually by searching for “update”).
- Install Updates: The Software Updater will check for new packages. Review the list of updates and click “Install Now.” You may be prompted for your password.
- Restart: After the updates are installed, the system might recommend a restart to apply kernel updates or other critical changes. Always perform the recommended restart to finalize the updates.
Keeping your system updated is paramount for digital security. Updates often include crucial bug fixes, performance improvements, and patches for newly discovered vulnerabilities, protecting your system from potential threats.
4.2. Installing Proprietary Drivers and Additional Software
While Ubuntu strives for open-source compatibility, some hardware components, particularly graphics cards (NVIDIA, AMD) and certain Wi-Fi adapters, might benefit from proprietary drivers for optimal performance and stability.
- Open “Software & Updates”: Go to the applications menu and search for “Software & Updates.”
- Navigate to “Additional Drivers”: In the “Software & Updates” window, click on the “Additional Drivers” tab.
- Install Drivers: The system will search for available proprietary drivers for your hardware. If any are found, you’ll see a list. Select the recommended or desired driver and click “Apply Changes.” You’ll need to authenticate with your password.
- Restart: A restart is often required after installing new drivers for them to take full effect.
Beyond drivers, you might want to install additional media codecs or software that wasn’t included in the default installation. The Ubuntu Software Center (discussed next) is your primary tool for this. However, for specialized codecs or tools, you might use the terminal:
sudo apt install ubuntu-restricted-extras (for popular media codecs, Microsoft fonts, etc.)
4.3. Exploring the Ubuntu Software Center and Customization
The Ubuntu Software Center is your one-stop shop for discovering, installing, and managing applications. It’s an intuitive marketplace for thousands of free and open-source applications, making it incredibly easy to enhance your system’s functionality.
- Launch Software Center: Find “Ubuntu Software” in your applications menu.
- Browse and Search: Explore categories like “Editors’ Picks,” “Productivity,” “Games,” or use the search bar to find specific applications (e.g., GIMP for image editing, VLC for media playback, VS Code for development).
- Install Applications: Click on an application, then click the “Install” button. You’ll need to authenticate with your password.
Customization:
Ubuntu’s GNOME desktop environment is highly customizable.
- Appearance Settings: Go to “Settings” -> “Appearance” to change wallpapers, themes (dark/light mode), icon sizes, and dock behavior.
- GNOME Extensions: For deeper customization, you can install GNOME Shell extensions. First, install the browser extension and the
chrome-gnome-shellpackage (sudo apt install chrome-gnome-shell). Then visitextensions.gnome.orgto browse and install extensions that add functionality or change the desktop’s look and feel. Popular extensions include “Dash to Dock” (for a macOS-like dock), “User Themes” (to apply custom themes), and “Caffeine” (to prevent screen locking).
By performing these post-installation steps, your Ubuntu system will be fully operational, secure, and tailored to your preferences, ready to tackle any task.
5. Troubleshooting Common Issues and Final Thoughts
Even with a detailed guide, new operating system installations can sometimes present unexpected hurdles. This section addresses a few common issues you might encounter and offers some final words of encouragement as you settle into the Ubuntu ecosystem.
5.1. Addressing Potential Installation Roadblocks
-
Boot Issues (Can’t boot from USB):
- Check BIOS/UEFI settings: Ensure the USB drive is correctly prioritized in the boot order.
- Disable Secure Boot: On some UEFI systems, “Secure Boot” can prevent booting from non-Windows operating systems. Disable it in your BIOS/UEFI settings.
- Try Legacy/CSM Mode: If your system is older or having trouble with UEFI, try enabling “Legacy Mode” or “Compatibility Support Module (CSM)” in BIOS/UEFI, if available.
- Recreate USB drive: The USB might be corrupted. Try recreating the bootable USB with Rufus or Etcher on a different drive or computer.
-
Wi-Fi Not Working After Installation:
- This is often due to missing proprietary drivers. Go to “Software & Updates” -> “Additional Drivers” as described in section 4.2.
- If that doesn’t work, search online for your specific Wi-Fi adapter model and “Ubuntu driver.” You might need to temporarily connect via Ethernet to download necessary packages.
-
Slow Performance:
- Ensure your system meets the minimum hardware requirements.
- Install proprietary graphics drivers if available.
- Check for system updates regularly.
- Consider using a lighter desktop environment (like XFCE with Xubuntu or LXQt with Lubuntu) if your hardware is very old.
-
Dual Boot Issues (Can’t see Windows/Ubuntu):
- Boot-repair: If you installed Ubuntu alongside Windows and can’t see Windows in the GRUB menu (or vice-versa), try using the “Boot-Repair” tool. You can run it from the live Ubuntu USB session. Open a terminal and run
sudo add-apt-repository ppa:yannubuntu/boot-repair && sudo apt update && sudo apt install -y boot-repair && boot-repair. - Fast Startup/Hibernate: On Windows, “Fast Startup” (in Power Options) and hibernation can prevent Ubuntu from accessing Windows partitions safely. Disable both in Windows before installing Ubuntu.
- Boot-repair: If you installed Ubuntu alongside Windows and can’t see Windows in the GRUB menu (or vice-versa), try using the “Boot-Repair” tool. You can run it from the live Ubuntu USB session. Open a terminal and run
For more complex issues, the vast Ubuntu community forums and documentation are invaluable resources. A quick search with your specific error message will often lead you to a solution.

5.2. Embracing the Ubuntu Ecosystem
Installing Ubuntu is more than just setting up a new operating system; it’s an entry point into a vibrant and supportive open-source community. You’ve gained access to a world of free software, robust security, and unparalleled customization. As you explore your new system, remember that the learning curve, while present, is rewarding. Familiarize yourself with the terminal (a powerful tool for managing your system), explore different applications, and don’t hesitate to engage with the online community if you encounter challenges or have questions.
Ubuntu is not just an OS; it’s a philosophy – one of accessibility, collaboration, and empowering users with control over their technology. By successfully installing Ubuntu, you’ve taken a significant step towards a more secure, personalized, and efficient computing experience, aligning perfectly with the ethos of a modern tech enthusiast. Enjoy your journey with Ubuntu!
aViewFromTheCave is a participant in the Amazon Services LLC Associates Program, an affiliate advertising program designed to provide a means for sites to earn advertising fees by advertising and linking to Amazon.com. Amazon, the Amazon logo, AmazonSupply, and the AmazonSupply logo are trademarks of Amazon.com, Inc. or its affiliates. As an Amazon Associate we earn affiliate commissions from qualifying purchases.