
Upgrading your personal computer’s storage is one of the most impactful and cost-effective ways to boost its performance. For years, the bottleneck in many PC builds and upgrades has been the traditional Hard Disk Drive (HDD). These mechanical marvels, while offering ample storage at a lower cost, are significantly slower than their Solid State Drive (SSD) counterparts. If you’ve ever experienced long boot times, slow application loading, or frustratingly sluggish file transfers, an SSD is likely the solution you’ve been seeking. This comprehensive guide will walk you through the entire process of installing an SSD drive in your PC, from understanding the different types of SSDs to the final boot-up.

The transition from HDDs to SSDs has been a game-changer for PC users across all spectrums, from casual home users to hardcore gamers and creative professionals. The speed difference is not merely a minor improvement; it’s a transformative leap. Imagine your operating system booting up in mere seconds, applications launching instantaneously, and large files copying in a fraction of the time. This speed enhancement translates directly into a more responsive and enjoyable computing experience. Furthermore, SSDs are more durable, consume less power, and operate silently, making them a superior choice for virtually any modern PC build.
This article is designed to be your all-encompassing resource, whether you’re a seasoned PC builder or a complete novice. We’ll demystify the technical jargon, break down the installation process into manageable steps, and ensure you have the confidence to tackle this upgrade head-on. So, let’s dive in and unlock the full potential of your PC with the lightning-fast speeds of an SSD.
Understanding SSD Types and Connectivity
Before you can install an SSD, it’s crucial to understand the different types available and how they connect to your motherboard. This knowledge will help you choose the right drive for your needs and ensure compatibility.
SATA SSDs: The Ubiquitous Upgrade
The most common type of SSD you’ll encounter is the 2.5-inch SATA SSD. These drives are the direct replacements for traditional 3.5-inch HDDs. They connect to your motherboard via a SATA data cable and draw power from your power supply unit (PSU) through a SATA power cable.
- Form Factor: These are the familiar rectangular drives, similar in size to laptop HDDs.
- Connectivity: They utilize the SATA III (6Gb/s) interface, which offers theoretical maximum transfer speeds of around 550 MB/s. While this is a significant upgrade over HDDs, it’s not the fastest available.
- Installation: SATA SSDs are incredibly straightforward to install. They typically mount in the same drive bays as HDDs, and the cable connections are keyed to prevent incorrect insertion.
When upgrading an older PC, a SATA SSD is often the easiest and most cost-effective option. It provides a substantial performance boost without requiring any changes to your motherboard’s M.2 slots or PCIe lanes. Many older motherboards may not even support M.2 SSDs, making SATA the only viable SSD upgrade path.
NVMe SSDs: Unleashing True Speed
For those seeking the absolute pinnacle of storage performance, NVMe (Non-Volatile Memory Express) SSDs are the way to go. These drives leverage the much faster PCIe (Peripheral Component Interconnect Express) interface, offering bandwidth significantly greater than SATA.
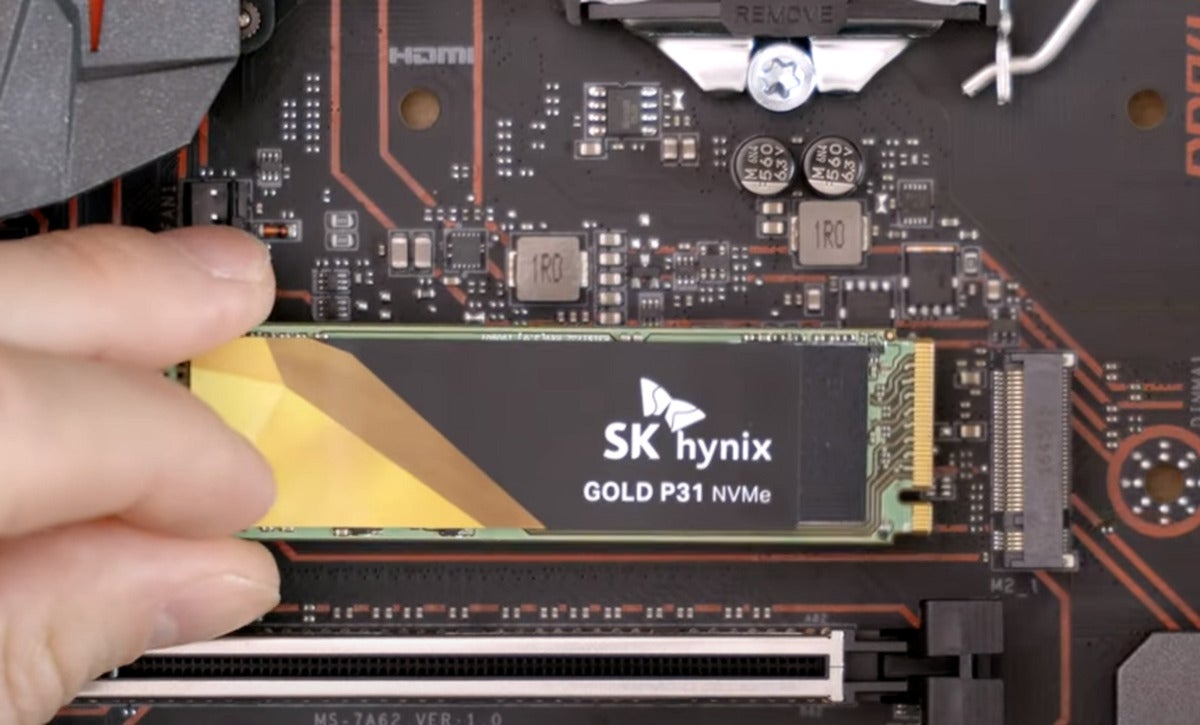
- Form Factor: NVMe SSDs primarily come in the M.2 form factor. These are small, gumstick-like drives that plug directly into dedicated M.2 slots on modern motherboards. Some PCIe add-in cards also accommodate NVMe SSDs.
- Connectivity: NVMe SSDs utilize PCIe lanes, with PCIe Gen3 x4 offering theoretical speeds up to 3,500 MB/s, and the newer PCIe Gen4 x4 pushing that figure to over 7,000 MB/s.
- Installation: M.2 NVMe SSDs are installed directly onto the motherboard. This requires locating an M.2 slot, removing a small screw, inserting the drive at an angle, and then securing it with the screw. While slightly more involved than SATA, it’s still a relatively simple process.
Important Considerations for NVMe:
- Motherboard Compatibility: Not all motherboards have M.2 slots. If yours does, ensure it supports NVMe protocols. Older M.2 slots might only support SATA M.2 SSDs. Consult your motherboard manual for specifics.
- Performance Tiers: NVMe SSDs come in different generations (PCIe Gen3, Gen4, Gen5) and configurations (x2, x4 lanes). For optimal performance, aim for a PCIe Gen3 x4 or Gen4 x4 drive if your motherboard supports it.
- Cooling: High-performance NVMe SSDs can generate heat. Many come with pre-installed heatsinks, or your motherboard might have one for the M.2 slot. Consider a heatsink if yours doesn’t, especially if you’ll be performing sustained heavy workloads.
Preparing for the Installation
Before you physically begin installing your SSD, a bit of preparation will make the process smoother and prevent potential issues. This includes gathering tools, backing up your data, and deciding whether you’re cloning your existing drive or performing a fresh installation.
Essential Tools and Workspace
You won’t need a vast array of specialized tools for an SSD installation. Most of what you require is standard for PC maintenance.
- Phillips Head Screwdriver: A magnetic tip is a lifesaver for handling tiny screws. You’ll likely need a medium-sized one.
- Anti-Static Wrist Strap (Recommended): Static electricity can damage sensitive computer components. Wearing a wrist strap connected to a grounded metal object (like your PC case) is a good preventative measure.
- Your New SSD: Make sure you have the correct type (SATA or NVMe) and capacity for your needs.
- SATA Data Cable (if installing a SATA SSD): While many motherboards come with a few, it’s good to have an extra on hand. Ensure it’s a SATA III cable for maximum speed.
- Your PC’s Manual: Especially if you’re new to your PC or motherboard, the manual will be invaluable for identifying ports, slots, and drive bay locations.
- Adequate Lighting: A well-lit workspace will make it much easier to see what you’re doing.
- A Clean, Non-Carpeted Surface: Working on a hard, static-free surface reduces the risk of electrostatic discharge.
Backing Up Your Data and Choosing Your Installation Method
This is arguably the most critical step. Whether you’re cloning your existing drive or starting fresh, always back up your important data.
- Cloud Storage: Services like Google Drive, Dropbox, or OneDrive are excellent for backing up documents, photos, and other smaller files.
- External Hard Drive: For larger backups, an external HDD or SSD is ideal.
- Backup Software: Many operating systems and third-party programs offer robust backup solutions.
Once your data is secure, you have two primary methods for getting your operating system onto the new SSD:
Cloning Your Existing Drive
Cloning creates an exact replica of your current hard drive onto the new SSD. This is a popular choice because it allows you to keep all your installed programs, settings, and files without needing to reinstall everything.
- How it works: You’ll need cloning software (many SSD manufacturers provide their own, or you can use free options like Macrium Reflect Free) and a way to connect both drives simultaneously. For a SATA SSD, this might mean temporarily connecting it alongside your existing HDD. For an NVMe drive, if you’re replacing your boot drive, you might need an external enclosure or a secondary M.2 slot to clone from the old drive to the new one before swapping them.
- Pros: Saves time and effort by avoiding a full reinstallation of the OS and applications. Preserves your existing setup.
- Cons: If your old drive has issues or is fragmented, you might be cloning those problems to your new, faster drive. You’ll need to ensure the target SSD is at least as large as the used space on your source drive.
Performing a Fresh Installation (Clean Install)
A fresh installation involves installing a brand-new copy of your operating system (Windows, Linux, etc.) onto the SSD. This is often recommended for optimal performance and stability.

- How it works: You’ll need a bootable USB drive with your operating system’s installation media. You boot your PC from this USB drive, format the new SSD, and install the OS.
- Pros: Ensures a clean slate, free from any potential issues or bloatware from your old installation. Generally leads to the best performance and stability.
- Cons: Requires reinstalling all your applications and reconfiguring your settings. You’ll need to manually transfer your backed-up data back to the PC.
The choice between cloning and a fresh install often comes down to personal preference, time constraints, and how clean you want your system to be. For many, the performance gain from an SSD is so significant that the effort of a clean install is well worth it.
The Physical Installation Process
With your preparations complete, it’s time to get your hands dirty. This section will guide you through the physical installation of both SATA and NVMe SSDs. Remember to unplug your PC from the power outlet and discharge any residual power by holding the power button for a few seconds before you begin.
Installing a 2.5-inch SATA SSD
This is the most straightforward type of SSD installation.
- Open Your PC Case: Most PC cases have side panels that are secured with thumbscrews or standard screws. Remove the necessary screws and gently slide or lift off the side panel.
- Locate a Drive Bay: Look for 2.5-inch drive bays. These are typically smaller than the 3.5-inch bays used for HDDs. If your case doesn’t have dedicated 2.5-inch bays, you might need a 2.5-inch to 3.5-inch adapter bracket to mount the SSD in a larger bay.
- Mount the SSD: Slide the SSD into the drive bay and secure it with screws. Some cases have tool-less designs where the SSD clicks into place.
- Connect the SATA Data Cable: Plug one end of the SATA data cable into the back of the SSD. Plug the other end into an available SATA port on your motherboard. These ports are usually labeled “SATA” and are often located near your SATA drives.
- Connect the SATA Power Cable: Locate a SATA power connector coming from your power supply unit. Plug this into the corresponding port on the SSD. These connectors are L-shaped and will only fit one way.
- Close Your PC Case: Reattach the side panel and secure it with the screws.
Installing an M.2 NVMe SSD
This process involves interacting directly with your motherboard.
- Open Your PC Case: As with the SATA installation, remove the side panel.
- Locate the M.2 Slot: Consult your motherboard manual to find the M.2 slot(s). They are typically horizontal slots on the motherboard, often near the CPU socket or the PCIe slots. Some motherboards have M.2 heatsinks that you’ll need to remove first.
- Remove the M.2 Screw: An M.2 slot usually has a small standoff screw pre-installed or included in your motherboard’s accessory bag. Unscrew this.
- Insert the NVMe SSD: The M.2 SSD has a notched connector. Align the notch on the SSD with the notch in the M.2 slot. Insert the SSD at an angle (around 30 degrees) into the slot.
- Secure the SSD: Gently press the SSD down so it lies flat against the motherboard. Then, use the M.2 screw you removed earlier to secure the end of the SSD to the standoff. Be careful not to overtighten.
- Reinstall Heatsink (if applicable): If your motherboard has an M.2 heatsink, reattach it according to your motherboard manual.
- Close Your PC Case: Reattach the side panel and secure it with the screws.
Important Note for NVMe: If you are replacing your primary boot drive with an NVMe SSD and your motherboard has only one M.2 slot, you might need to perform the cloning process first using an external NVMe enclosure before physically installing the new drive and removing the old one.
Post-Installation Configuration and Boot-Up
Once the physical installation is complete, the final steps involve configuring your system to recognize and use the new SSD.
Initial Boot and BIOS/UEFI Settings
- Connect Peripherals and Power: Reconnect your monitor, keyboard, mouse, and power cable.
- Boot into BIOS/UEFI: Power on your PC. Immediately start pressing the key that accesses your BIOS or UEFI settings. This is typically one of the
Delete,F2,F10, orF12keys, depending on your motherboard manufacturer. Watch the initial boot screen for prompts. - Verify the SSD is Recognized: In the BIOS/UEFI, navigate to a section that lists your storage devices (often labeled “Storage Configuration,” “SATA Configuration,” or “Boot Order”). Your new SSD should appear here.
- For SATA SSDs: Ensure the SATA port it’s connected to is enabled and set to AHCI mode (this is usually the default and optimal setting for SSDs).
- For NVMe SSDs: They are typically detected automatically. Ensure the M.2 slot is enabled.
- Set Boot Order (if applicable): If you performed a fresh installation, you’ll need to ensure your PC boots from the USB drive containing the operating system installation media first. If you cloned your drive and are replacing the old boot drive, the BIOS should ideally detect the new SSD as the primary boot device. You can adjust the boot order here if necessary, placing the new SSD at the top.
- Save and Exit: Save your changes in the BIOS/UEFI and exit. Your PC will restart.
Setting Up the SSD in Your Operating System
The subsequent steps depend on whether you cloned your drive or performed a fresh installation.
If You Cloned Your Drive
If you successfully cloned your old drive to the new SSD and replaced the original boot drive, your PC should boot directly into your familiar operating system.
- Check Disk Management: Once Windows loads, open “Disk Management” (search for it in the Start menu).
- Your new SSD should be listed with the same partitions as your old drive.
- If your old drive was larger than your new SSD (and you cloned successfully to a smaller SSD), you might need to extend the partition on the new SSD to utilize its full capacity. Right-click on the partition and select “Extend Volume.”
- Set SSD as Primary (if you didn’t replace the old drive): If you installed the SSD as a secondary drive for extra speed or storage and didn’t remove your old HDD, you’ll need to format the new SSD and assign it a drive letter. In Disk Management, right-click on the unallocated space of your new SSD, create a new simple volume, assign a drive letter, and format it (NTFS is standard for Windows).
- Change Boot Drive in Windows (Advanced): If you cloned to a secondary drive and want to make that the boot drive, you’ll need to boot into BIOS/UEFI and set the new SSD as the primary boot device.
If You Performed a Fresh Installation
If you opted for a clean install:
- Boot from Installation Media: Your PC will boot from the USB drive you prepared.
- Follow OS Installation Prompts: Proceed through the operating system installation. When asked where to install Windows, select your new SSD.
- Format the SSD: The installer will likely prompt you to format the SSD. Choose to do so. This will erase any data that might be on the SSD if it was pre-formatted.
- Complete Installation: Finish the OS installation process.
- Install Drivers: After the OS is installed, install essential drivers, especially for your motherboard’s chipset, graphics card, and network adapter. You can usually find these on the manufacturer’s website.
- Install Applications and Transfer Data: Reinstall your favorite applications and copy your backed-up personal files back to your PC.
- Format Old Drive (Optional): If you’re not using your old HDD anymore and it’s not your boot drive, you can format it to use as additional storage.
Optimizing Your SSD for Performance
Modern operating systems are generally good at recognizing and optimizing SSDs automatically. However, there are a few things you can ensure are enabled for maximum longevity and performance.
- TRIM: TRIM is a command that tells the SSD which blocks of data are no longer in use and can be wiped. This is crucial for maintaining write performance. Windows typically enables TRIM automatically for SSDs. You can check this by opening Command Prompt as an administrator and typing
fsutil behavior query DisableDeleteNotify. If the output is0, TRIM is enabled. - Defragmentation: Do NOT defragment an SSD. Defragmentation is a process for HDDs that reorganizes scattered file fragments. SSDs do not benefit from this and it can actually reduce their lifespan. Windows will usually recognize an SSD and disable automatic defragmentation for it, opting for TRIM instead.
- SATA Mode (AHCI): As mentioned in the BIOS section, ensure your SATA controller is set to AHCI mode. This is the standard for SSDs and provides better performance and features like hot-plugging.
Conclusion: Enjoying Your Speed Boost
Congratulations! You’ve successfully navigated the process of installing an SSD drive in your PC. The difference in performance will be immediately noticeable. From quicker boot times to lightning-fast application loading and file transfers, your computing experience will be transformed.
Whether you chose a budget-friendly SATA SSD to revive an older machine or opted for the cutting-edge speeds of an NVMe SSD to build a powerhouse, the benefits of solid-state technology are undeniable. This upgrade not only enhances your day-to-day productivity but also opens up new possibilities for gaming, content creation, and any task that demands quick access to data.
Remember that this installation is just the beginning. By keeping your operating system and drivers up to date, and by following best practices like using TRIM and avoiding unnecessary defragmentation, you’ll ensure your SSD continues to perform at its peak for years to come. If you ever decide to upgrade your system further or build a new PC, you’ll now have the confidence and knowledge to tackle storage installations with ease. Enjoy the speed!
aViewFromTheCave is a participant in the Amazon Services LLC Associates Program, an affiliate advertising program designed to provide a means for sites to earn advertising fees by advertising and linking to Amazon.com. Amazon, the Amazon logo, AmazonSupply, and the AmazonSupply logo are trademarks of Amazon.com, Inc. or its affiliates. As an Amazon Associate we earn affiliate commissions from qualifying purchases.