In the ever-evolving landscape of technology, a common bottleneck for both personal computers and professional workstations is often the amount of available RAM (Random Access Memory). Whether you’re a gamer seeking smoother gameplay, a content creator demanding faster rendering times, a student juggling multiple research tabs, or a business professional managing complex spreadsheets, insufficient memory can lead to frustrating slowdowns. Fortunately, upgrading your computer’s RAM is one of the most accessible and impactful hardware improvements you can make. This comprehensive guide will walk you through the process of installing memory, ensuring you can unlock your system’s full potential.
Understanding Your Memory Needs and the Types of RAM
Before diving into the physical installation, it’s crucial to understand why you need more memory and what types of RAM are compatible with your system. Memory, or RAM, acts as your computer’s short-term working space. When you open an application or a file, it’s loaded into RAM for quick access by the CPU. The more RAM you have, the more applications and data your computer can handle simultaneously without performance degradation.
Determining Your Current Memory Usage and Needs
Several indicators suggest you might benefit from a RAM upgrade:
- Slowdowns and Freezing: If your computer frequently becomes unresponsive, lags during everyday tasks, or applications take a long time to load, insufficient RAM is a prime suspect.
- High CPU Usage with Low Disk Activity: When your CPU is consistently maxed out but your hard drive or SSD isn’t working overtime, it often means the system is struggling to access data from slower storage because RAM is full.
- Limited Multitasking: If you find yourself closing applications just to open a new one, or if switching between programs is a chore, you’re likely hitting your RAM limit.
- Specific Application Requirements: Many demanding applications, such as video editing software, 3D rendering programs, virtual machines, and modern AAA games, have recommended RAM specifications. Exceeding these recommendations can significantly boost performance.
To gauge your current RAM usage, you can use your operating system’s built-in tools:
- Windows: Press
Ctrl + Shift + Escto open the Task Manager. Navigate to the “Performance” tab and select “Memory.” This will show you your total installed RAM and how much is currently in use. - macOS: Open “Activity Monitor” (found in Applications > Utilities). Click on the “Memory” tab to see your memory usage.
Identifying the Correct RAM Type and Specifications
Not all RAM modules are created equal. Using incompatible RAM can lead to your computer not booting, instability, or even damage to your motherboard. The key specifications to consider are:
DDR Generation (DDR3, DDR4, DDR5)
This is the most fundamental compatibility factor. Your motherboard is designed to work with a specific DDR generation. Installing a DDR4 module into a DDR3 slot (or vice versa) is physically impossible due to differing notch placements and electrically incompatible.
- DDR3: An older standard, found in many pre-2015 systems.
- DDR4: The most common standard for systems from around 2015 to early 2023.
- DDR5: The latest standard, offering higher speeds and efficiency, becoming prevalent in newer systems.
How to find your DDR generation:
- Consult your motherboard manual: This is the most reliable source.
- Use system information tools: Software like CPU-Z (Windows) or System Information on macOS can often display this information.
- Check your existing RAM modules: The DDR generation is usually printed on the label of the RAM stick itself.
RAM Speed (MHz)
RAM speed, measured in Megahertz (MHz), indicates how quickly the memory can transfer data. Higher MHz generally means better performance, but it’s also limited by your motherboard’s support and your CPU’s memory controller.
- Compatibility: While faster RAM is often backwards compatible (e.g., DDR4-3200 might work in a motherboard that supports DDR4-2400, but it will run at the lower speed), it’s best to match or stay within the motherboard’s specified speed range for optimal performance and stability.
- XMP/EXPO Profiles: Many performance RAM kits come with Extreme Memory Profile (XMP) for Intel systems or Extended Profiles for Overclocking (EXPO) for AMD systems. These profiles allow you to easily set the RAM to its advertised speeds via your BIOS/UEFI.
RAM Capacity (GB)
This refers to the total amount of memory installed. For typical users, 8GB is a minimum, 16GB is recommended for most, and 32GB or more is beneficial for heavy multitasking, gaming, and professional applications.
- Motherboard Limits: Your motherboard will have a maximum total RAM capacity it can support (e.g., 64GB, 128GB).
- Per-Slot Limits: It also has a maximum capacity per RAM slot.
RAM Form Factor (DIMM vs. SO-DIMM)
This is crucial for determining physical compatibility with your motherboard.
- DIMM (Dual In-line Memory Module): These are the standard RAM sticks used in desktop computers.
- SO-DIMM (Small Outline Dual In-line Memory Module): These are smaller and used in laptops, all-in-one computers, and some compact desktops. They are not interchangeable.
Dual-Channel, Quad-Channel Configurations
To maximize memory bandwidth, modern motherboards support multi-channel memory configurations. Installing RAM in pairs (or quads) into specific slots on your motherboard allows the CPU to access data from multiple memory modules simultaneously, significantly boosting performance, especially in memory-intensive tasks.
- Consult your motherboard manual: It will clearly indicate which slots to populate for dual-channel or quad-channel operation. Typically, for dual-channel, you’ll use slots 1 and 3, or 2 and 4.
Preparing for the RAM Installation
Once you’ve identified the correct RAM for your system, it’s time to prepare for the installation. This involves gathering your tools, ensuring a safe environment, and backing up your data as a precautionary measure.
Gathering Your Tools and Workspace
You won’t need many specialized tools for RAM installation, making it an accessible DIY project.
- Your new RAM modules: Ensure they are the correct type, speed, and capacity.
- Your computer: Shut down and unplugged.
- Screwdriver: Usually a Phillips head screwdriver is sufficient for opening most computer cases.
- Anti-static wrist strap (recommended): This is crucial for preventing electrostatic discharge (ESD), which can damage your components.
- A well-lit, clean workspace: Plenty of space to maneuver and prevent dropping small parts.
- Your motherboard manual (highly recommended): For slot identification and specific instructions.
- Small container or magnetic tray: To keep screws organized.
Ensuring a Safe Environment and ESD Protection
Electrostatic discharge is a silent killer of computer components. Even a small, imperceptible shock can fry sensitive circuits. Taking precautions is paramount.
- Work on a non-carpeted surface: Wood or tile floors are preferable.
- Ground yourself regularly:
- Wear an anti-static wrist strap: Connect one end to your wrist and the other to an unpainted metal part of your computer case before you touch any internal components.
- Touch a metal object: If you don’t have a strap, frequently touch an unpainted metal part of your computer case to discharge static electricity.
- Handle components by their edges: Avoid touching the gold contacts or the chips on the RAM modules.
- Keep components in their anti-static packaging: Until you are ready to install them.
Backing Up Your Data (Precautionary Measure)
While RAM installation is generally a very safe procedure and doesn’t involve your storage drives, it’s always good practice to have your important data backed up. This is a general computing best practice, and while not strictly necessary for RAM installation, it’s a wise habit to maintain.
- External Hard Drive: Copy critical files and folders.
- Cloud Storage: Services like Google Drive, Dropbox, or OneDrive offer convenient cloud backups.
The Step-by-Step RAM Installation Process

With your workspace prepared and safety measures in place, you’re ready to install the new memory modules.
Opening Your Computer Case
The process varies slightly between desktop and laptop computers, but the core principle is gaining access to the motherboard.
For Desktop Computers:
- Power Down and Unplug: Ensure the computer is completely shut down, and disconnect the power cable from the back of the power supply unit (PSU). It’s also good practice to unplug all peripheral cables.
- Locate the Side Panel: Most desktop cases have a removable side panel, typically held in place by thumbscrews or regular screws at the rear of the case.
- Remove the Panel: Unscrew the screws and slide or lift the panel off. Usually, the left-hand side panel (when viewed from the front) provides access to the motherboard.
- Ground Yourself: Before touching anything inside, attach your anti-static wrist strap to an unpainted metal part of the chassis.
For Laptop Computers:
- Power Down and Unplug: Completely shut down the laptop and unplug the AC adapter.
- Remove the Battery (if removable): For older laptops with user-removable batteries, disconnect the battery. Newer laptops often have internal batteries that don’t need removal, but consult your manual.
- Locate the RAM Access Panel or Bottom Cover: Many laptops have a dedicated small panel on the underside for RAM access. Others require removing the entire bottom cover. Consult your laptop’s service manual (often found on the manufacturer’s website) to identify the correct procedure.
- Unscrew and Remove: Use the appropriate screwdriver to remove the screws. Keep them organized.
- Ground Yourself: As with desktops, ground yourself before touching internal components.
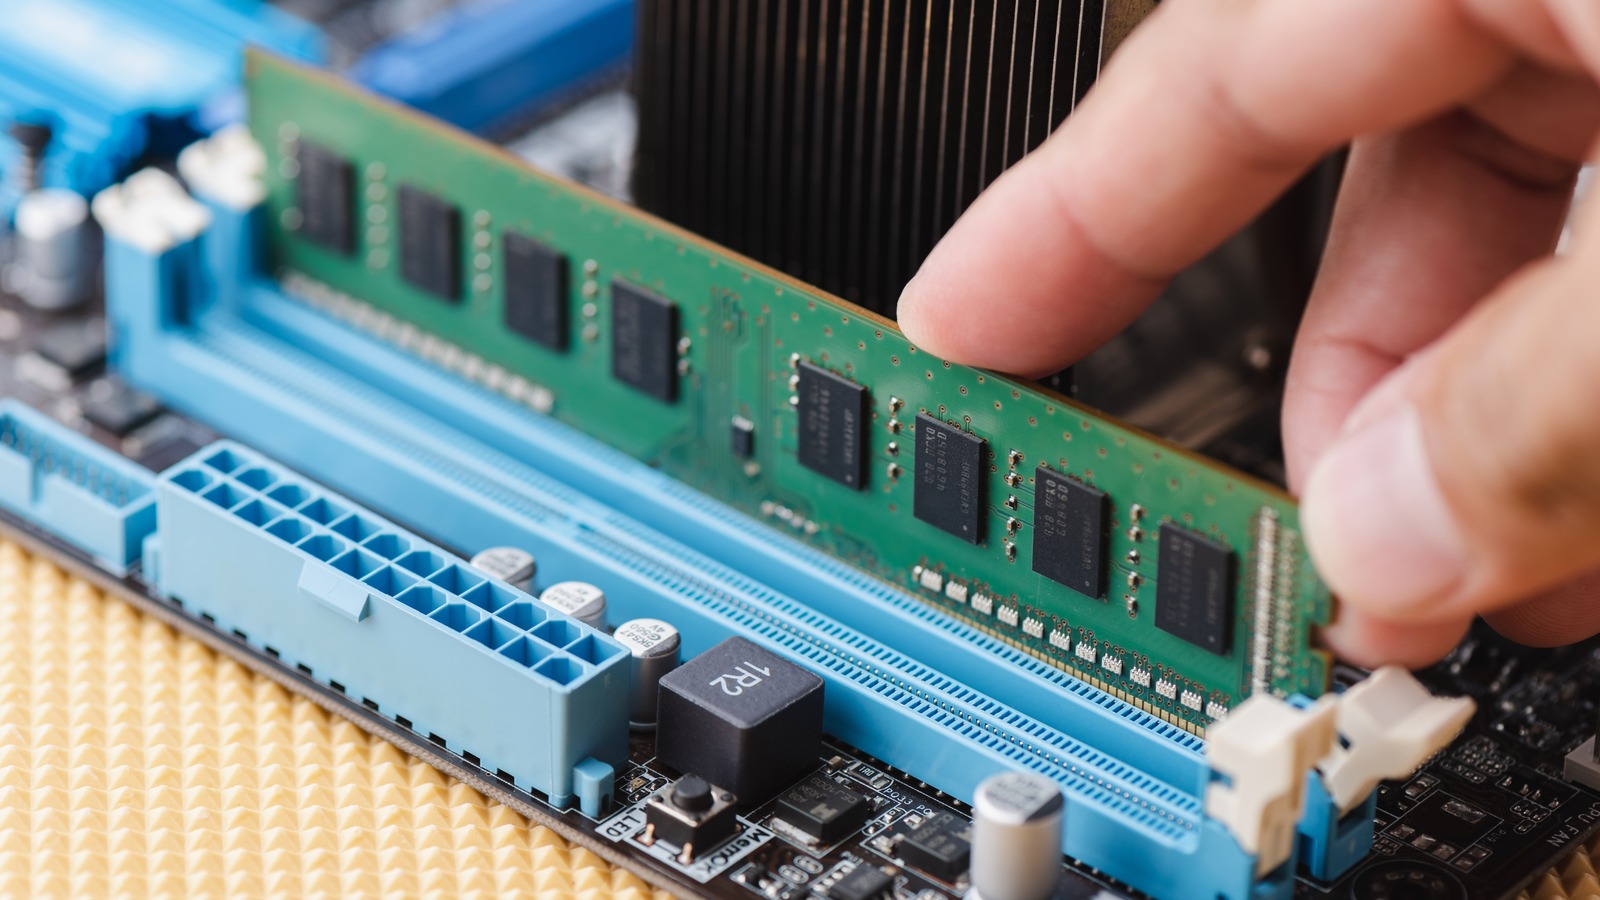
Locating the RAM Slots on the Motherboard
Once you have access to the interior of your computer, you need to find the RAM slots.
- Desktop Motherboards: RAM slots are typically long, narrow slots with clips at either end, located near the CPU socket. They are usually oriented parallel to the CPU. Motherboards often have 2 or 4 RAM slots.
- Laptop Motherboards: RAM slots (SO-DIMM) are usually located under a dedicated access panel or the bottom cover. They are also narrow slots with clips, often arranged side-by-side or stacked.
Crucially, refer to your motherboard or laptop manual to identify the correct slots for dual-channel configuration if you are installing more than one stick. The manual will often label the slots (e.g., DIMMA1, DIMMA2, DIMMB1, DIMMB2) and specify the order for optimal performance.
Removing Old RAM Modules (If Applicable)
If you are replacing existing RAM, you’ll need to remove the old modules first.
- Locate the Clips: Each RAM slot has clips on one or both ends.
- Gently Push the Clips Outward: Press these clips away from the RAM module. This will release the tension, and the RAM stick should pop up slightly.
- Remove the Module: Once released, gently pull the RAM module straight up and out of the slot. Handle it by the edges.
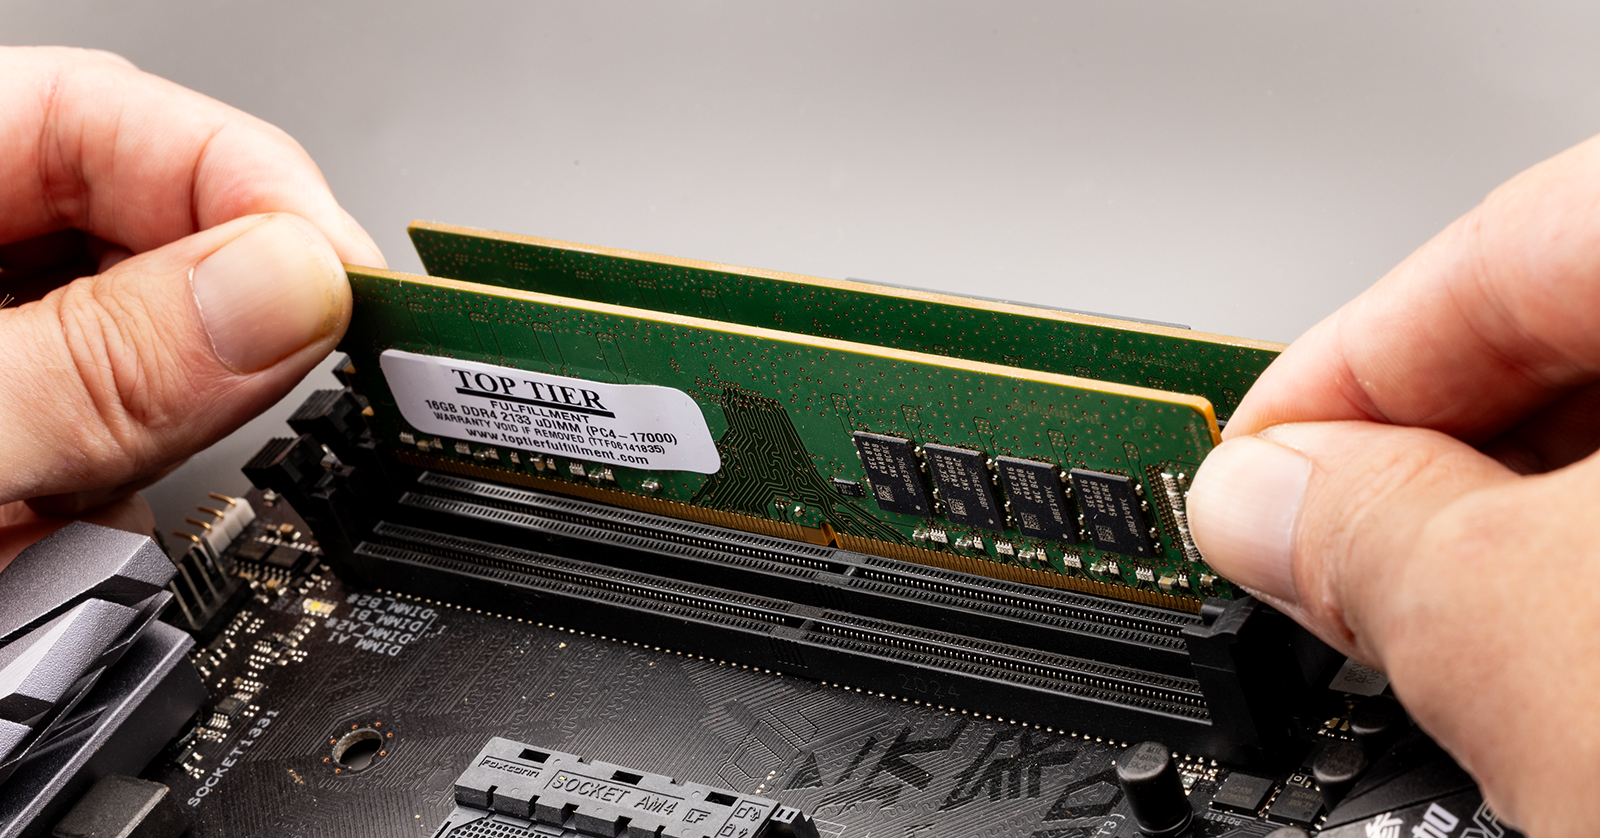
Installing the New RAM Modules
This is the core of the process. Take your time and be precise.
- Align the Notch: Examine your new RAM module. You’ll notice a notch in the gold contacts. This notch is not centered. Compare this notch to the corresponding key or raised area in the RAM slot on the motherboard. The notch on the RAM must align perfectly with the key in the slot. This is a key physical indicator of correct orientation.
- Position the Module: Place the RAM module into the slot, ensuring the notch is aligned.
- Apply Even Pressure: Once aligned, press down firmly and evenly on both ends of the RAM module simultaneously. You should hear a distinct “click” as the clips on either side of the slot snap into place, securing the module.
- Check for Secure Fit: Ensure the module is fully seated and the clips are firmly engaged. There should be no gap between the module and the slot.
- Repeat for Additional Modules: If you are installing multiple RAM sticks, repeat steps 1-4 for each module, ensuring they are installed in the correct slots for dual-channel or quad-channel operation as per your motherboard manual.
Post-Installation Checks and Troubleshooting
Once the new RAM is installed, it’s time to put everything back together and verify the upgrade.
Reassembling Your Computer
Reassembly is the reverse of disassembly.
- Desktop: Carefully place the side panel back on and secure it with screws.
- Laptop: Reattach the bottom cover or RAM access panel and secure it with screws. If you removed the battery, reinsert it.
Initial Boot-Up and BIOS/UEFI Verification
- Reconnect Peripherals and Power: Plug in all cables, including the power cord.
- Power On Your Computer:
- Successful Boot: If everything is installed correctly, your computer should boot up as usual. You might notice a slightly faster boot time.
- Failure to Boot: If your computer doesn’t boot (e.g., no POST beep, no display, fans spin but nothing happens), power it off immediately, disconnect power, and re-open the case to re-check the RAM installation.
- Access BIOS/UEFI: During the initial boot sequence, you’ll typically see a prompt to press a key (often
DEL,F2,F10, orF12) to enter the BIOS or UEFI setup. Press this key repeatedly as soon as you power on. - Verify RAM Recognition: In the BIOS/UEFI, look for a section related to system information, memory, or hardware. It should display the total amount of RAM installed and its speed. Confirm that the new total amount matches your expected capacity.
Confirming RAM Recognition in the Operating System
After verifying in BIOS/UEFI, boot into your operating system to confirm the RAM is recognized and usable.
- Windows:
- Right-click on “This PC” (or “Computer”) and select “Properties.”
- Alternatively, open Task Manager (
Ctrl + Shift + Esc), go to the “Performance” tab, and select “Memory.” - Check the “Installed RAM” or “Total memory” displayed.
- macOS:
- Click the Apple menu in the top-left corner.
- Select “About This Mac.”
- The Memory section will display the amount and type of RAM.
Troubleshooting Common Issues
If your system doesn’t boot or the RAM isn’t recognized correctly, don’t panic. Here are common troubleshooting steps:
- Reseat the RAM: Power off, unplug, and carefully remove and reinsert each RAM module, ensuring they are fully seated and the clips engage.
- Test One Module at a Time: If you installed multiple modules, try booting with just one stick in the primary slot (as indicated in your manual). If it boots, swap it with another stick and test again. This helps identify a faulty module.
- Check Slot Order: Ensure you’ve followed the motherboard manual’s instructions for populating slots for dual-channel operation.
- Dirty Contacts: While rare, the gold contacts on the RAM or the slots might have dust. Gently clean the contacts with a pencil eraser (then blow away any eraser shavings) or use compressed air on the slots. Do not use liquids.
- Incompatible RAM: Double-check that you purchased RAM compatible with your motherboard’s DDR generation, speed, and form factor.
- BIOS Update: In some cases, older motherboards might require a BIOS update to fully support newer or faster RAM. Consult your motherboard manufacturer’s website.
Enhancing Performance and Longevity
Successfully installing new memory is a significant step towards a faster, more responsive computing experience. Beyond the immediate performance boost, understanding your RAM can lead to better system management and longevity.
Optimizing Performance with Increased RAM
The most direct benefit of a RAM upgrade is the ability to run more applications concurrently without slowdowns. This translates to:
- Smoother Multitasking: Effortlessly switch between web browsing, document editing, music playback, and other background tasks.
- Faster Application Loading and Operation: Especially for memory-hungry applications like photo and video editors, CAD software, and virtual machines.
- Improved Gaming Experience: Higher RAM can reduce loading times, prevent stuttering, and allow for higher texture settings in many games.
- Increased Productivity: Less time waiting for your computer means more time for productive work.
Memory Management and System Health
While more RAM generally means better performance, efficient memory management by your operating system is also key.
- Closing Unused Applications: Even with ample RAM, it’s good practice to close applications you are no longer using to free up resources.
- Monitoring RAM Usage: Regularly checking your system’s RAM usage (via Task Manager or Activity Monitor) can help you identify if an application is behaving erratically or consuming more memory than it should.
- Malware and Bloatware: Certain types of malware and unnecessary background programs (bloatware) can consume significant amounts of RAM. Regular system scans and judicious software installation can help maintain system health.
Future-Proofing Your System
Investing in RAM is a relatively inexpensive way to extend the useful life of your computer. As software becomes more demanding and operating systems evolve, having adequate RAM ensures your system can keep up for longer, delaying the need for a full system upgrade.
In conclusion, installing memory is a rewarding upgrade that can dramatically improve your computer’s performance. By understanding your needs, choosing the right components, and following this step-by-step guide, you can successfully enhance your system and enjoy a smoother, more efficient computing experience.
aViewFromTheCave is a participant in the Amazon Services LLC Associates Program, an affiliate advertising program designed to provide a means for sites to earn advertising fees by advertising and linking to Amazon.com. Amazon, the Amazon logo, AmazonSupply, and the AmazonSupply logo are trademarks of Amazon.com, Inc. or its affiliates. As an Amazon Associate we earn affiliate commissions from qualifying purchases.