
In the rapidly evolving world of technology, where innovation is constant and collaboration is key, version control systems have become the bedrock of successful software development. Among these, Git stands as the undisputed champion, empowering developers, data scientists, and anyone working with code or digital assets to manage changes, collaborate seamlessly, and maintain a robust history of their projects. For Mac users, integrating Git into your development workflow is a fundamental step towards enhanced productivity and a streamlined approach to project management.
This comprehensive guide will walk you through the process of installing Git on your macOS system, exploring various methods and providing essential setup instructions. Whether you’re a seasoned developer, an aspiring coder, or an entrepreneur leveraging AI tools and software for your brand, understanding and utilizing Git is an invaluable asset that directly contributes to efficiency, stability, and ultimately, the success of your tech endeavors.
Why Git is Indispensable for Modern Development and Beyond
Before diving into the “how-to,” it’s crucial to understand the “why.” Git isn’t just a tool; it’s a paradigm shift in how digital projects are managed, especially in team environments. Its principles resonate deeply with the core aspects of modern tech — collaboration, iteration, and robust security.
Version Control Explained: The Foundation of Modern Software
At its heart, Git is a Distributed Version Control System (DVCS). Imagine working on a document, saving multiple versions with different names, and then trying to figure out which changes were made between “finalfinal.doc” and “finalfinalv2review.doc.” Now, multiply that complexity by a team of developers, each working on different parts of an application simultaneously. Git solves this nightmare.
Instead of saving full copies of files repeatedly, Git tracks changes to files. Every time you “commit” your changes, Git records a snapshot of your project’s state. This allows you to:
- Track Every Change: See who changed what, when, and why.
- Revert to Previous States: Easily roll back to any prior version of your project if something goes wrong. This is an absolute lifesaver, providing a safety net that protects your work and saves countless hours of debugging.
- Branch and Merge: Work on new features or bug fixes in isolated “branches” without affecting the main codebase. Once complete and tested, these branches can be “merged” back into the main project. This parallel development capability is a cornerstone of agile methodologies and efficient project delivery.
For any professional operating in the tech space, from developing advanced AI models to crafting new mobile apps, the ability to manage complexity and maintain project integrity with such precision is non-negotiable. It fosters an environment where experimentation is encouraged, and mistakes are easily rectified, promoting innovation and reducing project risk.
Collaboration and Project Management: Building Stronger Tech Teams
In today’s interconnected world, very few significant tech projects are built in isolation. Teams are often distributed globally, with members contributing from different time zones. Git excels in facilitating this collaboration.
- Seamless Teamwork: Multiple developers can work on the same project simultaneously. Git handles the intricate process of merging their contributions, identifying conflicts, and helping resolve them. This significantly streamlines workflows and prevents the “merge hell” often associated with older, centralized version control systems.
- Code Review and Quality Assurance: Git platforms like GitHub, GitLab, and Bitbucket integrate seamlessly with Git, providing tools for code review, issue tracking, and continuous integration/continuous delivery (CI/CD) pipelines. This ensures higher code quality, reduces bugs, and accelerates deployment cycles – critical factors for any tech brand aiming for excellence and customer satisfaction.
- Open Source Contribution: Git is the backbone of the open-source community. If you plan to contribute to open-source projects, learn from them, or even build your own, a solid understanding of Git is essential. This not only hones your technical skills but also builds your personal brand within the wider tech ecosystem, demonstrating your commitment to community and collaborative development.
The efficiencies gained through Git’s collaborative features directly translate into better project outcomes, faster time-to-market, and ultimately, more robust and successful software, which can significantly impact a company’s financial performance and competitive edge.
The Developer’s Essential Toolkit: Productivity and Security
Git is more than just a tool for tracking changes; it’s a force multiplier for developer productivity and digital security.
- Enhanced Productivity: By automating the tracking of changes and simplifying collaboration, Git frees up developers to focus on writing code and solving problems, rather than getting bogged down in administrative tasks. Features like stashing, cherry-picking, and rebasing offer powerful ways to manage work-in-progress and refine commit histories, leading to cleaner, more manageable projects.
- Digital Security and Auditing: Every commit in Git is cryptographically secure, meaning its history cannot be tampered with without detection. This provides a clear, auditable trail of all changes made to a project, which is invaluable for compliance, security audits, and understanding the evolution of a codebase. For businesses handling sensitive data or operating in regulated industries, this level of security and accountability is paramount.
For anyone in tech looking to optimize their workflow, safeguard their projects, and contribute effectively to modern software development, Git is not an option but a necessity.
Preparing Your Mac for Git Installation
Before you install Git, it’s a good practice to understand what you might already have and what tools are commonly used in the macOS development ecosystem. macOS is a Unix-based system, which makes it particularly developer-friendly, but a few foundational utilities enhance the experience significantly.
Checking for Existing Git Installations
Many macOS systems, especially those with Xcode or its Command Line Tools already installed, might have Git pre-installed or available as part of other development packages. It’s always a good idea to check first:
-
Open Terminal: You can find Terminal in
Applications/Utilitiesor by searching for it via Spotlight (Command + Space and type “Terminal”). -
Run the
git --versioncommand: Typegit --versionand press Enter.git --version- If Git is installed, you’ll see output similar to
git version 2.37.1(the version number will vary). - If Git is not installed, or if the system prompts you to install developer tools, it means Git is not immediately available. In some cases, running this command will automatically trigger an alert asking if you’d like to install the Xcode Command Line Tools, which often includes Git. If this happens, you can proceed by clicking “Install.”
- If Git is installed, you’ll see output similar to
Understanding Xcode Command Line Tools
The Xcode Command Line Tools (CLT) package is a collection of essential tools for macOS developers that run in the command line. While you don’t need the full Xcode IDE (Integrated Development Environment) to get Git, the CLT package is a lightweight alternative that provides many Unix tools, including Git, GCC (a C compiler), Make, and other utilities commonly used in development.
If you don’t have Git and are prompted to install CLT, it’s a straightforward way to get Git onto your system. However, it might not always install the absolute latest version of Git.
Introducing Homebrew: The macOS Package Manager
For many developers, Homebrew is the de facto package manager for macOS. It simplifies the installation and management of various software packages, libraries, and tools that Apple doesn’t include by default. Think of it as an app store for command-line tools. Homebrew makes installing and updating Git, along with hundreds of other development necessities, incredibly easy and ensures you’re always running the latest stable versions.
Using Homebrew aligns perfectly with a productive tech workflow, reducing the manual effort of downloading and managing software dependencies. It’s a tool that every Mac user serious about development should have.
Step-by-Step Git Installation Methods
Now, let’s explore the primary methods for installing Git on your Mac. We’ll start with the recommended approach using Homebrew, then cover the Xcode Command Line Tools, and finally, the official installer.
Method 1: Installing Git via Homebrew (Recommended)
This is the most popular and generally preferred method for macOS users due to its simplicity, ease of updates, and ability to manage other development dependencies.
1. Install Homebrew (If You Haven’t Already)
If Homebrew isn’t already on your system, you’ll need to install it first.
-
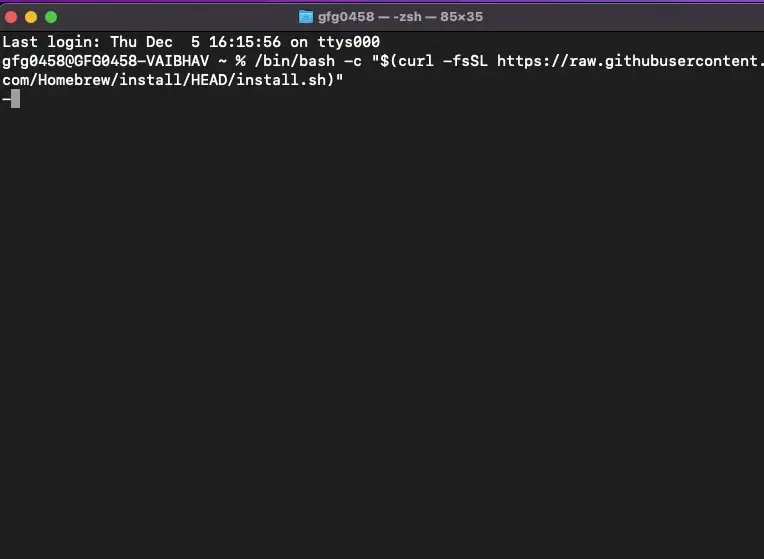
Open Terminal.
-
Run the Homebrew installation command: You can find the latest command on the official Homebrew website (brew.sh). As of now, it typically looks like this:
/bin/bash -c "$(curl -fsSL https://raw.githubusercontent.com/Homebrew/install/HEAD/install.sh)" -
Follow the on-screen prompts:
- The script will explain what it’s going to do. Press
Enterto continue. - You may be prompted to enter your macOS user password. Type it in (it won’t show characters as you type) and press
Enter. - Homebrew might also prompt you to install the Xcode Command Line Tools if they are not already present. Allow it to do so.
- The script will explain what it’s going to do. Press
-
Wait for the installation to complete: This might take a few minutes, depending on your internet connection and system speed.
-
Verify Homebrew installation: Once the script finishes, run:
brew doctorThis command checks for potential issues and ensures Homebrew is set up correctly. Ideally, it should output “Your system is ready to brew.”
2. Install Git Using Homebrew
With Homebrew successfully installed, installing Git is a single, simple command:
-
Open Terminal.
-
Run the Git installation command:
brew install git -
Wait for the installation to complete: Homebrew will download the latest stable version of Git and install it on your system.
-
Verify Git installation: After it’s done, confirm Git is installed by checking its version:
git --versionYou should see the newly installed Git version number.
Homebrew ensures that Git is installed in a sensible location and is added to your system’s PATH, making it accessible from any directory in Terminal.
Method 2: Installing Git with Xcode Command Line Tools
If you prefer not to use Homebrew, or if you already have Xcode installed, the Command Line Tools provide a quick way to get Git.
1. Install Xcode (Optional, but often includes CLT)
If you do a lot of iOS or macOS app development, you likely already have the full Xcode IDE from the Mac App Store. Installing Xcode typically includes the Command Line Tools.
2. Install Command Line Tools (If Not Already Present)
If you don’t have Xcode, you can install just the Command Line Tools:
-
Open Terminal.
-
Run the installation command:
xcode-select --install -
Follow the prompt: A software update dialog will appear. Click “Install” and agree to the terms and conditions.
-
Wait for the download and installation to complete: This can take a while.
-
Verify Git installation: Once finished, check the Git version:
git --versionThis method will install a version of Git that Apple bundles with its development tools, which might not always be the very latest version, but it’s usually stable and functional.
Method 3: Using the Official Git Installer
For those who prefer a traditional graphical installer or want the latest version directly from the Git project, you can use the official macOS installer.
1. Download the Installer
- Visit the official Git website: Go to git-scm.com.
- Download the macOS installer: Click on the “Download for macOS” button. This will usually link you to a project like Homebrew or a direct
.pkgfile. Look for the “Installer for macOS” link or “binary installer” if available, usually maintained by Tim Harper.
2. Run the Installer
-
Locate the downloaded
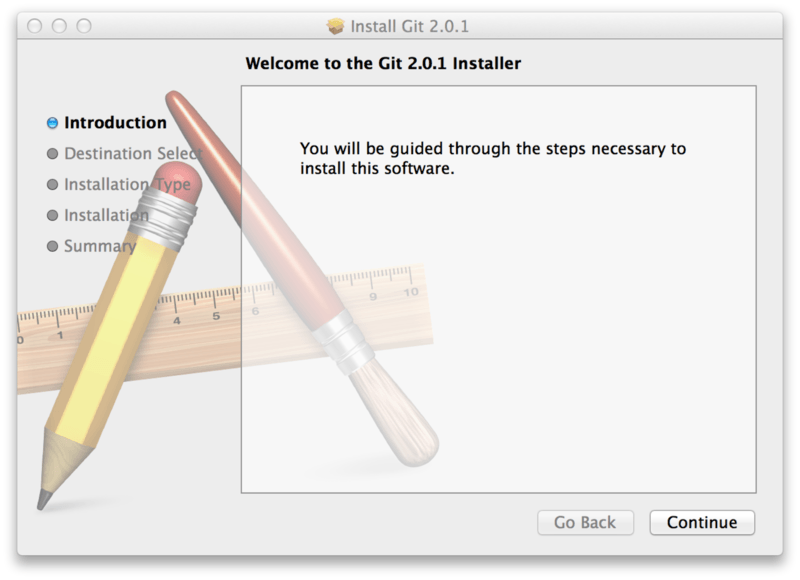
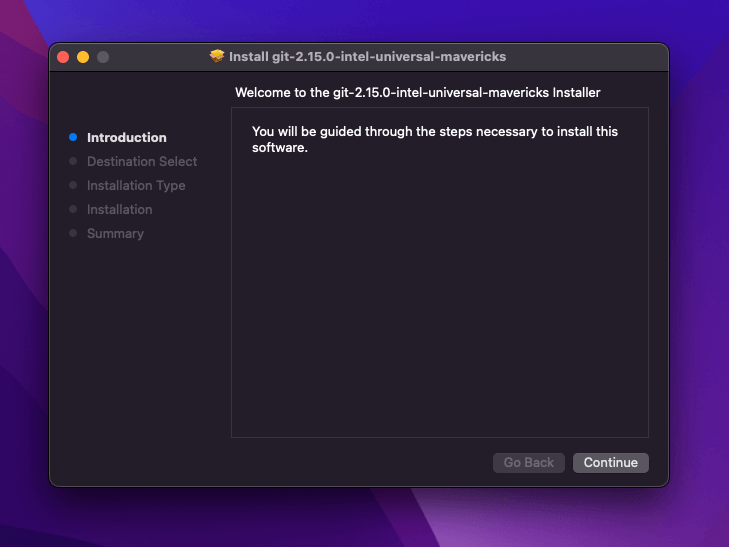
.pkgfile (e.g.,git-*-intel-universal-mavericks.pkg) in yourDownloadsfolder. -
Double-click the
.pkgfile to start the installer. -
Follow the on-screen instructions:
- Click “Continue” through the introduction and license agreements.
- Choose an installation location (usually the default is fine).
- Click “Install.” You may be prompted for your macOS user password.
-
Complete the installation: Once the installation is finished, click “Close.”
-
Verify Git installation: Open Terminal and run:
git --versionYou should see the installed Git version.
This method gives you direct control over the installation process through a familiar GUI, which can be reassuring for users who are less comfortable with the command line initially.
Verifying Your Git Installation and Initial Configuration
After installing Git, the final crucial steps are to verify its presence and perform some initial configuration. These configurations are essential for properly attributing your work and ensuring smooth collaboration in any Git-managed project.
Confirming Git’s Presence and Accessibility
Even if git --version worked right after installation, it’s good practice to ensure it’s properly integrated into your shell’s PATH.
-
Check Git version again:
git --versionIf this outputs a version number, you’re good to go. If not, you might need to restart your Terminal or ensure Git’s executable path is included in your shell’s configuration file (e.g.,
.zshrcor.bash_profile). Homebrew typically handles this automatically. -
Get help message: Another simple command to verify functionality is:
git helpThis should display a list of common Git commands and further help topics, confirming that Git is fully operational.
Setting Up Your Git Identity: User Name and Email
Every commit you make in Git is associated with an author. It’s critical to configure your user name and email address globally so that Git correctly attributes your contributions. This is especially important for collaborative projects, allowing team members to see who made what changes and ensuring a clear audit trail. This also builds your personal brand as a diligent and accountable contributor.
-
Set your user name: Choose a name that represents you professionally, often your full name.
git config --global user.name "Your Name"Replace
"Your Name"with your actual name (e.g., “Jane Doe”). -
Set your email address: Use the email address associated with your developer accounts (e.g., GitHub, GitLab).
git config --global user.email "your.email@example.com"Replace
"your.email@example.com"with your actual email address. -
Verify your configuration: You can check your global settings using:
git config --list --globalThis command will display all your global Git configurations, including
user.nameanduser.email.
Exploring Further Customization (Optional, but Recommended)
While not strictly necessary for basic usage, Git offers extensive customization options that can enhance your workflow and productivity.
-
Default Text Editor: You can configure Git to use your preferred text editor (e.g., VS Code, Sublime Text, Vim) for writing commit messages. For example, to set VS Code:
git config --global core.editor "code --wait" -
Aliases: Create shortcuts for frequently used Git commands to save typing. For example,
git stforgit status.git config --global alias.st statusThere are many resources online for popular Git aliases that can dramatically speed up your command-line interactions.
These initial configurations are minor steps, but they lay the groundwork for a more efficient and professional Git experience, directly contributing to your productivity in any tech-related endeavor.
Conclusion: Embracing Git for Enhanced Productivity and Innovation
Installing Git on your Mac is more than just adding another tool to your system; it’s an investment in your productivity, your collaboration capabilities, and your ability to navigate the complexities of modern software development. Whether you chose the straightforward Homebrew method, leveraged the Xcode Command Line Tools, or opted for the official installer, you’ve now equipped your macOS environment with a powerful version control system that will serve as the backbone for all your coding projects.
Git’s impact extends across the entire tech landscape, from small side hustles generating online income to large-scale corporate development and the cutting edge of AI tools. By enabling seamless collaboration, meticulous change tracking, and robust project integrity, Git empowers individuals and teams to build better software, faster. It reduces risk, fosters experimentation, and ensures that every line of code contributes to a coherent and evolving project.
Now that Git is installed and configured, the real journey begins: learning its commands and incorporating it into your daily workflow. The initial setup is a foundational step towards becoming a more efficient developer, a more valuable team member, and a more resilient innovator in the dynamic world of technology. Embrace Git, and unlock a new level of control and confidence in your digital creations.
aViewFromTheCave is a participant in the Amazon Services LLC Associates Program, an affiliate advertising program designed to provide a means for sites to earn advertising fees by advertising and linking to Amazon.com. Amazon, the Amazon logo, AmazonSupply, and the AmazonSupply logo are trademarks of Amazon.com, Inc. or its affiliates. As an Amazon Associate we earn affiliate commissions from qualifying purchases.