Installing a CPU (Central Processing Unit) processor might seem like a daunting task, especially for those new to PC building, but it’s one of the most fundamental and rewarding steps in assembling your own computer. The CPU is, after all, the “brain” of your system, responsible for executing instructions and processing data. A successful CPU installation is a critical milestone, ensuring your system functions optimally from the get-go. This comprehensive guide will walk you through every step, from preparation to the final touches, empowering you to confidently install your CPU and take pride in your self-built machine.
The Foundation of Your Build: Understanding the CPU
Before diving into the mechanics, it’s helpful to understand why the CPU is so vital and what makes a proper installation so important. The CPU dictates the overall performance of your computer, influencing everything from gaming frame rates to video rendering times and general application responsiveness. Incorrect installation can lead to a non-functional system, or worse, damaged components – a costly mistake that no tech enthusiast or savvy spender wants to make.
Why DIY Your CPU Installation?
Beyond the significant cost savings compared to purchasing a pre-built system or paying a professional for assembly, there are numerous advantages to taking on the CPU installation yourself. Firstly, it provides an invaluable learning experience, demystifying the internal workings of your computer. This knowledge is not just empowering but also equips you with the skills for future upgrades or troubleshooting. Secondly, it offers a deep sense of satisfaction and personal achievement – there’s a unique pride in booting up a system you’ve meticulously put together with your own hands. For those interested in the ‘Brand’ aspect, building your own PC allows you to curate your components, choosing brands you trust for performance and reliability, effectively crafting a personalized ‘brand’ of computing experience. From a ‘Money’ perspective, understanding the installation process helps you protect your investment, minimizing the risk of accidental damage and avoiding professional service fees.
Essential Tools and Safety Precautions
Proper preparation is paramount for a smooth CPU installation. Gathering the right tools and adhering to safety guidelines will prevent potential issues and safeguard your components.
Essential Tools:
- Phillips Head Screwdriver: A good quality, magnetized screwdriver (usually #2 size) is indispensable for mounting the motherboard and CPU cooler.
- Thermal Paste: Essential for transferring heat from the CPU to the cooler. Your CPU cooler often comes with pre-applied paste or a tube, but having a high-quality, reputable brand like Arctic MX-4 or Noctua NT-H1 on hand is a smart choice for optimal thermal performance.
- Isopropyl Alcohol (90%+): For cleaning the CPU and cooler surface if you need to reapply thermal paste or remove old paste.
- Lint-Free Cloth or Coffee Filters: For applying alcohol and wiping surfaces clean without leaving fibers.
- Anti-Static Wrist Strap: While not strictly mandatory for experienced builders in a static-controlled environment, it’s highly recommended for beginners. Electrostatic discharge (ESD) can fatally damage sensitive electronic components. Connect it to an unpainted metal surface of your PC case.
- Good Lighting: A well-lit workspace helps prevent mistakes.
Safety Precautions:
- Static Electricity: This is your primary enemy. Always ground yourself. Wear an anti-static wrist strap, touch an unpainted metal part of your case, or frequently touch a grounded object. Avoid carpeting.
- Handle with Care: CPUs, especially the pins (on AMD PGA) or the tiny contact pads (on Intel LGA and AMD LGA), are incredibly delicate. Never touch the pins or pads. Hold the CPU by its edges.
- Clean Workspace: Ensure your work area is clean, dry, and free of clutter. A clear desk reduces the chances of dropping small screws or components.
- Read Manuals: Your CPU and motherboard manuals contain specific instructions for your models. Always consult them, as slight variations exist between manufacturers and generations. This is part of being a meticulous tech builder, a characteristic that subtly builds your “brand” as a reliable DIYer.
Pre-Installation Checklist: Getting Everything Ready
With your tools in hand and safety in mind, it’s time to prepare your components and workstation for the main event. This stage sets the tone for a successful build.
Unboxing Your Components: CPU and Motherboard
Carefully unbox your CPU and motherboard. Resist the urge to rip open packaging; methodical unboxing allows you to inspect components for any damage and ensures you don’t lose small accessories.
- CPU: The CPU typically comes in a plastic clamshell or tray. Leave it in its protective packaging until you are ready to install it.
- Motherboard: Place the motherboard on its anti-static bag or on a non-conductive surface, like its cardboard box, outside of your PC case. This provides a stable and safe platform for installation. Inspect the CPU socket for any bent pins or debris. This is crucial as a damaged socket can render your entire motherboard useless – a significant hit to your ‘Money’ budget.
Preparing Your Workstation
Your workstation should be conducive to precision work.
- Ample Space: Ensure you have enough room to maneuver both your motherboard and the CPU.
- Static Control: As mentioned, ground yourself. If you don’t have an anti-static wrist strap, frequently touch the metal frame of your PC case.
- Organize Screws: As you remove screws (e.g., from the CPU cooler bracket), place them in a small container or magnetic mat to prevent them from rolling away.
Step-by-Step CPU Installation: A Detailed Guide
The installation process varies slightly depending on whether you have an Intel (LGA) or AMD (PGA/LGA) processor. It’s vital to identify your CPU type and socket before proceeding. Intel CPUs primarily use an LGA (Land Grid Array) socket, where the pins are on the motherboard. Modern AMD CPUs use either PGA (Pin Grid Array) sockets (like AM4) where pins are on the CPU, or LGA sockets (like AM5) similar to Intel.
Installing Intel LGA Processors
Intel’s LGA sockets (e.g., LGA 1151, LGA 1200, LGA 1700) are designed with the pins on the motherboard, and the CPU has flat contact pads.
- Open the Socket: Locate the CPU socket on your motherboard. There will be a small metal retention arm next to it. Push this arm down and slightly away from the socket to release it. Lift the arm up, which will also lift the metal load plate that covers the socket.
- Remove the Protective Cover: The socket will likely have a black plastic protective cover. This cover usually pops off automatically when the load plate is fully opened. If it doesn’t, gently remove it and set it aside. Do not discard this cover; it’s useful for protecting the socket if you ever remove the CPU.
- Orient the CPU: Carefully take your Intel CPU out of its packaging, holding it by the edges. Look for two small indentations or “keys” on the CPU’s edges, and corresponding notches on the CPU socket. Also, there’s often a small gold arrow or triangle on one corner of the CPU. Align this arrow with the matching arrow or triangle etched onto the motherboard’s socket. This ensures correct orientation. Do not force the CPU. It should drop gently into place with minimal effort. If it doesn’t, re-check the alignment. Forcing it can bend the delicate pins in the socket, which is usually irreparable and a costly ‘Money’ mistake.
- Close the Socket: Once the CPU is seated correctly, lower the metal load plate back over the CPU. Then, push the retention arm down and clip it back into place. This action will apply pressure, securing the CPU firmly in the socket. It might require a bit of force, and you might hear a small click as the arm locks. This is normal.
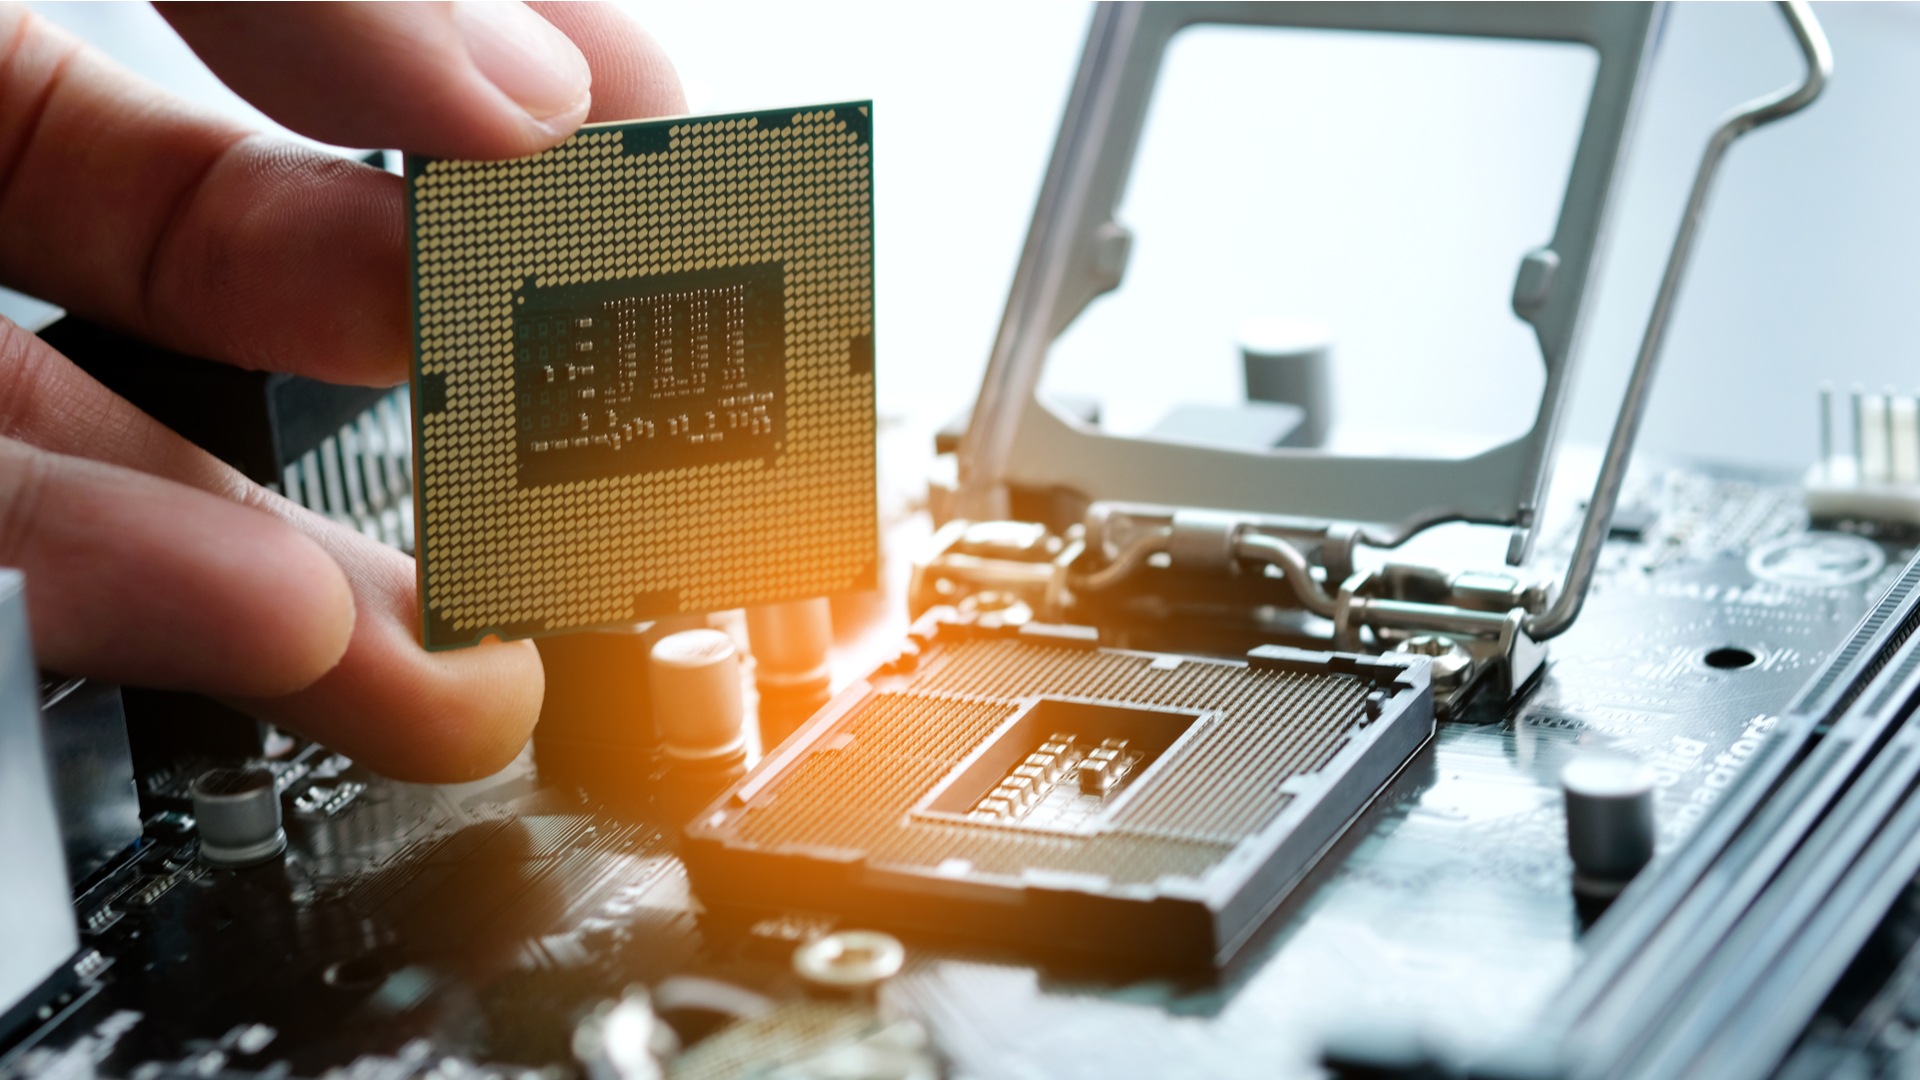
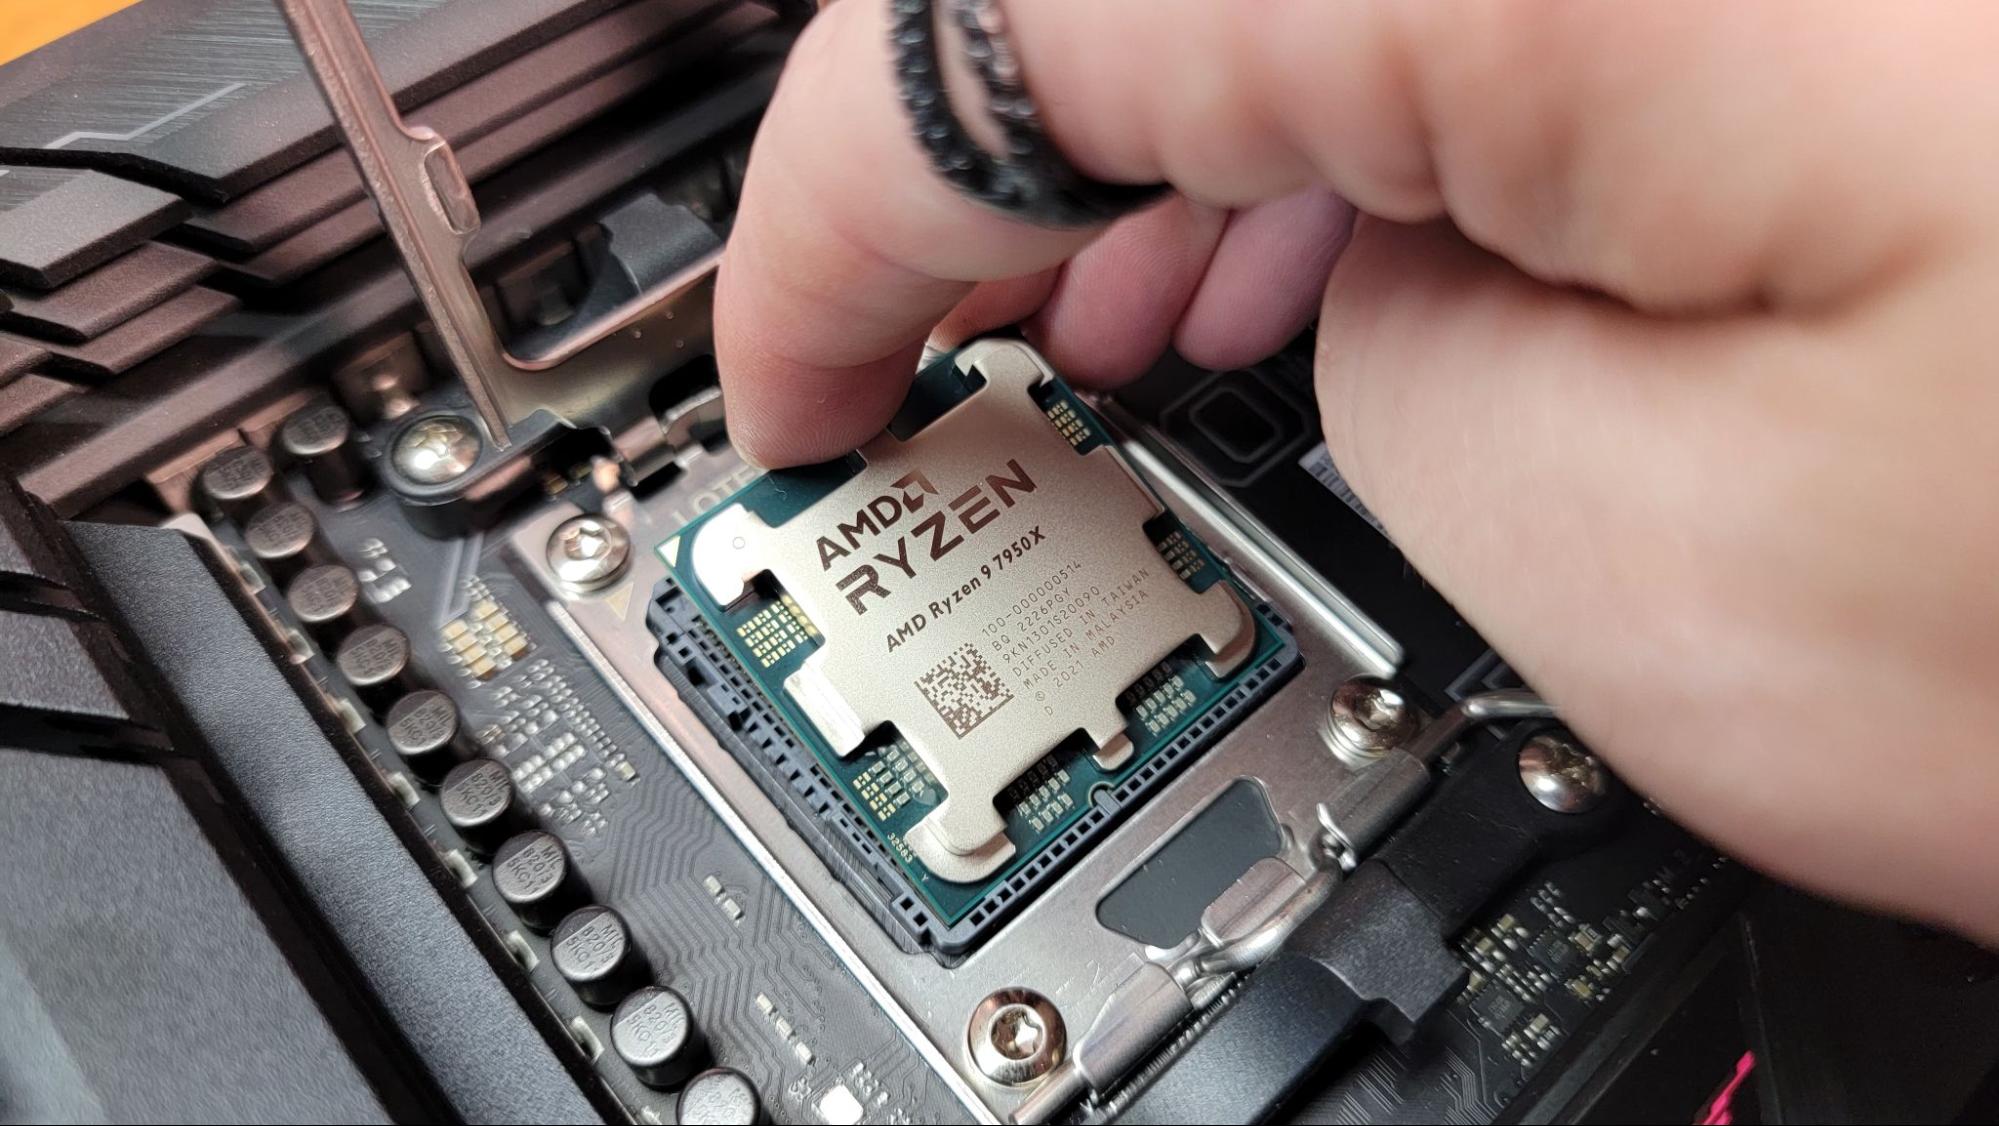
Installing AMD PGA/LGA Processors (AM4/AM5)
AMD’s AM4 socket uses PGA (Pin Grid Array), meaning the pins are on the CPU. The newer AM5 socket uses LGA, similar to Intel.
For AMD AM4 (PGA):
- Open the Socket: Locate the CPU socket on your motherboard. There’s a small metal lever next to it. Push this lever sideways and lift it straight up to unlock the socket.
- Orient the CPU: Carefully remove your AMD CPU from its packaging, holding it by the edges. Look for a small gold arrow or triangle on one corner of the CPU. Align this arrow with the matching arrow or triangle etched onto the motherboard’s socket. Also, match the pin configuration with the holes in the socket.
- Insert the CPU: Gently lower the CPU straight down into the socket. Do not force it. The pins should slide into the holes with almost no resistance. If you feel any resistance, stop immediately, lift the CPU, and re-check the alignment. Forcing it will bend or break pins, rendering the CPU useless. A bent pin can sometimes be carefully straightened with a very thin blade or mechanical pencil, but it’s a risky maneuver and best avoided. This is where the ‘Tech’ knowledge of precise handling is crucial to protect your ‘Money’ investment.
- Close the Socket: Once the CPU is fully seated, push the metal lever back down and clip it into its locked position. This secures the CPU.
For AMD AM5 (LGA):
The process for AM5 is very similar to Intel LGA sockets:
- Open the Socket: Locate the CPU socket on your AM5 motherboard. There will be a metal retention arm. Push it down and slightly away to release, then lift it and the metal load plate covering the socket.
- Remove Protective Cover: Gently remove the plastic protective cover from the socket if it doesn’t pop off automatically. Store it safely.
- Orient the CPU: Carefully hold your AM5 CPU by its edges. Look for the small gold arrow or triangle on one corner of the CPU and align it with the matching arrow/triangle on the socket. The CPU also has specific notches that align with keys on the socket.
- Insert the CPU: Gently place the CPU into the socket. It should drop in without any force. If it doesn’t, re-check the orientation and try again.
- Close the Socket: Lower the metal load plate over the CPU, then push the retention arm down until it clips into place. This secures the CPU firmly. Again, a slight amount of force is normal, and you might hear a click.
Completing the Setup: Thermal Paste and Cooler Installation
With the CPU securely in place, the next crucial step is to ensure it stays cool. This involves applying thermal paste and installing the CPU cooler. Without proper cooling, your CPU will overheat, throttle its performance, and eventually damage itself.
Applying Thermal Paste: Less is More
Thermal paste fills the microscopic imperfections between the CPU’s heat spreader and the CPU cooler’s cold plate, allowing for efficient heat transfer.
- Clean Surfaces (if necessary): If your CPU or cooler has old thermal paste, or if the cooler came with a pre-applied pad you wish to replace with better paste, clean both surfaces thoroughly using isopropyl alcohol and a lint-free cloth. Ensure they are bone dry before proceeding.
- Apply a Small Amount: The “pea-sized dot” method is widely recommended and effective for most CPUs. Place a small, single dot (about the size of a green pea or a grain of rice) in the very center of the CPU’s integrated heat spreader (IHS). Other patterns like a thin line or ‘X’ are also viable, but the pea method is often the simplest and covers well when pressure is applied. Do not spread the paste manually unless your specific thermal paste or cooler manufacturer advises it. The pressure from the CPU cooler will spread it evenly. Using too much paste can actually hinder thermal performance and make a mess, while too little will leave gaps. Investing in a quality thermal paste from a reputable brand (e.g., Noctua, Arctic) is a small ‘Money’ outlay for significant ‘Tech’ performance benefits.
Installing the CPU Cooler
Every CPU cooler (stock or aftermarket) has a specific mounting mechanism. Refer to your cooler’s manual for precise instructions, as these can vary significantly.
- Prepare the Backplate (if needed): Many aftermarket coolers require a backplate to be installed on the underside of the motherboard. Carefully align and attach it according to the cooler’s instructions.
- Position the Cooler: Gently place the CPU cooler onto the CPU, aligning the mounting holes on the cooler’s base or brackets with the standoffs or mounting points around the CPU socket on the motherboard.
- Secure the Cooler:
- Screws: If using screws, tighten them in a diagonal or “X” pattern (e.g., top-left, bottom-right, top-right, bottom-left). Tighten each screw a few turns at a time, incrementally, until all are snug. This ensures even pressure and prevents damage to the CPU or motherboard. Do not overtighten, as this can strip screws or crack the motherboard.
- Clips/Levers: Some stock coolers use clip-on mechanisms or levers. Follow the specific instructions to secure them firmly.
- Connect Fan Cables: Locate the “CPU_FAN” header on your motherboard. Connect the CPU cooler’s fan cable to this header. This is crucial for the fan to receive power and for the motherboard to monitor its speed and control it based on CPU temperature. Overlooking this simple ‘Tech’ detail can lead to severe overheating.
Post-Installation Checks and First Boot
You’re almost there! Before closing up your case, it’s wise to perform some final checks and prepare for the initial power-up.
Initial Power-Up and BIOS Verification
- Double-Check Connections: Briefly review all your connections: CPU power cable (usually 4+4 or 8-pin near the top-left of the motherboard), ATX 24-pin power cable, CPU fan header, and any other essential components like RAM and GPU.
- First Boot: With minimal components connected (CPU, CPU cooler, RAM, GPU, PSU, and monitor), power on your system.
- Enter BIOS/UEFI: As the system starts, repeatedly press the designated key (usually DEL, F2, F10, or F12) to enter the BIOS/UEFI firmware.
- Verify CPU and Temperatures: In the BIOS, navigate to the system information or hardware monitor section. Confirm that your CPU is detected correctly and, most importantly, check the CPU temperature. If temperatures are unusually high (e.g., consistently above 50-60°C at idle), power down immediately. This could indicate an issue with thermal paste application or cooler mounting. A good ‘Brand’ name cooler and proper ‘Tech’ installation usually yield excellent idle temperatures.
Common Troubleshooting Tips
- No Display: If your system powers on but you get no display, recheck all power connections, especially the CPU power. Ensure your RAM is seated correctly.
- CPU Overheating: If temperatures are high, power off the system. Remove the CPU cooler, clean off the thermal paste from both the CPU and cooler, and reapply a fresh dot of paste. Reinstall the cooler carefully, ensuring even pressure.
- System Not Powering On: Ensure the power supply is switched on at the back, all power cables are firmly connected, and the front panel power switch header is correctly connected to the motherboard.
- Bent Pins (AMD PGA): If you suspect bent pins after a failed installation, carefully inspect the CPU. If any are slightly bent, a very thin blade (e.g., from a craft knife) or a mechanical pencil with the lead retracted can sometimes be used to gently coax them back into alignment. This is a delicate operation that requires extreme patience and a steady hand.

Conclusion: The Satisfaction of a Self-Built System
Successfully installing your CPU is a monumental step in your PC building journey. It’s a testament to your patience, attention to detail, and willingness to dive into the intricate world of computing hardware. Beyond the financial savings, the knowledge gained and the confidence built are invaluable. You’ve not only assembled a machine but also gained a deeper understanding of the technology that powers your digital life.
This hands-on experience enhances your “Tech” prowess, provides a unique “Brand” identity to your personal rig, and smartly manages your “Money” by avoiding professional fees and protecting your hardware investment. Enjoy the fruits of your labor, knowing that the heart of your computer beats strong and true because you put it there. Happy computing!
aViewFromTheCave is a participant in the Amazon Services LLC Associates Program, an affiliate advertising program designed to provide a means for sites to earn advertising fees by advertising and linking to Amazon.com. Amazon, the Amazon logo, AmazonSupply, and the AmazonSupply logo are trademarks of Amazon.com, Inc. or its affiliates. As an Amazon Associate we earn affiliate commissions from qualifying purchases.