In the dynamic world of technology, Java remains an indispensable pillar, powering everything from enterprise-level applications and mobile apps to large-scale data processing and embedded systems. Whether you’re a developer embarking on a new coding journey, a system administrator maintaining server environments, or an end-user needing to run a specific Java-based application, understanding how to properly install and configure Java is a fundamental skill. This comprehensive guide will walk you through the entire process, demystifying the different versions, providing detailed installation steps for various operating systems, and offering crucial advice for verification and troubleshooting.

Understanding Java: Why and What to Install?
Before diving into the installation process, it’s essential to grasp what Java is and why you might need it. Java is a class-based, object-oriented programming language designed to have as few implementation dependencies as possible. Its slogan, “Write once, run anywhere” (WORA), highlights its cross-platform compatibility, making it incredibly versatile.
You might need Java for several reasons:
- Running Java Applications: Many desktop applications, games (like Minecraft), and web applications (especially older enterprise systems) require the Java Runtime Environment (JRE) to function.
- Developing Java Applications: If you plan to write code in Java, you’ll need the Java Development Kit (JDK), which includes the JRE along with development tools.
- System Dependencies: Certain development tools, build automation systems (like Maven or Gradle), and even some operating system utilities rely on a Java installation to operate correctly.
Navigating the various Java versions and components can sometimes be confusing. Let’s clarify the key distinctions.
Java Runtime Environment (JRE) vs. Java Development Kit (JDK)
These two terms are frequently encountered but serve distinct purposes:
- Java Runtime Environment (JRE): The JRE is what end-users need to run Java applications. It contains the Java Virtual Machine (JVM), core libraries, and other components necessary to execute Java bytecode. If your primary goal is simply to use a Java-based program, the JRE is typically sufficient. However, modern JDKs often include a full JRE, so installing a JDK often covers JRE needs as well.
- Java Development Kit (JDK): The JDK is designed for Java developers. It encompasses everything in the JRE, plus a suite of development tools such as the Java compiler (javac), debugger, archiver (jar), and documentation generator (javadoc). If you intend to write, compile, or debug Java programs, the JDK is what you need. For most modern usage, especially for developers, installing the JDK is the standard approach, as it allows both development and execution.
Choosing the Right Java Version (LTS vs. Latest)
Java has a well-defined release cadence, with a new feature release every six months. Among these, certain versions are designated as Long-Term Support (LTS) releases.
- LTS Versions: LTS versions receive extended support and maintenance updates for several years, making them ideal for production environments and long-term projects where stability and compatibility are paramount. Currently, key LTS versions include Java 8, Java 11, Java 17, and Java 21. For most new development or stable environments, choosing the latest LTS version (currently Java 21, with Java 17 still widely used) is highly recommended.
- Non-LTS Versions: These are interim releases that provide new features but have a shorter support window. They are excellent for experimenting with the latest features or for projects that can rapidly upgrade to newer versions.
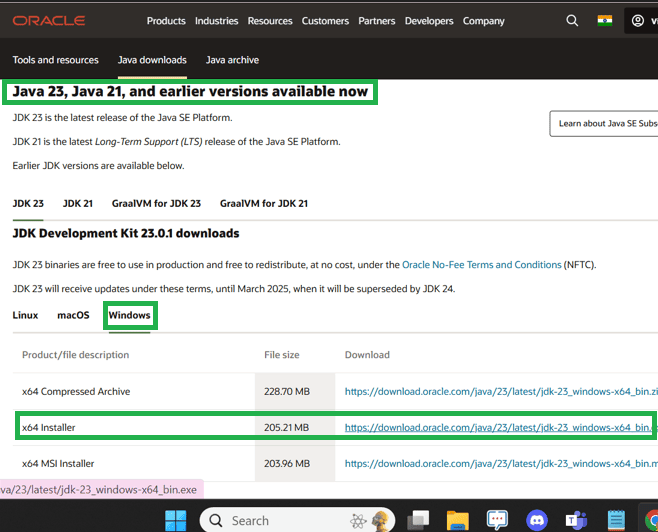
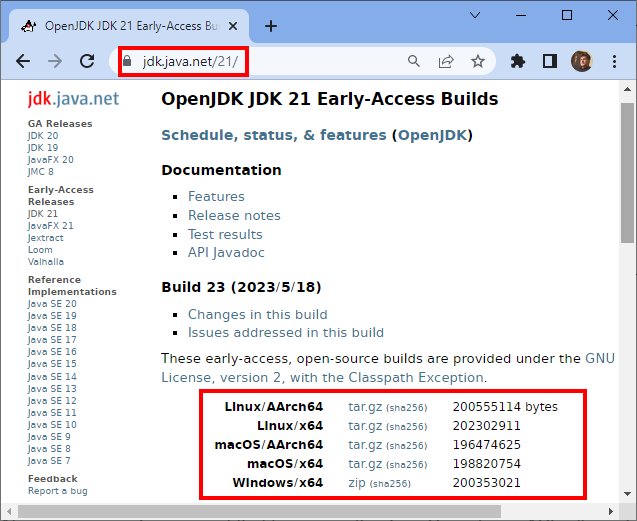
- Where to Get Java: While Oracle provides commercial JDKs, the open-source OpenJDK is the reference implementation of Java and is freely available. Many vendors provide their own builds of OpenJDK, such as Adoptium (formerly AdoptOpenJDK), Amazon Corretto, Microsoft Build of OpenJDK, and Red Hat OpenJDK. For most users, Adoptium is a popular and reliable choice for downloading OpenJDK builds. Always download Java from official and reputable sources to ensure security and stability.
For this guide, we will focus on installing a common LTS version of OpenJDK (e.g., Java 17 or 21) from Adoptium, as it’s a widely accepted and free solution.
Step-by-Step Installation Guides
The installation process varies slightly depending on your operating system. We’ll cover Windows, macOS, and popular Linux distributions.
Installing Java on Windows
Installing Java on Windows typically involves downloading an installer and following a wizard.
-
Download the JDK:
- Open your web browser and go to the Adoptium website (adoptium.net).
- On the homepage, you’ll usually see a prominent download button for the latest LTS version (e.g., “Latest LTS Release” or “OpenJDK 21 (LTS)”). Ensure you select the correct operating system (Windows) and architecture (x64 for most modern PCs).
- Download the
.msiinstaller file.
-
Run the Installer:
- Locate the downloaded
.msifile (e.g.,OpenJDK-XX_windows-x64_bin.msi) and double-click it to start the installation wizard. - Click “Next” on the welcome screen.
- Accept the terms in the License Agreement and click “Next.”
- Custom Setup: On the Custom Setup screen, you’ll see options. Ensure “Set JAVA_HOME variable” and “Associate .jar files” (if desired) are selected. Installing the JDK usually automatically adds
java.exeto your system’s PATH variable, but explicitly settingJAVA_HOMEis crucial for many development tools. - Click “Next” and then “Install.”
- If prompted by User Account Control (UAC), click “Yes.”
- Once the installation is complete, click “Finish.”
- Locate the downloaded
-
Verify Environment Variables (Optional, but Recommended):
- While the installer often handles this, it’s good practice to verify.
- Search for “Environment Variables” in the Windows search bar and select “Edit the system environment variables.”
- In the System Properties window, click the “Environment Variables…” button.
- Under “System variables,” look for
JAVA_HOME. It should point to your JDK installation directory (e.g.,C:Program FilesEclipse Adoptiumjdk-21.0.2.13-hotspot). If it’s not there, you’ll need to add it manually:- Click “New…” under “System variables.”
- Variable name:
JAVA_HOME - Variable value: The path to your JDK installation (e.g.,
C:Program FilesEclipse Adoptiumjdk-21.0.2.13-hotspot). - Click “OK.”
- Also, ensure that
%JAVA_HOME%binis included in yourPathvariable. If not, select thePathvariable, click “Edit,” then “New,” and add%JAVA_HOME%bin. Move it to the top for priority if you have multiple Java versions. - Click “OK” on all open windows to save changes.
Installing Java on macOS
For macOS users, a .pkg installer is the most straightforward method.
-
Download the JDK:
- Go to the Adoptium website (adoptium.net).
- Select the macOS operating system and x64 architecture.
- Download the
.pkginstaller file for the desired LTS version.
-
Run the Installer:
- Locate the downloaded
.pkgfile and double-click it. - Follow the on-screen instructions in the installer wizard. This typically involves clicking “Continue,” agreeing to the license, choosing an installation location (usually the default, which is
/Library/Java/JavaVirtualMachines/), and entering your administrator password when prompted. - Click “Install” and then “Close” once complete.
- Locate the downloaded
-
Set JAVA_HOME (Optional, but Recommended for Developers):
- On macOS, the
javacommand is often automatically linked to the newly installed JDK. However, settingJAVA_HOMEis good practice for many development tools. - Open your terminal (search for “Terminal” in Spotlight).
- Determine your shell:
echo $SHELL(usuallybashorzsh). - Edit your shell configuration file:
- For
bash:nano ~/.bash_profileornano ~/.bashrc - For
zsh:nano ~/.zshrc
- For
- Add the following lines to the end of the file, replacing
jdk-21.0.2.13-hotspotwith your specific JDK version folder name (you can find this by navigating to/Library/Java/JavaVirtualMachines/in Finder):
bash

export JAVA_HOME="/Library/Java/JavaVirtualMachines/jdk-21.0.2.13-hotspot/Contents/Home"

export PATH="$JAVA_HOME/bin:$PATH"
- Save the file (Ctrl+O, Enter, Ctrl+X for nano).
- Apply the changes by running:
- For
bash:source ~/.bash_profileorsource ~/.bashrc - For
zsh:source ~/.zshrc
- For
- On macOS, the
Installing Java on Linux
Linux offers several ways to install Java, often via package managers or manual archives. We’ll cover common distributions.
Ubuntu/Debian (using APT)
-
Update Package List:
sudo apt update -
Install OpenJDK (Latest LTS):
The default OpenJDK package in Ubuntu/Debian repositories is often a good starting point. To install OpenJDK 21 (or the latest available LTS):sudo apt install openjdk-21-jdkIf you need an older LTS like Java 17:
sudo apt install openjdk-17-jdkTo install just the JRE:
sudo apt install openjdk-21-jre -
Set Default Java Version (if multiple are installed):
sudo update-alternatives --config java
sudo update-alternatives --config javac
This command will present a list of installed Java versions, allowing you to choose the default.
-
Set JAVA_HOME (Optional, but Recommended):
Theaptinstallation typically configures the systemPATHcorrectly. However,JAVA_HOMEis often needed for specific applications or IDEs.- Find the installation path:
bash

readlink -f /usr/bin/java
This usually outputs something like/usr/lib/jvm/java-21-openjdk-amd64/bin/java. YourJAVA_HOMEwould then be/usr/lib/jvm/java-21-openjdk-amd64. - Edit your shell configuration file (
~/.bashrcor~/.zshrc):
bash

nano ~/.bashrc
- Add the following lines, replacing the path with your actual JDK path:
bash

export JAVA_HOME="/usr/lib/jvm/java-21-openjdk-amd64"

export PATH="$JAVA_HOME/bin:$PATH"
- Save and apply changes:
source ~/.bashrc
- Find the installation path:
CentOS/Fedora/Red Hat (using YUM/DNF)
-
Update System:
sudo dnf update -y # or for older CentOS/RHEL: sudo yum update -y -
Install OpenJDK (Latest LTS):
To install OpenJDK 21 (or the latest available LTS):sudo dnf install java-21-openjdk-devel # For older versions: sudo dnf install java-17-openjdk-develThe
-develpackage includes the JDK (development tools). For just the JRE, usejava-21-openjdk. -
Set Default Java Version (if multiple are installed):
sudo alternatives --config java
sudo alternatives --config javac
Choose the desired version from the list.
-
Set JAVA_HOME (Optional, but Recommended):
- Find the installation path (usually
/usr/lib/jvm/java-XX-openjdk):
bash

readlink -f /etc/alternatives/java
This will give you a path similar to/usr/lib/jvm/java-21-openjdk-21.0.2.0.13-1.el9_3.x86_64/bin/java. YourJAVA_HOMEwould be/usr/lib/jvm/java-21-openjdk-21.0.2.0.13-1.el9_3.x86_64. - Edit your shell configuration file (
~/.bashrcor~/.zshrc):
bash

nano ~/.bashrc
- Add the following lines:
bash

export JAVA_HOME="/usr/lib/jvm/java-21-openjdk-21.0.2.0.13-1.el9_3.x86_64"

export PATH="$JAVA_HOME/bin:$PATH"
- Save and apply changes:
source ~/.bashrc
- Find the installation path (usually
Verifying Your Java Installation
After completing the installation steps, it’s crucial to verify that Java is correctly installed and configured. This ensures that your system recognizes the Java commands and is ready to execute or compile Java applications.
Checking Java Version
The most fundamental verification is to check the installed Java version.
-
Open Terminal/Command Prompt:
- Windows: Search for “cmd” and open Command Prompt.
- macOS/Linux: Open your terminal application.
-
Execute the
java -versioncommand:java -versionYou should see output similar to this (the version number will vary based on what you installed):
openjdk version "21.0.2" 2024-01-16
OpenJDK Runtime Environment (build 21.0.2+13-LTS)
OpenJDK 64-Bit Server VM (build 21.0.2+13-LTS, mixed mode, sharing)
This confirms that the Java Runtime Environment (JRE) is correctly installed and accessible via your system’s
PATH. -
Execute the
javac -versioncommand (for JDK installations):
If you installed the JDK (which you should if you’re developing), verify the Java compiler as well:
bash

javac -version
You should see output like:
javac 21.0.2
This confirms that the Java Development Kit (JDK) is also correctly installed and its compiler (javac) is accessible. Ifjavac -versiongives an error like “command not found,” it usually indicates that the JDK’sbindirectory (which containsjavac) is not correctly added to your system’sPATHenvironment variable.
Configuring Environment Variables (JAVA_HOME, PATH)
While java -version indicates general accessibility, explicit environment variables like JAVA_HOME and PATH are vital for many advanced tools, IDEs (like IntelliJ IDEA, Eclipse, VS Code), and build systems (like Maven, Gradle).
JAVA_HOME: This variable should point to the root directory of your JDK installation. It’s often required by Java-dependent software to locate the correct Java installation.PATH: This system variable tells your operating system where to look for executable programs. Thebindirectory within yourJAVA_HOME(i.e.,%JAVA_HOME%binon Windows or$JAVA_HOME/binon Linux/macOS) should be part of yourPATHso you can runjavaandjavaccommands from any directory.
To verify JAVA_HOME (after setting it as described in the installation steps):
- Windows:
bash

echo %JAVA_HOME%
- macOS/Linux:
bash

echo $JAVA_HOME
The output should be the full path to your JDK installation directory. If it’s empty or incorrect, revisit the environment variable setup steps for your OS.
Best Practices and Troubleshooting
Even with clear instructions, issues can arise during installation or when using Java. Here are some best practices and common troubleshooting tips.
Keeping Java Updated and Secure
Digital security and system performance are paramount. Regularly updating your Java installation is a critical best practice:
- Security Patches: New Java releases and updates frequently include security fixes for newly discovered vulnerabilities. Running outdated Java versions can expose your system to risks.
- Performance Improvements: Each new Java version often brings performance enhancements, garbage collector improvements, and new language features that can benefit your applications.
- Compatibility: While Java emphasizes “write once, run anywhere,” specific applications might require a minimum Java version or be optimized for a particular one.
- How to Update:
- Windows/macOS: The easiest way is often to download the new
.msior.pkginstaller from Adoptium and run it. It will usually install the new version alongside or replace the old one, depending on the installer. Remember to update yourJAVA_HOMEif it points to an older version. - Linux: Use your package manager (
sudo apt update && sudo apt upgradeorsudo dnf update) to keep your OpenJDK installation up-to-date. This is generally the most reliable method for security and stability.
- Windows/macOS: The easiest way is often to download the new
Common Installation Issues and Solutions
-
“java: command not found” or “javac: command not found”:
- Cause: The
java(andjavac) executable is not in your system’sPATHenvironment variable. - Solution: Revisit the environment variable setup for your operating system. Ensure
JAVA_HOMEis set correctly and that%JAVA_HOME%bin(Windows) or$JAVA_HOME/bin(macOS/Linux) is added to yourPATH. Remember to open a new terminal or command prompt after making changes to environment variables.
- Cause: The
-
JAVA_HOMEnot pointing to the correct version:- Cause: You have multiple Java versions installed, and
JAVA_HOMEis pointing to an older or incorrect one, or it’s not set at all. - Solution: Manually adjust the
JAVA_HOMEvariable to point to the desired JDK installation directory. On Linux/macOS, modify your shell configuration file. On Windows, use the System Environment Variables dialog.
- Cause: You have multiple Java versions installed, and
-
Application requiring a specific Java version (e.g., “This application requires Java 8”):
- Cause: The application is compiled for or only supports an older Java version.
- Solution: You might need to install multiple Java versions side-by-side. For development, tools like SDKMAN! (Linux/macOS) or manually switching
JAVA_HOMEcan manage this. For end-users, you might need to find an older JRE specific to that application. Be cautious with older versions due to security risks.
-
Installer download issues or corruption:
- Cause: Interrupted download, network issues, or a corrupt file.
- Solution: Redownload the installer from a reliable source (Adoptium is recommended). Check the integrity of the downloaded file if the website provides checksums (SHA256).
-
Permissions issues during installation (Linux/macOS):
- Cause: Not running the installer or commands with sufficient privileges.
- Solution: Use
sudofor package manager commands (apt,dnf) or for moving/extracting files to system directories. Ensure your user has read/execute permissions for the installed Java directory.
Managing Multiple Java Versions
Developers, in particular, often need to work with different Java versions for various projects. Managing these can be done effectively:
- Linux/macOS – SDKMAN!: A powerful command-line tool for managing multiple SDKs (Software Development Kits), including various Java versions. It allows you to switch between versions easily.
- Install:
curl -s "https://get.sdkman.io" | bash - List available Javas:
sdk list java - Install a specific version:
sdk install java 17.0.10-tem - Set as default:
sdk default java 17.0.10-tem - Switch for current session:
sdk use java 21.0.2-tem
- Install:
- Manual
JAVA_HOMESwitching: On all OSes, you can manually change yourJAVA_HOMEenvironment variable to point to a different JDK installation. This requires restarting your terminal/IDE or sourcing your shell configuration file. - IDE Configuration: Most modern IDEs (IntelliJ IDEA, Eclipse, VS Code) allow you to configure the specific JDK to use for each project, overriding system-wide settings. This is often the most practical approach for developers.
Conclusion
Installing Java, while seemingly straightforward, involves crucial decisions about which version and component to choose, followed by precise steps for your operating system. By following this guide, you should now have a robust understanding of how to get Java up and running on your Windows, macOS, or Linux machine.
Remember that Java’s longevity and pervasive use across the tech landscape underscore the importance of maintaining a current and secure installation. Regular updates, verification of environment variables, and proactive troubleshooting are key to ensuring a smooth and productive experience, whether you’re developing cutting-edge applications, running essential software, or simply exploring the vast ecosystem powered by Java. Stay updated, stay secure, and keep leveraging the power of “write once, run anywhere.”
aViewFromTheCave is a participant in the Amazon Services LLC Associates Program, an affiliate advertising program designed to provide a means for sites to earn advertising fees by advertising and linking to Amazon.com. Amazon, the Amazon logo, AmazonSupply, and the AmazonSupply logo are trademarks of Amazon.com, Inc. or its affiliates. As an Amazon Associate we earn affiliate commissions from qualifying purchases.