In the rapidly evolving landscape of personal computing, the quest for speed and efficiency remains paramount. While processors and graphics cards often grab the spotlight, one of the most impactful upgrades you can make to an aging or even a new desktop PC is installing a Solid State Drive (SSD). Moving beyond the mechanical limitations of traditional Hard Disk Drives (HDDs), SSDs offer a revolutionary leap in data access speed, system responsiveness, and overall user experience. This guide will walk you through everything you need to know, from selecting the right SSD to the step-by-step installation process and post-setup optimization, ensuring your desktop unleashes its full potential.
Why Upgrade to an SSD? Unlocking Superior Desktop Performance
For many users, the primary bottleneck in their system’s performance isn’t the CPU or RAM, but the slow speed of their storage drive. Traditional HDDs, relying on spinning platters and read/write heads, simply cannot keep pace with modern applications and operating systems. An SSD upgrade fundamentally transforms your desktop’s responsiveness, offering tangible benefits that permeate every aspect of your computing experience.
The Speed Advantage: Beyond Traditional Hard Drives
The most compelling reason to switch to an SSD is undeniably speed. Unlike HDDs, SSDs have no moving parts, using flash memory to store data. This architectural difference translates into staggering performance gains:
- Blazing Boot Times: Say goodbye to agonizing minutes waiting for your operating system to load. With an SSD, your desktop can boot up in mere seconds, drastically reducing the time it takes to get to your desktop and start working.
- Rapid Application Loading: Programs like Photoshop, video editing suites, modern games, and even your web browser will launch and load files significantly faster. This eliminates frustrating wait times and allows for a smoother, more fluid workflow.
- Faster File Transfers: Copying large files, whether it’s documents, media, or game installations, becomes a near-instantaneous task rather than a drawn-out process.
- Improved Multitasking: With quicker data access, your system can handle multiple demanding applications simultaneously without bogging down, leading to a much more productive and less frustrating experience.
- Enhanced System Responsiveness: From opening File Explorer to browsing the web, every interaction feels snappier and more immediate, making your computer feel more powerful and intuitive.
Enhanced Productivity and User Experience
Beyond raw speed, the upgrade to an SSD offers qualitative improvements that enhance your daily interactions with your computer. Less time waiting means more time doing, directly impacting your productivity. For professionals, this translates to faster project completion and less downtime. For gamers, it means quicker level loads and smoother in-game asset streaming. Even for casual users, the sheer enjoyment of a responsive, frustration-free system is a significant upgrade. Furthermore, SSDs are more durable, produce less heat, and operate silently compared to their HDD counterparts, contributing to a quieter and potentially longer-lasting system.
Preparing for Your SSD Upgrade: What You Need to Know
Before you open your desktop case, a little preparation goes a long way. This involves understanding the different types of SSDs, verifying compatibility with your existing hardware, and taking crucial steps to ensure a smooth installation process.
Choosing the Right SSD: SATA vs. NVMe (M.2)
The world of SSDs offers a few key form factors and interfaces, each with its own advantages. Understanding these will help you select the best fit for your desktop and budget.
- 2.5-inch SATA SSDs: These are the most common and often the most affordable type of SSD. They connect to your motherboard via a SATA data cable and draw power from a SATA power cable from your power supply. Their form factor is similar to a small laptop HDD, making them easy to mount in most desktop cases that have 2.5-inch or 3.5-inch drive bays (often with an adapter for 3.5-inch bays). SATA SSDs offer a significant speed boost over HDDs, typically reaching sequential read/write speeds of around 500-550 MB/s.
- M.2 NVMe SSDs: Representing the cutting edge of consumer storage, NVMe (Non-Volatile Memory Express) SSDs utilize the PCIe interface, which offers vastly greater bandwidth than SATA. They come in a compact stick-like form factor (M.2) that plugs directly into a dedicated slot on your motherboard. NVMe drives can achieve sequential read/write speeds ranging from 2,000 MB/s to over 7,000 MB/s, making them ideal for high-performance tasks, gaming, and professional workloads where every millisecond counts.
- Important Note: Not all M.2 slots support NVMe. Some M.2 slots are SATA-only. Always check your motherboard’s manual to confirm NVMe compatibility for any M.2 slot you intend to use. NVMe drives typically have an “M key” notch, while SATA M.2 drives may have “B+M key” notches.
Consider your budget, your motherboard’s capabilities, and your performance needs when making your choice. For a significant upgrade on a budget, a 2.5-inch SATA SSD is excellent. For maximum performance and future-proofing, if your motherboard supports it, an NVMe M.2 drive is the way to go.
Compatibility Check: Decoding Your Desktop’s Potential
Before purchasing, ensure your desktop can accommodate your chosen SSD.
- Motherboard:
- For SATA SSDs: Almost all modern motherboards have SATA 3.0 ports, which are backwards compatible with older SATA standards but offer the best performance. Check for available SATA data ports (small, L-shaped connectors) and ensure you have an extra SATA power connector from your power supply.
- For M.2 NVMe SSDs: You’ll need an M.2 slot on your motherboard that explicitly supports NVMe drives. Refer to your motherboard’s manual. M.2 slots vary in length (22mm wide, lengths like 42mm, 60mm, 80mm, 110mm). Most consumer NVMe drives are 2280 (22mm wide, 80mm long).
- Power Supply (PSU): Ensure you have an available SATA power connector for 2.5-inch SATA SSDs. NVMe M.2 drives draw power directly from the motherboard slot, so no separate power cable is needed.
- Case Space:
- For 2.5-inch SATA SSDs: Check for available 2.5-inch drive bays or 3.5-inch bays where you can mount a 2.5-inch drive using an adapter bracket.
- For M.2 NVMe SSDs: No physical space in a drive bay is needed as it mounts directly to the motherboard.
- Operating System: Ensure you’re running Windows 7 (with appropriate drivers), Windows 8.1, or Windows 10/11, all of which natively support SSDs and TRIM functionality.
Essential Pre-Installation Steps
Preparation isn’t just about hardware; it’s also about safeguarding your data and streamlining the software aspect of the upgrade.
- Backup Your Data: This is crucial. Before making any significant hardware changes, back up all critical files, documents, photos, and personal data from your existing drive to an external drive, cloud storage, or another reliable backup solution. While unlikely, unforeseen issues can occur.
- Gather Your Tools: You’ll typically need a Phillips-head screwdriver. An anti-static wrist strap is highly recommended to protect sensitive components from electrostatic discharge (ESD).
- Decide on OS Installation:
- Clean Installation: This is generally recommended for the best performance. You’ll install a fresh copy of your operating system onto the new SSD. This requires a Windows installation USB drive (created using the Media Creation Tool) or your operating system’s original installation media.
- Cloning Your Existing Drive: If you want to transfer your existing OS, programs, and files exactly as they are from your old drive to the new SSD, you’ll need cloning software (many SSD manufacturers provide this, or you can use third-party tools like Macrium Reflect Free). This requires both drives to be connected simultaneously during the cloning process. Ensure your new SSD is equal to or larger than the used space on your old drive, even if the new SSD’s total capacity is smaller than the old one.
- Update BIOS/UEFI (Optional but Recommended): Sometimes, an updated motherboard firmware can improve SSD compatibility and performance. Check your motherboard manufacturer’s website for the latest BIOS/UEFI version and update instructions.
Step-by-Step Installation: Bringing Your New SSD to Life
With your preparations complete, it’s time to physically install the SSD into your desktop. Work calmly and follow these steps carefully.
Opening Your Desktop and Taking Precautions
- Power Down and Unplug: Completely shut down your computer, then unplug the power cable from the wall outlet and the back of your PC. It’s also wise to unplug all peripherals (monitor, keyboard, mouse, etc.).
- Discharge Static Electricity: Touch a bare metal part of your PC case (the painted exterior is not sufficient) before opening it to discharge any static electricity from your body. If you have an anti-static wrist strap, put it on and clip it to a bare metal part of the case.
- Open the Case: Remove the side panel(s) of your desktop case, usually held in place by thumbscrews or regular screws at the back. Carefully set the panel aside.
Physical Installation: Mounting and Connecting
The installation steps differ slightly depending on whether you have a 2.5-inch SATA SSD or an M.2 NVMe SSD.
For 2.5-inch SATA SSDs:
- Locate a Drive Bay: Find an available 2.5-inch drive bay in your case. If you only have 3.5-inch bays, use a 2.5-inch to 3.5-inch adapter bracket. Many modern cases have tool-less drive sleds.
- Mount the SSD: Slide the SSD into the bay or mount it to the adapter bracket, then secure it with screws or the case’s locking mechanism. Ensure it’s firmly in place.
- Connect Data Cable: Connect one end of a SATA data cable (usually red, black, or blue, and L-shaped) to the smaller port on the back of the SSD and the other end to an available SATA port on your motherboard. Look for “SATA1,” “SATA2,” etc., on the motherboard.
- Connect Power Cable: Connect an available SATA power connector from your power supply (a wider, flatter L-shaped connector) to the larger port on the back of the SSD. Ensure both connections are snug.
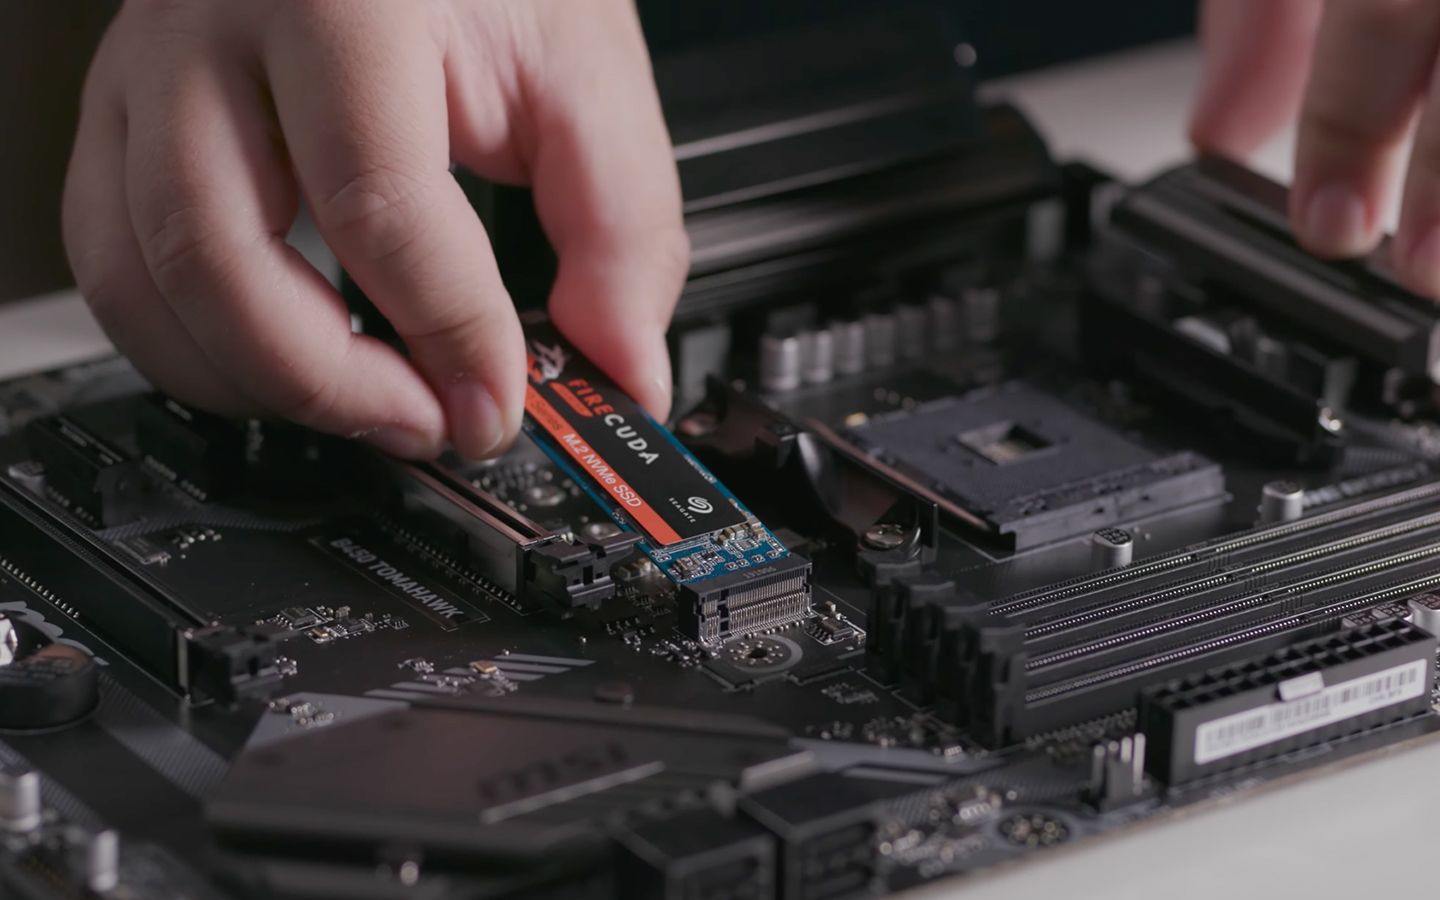
For M.2 NVMe SSDs:
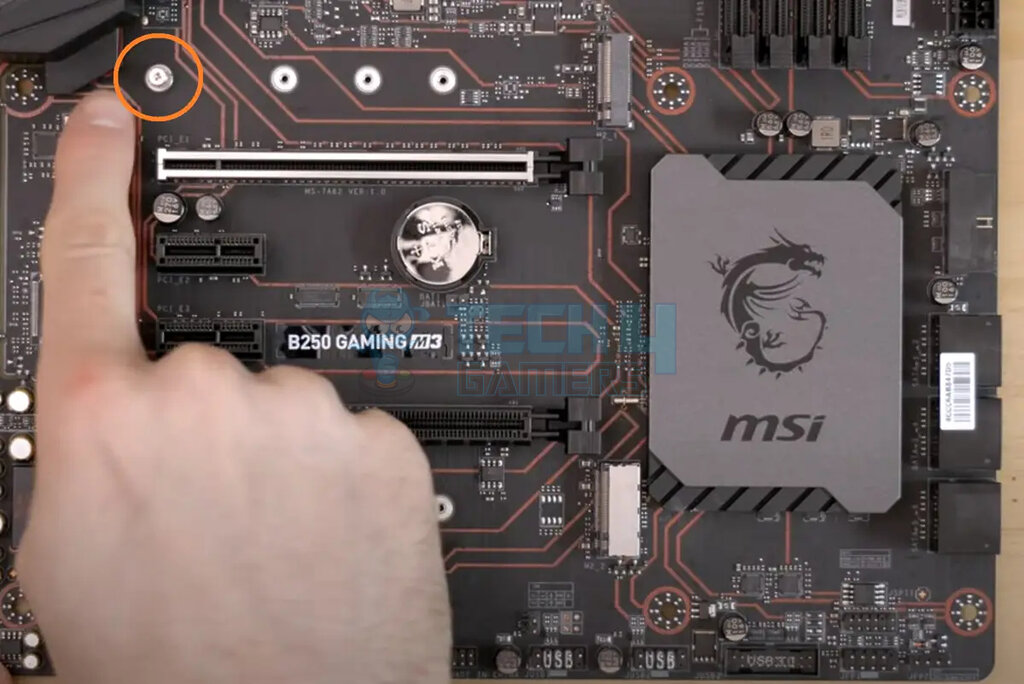
- Locate the M.2 Slot: Find the M.2 slot on your motherboard. It usually looks like a long horizontal slot, often near the CPU or under the graphics card. It may have a small screw already in place at the far end, or a stand-off and a separate screw in a small bag with your motherboard accessories.
- Remove the Standoff Screw (if present): If there’s a screw securing a small metal standoff, remove it. If there’s just a screw and no standoff, or a separate standoff, install the standoff into the correct hole for the length of your M.2 drive (most common is 2280).
- Insert the SSD: Gently slide the M.2 NVMe SSD into the slot at a slight angle (about 30 degrees) until it’s fully seated. The gold contacts should disappear into the slot.
- Secure the SSD: Gently push the SSD down until it’s parallel with the motherboard. Then, use the small screw (provided with your motherboard or SSD) to secure the notched end of the M.2 drive to the standoff. Do not overtighten. Some motherboards use a tool-less clip mechanism.
- Remove Old HDD (Optional): If you’re replacing your primary boot drive and don’t plan to use your old HDD for storage, you can remove it at this point to simplify the boot process.
Securing Your System
- Double-Check Connections: Ensure all cables (SATA data, SATA power) are firmly connected to the SSD and motherboard. For M.2, verify it’s seated and screwed down properly.
- Replace Side Panel: Carefully put the side panel(s) back on your desktop case and secure them with screws.
- Reconnect Peripherals: Plug back in your monitor, keyboard, mouse, and finally, the power cable.
Post-Installation & Optimization: Maximizing Your SSD’s Potential
The physical installation is just the first step. To fully leverage your new SSD, you’ll need to configure it within your operating system and optimize its settings.
Initializing Your SSD and Operating System Setup
- Boot into BIOS/UEFI: Turn on your computer and immediately press the designated key to enter your BIOS/UEFI settings (commonly Delete, F2, F10, or F12, depending on your motherboard).
- Verify SSD Recognition: In the BIOS/UEFI, navigate to the storage or boot devices section. Confirm that your new SSD is detected.
- Adjust Boot Order (if performing a clean install): If you’re doing a clean installation of your OS, you’ll need to change the boot order to prioritize your Windows installation USB drive or disc. Save changes and exit BIOS/UEFI.
- Install Operating System (Clean Install): Your computer will now boot from your installation media. Follow the on-screen prompts to install Windows. When prompted to select a drive, choose your new SSD. You may need to delete any existing partitions on the SSD or create new ones.
- Initialize and Format (If not installing OS, or using as a secondary drive): If you cloned your OS, or are using the SSD as a secondary storage drive, you’ll need to initialize and format it.
- Boot into your existing OS (which should now be on your old drive or the newly cloned SSD).
- Right-click the Start button and select “Disk Management.”
- You should see your new SSD listed as “Unallocated Space.” Right-click on it and select “Initialize Disk.” Choose GPT (GUID Partition Table) for modern systems.
- Once initialized, right-click the “Unallocated Space” again and select “New Simple Volume.” Follow the wizard to assign a drive letter and format it (NTFS is standard for Windows).
BIOS/UEFI Configuration and Boot Order
After installing your OS, revisit your BIOS/UEFI settings:
- Set Boot Order (Primary SSD): Ensure your new SSD is set as the primary boot device. This guarantees your system boots from the fastest drive.
- SATA Mode (for SATA SSDs): Verify that the SATA controller mode is set to “AHCI” (Advanced Host Controller Interface). This is crucial for optimal SSD performance and features like TRIM. If it’s set to “IDE,” switching it after OS installation can cause boot issues; you might need to enable AHCI before OS installation or modify Windows registry settings if changing post-installation. For NVMe, this setting is usually not relevant as it uses PCIe.
- Fast Boot/Ultra Fast Boot (Optional): Enable these options in BIOS/UEFI to further speed up your system’s boot process.
Optimizing for Longevity and Performance
Modern operating systems like Windows 10/11 are generally good at managing SSDs, but a few checks can ensure peak performance and longevity.
- Enable TRIM: TRIM is a command that helps SSDs manage deleted data blocks efficiently, maintaining performance over time. Windows automatically enables TRIM for SSDs. You can verify it by opening Command Prompt as administrator and typing
fsutil behavior query DisableDeleteNotify. If the result is0, TRIM is enabled. - Disable Defragmentation: Unlike HDDs, SSDs do not benefit from defragmentation; in fact, it can reduce their lifespan by writing unnecessary data. Windows typically detects SSDs and disables scheduled defragmentation, replacing it with an optimization process that sends TRIM commands. You can check this in the “Optimize Drives” tool (search for it in Windows).
- Check for Latest Drivers: Ensure your motherboard’s chipset drivers are up to date, as these can impact storage controller performance. Your SSD might also have manufacturer-specific firmware updates or drivers; check their website.
- Over-Provisioning (Advanced): Some users choose to allocate a small percentage (e.g., 10%) of their SSD’s capacity as unallocated space for over-provisioning. This gives the SSD controller more space to manage wear leveling and background tasks, potentially extending its life and maintaining performance. Most modern SSDs come with sufficient factory over-provisioning, so this is often unnecessary for general users.
Troubleshooting Common Issues and Final Thoughts
Even with careful preparation, you might encounter minor hiccups. Here’s a brief guide to common issues.
What to Do If Things Go Wrong
- SSD Not Detected:
- Physical Connections: Double-check that all SATA data and power cables (or M.2 seating) are secure. Try different ports/cables.
- BIOS/UEFI: Ensure the SSD is detected in the BIOS/UEFI. If not, the drive might be faulty, or connections are incorrect.
- Drivers: Update motherboard chipset drivers.
- Slow Performance:
- AHCI Mode: Ensure SATA mode is set to AHCI in BIOS/UEFI for SATA SSDs.
- SATA Port: Ensure the SATA SSD is connected to a SATA 3.0 (6Gbps) port, not an older 2.0 (3Gbps) port, for maximum speed.
- NVMe Speed: If an NVMe drive is slow, ensure it’s in a PCIe 3.0 x4 or PCIe 4.0 x4 slot (depending on the drive’s generation) and not sharing lanes with other devices that might throttle its speed (check your motherboard manual).
- TRIM: Verify TRIM is enabled.
- Operating System Won’t Boot:
- Boot Order: Check BIOS/UEFI boot order to ensure the SSD with your OS is prioritized.
- OS Installation: If you performed a clean install, ensure the OS was installed correctly onto the SSD. If cloning, ensure the cloning process was successful.
- Legacy/UEFI Boot: Sometimes, a mismatch between your OS installation type (Legacy BIOS vs. UEFI) and your motherboard settings can cause issues.

The Lasting Impact of Your SSD Upgrade
Installing an SSD is one of the most cost-effective and impactful upgrades you can make to your desktop computer. It breathes new life into older systems and unlocks the full potential of newer ones, providing a tangible boost in speed, responsiveness, and overall user satisfaction. By following this comprehensive guide, you’ve not only performed a significant technical upgrade but also enhanced your daily computing experience, making your desktop faster, more efficient, and ultimately, more enjoyable to use. Welcome to the world of instant computing!
aViewFromTheCave is a participant in the Amazon Services LLC Associates Program, an affiliate advertising program designed to provide a means for sites to earn advertising fees by advertising and linking to Amazon.com. Amazon, the Amazon logo, AmazonSupply, and the AmazonSupply logo are trademarks of Amazon.com, Inc. or its affiliates. As an Amazon Associate we earn affiliate commissions from qualifying purchases.