In the fast-paced world of technology, where every millisecond counts, optimizing your PC’s performance is paramount. Whether you’re a gamer seeking seamless frame rates, a content creator rendering high-resolution videos, or simply a multi-tasker juggling countless browser tabs, Random Access Memory (RAM) plays a pivotal role in your system’s responsiveness. Upgrading your RAM is one of the most impactful and surprisingly straightforward enhancements you can make to breathe new life into an aging machine or supercharge a new build.
This comprehensive guide will walk you through everything you need to know about installing RAM on your PC, from understanding its importance to selecting the right modules and executing the installation with confidence. Forget the intimidation; with a little preparation and careful execution, you’ll be enjoying a snappier, more efficient computing experience in no time. Let’s dive into the essential steps that will transform your digital workspace.

Understanding RAM: Why an Upgrade Matters
Before we get our hands dirty, it’s crucial to grasp what RAM is and why it’s so fundamental to your computer’s operation. Often misunderstood or underestimated, RAM is far more than just another component; it’s the short-term memory of your PC, a high-speed data bank that your processor constantly accesses to run programs and manage tasks.
The Role of RAM in Your PC’s Performance
Think of your computer’s storage drive (SSD or HDD) as a vast library containing all the books (programs, files, operating system). When you want to read a book, you don’t read it directly from the library shelf; you bring it to your desk. RAM is that desk. When you open an application, load a game, or even just browse the web, the necessary data is temporarily moved from your slower storage drive to the much faster RAM. Your Central Processing Unit (CPU) then fetches instructions and data from RAM, processes them, and stores the results back in RAM until they’re saved to permanent storage or no longer needed.
The more RAM you have, the larger your “desk” is. This means your computer can hold more programs and data ready for immediate access by the CPU without having to constantly fetch information from the slower storage drive. This dramatically reduces bottlenecks, leading to:
- Faster Application Loading: Programs open almost instantly.
- Smoother Multitasking: You can run numerous applications simultaneously without slowdowns.
- Enhanced Gaming Performance: Games can load assets quicker and maintain higher frame rates.
- Efficient Content Creation: Video editing, graphic design, and 3D rendering benefit immensely from abundant RAM, as large files can be manipulated in real-time.
- Improved Web Browsing: Modern browsers, especially with many tabs open, are notorious RAM consumers. More RAM means snappier tab switching and fewer reloads.
In essence, while your CPU is the brain and your storage is the long-term memory, RAM is the working memory that dictates how fluidly your PC can think and act.
Signs You Need a RAM Upgrade
How do you know if your current RAM configuration is holding you back? There are several tell-tale signs that indicate a RAM upgrade could significantly improve your user experience:
- Frequent Stuttering and Freezes: Your PC regularly lags, pauses, or even crashes, especially when running multiple applications or resource-intensive tasks.
- Slow Application Launch Times: Programs take an unusually long time to open, or you notice a significant delay when switching between them.
- “Not Responding” Messages: Applications frequently display “not responding” errors, forcing you to close them.
- Excessive Disk Activity: Even when you’re not actively saving files, you hear or see your hard drive working overtime. This is often a sign that your system is constantly swapping data between RAM and the slower storage drive (using a “page file” or “swap file”) because RAM is insufficient.
- Poor Gaming Performance: Games struggle to maintain consistent frame rates, textures load slowly, or you experience micro-stutters, despite having a capable CPU and GPU.
- Task Manager/Activity Monitor Warnings: If you check your system’s performance monitor (Task Manager on Windows, Activity Monitor on macOS), and your RAM usage is consistently near 80-100%, it’s a clear indicator that you’re running out of memory.
If any of these scenarios sound familiar, a RAM upgrade is likely one of the most cost-effective and impactful ways to revitalize your PC.
Before You Begin: Preparing for Your RAM Installation
Successful RAM installation isn’t just about physically inserting the modules; it’s about preparation. Taking the time to properly assess your system, choose the right components, and adhere to safety protocols will ensure a smooth, problem-free upgrade.
Identifying Your Current RAM Specifications
The first crucial step is to understand what kind of RAM your PC currently uses and what your motherboard supports. Compatibility is key. Installing the wrong type of RAM can range from simply not working to potentially damaging your system.
Here’s how to identify your current RAM:
-
Windows Task Manager:
- Press
Ctrl + Shift + Escto open Task Manager. - Go to the “Performance” tab.
- Click on “Memory.”
- You’ll see your total RAM capacity, its speed (e.g., 2400 MHz), and its type (e.g., DDR4). It might also show the number of slots used.
- Press
-
System Information (Windows):
- Type
msinfo32into the Windows search bar and press Enter. - Look for “Installed Physical Memory (RAM)” to see the total capacity.
- While it doesn’t always show the exact type or speed, it’s a good starting point.
- Type
-
Third-Party Software (Recommended):
- Tools like CPU-Z (free) provide extremely detailed information about your RAM, including:
- Memory Tab: Total size, type (DDR3, DDR4, DDR5), DRAM frequency (multiply by 2 for effective speed, e.g., 1200MHz DRAM Freq = 2400MHz effective speed), CAS Latency (CL).
- SPD Tab: This is critical. For each slot, it tells you the module size, manufacturer, part number, and more importantly, the specific timings and JEDEC profiles. This helps ensure you match existing RAM or buy fully compatible new RAM.
- Tools like CPU-Z (free) provide extremely detailed information about your RAM, including:
-
Physical Inspection: If all else fails, open your PC case (after powering down and unplugging!) and look at the RAM modules. They usually have stickers indicating their type (DDR4, DDR5), capacity (GB), and speed (MHz).
Pay close attention to the DDR generation (DDR3, DDR4, DDR5), the speed (MHz), and the form factor (DIMM for desktops, SO-DIMM for laptops). Your motherboard will only support one DDR generation. While it’s best to match the speed of existing RAM, your motherboard will usually default to the slowest module installed.
Choosing the Right RAM for Your PC
Once you know what you have, you can select your upgrade. Here’s what to consider:
- DDR Generation: This is non-negotiable. If your motherboard supports DDR4, you must buy DDR4 RAM. DDR3, DDR4, and DDR5 modules have different physical notches and pin counts, making them incompatible.
- Capacity: Decide how much RAM you need.
- 8GB: Minimum for general use, web browsing, and light office work.
- 16GB: The sweet spot for most users, including gamers and casual content creators.
- 32GB+: Recommended for professional content creation (video editing, CAD, 3D rendering), heavy virtualization, or future-proofing high-end gaming rigs.
- Speed (MHz): Faster RAM can improve performance, especially with AMD Ryzen CPUs. Check your motherboard’s specifications for the maximum supported RAM speed. Aim for a speed that balances cost and performance, usually between 3200MHz and 3600MHz for DDR4, or 4800MHz to 6000MHz for DDR5.
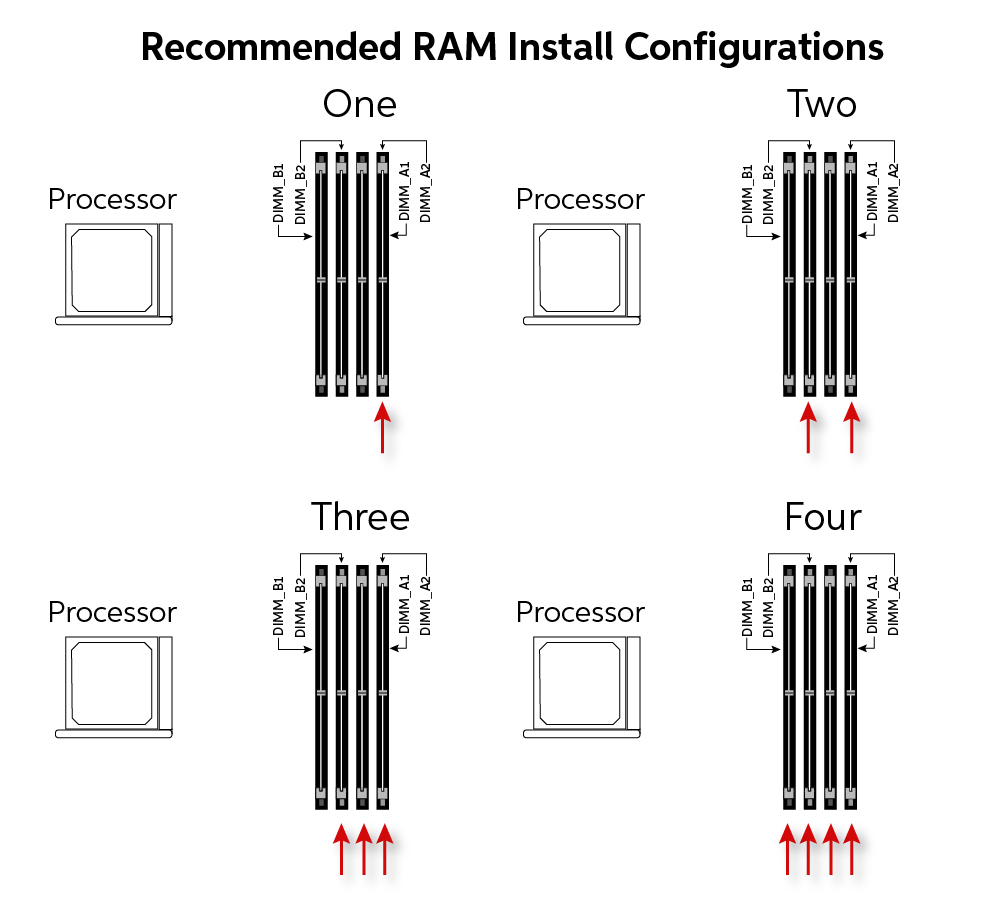
- Module Configuration (Dual/Quad Channel): Most consumer motherboards support dual-channel memory, meaning they can access two RAM modules simultaneously, doubling the bandwidth. To take advantage of this, install RAM in pairs (e.g., two 8GB sticks instead of one 16GB stick) into the specified slots (usually indicated in your motherboard manual, often slots 2 and 4). High-end desktop (HEDT) platforms support quad-channel.
- Latency (CL): Lower CAS Latency (CL) is generally better. For example, CL16 is faster than CL18 at the same speed. It’s less critical than speed but contributes to overall responsiveness.
- Brand and Aesthetics: Choose reputable brands like Corsair, G.Skill, Crucial, Kingston, or Patriot. If your case has a window, you might consider RGB RAM for visual appeal.
Important Note on Mixing RAM: While it’s technically possible to mix RAM modules from different brands or with slightly different speeds/latencies, it’s generally not recommended. Your system will default to the slowest speed and highest latency of all installed modules, and mixing can sometimes lead to instability. For optimal performance and stability, it’s best to buy a matched kit (e.g., 2x8GB or 2x16GB) that is identical in brand, capacity, speed, and latency.
Essential Tools and Safety Precautions
Before you open your PC, gather your tools and take necessary safety measures to protect yourself and your hardware.
Essential Tools:
- Phillips Head Screwdriver: Most PC cases and components use Phillips screws.
- Anti-Static Wrist Strap (Recommended): This is the best way to prevent electrostatic discharge (ESD), which can permanently damage sensitive electronics.
- Good Lighting: A desk lamp or headlamp can help illuminate the interior of your PC.
- Clean, Flat Workspace: A clear, non-carpeted surface is ideal. Avoid working on carpet, as it generates static electricity.
Safety Precautions:
- Power Down and Unplug: Absolutely critical. Turn off your PC completely, then unplug it from the wall outlet.
- Ground Yourself: Static electricity is your enemy.
- Anti-Static Wrist Strap: Attach one end to your wrist and the other to an unpainted metal part of your PC case (like the power supply enclosure) or a grounded metal object.
- Manual Grounding (if no strap): Before touching any components, frequently touch an unpainted metal part of the PC chassis to discharge any static buildup from your body. Do this even if you’re not wearing a strap.
- Avoid Carpets: Work on a hard, flat surface.
- Handle Components by Edges: Always hold RAM modules by their sides, never touch the gold connectors or the chips themselves, as oils and static can interfere with their function.
- Take Your Time: Don’t rush. Precision and patience prevent mistakes.
- Keep Screws Organized: Use a small container or magnetic mat to keep track of screws.
Step-by-Step Guide: Installing Your New RAM
With your new RAM in hand and safety precautions in place, it’s time for the actual installation. This process is surprisingly straightforward, even for first-timers.
Opening Your PC Case and Locating RAM Slots
- Move Your PC: Carefully move your PC to your clean, well-lit workspace.
- Remove the Side Panel: Most PC cases have side panels secured by two or more thumb screws at the rear. Unscrew these, then slide the panel backward and lift it off. If your case has a latch system, consult your manual. Set the panel aside carefully.
- Orient Your PC: Lay your PC on its side so the motherboard is facing up. This makes it easier to work on.
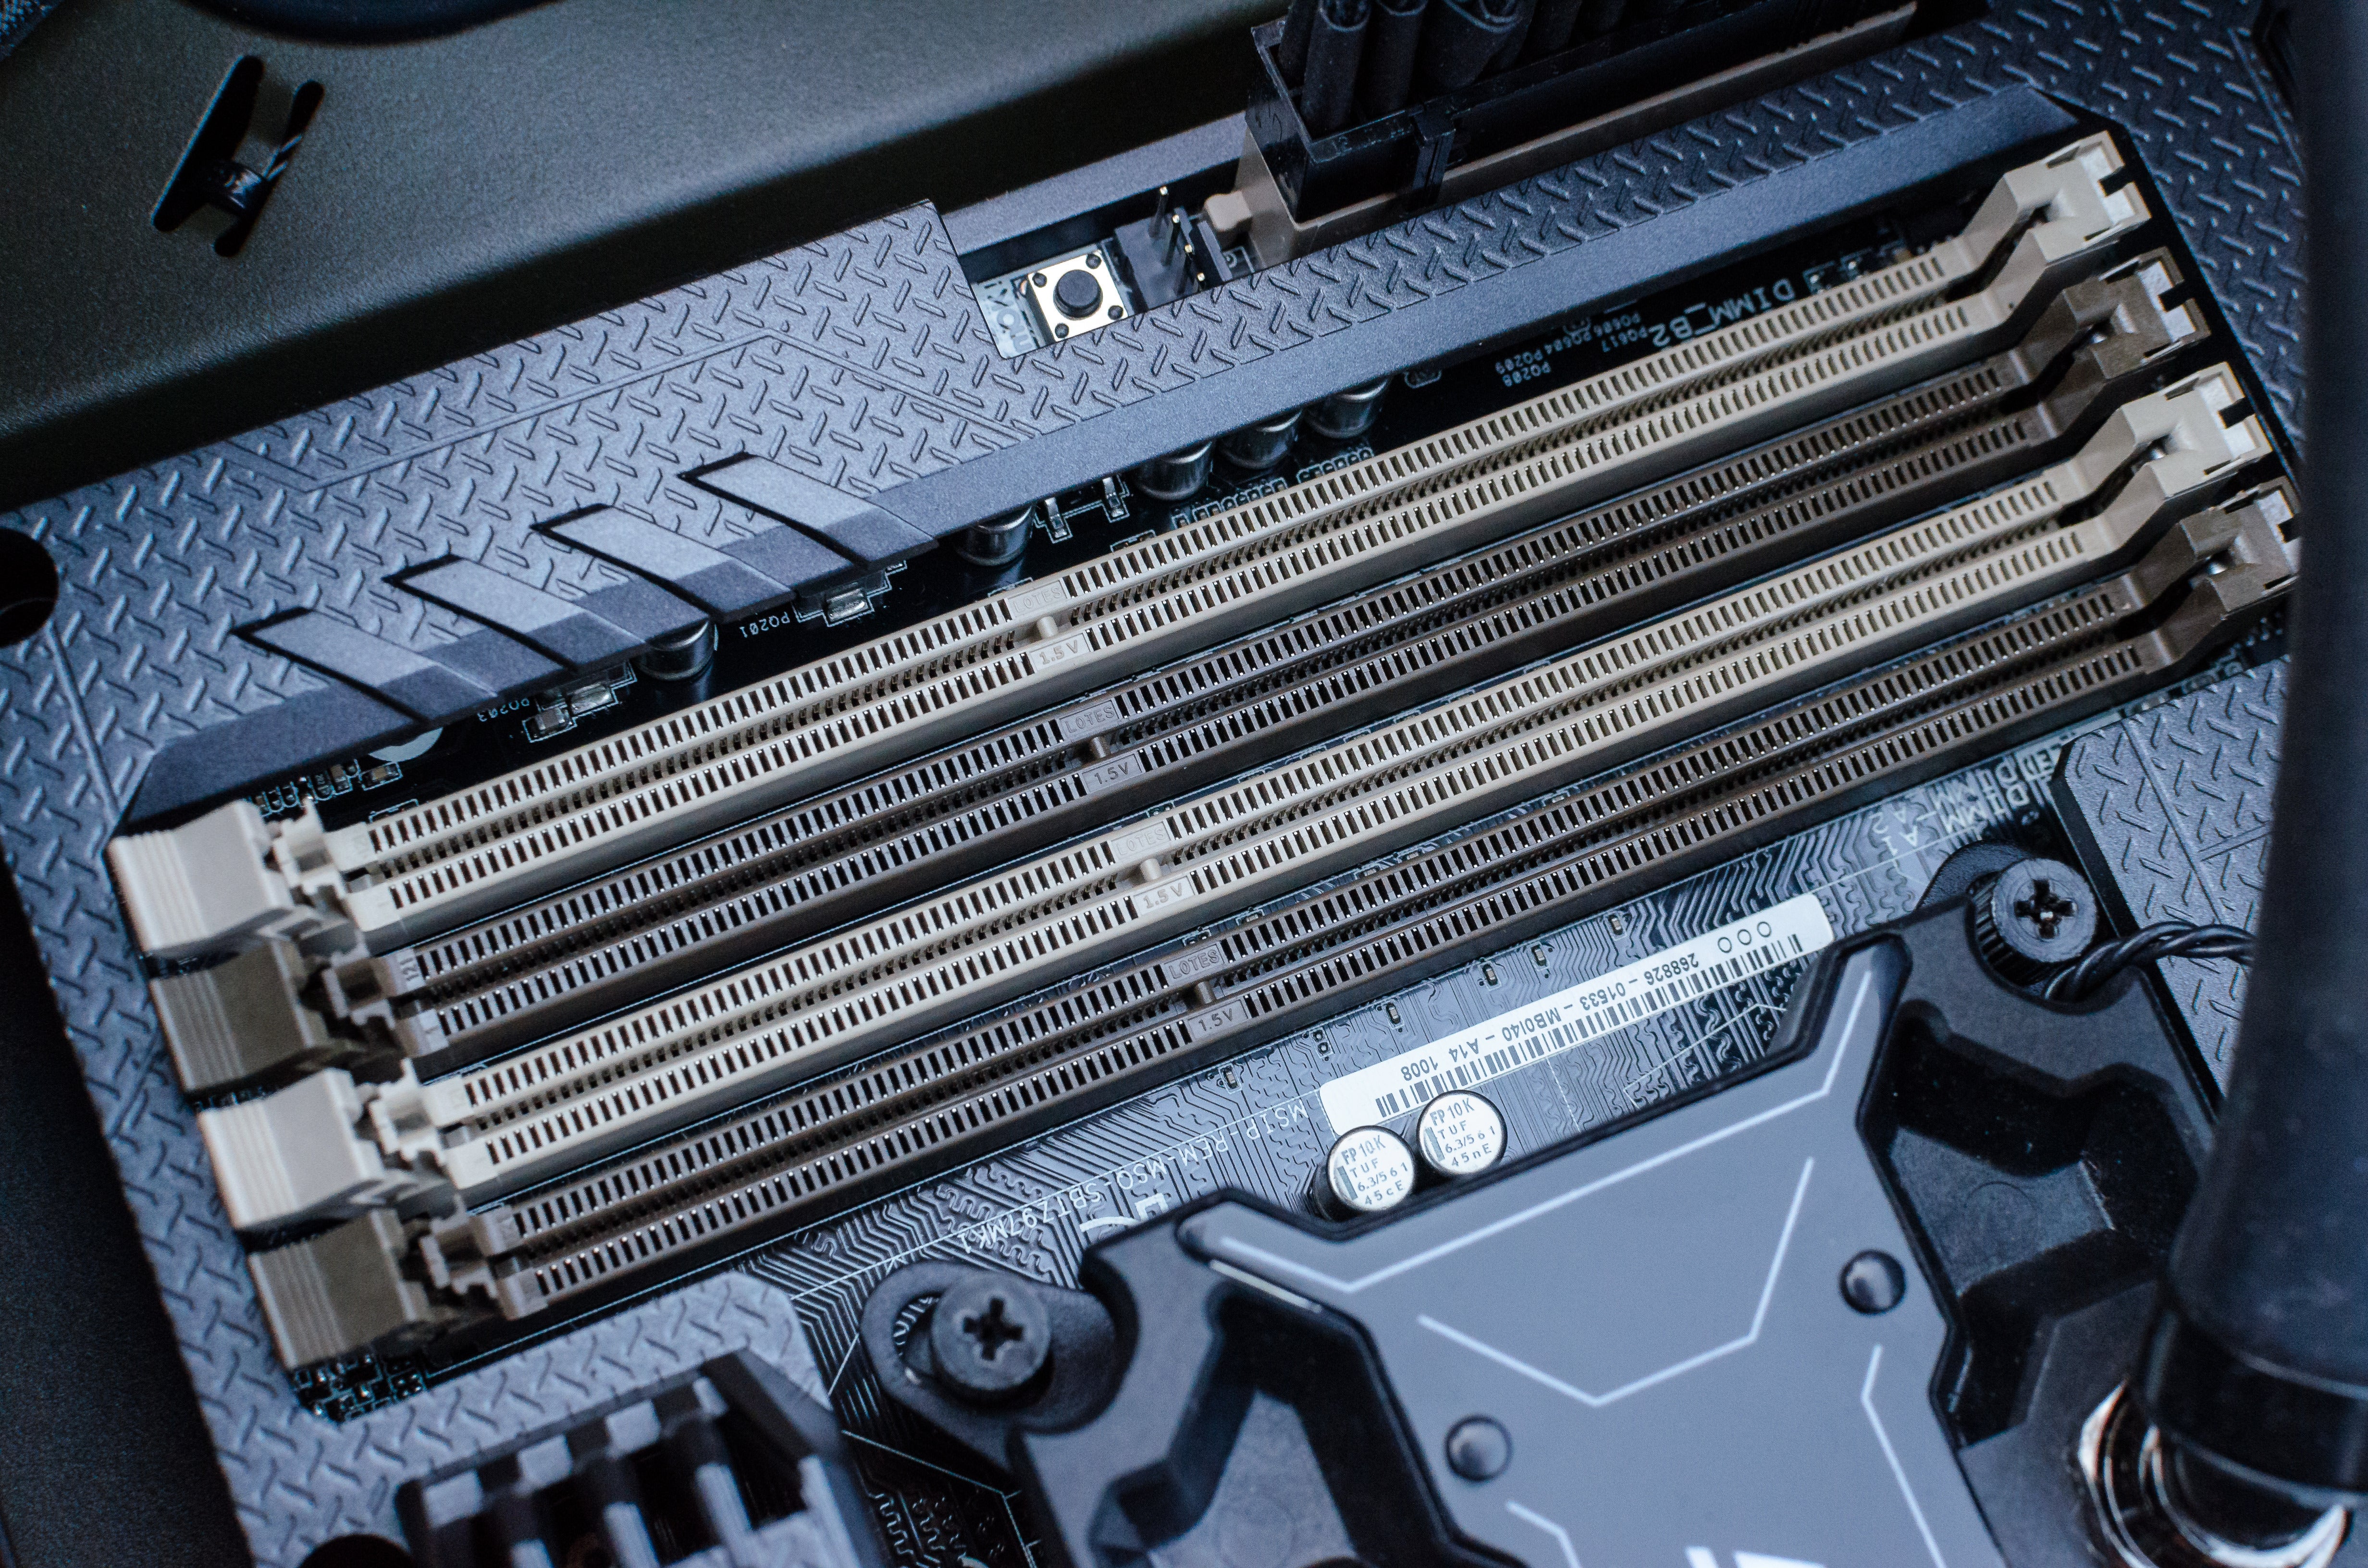
- Locate the RAM Slots: Look for the long, narrow slots on your motherboard, usually to the right of the CPU cooler. They are typically color-coded (e.g., black and grey, or blue and black) and are called DIMM slots. Most motherboards have two or four slots.
Removing Existing RAM (If Applicable)
If you’re replacing old RAM or adding to existing modules, you might need to remove current sticks. If you’re installing into empty slots, you can skip this step.
- Release the Latches: Each RAM slot has small plastic latches or clips at both ends. Gently push these latches outwards until they click open.
- Remove the Module: Once the latches are open, the RAM stick should slightly pop up. Gently grasp the module by its sides and pull it straight up out of the slot. Avoid wiggling or twisting.
- Store Safely: Place the old RAM modules in an anti-static bag or a safe, dry place if you plan to reuse or sell them.
Inserting the New RAM Modules
This is the core step. Precision is important to ensure proper seating.
- Open Latches: Ensure the latches on the RAM slots you intend to use are fully open.
- Identify the Notch: Look at the gold pins on the bottom of your RAM module. You’ll see a small notch or cutout that is off-center. This notch must align with the corresponding raised section in the RAM slot. This “keying” prevents you from inserting the RAM incorrectly (e.g., inserting DDR4 into a DDR3 slot, or inserting it backward).
- Align and Position: Gently align the RAM module with the slot, ensuring the notch matches. Position it directly over the slot.
- Apply Even Pressure: Using both thumbs, press down firmly and evenly on both ends of the RAM module simultaneously. You should feel it slide into the slot.
- Listen for the Click: Continue applying pressure until the latches on both sides automatically click back into place, securing the RAM module. If the latches don’t click, the module isn’t fully seated. Do not force the latches shut manually if the RAM isn’t seated. Re-open them, ensure alignment, and re-apply pressure.
- Verify Seating: Visually inspect both ends of the RAM stick. It should be level and firmly seated in the slot, with the latches fully closed against its sides.
Important Tip for Multiple Modules: If you’re installing two or four RAM modules, consult your motherboard manual for the correct slot configuration for dual-channel (or quad-channel) operation. Typically, for two modules, you’ll use slots A2 and B2 (often the second and fourth slots from the CPU, or the ones explicitly mentioned in the manual). Using the correct slots maximizes performance.
Securing Your PC Case
Once all your RAM modules are securely installed:
- Double-Check Connections: Briefly check all other cables and components to ensure nothing was accidentally dislodged during the process.
- Re-attach Side Panel: Carefully slide the side panel back into place, ensuring it aligns correctly with the case.
- Secure Screws: Replace and tighten the thumb screws (or use the latch system) to secure the side panel.
- Reconnect Peripherals: Move your PC back to its original location and reconnect all cables (power, monitor, keyboard, mouse, etc.).
Post-Installation: Verifying and Troubleshooting
You’ve done the hard part! Now it’s time to power on your PC and confirm that your new RAM is recognized and working correctly.
Checking Your RAM in the Operating System
- Power On: Press the power button on your PC.
- Initial Boot: The first boot after a hardware change might take slightly longer than usual as the BIOS/UEFI detects the new components. Don’t panic if it takes an extra few seconds or restarts once.
- Access BIOS/UEFI (Optional but Recommended): As soon as you power on, repeatedly press the designated key (usually Del, F2, F10, or F12) to enter your system’s BIOS/UEFI settings. Look for a section that displays system information or memory settings. Here, you should see the total installed RAM listed. This confirms the motherboard has recognized it.
- Check in Windows:
- Once Windows boots, right-click on the Start button and select “System.” Under “Installed RAM,” you should see the new total capacity.
- Alternatively, open Task Manager (
Ctrl + Shift + Esc), go to the “Performance” tab, and click “Memory.” The top right corner will show your total RAM.
- Verify Speed: In Task Manager’s “Memory” section, below the graph, it will also display the speed (e.g., 3200 MHz). If this is lower than your RAM’s rated speed, you might need to enable an XMP (Extreme Memory Profile) or DOCP (Direct Overclock Profile) in your BIOS/UEFI to achieve the advertised speeds. This is usually found in the “Overclocking” or “Advanced” memory settings.
If the displayed RAM capacity and speed match what you installed, congratulations! Your upgrade was successful.
Common Issues and How to Resolve Them
Even with careful installation, sometimes issues can arise. Here’s a quick troubleshooting guide:
- PC Doesn’t Boot / Black Screen: This is the most common issue and usually indicates the RAM is not properly seated or is incompatible.
- Action: Power off, unplug, re-ground yourself, and re-seat the RAM modules. Ensure the latches click securely. Try installing only one stick at a time to identify a potentially faulty module or slot.
- Incompatibility: Double-check your motherboard’s manual for supported RAM types and speeds.
- Incorrect RAM Capacity Detected: Your system boots, but shows less RAM than installed.
- Action:
- Re-seat modules.
- Try one module at a time in each slot to see if a slot or module is faulty.
- Check your motherboard’s manual for recommended slot population, especially for dual-channel configurations.
- Ensure your operating system is 64-bit; 32-bit Windows can only use about 3.5GB of RAM.
- Action:
- RAM Speed is Slower Than Advertised: Your system detects the correct capacity but at a lower speed (e.g., 2133MHz when you installed 3200MHz RAM).
- Action: This is normal by default. You need to enable XMP (Intel) or DOCP (AMD) in your BIOS/UEFI settings. This profile tells your motherboard to run the RAM at its manufacturer-rated speed and timings. Refer to your motherboard manual for how to access and enable this setting, often found under “AI Tweaker,” “OC Tweaker,” or “Advanced Memory Settings.”
- Frequent Crashes or Blue Screens of Death (BSODs):
- Action: This could indicate unstable RAM, especially if you’re mixing modules or if XMP/DOCP settings are too aggressive.
- Try running Windows Memory Diagnostic Tool or MemTest86 (a bootable memory testing tool) to check for errors.
- Reset your BIOS/UEFI settings to default.
- Ensure your BIOS/UEFI is up to date, as updates often improve memory compatibility.
- Action: This could indicate unstable RAM, especially if you’re mixing modules or if XMP/DOCP settings are too aggressive.
Conclusion: Enjoying Your Upgraded System
Congratulations! You’ve successfully navigated the process of installing RAM on your PC. From understanding the vital role RAM plays in system performance to carefully selecting compatible modules and executing the physical installation, you’ve taken a significant step toward optimizing your computing experience.
By investing a little time and effort, you’ve unlocked snappier application launches, smoother multitasking, and potentially higher frame rates in your favorite games. This upgrade not only enhances your productivity and entertainment but also extends the useful life of your PC, proving that a targeted hardware upgrade can be a powerful alternative to buying an entirely new system.
So, go ahead and open those extra browser tabs, launch that demanding software, or dive into a graphics-intensive game. You’ve earned a faster, more responsive PC, and the satisfaction of having upgraded it yourself. Welcome to the world of optimized performance!
aViewFromTheCave is a participant in the Amazon Services LLC Associates Program, an affiliate advertising program designed to provide a means for sites to earn advertising fees by advertising and linking to Amazon.com. Amazon, the Amazon logo, AmazonSupply, and the AmazonSupply logo are trademarks of Amazon.com, Inc. or its affiliates. As an Amazon Associate we earn affiliate commissions from qualifying purchases.