For millions of users worldwide, Google Chrome isn’t just another web browser; it’s a gateway to the digital world, celebrated for its speed, versatility, and deep integration with Google’s extensive ecosystem. While Apple’s Safari browser comes pre-installed on every Mac, many users opt to download Chrome for its robust feature set, expansive extension library, and consistent cross-platform experience. Whether you’re a seasoned tech enthusiast or new to the macOS environment, installing Google Chrome on your Mac is a straightforward process that takes just a few minutes. This guide will walk you through every step, from preparation to first launch, ensuring a seamless transition and optimal browsing experience.

Why Choose Google Chrome for Your Mac?
Before diving into the “how-to,” it’s worth exploring the compelling reasons why Google Chrome has become a preferred browser for countless Mac users. Understanding these benefits can help you appreciate the value Chrome brings to your daily digital interactions, aligning with a broader theme of leveraging technology for enhanced productivity and efficiency.
Speed and Efficiency
Google Chrome has long been lauded for its impressive browsing speed and efficient rendering of web pages. Its powerful V8 JavaScript engine ensures that even complex, dynamic websites load quickly and run smoothly. For users who frequently navigate numerous tabs or data-heavy applications, Chrome’s performance can significantly reduce wait times, transforming your browsing experience. This speed translates directly into time saved, a subtle but critical factor in both personal and professional spheres, touching upon the “Money” aspect through increased output and reduced friction in digital tasks.
Cross-Device Sync and Ecosystem Integration
One of Chrome’s most potent features is its seamless synchronization across all your devices. By simply signing into your Google account, your bookmarks, browsing history, saved passwords, and open tabs are instantly accessible whether you’re on your Mac, iPhone, iPad, or an Android device. This creates a cohesive browsing experience, eliminating the need to search for information or re-enter credentials across different platforms. This powerful integration speaks to the strength of the Google “Brand” and its commitment to creating a unified user journey, making your digital life more connected and convenient.
Vast Extension Library
The Chrome Web Store boasts an unparalleled collection of extensions, offering tools for almost every conceivable need. From productivity boosters like ad blockers and grammar checkers to specialized tools for developers, designers, or marketers, Chrome’s extensions empower users to customize their browsing experience to an extraordinary degree. These extensions can dramatically enhance workflow, streamline tasks, and even introduce new functionalities, making Chrome an incredibly adaptable platform. This customization capability ties directly into “Tech” by providing specialized software tools and indirectly to “Money” by facilitating more efficient work and specialized tasks.
Robust Security Features
In an increasingly complex digital landscape, browser security is paramount. Google Chrome incorporates a suite of advanced security features designed to protect users from various online threats. These include built-in phishing and malware protection, automatic updates that patch vulnerabilities, and a “Safe Browsing” mode that warns users about potentially dangerous websites. Regular security enhancements and privacy controls ensure that your data remains protected as you navigate the internet, making Chrome a trustworthy choice for safeguarding your digital footprint.
Preparing Your Mac for Google Chrome Installation
While installing Chrome is straightforward, a quick pre-check can ensure the process goes without a hitch. These simple steps ensure your Mac is ready to welcome its new browser.
System Requirements Check
Google Chrome is designed to be compatible with a wide range of macOS versions. Generally, if your Mac is running macOS Catalina (10.15) or newer, you should have no issues. Older macOS versions might require an older version of Chrome, but for optimal security and features, it’s always best to have an up-to-date operating system. To check your macOS version, click on the Apple menu in the top-left corner of your screen and select “About This Mac.” A stable, modern operating system is crucial not just for Chrome but for all your “Tech” endeavors.
Ensuring a Stable Internet Connection
The Google Chrome installer file, while not excessively large, does require an active internet connection to download. Before you begin, ensure your Mac is connected to a stable Wi-Fi network or via an Ethernet cable. A consistent connection will prevent interruptions during the download process, saving you time and potential frustration.
Step-by-Step Installation Guide
With your Mac prepared, you’re ready to download and install Google Chrome. Follow these steps meticulously for a smooth installation experience.
Downloading the Google Chrome Installer
- Open Safari (or any other existing browser): Since Chrome isn’t on your Mac yet, you’ll need to use your pre-installed browser, typically Safari, to download it.
- Navigate to the Official Google Chrome Download Page: In your browser’s address bar, type
www.google.com/chromeand press Enter. It’s crucial to download Chrome only from the official source to avoid malicious software or outdated versions. - Click the “Download Chrome” Button: On the official Chrome download page, you’ll see a prominent “Download Chrome” button. Click it. The website should automatically detect that you’re on a Mac and offer the correct version of the installer.
- Review Terms of Service and Accept (if prompted): A pop-up might appear asking you to accept Google Chrome’s Terms of Service. Read through them if you wish, then click “Accept and Install” or a similar button to proceed.
- Save the Installer File: Your browser will likely ask you where you want to save the
googlechrome.dmgfile. The default “Downloads” folder is usually the best place. Click “Save” or “OK.” The download will begin, and you can monitor its progress in your browser’s downloads list.
Opening the DMG File and Initiating Installation
- Locate the Downloaded DMG File: Once the download is complete, navigate to your “Downloads” folder (or wherever you saved the file). You can do this by opening Finder, selecting “Downloads” from the sidebar, or by clicking the download icon in your browser.
- Double-Click the
googlechrome.dmgFile: The.dmgfile is a disk image, which macOS uses for software distribution. Double-clicking it will “mount” the disk image, opening a new Finder window that displays its contents. This acts like a virtual drive on your desktop. - Confirm the Security Message (if it appears): Depending on your macOS security settings, you might see a warning asking if you are sure you want to open an application downloaded from the internet. Click “Open” or “Allow” to proceed. macOS’s Gatekeeper feature is designed to protect your system, and it’s always good practice to verify the source, which in this case is Google.
Dragging Chrome to Your Applications Folder
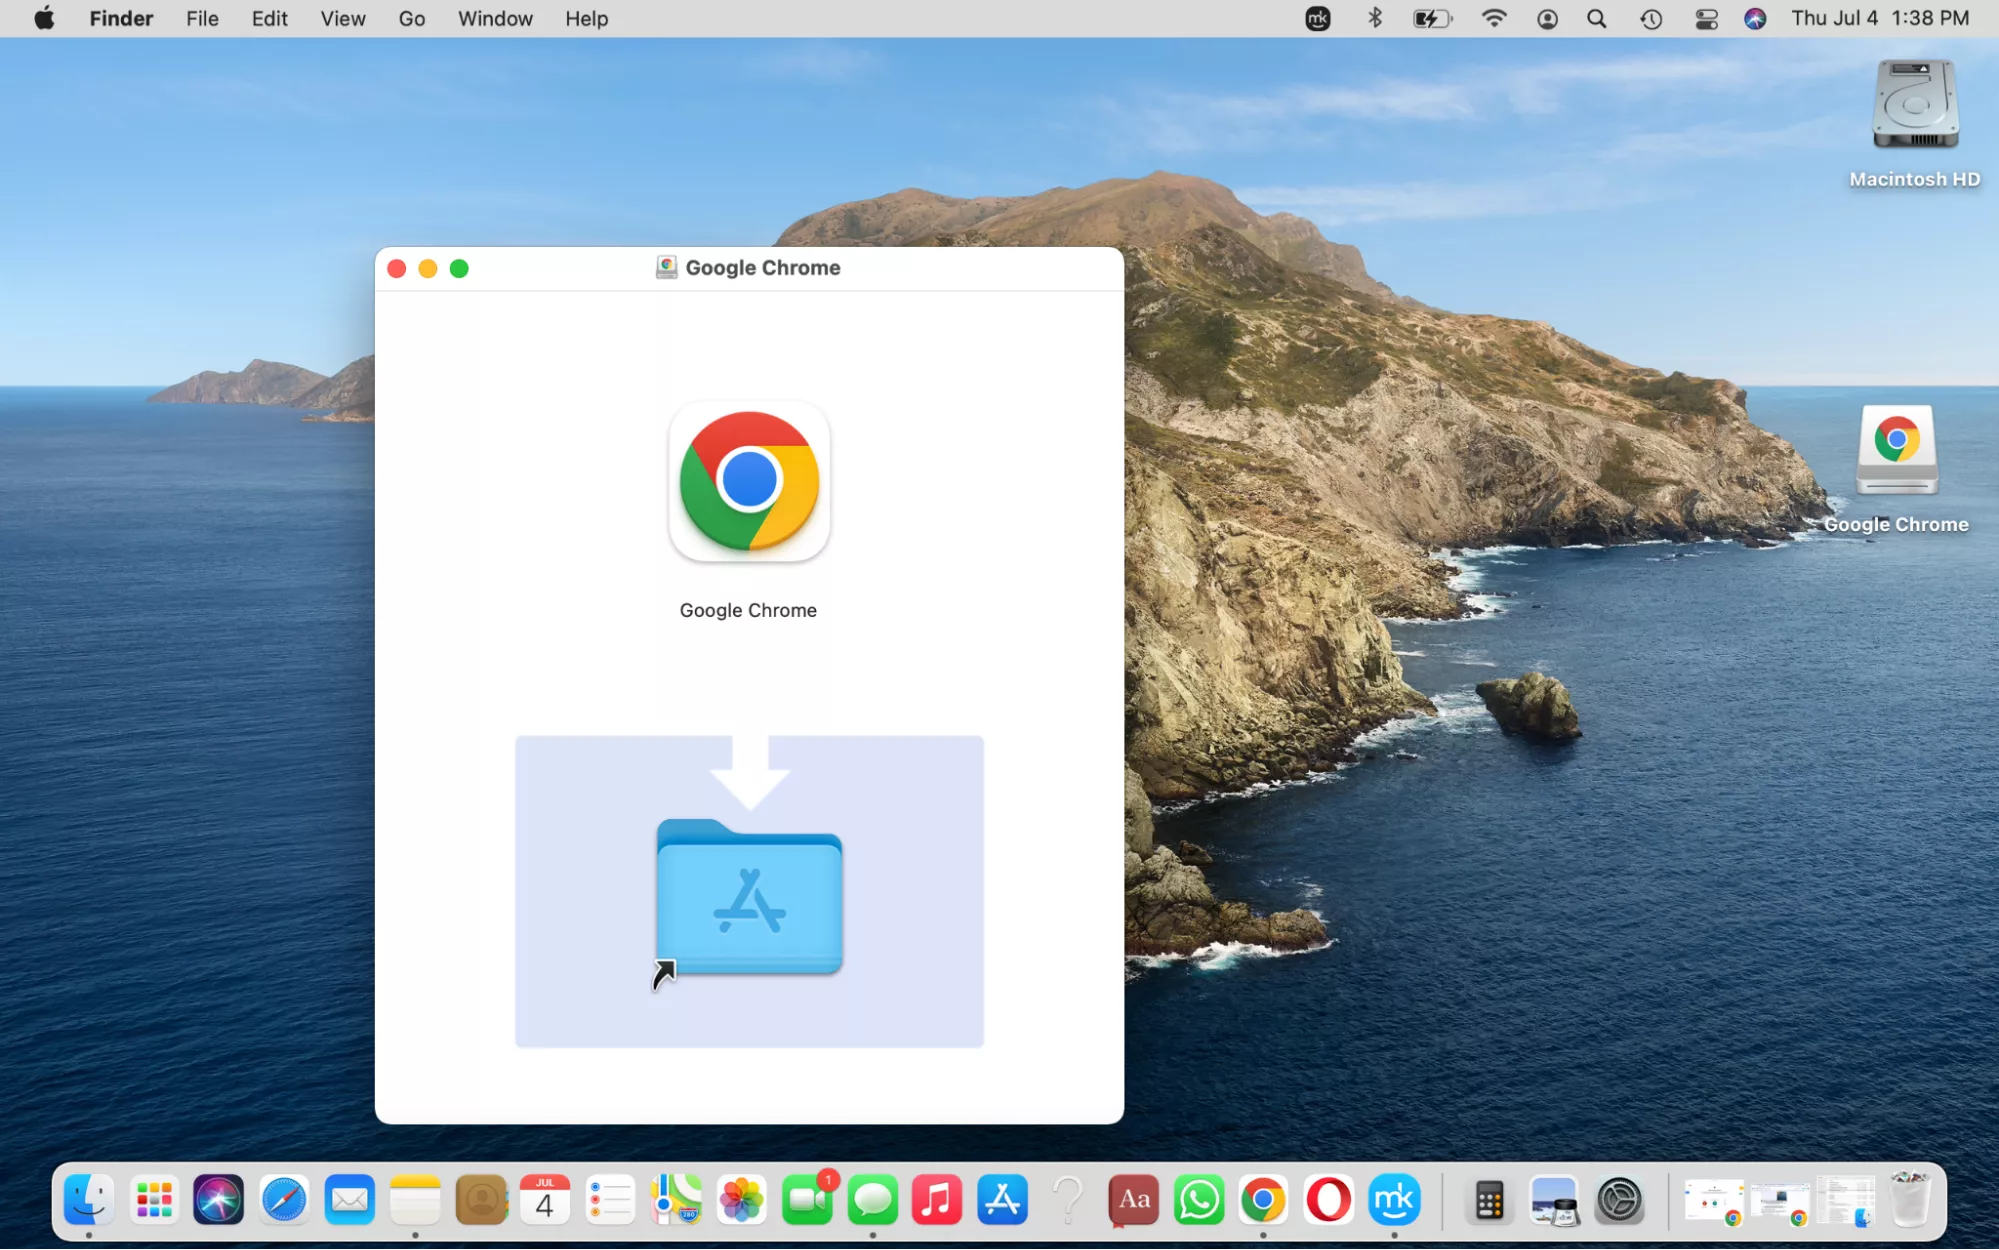
- Drag the Chrome Icon to the Applications Folder: Inside the newly opened Finder window from the DMG, you will typically see two icons: the Google Chrome application icon and an alias to your “Applications” folder. The instruction is usually clear: “Drag Google Chrome to the Applications folder.”
- Perform the Drag-and-Drop: Click and hold the Google Chrome icon, then drag it over to the “Applications” folder alias. Release the mouse button once the Chrome icon is hovering over the “Applications” folder. macOS will then copy the Chrome application into your Applications directory. This is the core step that installs the browser onto your system.
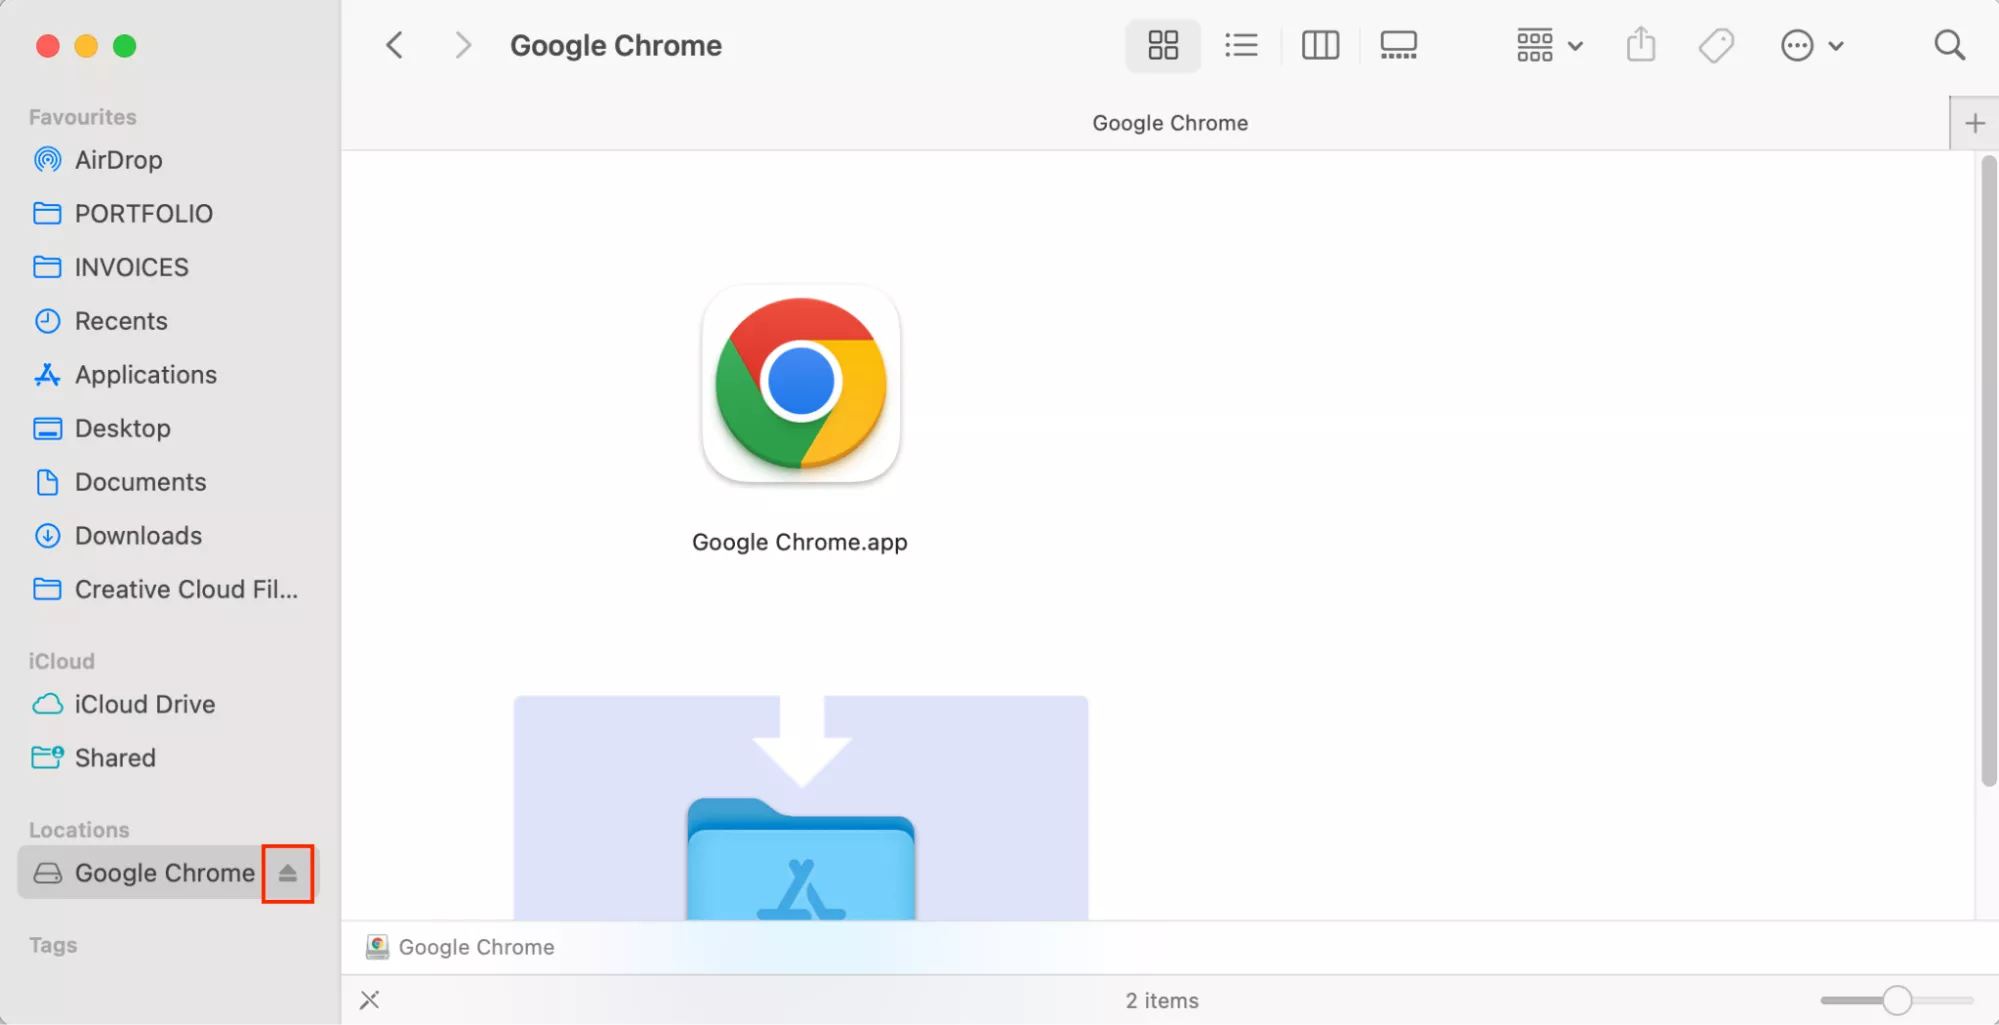
- Eject the Disk Image: After the copy is complete, it’s good practice to eject the disk image. You can do this by dragging the “Google Chrome” disk image icon (which appears on your desktop and in the Finder sidebar) to the Trash Can in your Dock, or by right-clicking it and selecting “Eject ‘Google Chrome’.” You can also simply close the Finder window associated with the DMG. You can then delete the original
googlechrome.dmgfile from your Downloads folder if you wish, as it’s no longer needed.
Verifying Installation and First Launch
- Open Your Applications Folder: Navigate to your Applications folder in Finder.
- Locate and Double-Click Google Chrome: Scroll through the list of applications until you find “Google Chrome.” Double-click its icon to launch the browser for the first time.
- Security Warning on First Launch (if applicable): The first time you open Chrome, macOS might ask for confirmation that you want to open an application downloaded from the internet. Click “Open.” This is a standard security protocol for new applications.
- Welcome Screen and Initial Setup: Chrome will open to a welcome screen. Here, you’ll have the option to sign in with your Google Account, which will enable synchronization of your bookmarks, history, and passwords across devices. You might also be prompted to set Chrome as your default browser.
Setting Chrome as Your Default Browser (Optional but Recommended)
Making Chrome your default browser means that whenever you click on a web link from an email, document, or another application, it will automatically open in Chrome.
- During First Launch: If prompted during the initial setup, click “Set as default.”
- From Chrome Settings: If you skip this step, you can set it later.
- Open Google Chrome.
- Click the three vertical dots (kebab menu) in the top-right corner to open the menu.
- Go to “Settings.”
- In the “Default browser” section, click “Make default.” This will open your Mac’s System Settings (or System Preferences).
- In System Settings, find the “Desktop & Dock” or “General” section (depending on your macOS version).
- Locate the “Default web browser” dropdown menu and select “Google Chrome.” Close System Settings.
Optimizing Your Chrome Experience on Mac
Installation is just the beginning. To truly harness Chrome’s power, especially for productivity and integrated workflows, consider these optimization steps.
Syncing Your Google Account
Signing in with your Google account is crucial for a truly integrated experience. Not only does it sync your data, but it also gives you quick access to all Google services like Gmail, Google Drive, Calendar, and YouTube without needing to sign in repeatedly. This unification of services amplifies the “Brand” experience and boosts productivity, reducing friction in your digital life.
- Click the Profile Icon: In the top-right corner of Chrome, click the circular profile icon (or the person icon if you haven’t signed in).
- Click “Sign in to Chrome”: Follow the on-screen prompts to enter your Google email and password.
- Turn on Sync: Once signed in, you’ll be asked if you want to “Turn on sync.” Confirm this to begin syncing your data.
Exploring Essential Extensions for Productivity
The Chrome Web Store is a treasure trove of tools. Consider adding extensions that boost your productivity, enhance security, or cater to your specific interests. Popular choices include:
- Ad Blockers: (e.g., uBlock Origin) for a cleaner, faster browsing experience.
- Password Managers: (e.g., LastPass, 1Password) for secure credential management.
- Grammar Checkers: (e.g., Grammarly) for flawless writing.
- Screenshot Tools: (e.g., Lightshot) for quick captures and annotations.
These extensions represent the cutting edge of “Tech” tools designed to make your online interactions more efficient, potentially saving time and resources—a direct link to the “Money” aspect through increased personal or business productivity.
Keeping Chrome Up-to-Date
Google regularly releases updates for Chrome, which include new features, performance enhancements, and critical security patches. Ensuring your browser is always up-to-date is vital for both security and optimal performance.
- Chrome Updates Automatically: By default, Chrome checks for updates and installs them automatically when you close and reopen the browser.
- Manually Check for Updates: If you’re concerned or experiencing issues, you can manually check:
- Click the three vertical dots (kebab menu) in the top-right corner.
- Go to “Help” > “About Google Chrome.”
- Chrome will automatically check for and apply any pending updates. You may be prompted to relaunch the browser.
Troubleshooting Common Installation Issues and Advanced Tips
While the installation process is generally smooth, you might encounter a few hurdles. Here’s how to address common issues and some advanced considerations.
“Google Chrome cannot be opened because the developer cannot be verified”
This is a common macOS security message, especially for applications downloaded outside the App Store.
- Solution:
- Go to your Mac’s “System Settings” (or “System Preferences” on older macOS versions).
- Click “Privacy & Security.”
- Scroll down to the “Security” section. You should see a message stating “Google Chrome was blocked from opening because it is not from an identified developer.” Next to this, click “Open Anyway.”
- You may need to enter your administrator password.
Installation Failed or Frozen
If the installation process appears stuck or gives an error message:
- Solution:
- Restart Your Mac: A simple restart can often resolve temporary system glitches.
- Re-download the DMG File: The original downloaded file might be corrupted. Delete it and download a fresh copy from
google.com/chrome. - Check Disk Space: Ensure you have enough free storage space on your Mac. Google Chrome itself doesn’t take up much space, but insufficient disk space can cause issues with any installation.
- Disable Antivirus Temporarily: Sometimes, overzealous antivirus software can interfere with installations. Temporarily disable it, try installing Chrome, and then re-enable it immediately afterward.
Reinstalling Chrome for a Fresh Start
If Chrome is behaving erratically after installation or you want to start fresh:
- Uninstall Chrome: Quit Chrome completely. Go to your Applications folder, drag “Google Chrome” to the Trash, and empty the Trash.
- Remove Residual Files (Optional but Recommended): For a truly clean uninstall, you might want to remove associated preference files. This requires navigating to your User Library folder (which is hidden by default).
- In Finder, click “Go” in the menu bar, then press the
Optionkey. “Library” will appear in the dropdown. Click it. - Go to
Application Support->Googleand drag theChromefolder to the Trash. - Also, check
CachesandPreferencesfolders withinLibraryfor anyGoogle Chromerelated files.
- In Finder, click “Go” in the menu bar, then press the
- Follow the Installation Steps Again: Once thoroughly removed, follow the installation guide from the beginning.
Uninstalling Google Chrome (If Necessary)
Should you ever decide to remove Chrome from your Mac, the process is straightforward:
- Quit Chrome: Ensure Chrome is completely closed. You can do this by going to the Chrome menu in the top-left corner of the screen and selecting “Quit Google Chrome,” or by right-clicking the Chrome icon in the Dock and choosing “Quit.”
- Open Applications Folder: In Finder, navigate to your Applications folder.
- Drag to Trash: Click and drag the “Google Chrome” application icon from the Applications folder to the Trash Can in your Dock.
- Empty Trash: Right-click on the Trash Can icon and select “Empty Trash” to permanently delete Chrome.
- Remove User Data (Optional): If you want to delete all browsing data, bookmarks, and settings associated with Chrome, you’ll need to remove its user profile folder. As mentioned above, this is usually found in
~/Library/Application Support/Google/Chrome/. Delete this folder after uninstalling the application.
Conclusion
Installing Google Chrome on your Mac is a simple yet powerful step towards enhancing your digital experience. By following this comprehensive guide, you’ve not only successfully set up one of the world’s most popular browsers but also gained insights into optimizing its features for speed, security, and productivity. Chrome’s robust ecosystem, extensive customization options through extensions, and seamless cross-device synchronization make it an invaluable tool for both personal use and professional endeavors. Embrace the versatility and power of Google Chrome on your Mac, and unlock a more efficient and connected way to navigate the internet.
aViewFromTheCave is a participant in the Amazon Services LLC Associates Program, an affiliate advertising program designed to provide a means for sites to earn advertising fees by advertising and linking to Amazon.com. Amazon, the Amazon logo, AmazonSupply, and the AmazonSupply logo are trademarks of Amazon.com, Inc. or its affiliates. As an Amazon Associate we earn affiliate commissions from qualifying purchases.