In today’s technologically advanced world, our vehicles are becoming increasingly sophisticated, incorporating features that enhance safety, convenience, and overall driving experience. Among these innovations, the backup camera has transitioned from a luxury amenity to a near-essential component for many drivers. Its ability to provide a clear, real-time view of the area behind your vehicle significantly reduces the risk of accidents, particularly during reversing maneuvers. Whether you’re navigating tight parking spots, backing out of a busy driveway, or maneuvering in low-visibility conditions, a backup camera is an invaluable tool.
While many new vehicles come equipped with integrated backup camera systems, a significant portion of older models, or even some newer budget-friendly options, lack this crucial safety feature. The good news is that retrofitting a backup camera system is a surprisingly accessible DIY project for those with a moderate level of technical aptitude. This guide will walk you through the process, covering everything from choosing the right kit to the step-by-step installation, ensuring you can confidently enhance your vehicle’s safety and parking prowess. We’ll also touch upon the technological aspects of these systems, how they integrate with your vehicle’s electronics, and even consider the potential financial implications of upgrading your car with such technology.
Understanding Your Backup Camera System: Components and Technology
Before diving into the installation process, it’s crucial to understand the fundamental components of a typical backup camera system and the technology that powers it. Most aftermarket kits are designed for straightforward integration, but knowing what you’re working with will make the installation smoother and help you troubleshoot any potential issues.
The Core Components
A standard backup camera system consists of three primary elements:
-
The Camera: This is the eye of the system, mounted externally, usually above the license plate or integrated into the trunk handle or bumper. Modern cameras are typically weatherproof, durable, and designed to withstand the elements. They capture the video feed and transmit it to the display. The quality of the camera dictates the clarity and field of view. Look for cameras with high resolution (often measured in pixels or TV lines) for a sharp image, and consider their low-light performance, especially if you frequently reverse in dimly lit areas.
-
The Display Monitor: This is where you’ll see the live feed from the camera. Aftermarket kits offer various display options:
- Stand-alone Monitor: These are small, dedicated screens that can be mounted on your dashboard or windshield. They offer a dedicated view and are often the simplest to install.
- Rearview Mirror Monitor: This is a popular choice as it seamlessly integrates into your existing rearview mirror. The camera feed is displayed on a screen embedded within the mirror, which appears as a normal mirror when the camera is not active. This option maintains a clean interior aesthetic.
- Navigation System Integration: If your vehicle already has a factory or aftermarket navigation system with a compatible screen, you might be able to integrate the backup camera directly into it. This is often the most seamless but can be the most complex installation, sometimes requiring specialized adapters or professional help.
-
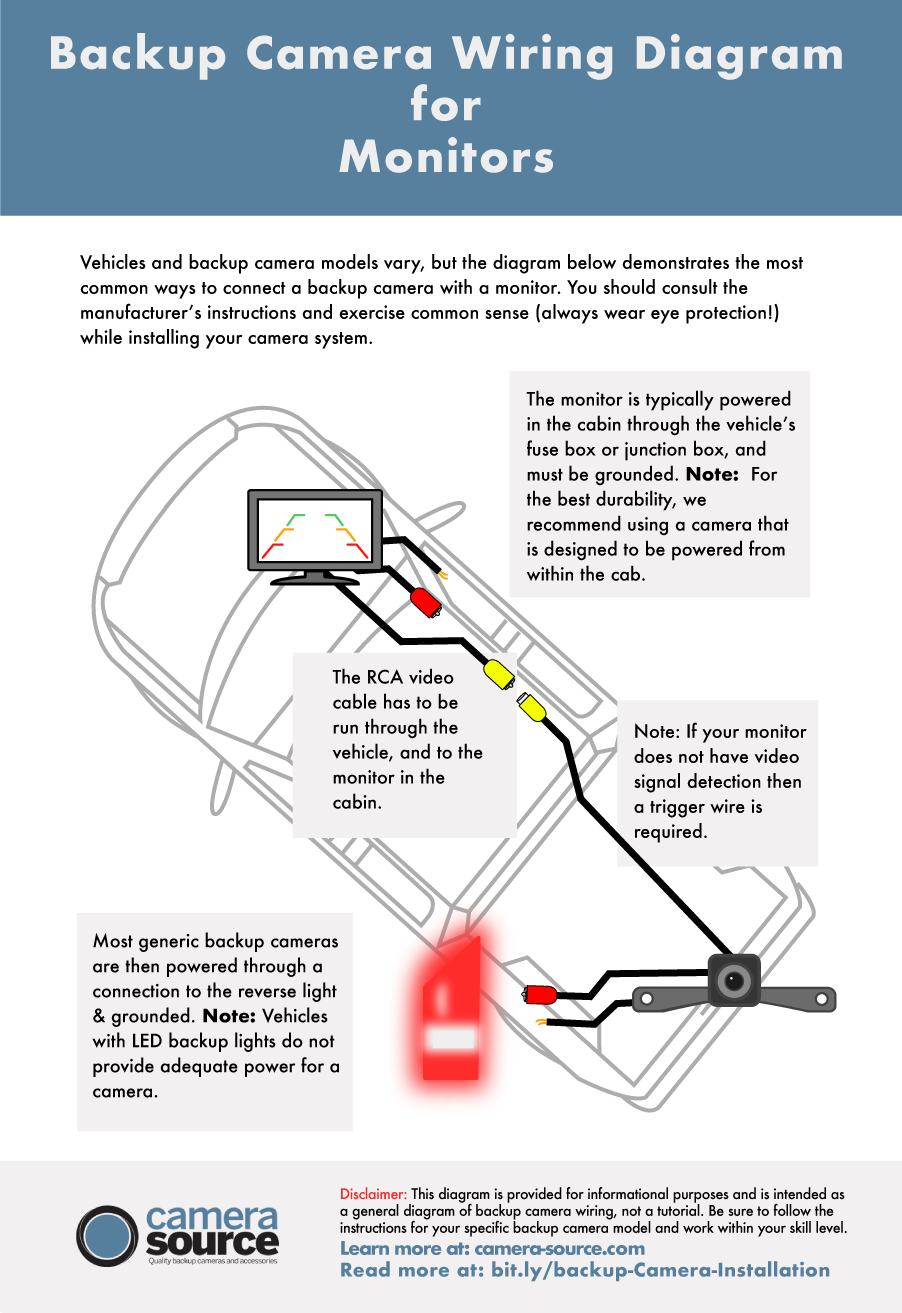
The Wiring Harness and Power Cables: This is the nervous system of the backup camera. It carries power to the camera and display, and transmits the video signal. Most kits come with pre-made harnesses, but you’ll need to route them through your vehicle’s interior and exterior. Understanding the wiring diagram provided with your kit is paramount for a successful installation.
Technological Integration and Considerations
The technology behind backup cameras is relatively straightforward, but understanding a few key aspects can be beneficial:
-
Video Signal Transmission: Most aftermarket cameras use RCA connectors for video transmission, a standard for composite video signals. The quality of the cable and its routing can influence signal integrity, though for the short distances within a vehicle, this is rarely a major issue.
-
Powering the System: The camera and the display both require power. The camera is typically powered by tapping into the vehicle’s reverse light circuit. This ensures the camera only activates when the vehicle is in reverse. The display monitor will also need a power source, which can often be tapped into the same reverse light circuit (for systems that only operate in reverse) or wired to a constant power source (like the fuse box) with an ignition-switched connection to turn on and off with the car.
-
Dynamic Parking Lines: Many modern backup cameras offer dynamic parking lines. These are lines displayed on the monitor that move with your steering wheel, indicating the projected path of your vehicle. This feature is highly dependent on the camera kit and its compatibility with your vehicle’s steering angle sensors, or it may be a simulated feature based on steering input. For most aftermarket installations, these lines are static and provide a general guide.
-
Field of View (FOV): The FOV of a backup camera determines how wide an area it can capture. A wider FOV (e.g., 170 degrees) provides a more comprehensive view of your surroundings, while a narrower FOV might offer a more magnified, detailed image of a smaller area. For general reversing, a wider FOV is usually preferred.
-
Night Vision: Many cameras incorporate infrared (IR) LEDs to provide improved visibility in low-light conditions. These LEDs are usually invisible to the naked eye but illuminate the area directly behind the vehicle, making the image clearer even in darkness.
Step-by-Step Installation Guide: A DIY Approach
Installing a backup camera can seem daunting, but by breaking it down into manageable steps, it becomes a rewarding DIY project. Always consult your specific kit’s manual for detailed instructions, as variations exist between manufacturers. Safety first: disconnect your vehicle’s battery before beginning any electrical work.
Preparation and Planning
Before you even pick up a tool, a thorough preparation phase is essential:
-
Gather Your Tools: You’ll likely need a set of screwdrivers (Phillips and flathead), trim removal tools (plastic pry tools are best to avoid scratching your car’s interior), wire strippers, wire crimpers, electrical tape, a drill (potentially with a small bit for wire routing), zip ties for cable management, and a multimeter to test for power and continuity.
-
Read Your Kit’s Manual: Every kit is different. Familiarize yourself with the specific components, wiring diagrams, and recommended installation points for your chosen system.
-
Plan Your Wiring Routes: Identify the best paths to run the video cable from the camera’s location to the display monitor. For the camera, this usually involves routing the wire from the rear of the vehicle, through the trunk lid or tailgate, and then into the passenger cabin. For the display, you’ll need to route its power and video cables from the back of the car to the dashboard or rearview mirror. Consider using existing grommets or channels in the vehicle’s body to minimize drilling.
-
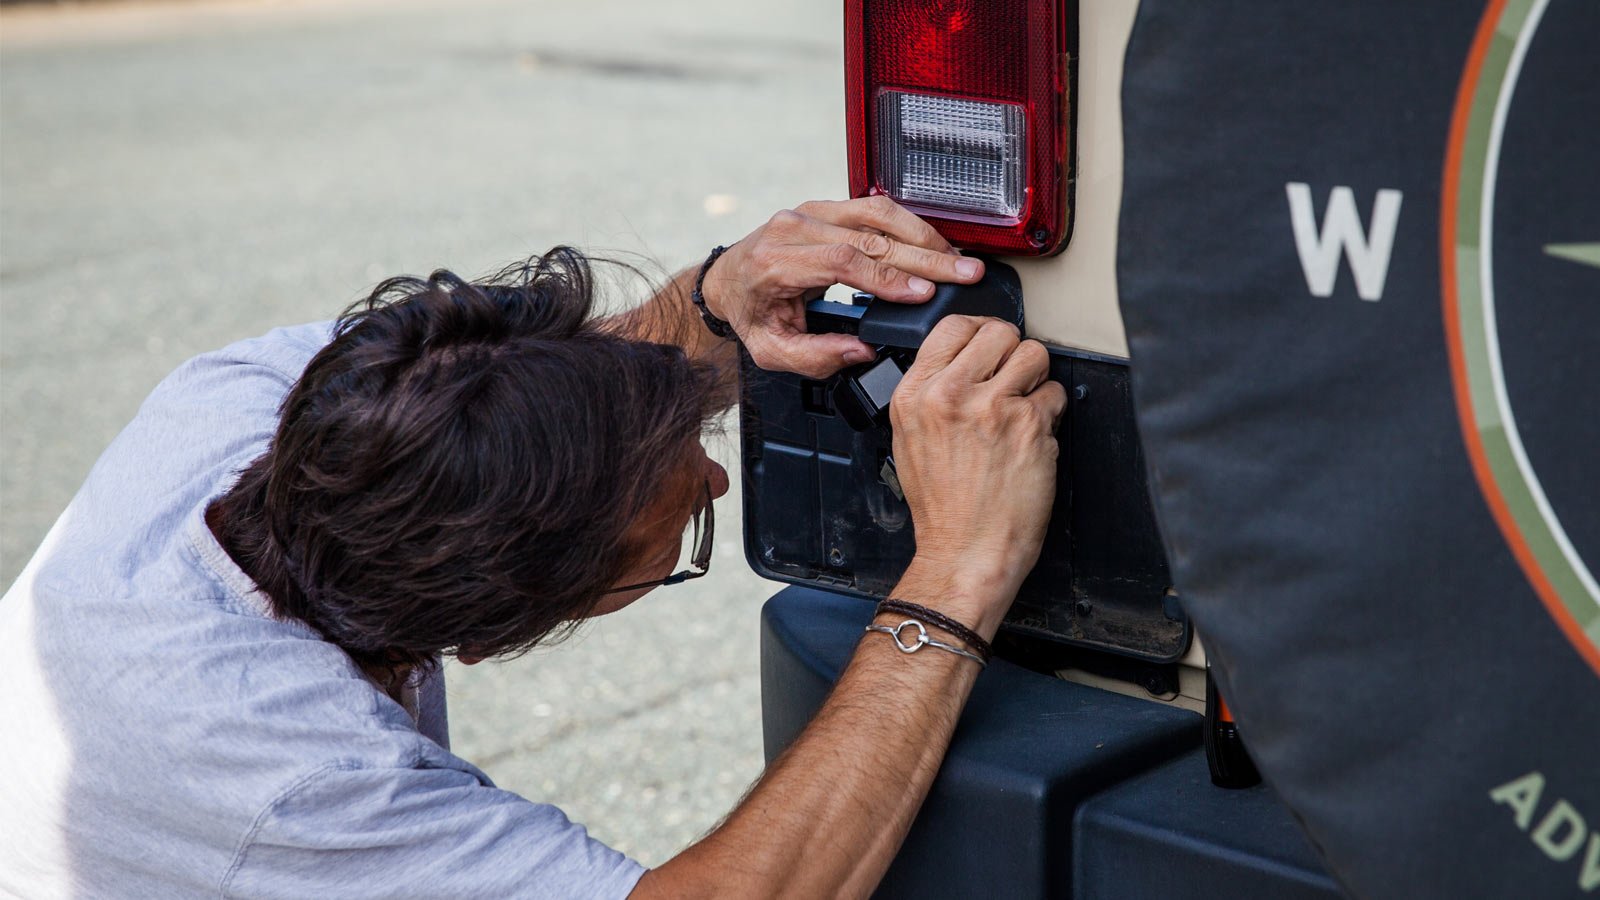
Choose Camera Mounting Location: Decide where you want to mount the camera. Common locations include above the license plate, within the trunk lid handle, or even integrated into a rear bumper if available. Ensure the chosen location offers an unobstructed view and is suitable for drilling if necessary.
Installing the Camera

This is arguably the most physically demanding part of the installation, requiring you to work with your vehicle’s exterior and potentially drill holes.
-
Mount the Camera:
- License Plate Mount: Many kits come with a bracket that attaches to your license plate screws. This is often the easiest and least invasive option.
- Drilling: If your chosen location requires drilling, measure carefully and mark your spot. Use a drill bit appropriate for the camera’s mounting hardware and the material of your vehicle. Drill slowly and steadily. Protect the drilled area with primer and paint to prevent rust.
- Weatherproofing: Ensure any drilled holes are properly sealed with grommets and silicone sealant to prevent water ingress.
-
Run the Video Cable:
- Through the Trunk/Tailgate: Carefully feed the video cable from the camera into the trunk or tailgate. Many vehicles have rubber grommets in the trunk lid or tailgate that can be used to pass wires through. If not, you might need to drill a small hole, again ensuring it’s properly sealed.
- Into the Cabin: Route the cable from the trunk into the passenger cabin. This often involves passing it through the trunk seal and then underneath the rear bumper or along the chassis, eventually finding a path into the vehicle’s interior. Some vehicles have access panels or channels that can be utilized.
Wiring and Connecting the System
This section involves working with your vehicle’s electrical system. Accuracy is key to avoid electrical damage.
-
Connect the Display Monitor:
- Power Source: The display monitor needs power. The most common method for aftermarket backup cameras is to tap into the reverse light circuit. Locate the wiring for your reverse light. You’ll typically need to connect the positive wire of the camera system to the positive wire of the reverse light. This ensures the camera and display activate only when the car is in reverse. Alternatively, you can wire it to a constant 12V source that is switched by the ignition, so the display is powered whenever the car is on.
- Ground Connection: Connect the ground wire from the camera system to a clean, unpainted metal surface on your vehicle’s chassis.
- Video Input: Connect the RCA video cable from the camera to the video input port on your display monitor.
-
Connect the Camera Power:
- Reverse Light Trigger: As mentioned, the camera is typically powered by the reverse light circuit. You’ll connect the camera’s positive power wire to the positive terminal of the reverse light. Use a wire tap or splice connector for a secure connection.
- Ground Connection: Connect the camera’s ground wire to the vehicle’s chassis.
-
Route and Secure Wiring:
- Interior Routing: Once the wires are inside the cabin, use trim removal tools to carefully pry away plastic panels (door sill plates, rear quarter panels, etc.) to create space for running the wires.
- Cable Management: Use zip ties to neatly secure all wiring along existing harnesses and structural components. This prevents wires from dangling, getting pinched, or making noise. Ensure no wires are obstructing moving parts like seat rails or the parking brake.
Testing and Finalization
Before reassembling everything, a thorough test is crucial.
-
Initial Power Test: Before reconnecting the battery, double-check all your connections. Once you’re confident, reconnect the vehicle’s battery.
-
Test the Camera:
- Turn the ignition to the “ON” position (without starting the engine).
- Shift the vehicle into reverse.
- The display monitor should power on, and you should see a video feed from the backup camera.
- Check the image quality, focus, and any parking lines (if applicable).
-
Troubleshooting: If the camera doesn’t work, re-check your wiring connections against the diagram. Ensure the reverse light is functioning correctly. Use a multimeter to test for voltage at the camera and display connections. Common issues include loose connections, incorrect polarity, or a faulty component.
-
Reassemble: Once you’re satisfied with the camera’s performance, carefully reassemble all the interior panels you removed. Ensure all clips are properly engaged.
Benefits and Considerations: More Than Just Parking
Installing a backup camera offers a multitude of advantages that extend beyond simply making parking easier. These systems contribute significantly to overall vehicle safety, can potentially prevent costly repairs, and add a modern touch to older vehicles.
Enhanced Safety and Accident Prevention
The most significant benefit of a backup camera is its ability to dramatically reduce the risk of accidents.
- Eliminating Blind Spots: The camera effectively eliminates the blind spot directly behind your vehicle, which is a common area for collisions with pedestrians, children, pets, cyclists, or other parked vehicles.
- Improved Maneuverability: Navigating tight spaces, such as crowded parking lots or narrow driveways, becomes far less stressful. The camera provides a clear visual guide, allowing for more precise movements and reducing the likelihood of minor bumps and scrapes.
- Low-Visibility Assistance: In adverse weather conditions like rain, snow, or fog, or in dimly lit environments like nighttime parking garages, the backup camera can significantly improve visibility and aid in safe reversing.
Cost Savings and Value Addition
While there’s an initial investment in the backup camera kit and potentially tools, the long-term benefits can translate into significant cost savings.
- Preventing Damage: Avoiding even minor collisions can save you hundreds or thousands of dollars in repair costs, not to mention the hassle of dealing with insurance claims and body shops. This is particularly relevant for larger vehicles like SUVs and trucks, where the cost of repairing bumper or tailgate damage can be substantial.
- Increased Resale Value: While not a primary selling point for every buyer, modern safety features like backup cameras are increasingly expected and can contribute to a higher resale value for your vehicle. It demonstrates that you’ve invested in maintaining and upgrading your car with practical technology.
- DIY Cost Effectiveness: By installing the system yourself, you save on the labor costs that a professional installer would charge, making the upgrade more affordable.
Considerations for the Tech-Savvy and Brand-Conscious Owner
For individuals who appreciate the intersection of technology and personal expression, a backup camera can be seen as a smart upgrade.
- Technological Integration: For those interested in technology trends, understanding how these systems integrate with a vehicle’s electrical system and display interfaces is part of the appeal. It’s a practical application of automotive electronics that enhances user experience.
- Personal Branding: For some, maintaining their vehicle with modern features is part of their personal branding and image. It signals an appreciation for functionality and a desire to keep their assets up-to-date.
- Brand Choice: When selecting a backup camera kit, you might consider the reputation of the brands involved. Just as with other gadgets, established brands often offer better reliability, customer support, and more advanced features. Researching reviews and comparing different brands can help you make an informed decision that aligns with your expectations for quality and performance.
In conclusion, installing a backup camera is a worthwhile endeavor for any vehicle owner looking to enhance safety, prevent accidents, and gain peace of mind. With careful planning and execution, this DIY project can significantly improve your driving experience and protect your investment.
aViewFromTheCave is a participant in the Amazon Services LLC Associates Program, an affiliate advertising program designed to provide a means for sites to earn advertising fees by advertising and linking to Amazon.com. Amazon, the Amazon logo, AmazonSupply, and the AmazonSupply logo are trademarks of Amazon.com, Inc. or its affiliates. As an Amazon Associate we earn affiliate commissions from qualifying purchases.