In the ever-evolving world of PC gaming, modding has become an integral part of the experience for countless players. Mods can breathe new life into aging titles, introduce innovative gameplay mechanics, enhance graphics, or simply cater to specific player preferences. At the heart of many modern PC game modding efforts lies BepInEx, a powerful and versatile plugin framework. While often installed automatically by mod managers, there are situations where a manual installation is necessary or preferred. This guide will walk you through the process of manually installing BepInEx, empowering you to take greater control over your game modding journey.
BepInEx, short for “Banana BE PinEX,” is an open-source plugin loader designed for .NET applications. It’s particularly popular within the gaming community for its ability to load and manage plugins for games developed using the Unity engine, which powers a vast number of contemporary titles. Its modular design and extensive API allow modders to create sophisticated modifications that can alter game behavior at a fundamental level. Understanding how to install it manually not only provides a fallback option but also deepens your appreciation for the underlying mechanics of game modding.
Understanding BepInEx and Its Role in Modding
Before diving into the installation process, it’s crucial to understand what BepInEx is and why it’s so important for modding. BepInEx acts as an intermediary between the game’s executable and the various plugins you wish to use. When the game launches, BepInEx intercepts its startup process and loads any compatible plugins placed within its designated folders. These plugins, often written in C# and compiled into DLL files, can then interact with the game’s code, making changes and adding new functionalities.
The power of BepInEx lies in its ability to abstract away much of the complexity involved in directly modifying game files. Instead of directly patching executables or replacing core game assets, modders create plugins that BepInEx manages. This approach offers several advantages:
- Modularity: Plugins are self-contained units, making it easier to install, uninstall, and manage individual mods without affecting others.
- Compatibility: BepInEx aims to provide a consistent environment for plugins across different Unity games, reducing the need for game-specific patching.
- Ease of Development: By providing a well-documented API, BepInEx simplifies the process for aspiring modders to create their own plugins.
- Performance: BepInEx is generally designed to be lightweight and efficient, minimizing any performance impact on the game.
While mod managers like Vortex or manual game file downloads often handle BepInEx installation seamlessly, knowing the manual steps is invaluable. It allows you to troubleshoot installation issues, ensure you have the correct version for a specific game or mod, and gain a better understanding of how your mods are integrated. This knowledge can be particularly useful for older games, niche titles, or when dealing with cutting-edge mods that might not yet be fully supported by all mod managers.
Preparing for Manual BepInEx Installation
Successful manual installation of BepInEx hinges on careful preparation. This stage is critical for ensuring a smooth process and avoiding potential conflicts or errors.
Downloading the Correct BepInEx Version
The first and most vital step is to download the appropriate version of BepInEx for your game. BepInEx is not a one-size-fits-all solution. Different games, and even different versions of the same game, might require specific builds of BepInEx to function correctly.
- Identify Your Game’s Platform: Most BepInEx installations are for PC games running on Windows. However, it’s good practice to confirm.
- Consult Game Modding Communities: The most reliable way to determine the correct BepInEx version is to check the modding communities for the specific game you intend to mod. Websites like Nexus Mods, Reddit communities dedicated to your game, or specific modding forums are excellent resources. Often, mod pages will explicitly state which BepInEx version is required.
- Visit the Official BepInEx Releases Page: You can find the latest releases of BepInEx on its official GitHub repository. Navigate to the “Releases” section. You’ll typically see different downloads available, often categorized by
.NET Frameworkversion or an “x64” or “x86” designation. The game’s Unity version and its target architecture will dictate which BepInEx download you need. Again, community recommendations are paramount here. - Understanding .NET Framework Versions: BepInEx targets specific .NET Framework versions. Games built with older versions of Unity might require an older BepInEx version compatible with an older .NET Framework, while newer games will likely need a BepInEx version supporting a more recent .NET Framework. If the game’s modding community doesn’t specify, you might need to do some detective work, or more commonly, try the latest stable release first.
Crucial Note: Always download BepInEx from its official sources (usually GitHub) to avoid malware or compromised versions.
Locating Your Game’s Installation Directory
The next step is to pinpoint the exact folder where your game is installed. This is where BepInEx will be placed.
- Steam Users:
- Open your Steam Library.
- Right-click on the game you wish to mod.
- Select “Manage” and then “Browse local files.” This will open the game’s installation directory in your File Explorer.
- Epic Games Store Users:
- Open the Epic Games Launcher.
- Go to your Library.
- Click on the three dots next to the game you want to mod.
- Select “Manage.”
- Click on the folder icon next to “Installation directory.”
- GOG Galaxy Users:
- Open the GOG Galaxy client.
- Navigate to your game in the Library.
- Click the “Install” button (or the game icon), and then select “Manage installation” from the dropdown.
- Click “Browse” to reveal the installation folder.
- Other Launchers/Direct Downloads: For games installed through other launchers or downloaded directly, you’ll need to navigate to the folder where you initially installed them. If you’re unsure, a quick search online for “[Game Name] installation directory” might help.
Once you’ve located the game’s root directory, make a note of it. This folder is where you’ll be extracting BepInEx.
The Manual Installation Process: Step-by-Step
With the necessary files downloaded and the game’s directory identified, we can proceed with the actual installation of BepInEx. This process involves extracting the downloaded files into the correct locations within your game’s directory.

Extracting BepInEx Files
The BepInEx download will typically be in a compressed archive format, such as a .zip or .7z file. You’ll need a program like 7-Zip or WinRAR to extract its contents.
-
Open the BepInEx Archive: Locate the downloaded BepInEx archive file and open it with your preferred extraction tool.
-
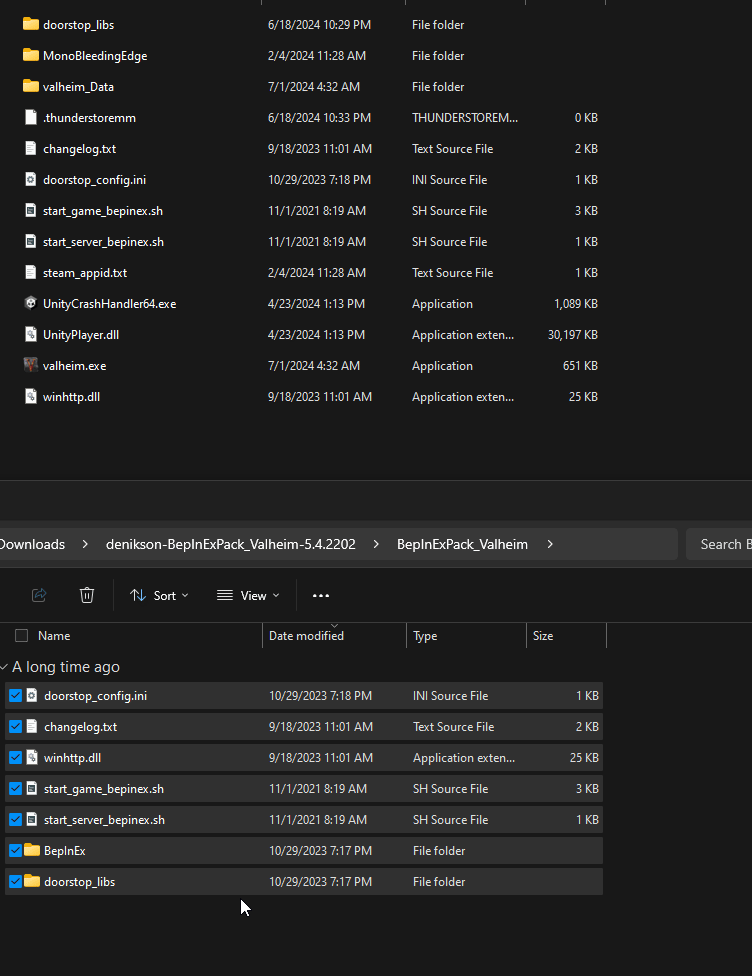
Access the Game’s Installation Directory: Open a separate File Explorer window and navigate to the game’s root installation directory that you identified earlier.
-
Extract Contents: You will see a structure within the BepInEx archive. Typically, there will be folders like
core,patchers,plugins, and configuration files. Crucially, you need to extract the contents of the BepInEx archive directly into the game’s root directory. Do not just drag the BepInEx folder itself into the game’s directory if it’s nested. You want thecore,patchers,pluginsfolders, and configuration files to be directly alongside your game’s executable (.exe) file and other main game folders.- Example: If your game’s directory is
C:GamesMyAwesomeGame, after extracting, you should see files and folders like:C:GamesMyAwesomeGameBepInEx(and inside this,core,patchers,plugins, etc.)C:GamesMyAwesomeGameMyAwesomeGame.exeC:GamesMyAwesomeGameUnityPlayer.dll(or similar game-specific files)
Some BepInEx releases might present a slightly different structure in the archive. Always refer to the README file included with the BepInEx download for specific instructions, as these can sometimes vary between versions. The general principle, however, is to ensure the BepInEx core components are placed at the root of your game’s installation.
- Example: If your game’s directory is
Verifying the Installation
After extracting, it’s essential to verify that BepInEx has been installed correctly.
- Launch the Game: Start the game as you normally would.
- Look for Confirmation: Upon launching, BepInEx will perform its initialization. You should see a console window appear briefly, displaying BepInEx startup messages and information about loaded plugins. This console window is a strong indicator that BepInEx is active. If you don’t see it, or if the game crashes immediately, there might be an issue with the installation.
- Check BepInEx Folders: Navigate back to your game’s installation directory. You should now see a
BepInExfolder created. Inside this folder, you’ll find subfolders like:core: Contains the essential BepInEx core files.patchers: Where BepInEx patches are loaded from.plugins: This is the most important folder for you. This is where you will place the.dllfiles for the mods you want to install.config: This folder will appear after the first launch and will contain configuration files for BepInEx itself and any installed plugins that offer configurable options.
If these folders are present and the console window appeared during launch, congratulations, BepInEx is successfully installed!
Installing Mods with Manual BepInEx
With BepInEx successfully installed, you’re now ready to start adding mods. The process of installing individual mods will vary depending on the mod itself, but the fundamental principle remains the same: placing the mod’s files into the correct BepInEx folders.
Placing Plugin .dll Files
Most BepInEx mods are distributed as .dll files. These are compiled C# code that BepInEx loads.
-
Download the Mod: Obtain the mod you wish to install from a reputable source, such as Nexus Mods, Mod DB, or the mod author’s official website.
-
Extract Mod Files: Mods often come in compressed archives (
.zip,.rar,.7z). Extract the contents of the mod archive. -
Locate the Plugin Files: Within the extracted mod files, look for
.dllfiles. These are your plugins. Sometimes, mods might also include other assets like configuration files, resource packs, or even entire subfolders that need to be placed in specific locations. Always read the installation instructions provided by the mod author. -
Copy to the
pluginsFolder: Navigate to your game’s installation directory, then into theBepInExfolder, and finally into thepluginssubfolder. Copy all the.dllfiles belonging to your mod into thisBepInExpluginsdirectory.- Example: If your mod has
MyAwesomeMod.dllandMyAwesomeMod.Configuration.dll, you would copy both intoC:GamesMyAwesomeGameBepInExplugins.
- Example: If your mod has
-
Handle Additional Files: If the mod includes other files or folders, the mod author’s instructions will guide you. For instance, some mods might require you to place specific configuration files in the
BepInExconfigfolder, or data files in the game’s root directory or other subfolders.
Configuration and Troubleshooting
Once your mods are in place, launching the game will allow BepInEx to load them.
- Configuration Files: After the first launch with mods installed, you’ll likely find new configuration files in the
BepInExconfigfolder. These files are usually in.cfgformat and allow you to tweak the settings of your installed mods. You can edit these files with a simple text editor like Notepad. - Troubleshooting Common Issues:
- Game Doesn’t Launch / Crashes Immediately:
- Incorrect BepInEx Version: Ensure you downloaded the BepInEx version compatible with your game.
- Corrupted Download: Redownload BepInEx and the problematic mod.
- Conflicting Mods: Try launching the game with only BepInEx installed, then add mods one by one to identify the culprit.
- Missing Dependencies: Some mods require other mods or specific libraries to function. Check the mod’s page for any dependencies.
- BepInEx Console Not Appearing:
- Installation Error: Re-extract BepInEx, making sure files are in the correct root directory.
- Game Version Mismatch: The game might have been updated, breaking compatibility with the current BepInEx version.
- Mod Not Working:
- Incorrect Placement: Double-check that the mod’s
.dllfiles are in theBepInExpluginsfolder and any other specified locations. - Configuration Issues: Review the mod’s configuration file in
BepInExconfig. - Mod Conflicts: As mentioned above, conflicts can prevent mods from working.
- Incorrect Placement: Double-check that the mod’s
- Game Doesn’t Launch / Crashes Immediately:
By following these steps, you can confidently manually install BepInEx and lay the groundwork for a deeply customized and enriched gaming experience. This process, while requiring a bit more attention to detail than automated installations, grants you a more profound understanding of how game modding frameworks operate and provides the flexibility to manage your mods with greater precision. Happy modding!
aViewFromTheCave is a participant in the Amazon Services LLC Associates Program, an affiliate advertising program designed to provide a means for sites to earn advertising fees by advertising and linking to Amazon.com. Amazon, the Amazon logo, AmazonSupply, and the AmazonSupply logo are trademarks of Amazon.com, Inc. or its affiliates. As an Amazon Associate we earn affiliate commissions from qualifying purchases.