
In the rapidly evolving landscape of technology, the ability to seamlessly integrate diverse operating systems and development environments has become a cornerstone of productivity and innovation. For Windows users, the introduction of the Windows Subsystem for Linux (WSL) marked a revolutionary step, effectively bridging the gap between the familiar Windows desktop and the robust, developer-centric world of Linux. This comprehensive guide will walk you through the process of installing WSL, empowering you to unlock a new realm of possibilities, from running powerful command-line tools to developing with Linux-native applications, all without leaving your Windows machine.
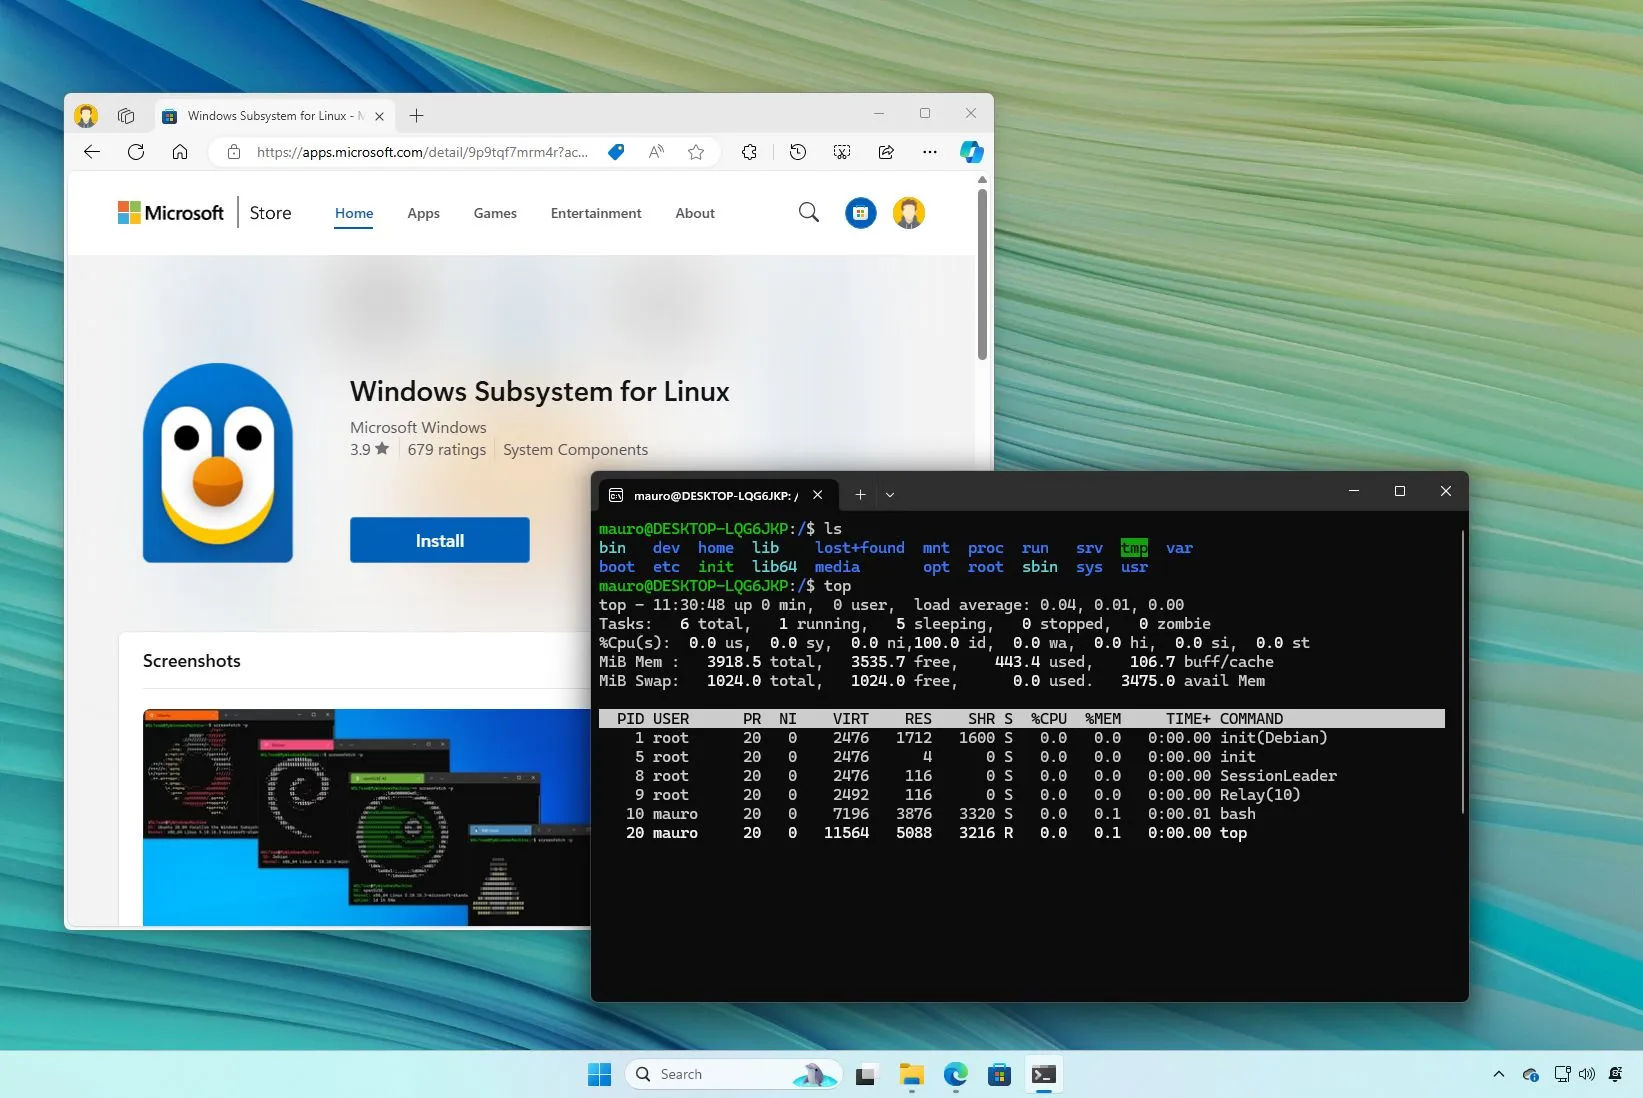
Whether you’re a seasoned developer, a curious student, or an IT professional looking to streamline your workflow, WSL offers an unparalleled environment that enhances efficiency, expands your toolkit, and keeps you at the forefront of modern software development. By the end of this article, you’ll have WSL up and running, ready to tackle any Linux-based task with ease.
Understanding WSL: Bridging Windows and Linux
Before diving into the installation process, it’s crucial to grasp what WSL is, why it exists, and how it has evolved to become an indispensable tool for millions. Its origins lie in Microsoft’s commitment to supporting developers and recognizing the critical role Linux plays in cloud computing, open-source development, and modern tech stacks.
What is WSL? A Developer’s Advantage
WSL, or Windows Subsystem for Linux, is a compatibility layer for running Linux binary executables (in ELF format) natively on Windows 10 and Windows 11. It allows developers to run a GNU/Linux environment, including most command-line tools, utilities, and applications, directly on Windows, without the overhead of a traditional virtual machine or dual-boot setup. This means you can use familiar Linux commands like grep, sed, awk, and access powerful tools such as Docker, Kubernetes, Git, and various programming language compilers and interpreters (Python, Node.js, Ruby, Go, Rust, etc.) as if you were on a native Linux machine.
Initially, WSL (now referred to as WSL 1) operated by translating Linux system calls into Windows system calls. While impressive, this approach had limitations regarding performance and full system call compatibility. This led to the development of WSL 2.
WSL 2 represents a significant architectural overhaul. Instead of a translation layer, WSL 2 uses a lightweight utility virtual machine (VM) that runs a real Linux kernel. This change dramatically improves file system performance, enhances system call compatibility, and allows for the full execution of Docker containers directly within WSL. The user experience remains largely the same – you still launch a Linux distribution from the Start menu – but under the hood, WSL 2 provides a much more robust and performant environment that is indistinguishable from running Linux in a traditional VM, yet far more integrated with Windows.
Why WSL Matters in Today’s Tech Landscape
In today’s fast-paced technology world, productivity is paramount. Developers often need to work across different platforms, utilizing a diverse set of tools. WSL addresses several key pain points:
- Seamless Integration: It eliminates the need for dual-booting or running heavy virtual machines, saving valuable system resources and setup time. You can copy and paste between Windows and Linux, access Windows files directly from your Linux distribution, and even launch Linux GUI applications (with recent WSL updates) right on your Windows desktop.
- Enhanced Productivity for Developers: Many modern web frameworks, cloud development tools, and open-source projects are designed with Linux in mind. WSL provides a native-like environment for these tools, reducing compatibility issues and streamlining development workflows. For instance, running a local Kubernetes cluster with MiniKube or developing server-side applications with Node.js or Python often feels more natural and performs better within WSL.
- Access to a Vast Ecosystem: Gain immediate access to the entire Linux package manager ecosystem (APT for Debian/Ubuntu, YUM/DNF for Fedora/RHEL, etc.), allowing you to install thousands of applications and libraries with simple commands. This is invaluable for everything from data science projects utilizing specific Python libraries to deploying web servers with Nginx or Apache.
- Cross-Platform Development: For teams that develop applications targeting Linux servers or Docker containers, WSL provides an excellent local development environment that closely mirrors production. This reduces “it works on my machine” issues and makes development and testing more reliable.
- AI/ML Development: Many AI and Machine Learning frameworks, such as TensorFlow and PyTorch, often have better documentation, support, and performance optimizations on Linux. WSL 2, with its native kernel and improved performance, allows Windows users to engage with these powerful tools more effectively, even leveraging GPU acceleration for training models within their Linux environment.
By installing WSL, you’re not just adding another piece of software; you’re fundamentally transforming your Windows machine into a versatile powerhouse capable of handling virtually any development task, maximizing your technological flexibility and output.
Preparing Your Windows Environment for WSL Installation
Before you can enjoy the benefits of WSL, there are a few prerequisites and preliminary steps to ensure your Windows system is ready. These steps are crucial for a smooth installation process and to ensure you can run the latest and most performant version of WSL, which is WSL 2.
System Requirements and Windows Version Check
To install WSL, your Windows operating system must meet certain criteria:
- For WSL 1: You need to be running Windows 10 version 1607 (Anniversary Update) or higher.
- For WSL 2: You need:
- x64 systems: Windows 10 version 1903 or higher, with Build 18362 or higher.
- ARM64 systems: Windows 10 version 2004 or higher, with Build 19041 or higher.
- Windows 11: All versions support WSL 2.
To check your Windows version and build number, press Windows key + R, type winver, and press Enter. If your version is older than required, it’s highly recommended to update Windows through Settings > Update & Security > Windows Update to ensure you can leverage the full power and features of WSL 2. Keeping your operating system up-to-date is a general best practice for security and performance.
Additionally, your system’s virtualization capabilities must be enabled in the BIOS/UEFI settings. This is usually called “Intel VT-x,” “AMD-V,” “Virtualization Technology,” or similar. Most modern computers have this enabled by default, but if you encounter issues, checking and enabling this setting might be necessary. You can often access these settings by pressing a key (like F2, F10, F12, or Del) during your computer’s boot-up sequence.
Enabling Essential Windows Features
Regardless of whether you use the streamlined wsl --install command (covered next) or opt for a manual setup, understanding the underlying Windows features is beneficial. For WSL to function, two primary Windows optional features must be enabled: “Windows Subsystem for Linux” and “Virtual Machine Platform.”
- Enable the Windows Subsystem for Linux: This is the core component that allows your Windows machine to run Linux environments.
- Enable Virtual Machine Platform: This feature is essential for WSL 2, as it hosts the lightweight virtual machine that runs the actual Linux kernel.
While the wsl --install command automates this, if you’re troubleshooting or performing a manual installation, you’ll need to enable these. You can do this via PowerShell (run as Administrator) or through the Windows Features GUI:
Using PowerShell (Administrator):
Open PowerShell as an administrator and run these commands:
dism.exe /online /enable-feature /featurename:Microsoft-Windows-Subsystem-Linux /all /norestart
dism.exe /online /enable-feature /featurename:VirtualMachinePlatform /all /norestart
After running these commands, you will need to restart your computer to apply the changes.
Using Windows Features GUI:
- Search for “Turn Windows features on or off” in the Windows search bar and open it.
- In the dialog box, scroll down and check the boxes for:
- Windows Subsystem for Linux
- Virtual Machine Platform
- Click “OK” and let Windows apply the changes.
- Restart your computer when prompted.
Once these features are enabled and your system has restarted, you’re ready to proceed with the actual WSL installation.
Step-by-Step WSL Installation Guide
Microsoft has significantly simplified the WSL installation process, especially for newer versions of Windows. We’ll cover the recommended streamlined method first, followed by manual steps for older systems or those who prefer more control.
Streamlined Installation with wsl --install (for newer Windows versions)
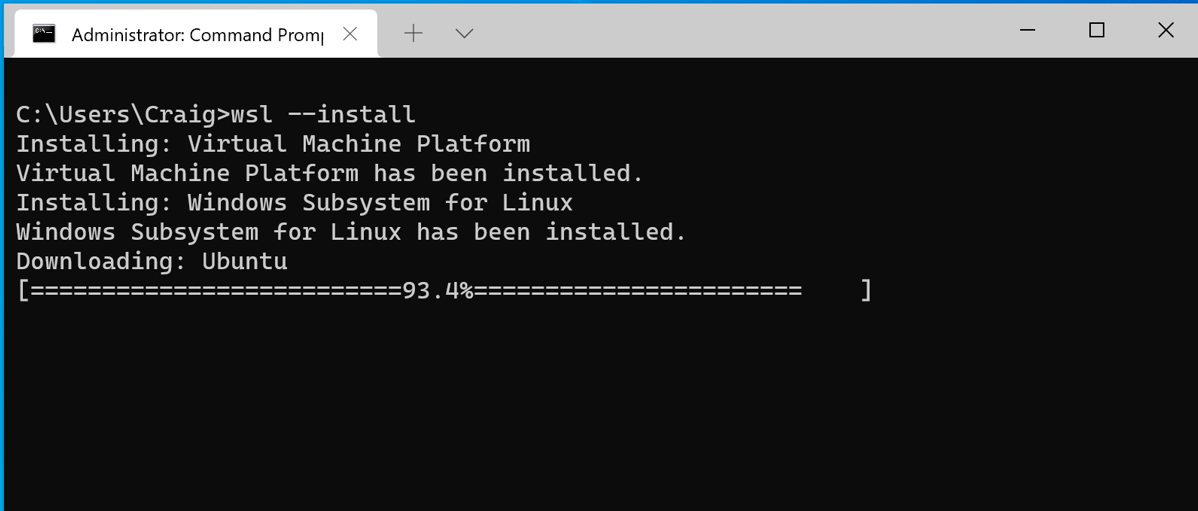
For users running Windows 10 version 2004 and higher (Build 19041+) or Windows 11, the installation is incredibly straightforward using a single command. This command handles enabling the necessary Windows features, installing the Linux kernel, setting WSL 2 as the default, and even installing a default Linux distribution (Ubuntu by default).
-
Open PowerShell or Command Prompt as Administrator:
Search for “PowerShell” or “CMD” in the Start menu, right-click on it, and select “Run as administrator.” -
Run the Installation Command:
Type the following command and press Enter:wsl --installThis command will:
- Enable the “Windows Subsystem for Linux” optional component.
- Enable the “Virtual Machine Platform” optional component.
- Download and install the latest WSL Linux kernel.
- Set WSL 2 as the default.
- Download and install the Ubuntu distribution.
-
Restart Your Computer:
Once the command completes, you’ll be prompted to restart your computer to finalize the installation. -
Complete Ubuntu Setup:
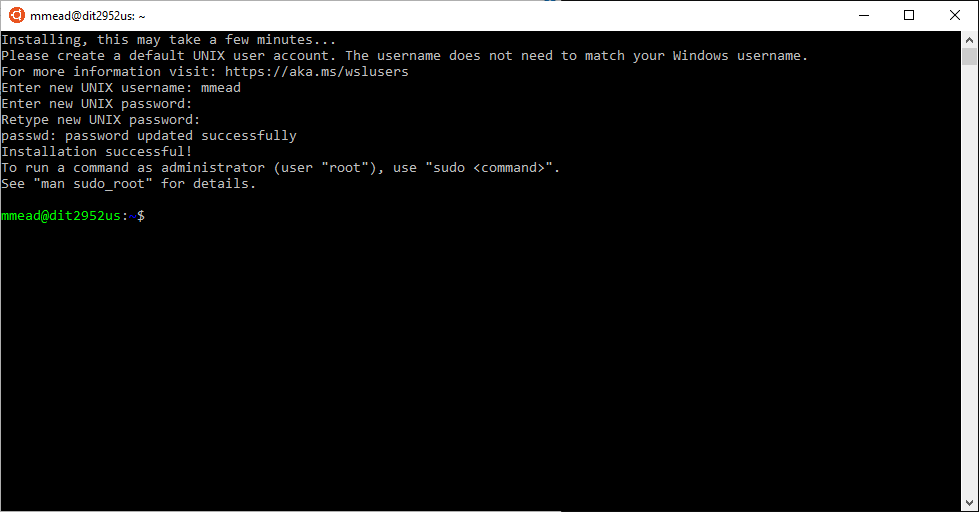
After restarting, Ubuntu will automatically launch and prompt you to create a username and password for your new Linux distribution. This username and password are specific to your Linux environment and are separate from your Windows credentials.Congratulations! WSL and Ubuntu are now installed and ready to use.
Manual Installation for Older Versions or Specific Needs
If your Windows version doesn’t support wsl --install or if you prefer to install a different Linux distribution first, you’ll need to follow these manual steps. (Note: Steps 1 and 2 are covered in the “Enabling Essential Windows Features” section above, but listed here for completeness of the manual process.)
Step 1: Enable WSL Feature
Open PowerShell as an administrator and run:
dism.exe /online /enable-feature /featurename:Microsoft-Windows-Subsystem-Linux /all /norestart
Step 2: Enable Virtual Machine Platform
Open PowerShell as an administrator and run:
dism.exe /online /enable-feature /featurename:VirtualMachinePlatform /all /norestart
Step 3: Restart Your Computer
After enabling both features, you must restart your machine for the changes to take effect.
Step 4: Download the Linux Kernel Update Package
For WSL 2 to work, you need the latest Linux kernel update package. Download it from the official Microsoft page:
https://wslstore.blob.core.windows.net/wsl2kernel/wslupdatex64.msi
Run the downloaded wsl_update_x64.msi installer. This is a straightforward installation wizard; just follow the prompts.
Step 5: Set WSL 2 as Your Default Version
Open PowerShell or Command Prompt (as a regular user is fine) and set WSL 2 as the default architecture for new installations:
wsl --set-default-version 2
You should see a message confirming the operation is complete. If you get an error about the “Virtual Machine Platform” feature, double-check that it’s enabled and your computer has been restarted.
Step 6: Install a Linux Distribution
Now you can install your preferred Linux distribution from the Microsoft Store.
- Open the Microsoft Store.
- Search for “Linux” or a specific distribution like “Ubuntu,” “Debian,” “Kali Linux,” “openSUSE,” etc.
- Select the distribution you want and click “Get” or “Install.”
- Once downloaded, click “Launch” or find it in your Start menu.
Step 7: Initial Setup of Your Linux Distribution
The first time you launch your new Linux distribution, a console window will open, and you’ll be prompted to create a new Unix username and password. Remember this, as you’ll use it to log in and for sudo commands within your Linux environment.
Migrating from WSL 1 to WSL 2 (if applicable)
If you previously had WSL 1 installed and want to upgrade your existing distributions to WSL 2, follow these steps:
-
List your installed WSL distributions:
Open PowerShell or Command Prompt and run:wsl -l -vThis will show you a list of your distributions and their current WSL version (1 or 2).
-
Set an existing distribution to WSL 2:
To convert a specific distribution (e.g., “Ubuntu-20.04”) to WSL 2, use the command:wsl --set-version Ubuntu-20.04 2Replace “Ubuntu-20.04” with the exact name of your distribution. This process might take a few minutes, depending on the size of your distribution.
-
Verify the migration:
Runwsl -l -vagain to confirm that your distribution is now running on WSL 2.
Getting Started with WSL: Your First Linux Experience
With WSL successfully installed, it’s time to dive into the Linux environment and begin leveraging its power. This section covers basic interactions and highlights how WSL integrates with your Windows workflow.
Basic Commands and Interacting with Your Linux Distro
When you launch your installed Linux distribution (e.g., Ubuntu) from the Start menu, you’ll be greeted by a terminal prompt. This is your gateway to the Linux command line.
-
Update and Upgrade Packages: It’s always a good idea to update your package lists and upgrade any installed software immediately after installation.
sudo apt update
sudo apt upgrade
(For Ubuntu/Debian-based systems. Other distros use
dnforpacman.) -
Navigating the File System:
ls: List directory contents.cd <directory>: Change directory.pwd: Print working directory.mkdir <name>: Create a new directory.
-
Installing Software: Use your distribution’s package manager. For Ubuntu/Debian:
sudo apt install <package-name>For example, to install
git:sudo apt install git -
Running Linux Tools: You can now run thousands of Linux command-line tools. Try
htop(you might need to install it first:sudo apt install htop) for a better process viewer, orcurl google.comto fetch a webpage.
Accessing Windows Files from Linux and Vice Versa
One of WSL’s most powerful features is its seamless file system integration.
-
Accessing Windows Files from Linux: Your Windows drives are mounted under
/mnt/. For example, your C: drive is accessible at/mnt/c/.cd /mnt/c/Users/<YourWindowsUsername>/DocumentsFrom here, you can interact with your Windows files using Linux tools.
-
Accessing Linux Files from Windows: Open File Explorer in Windows and type
\wsl$in the address bar. You’ll see your installed Linux distributions listed as network drives. You can browse their file systems just like any other folder.
Alternatively, for a more integrated experience, if you’re using Windows 11 or recent versions of Windows 10, your Linux distributions will appear directly in the navigation pane of File Explorer under “Linux.”Important Note on Performance: When working with files, performance is generally better when you store project files that are primarily used by Linux tools within the Linux file system (e.g., in your Linux home directory
~/projects). Accessing Windows files from Linux (via/mnt/c/) or vice-versa can be slower, especially for I/O-intensive operations, due to the cross-OS file system translation.
Essential Tools and Productivity Hacks with WSL
WSL significantly boosts productivity for developers and IT professionals. Here are some integrations and tips:
-
Visual Studio Code Integration: VS Code has excellent remote development extensions, including “Remote – WSL.” Install this extension in VS Code on Windows. When you open a project folder from your WSL distribution, VS Code will automatically detect it and run a “server” part of VS Code directly inside your Linux environment, giving you full access to Linux tools, compilers, and debuggers, while using the familiar VS Code GUI on Windows. Just type
code .from your WSL terminal in a project directory to open it in VS Code. -
Docker Desktop Integration: WSL 2 is the recommended backend for Docker Desktop on Windows. Installing Docker Desktop automatically configures it to run containers within your WSL 2 distributions, offering near-native Linux performance for Docker operations. This is a game-changer for containerized development.
-
Git and Version Control: Install Git within your WSL distribution (
sudo apt install git) and configure it. You can now manage your repositories with all the power of Linux Git, easily integrating withcode .for editing. -
Programming Languages and Frameworks: Set up your preferred development environments (Python, Node.js, Ruby, Java, Go, Rust) directly in WSL. This allows you to compile, run, and test your code using the same tools and environments that are common on Linux servers.
-
Running Linux GUI Applications (WSLg): For Windows 11 users and Windows 10 users with specific updates, WSLg (Windows Subsystem for Linux GUI) allows you to run Linux graphical applications directly on your Windows desktop. This means you can install a full-fledged Linux IDE like GIMP, Firefox, or even a full desktop environment, and launch them from the Windows Start menu, blurring the lines between the two operating systems even further.
Troubleshooting Common WSL Installation Issues
While the WSL installation process is generally robust, you might encounter some issues. Here’s how to address common problems and optimize your WSL experience.
Addressing Errors and Optimizing Performance
-
“The Virtual Machine Platform feature is not enabled.”
- Cause: This usually means the “Virtual Machine Platform” Windows feature wasn’t enabled or your system wasn’t restarted after enabling it.
- Solution: Re-run the PowerShell command
dism.exe /online /enable-feature /featurename:VirtualMachinePlatform /all /norestartand ensure you restart your computer. Also, check your BIOS/UEFI settings to ensure virtualization (Intel VT-x/AMD-V) is enabled.
-
“WSL 2 requires an update to its kernel component.”
- Cause: You haven’t installed the Linux kernel update package (
wsl_update_x64.msi). - Solution: Download and run the
wsl_update_x64.msiinstaller from the official Microsoft page (link provided in “Step 4: Download the Linux Kernel Update Package” section).
- Cause: You haven’t installed the Linux kernel update package (
-
“Error: 0x1bc / WSL 2 installation failed.”
- Cause: This can be due to various reasons, often related to older Windows builds or conflicting virtualization software.
- Solution: Ensure your Windows is fully updated. Try disabling Hyper-V if it’s installed (though WSL 2 uses Hyper-V technology, direct Hyper-V can sometimes conflict if misconfigured). Re-run the
wsl --installcommand or the manual steps from scratch, ensuring restarts are performed when prompted.
-
Slow File System Performance:
- Cause: Often occurs when working on Windows files from within WSL (e.g., editing files in
/mnt/c/) or vice-versa. - Solution: Store your project files primarily within the WSL file system (e.g., in your Linux home directory
~/). If you need to access them from Windows, use\wsl$or the Linux entry in File Explorer. For Git repositories, storing them within WSL can significantly speed up operations.
- Cause: Often occurs when working on Windows files from within WSL (e.g., editing files in
-
Network Connectivity Issues in WSL:
- Cause: Could be due to firewall settings or network configurations on your Windows host.
- Solution: Check your Windows firewall to ensure it’s not blocking outgoing connections from WSL. Sometimes, restarting your network adapters or even your entire PC can resolve transient issues. WSL 2 uses a NAT network, so ensure Windows is correctly sharing its internet connection.
-
Too much memory being used by WSL 2:
- Cause: WSL 2 VMs are designed to dynamically allocate memory, but sometimes they don’t release it quickly enough.
- Solution: You can create a
.wslconfigfile in your Windows user profile directory (C:Users<YourUsername>.wslconfig) to limit the memory, processors, and swap space WSL 2 distributions can use. - Example
.wslconfig:
ini

[wsl2]

memory=4GB  # Limits to 4GB RAM

processors=2 # Limits to 2 virtual processors

swap=2GB # Sets swap space
- After creating or modifying this file, open PowerShell and run
wsl --shutdownto apply the changes. Then restart your distributions.
-
Problems with specific Linux applications:
- Cause: Some highly specific Linux applications or very low-level system interactions might still have issues, especially if they rely on unique hardware interfaces not easily virtualized.
- Solution: Check the official WSL GitHub repository issues page or community forums for workarounds. For most common development tools, WSL 2 provides excellent compatibility.
By understanding these common issues and their solutions, you can ensure a smooth and productive experience with WSL. The active WSL community and Microsoft documentation are also invaluable resources for deeper troubleshooting.
Conclusion: Unleashing the Power of Linux on Windows
The Windows Subsystem for Linux is more than just an add-on; it’s a transformative feature that fundamentally redefines the capabilities of a Windows machine. By meticulously following this guide, you have successfully installed WSL, breaking down traditional barriers between operating systems and opening up a universe of possibilities for development, system administration, and technological exploration.
You’ve learned how WSL provides a native-like Linux environment without the complexities of dual-booting or cumbersome virtual machines, directly contributing to enhanced productivity and a broader technological toolkit. From setting up your core Linux distribution to integrating powerful tools like VS Code and Docker, your Windows system is now equipped to handle virtually any Linux-centric task with ease and efficiency.
The integration of WSL into the Windows ecosystem represents Microsoft’s commitment to the open-source community and the evolving needs of modern developers. It empowers you to harness the robustness and flexibility of Linux command-line tools, the vast package ecosystems, and cutting-edge development frameworks, all while enjoying the familiarity and desktop experience of Windows. As you delve deeper into your WSL environment, you’ll discover countless ways to streamline your workflows, experiment with new technologies, and push the boundaries of what’s possible on your desktop. Embrace this powerful synergy, and let your Windows machine truly become a globalized hub for all your technological endeavors.
aViewFromTheCave is a participant in the Amazon Services LLC Associates Program, an affiliate advertising program designed to provide a means for sites to earn advertising fees by advertising and linking to Amazon.com. Amazon, the Amazon logo, AmazonSupply, and the AmazonSupply logo are trademarks of Amazon.com, Inc. or its affiliates. As an Amazon Associate we earn affiliate commissions from qualifying purchases.