In the ever-evolving landscape of technology, the allure of open-source operating systems has grown significantly. Among them, Linux, and specifically the Ubuntu distribution, stands out as a powerful, versatile, and remarkably user-friendly choice. Whether you’re a seasoned tech enthusiast looking to expand your skillset, a budding programmer seeking a robust development environment, or simply someone curious about exploring an alternative to mainstream operating systems, Ubuntu offers a compelling solution. This guide will walk you through the entire process of installing Linux Ubuntu, demystifying what can sometimes seem like a daunting task for newcomers. We’ll cover everything from preparing your system to the final boot-up, ensuring you have a smooth and successful installation experience.
Understanding Ubuntu: Why Choose This Linux Distribution?
Before we dive into the installation process, it’s crucial to understand what makes Ubuntu such a popular and recommended Linux distribution. Ubuntu is built upon the Debian GNU/Linux foundation, making it stable and reliable. However, it distinguishes itself with a commitment to ease of use and a strong focus on user experience. This means that even if you’ve never encountered Linux before, Ubuntu is designed to be approachable.
Key Features and Benefits of Ubuntu:
- User-Friendly Interface: Ubuntu’s default desktop environment, GNOME, is modern, intuitive, and visually appealing. It offers a familiar experience for those coming from other operating systems, with a dock for frequently used applications and a clear system menu.
- Vast Software Repository: One of the most significant advantages of Linux, and Ubuntu in particular, is its access to an extensive software repository. This means you can easily install thousands of free and open-source applications for virtually any task – from office suites and multimedia players to development tools and creative software – directly from the Ubuntu Software Center.
- Strong Community Support: Ubuntu boasts one of the largest and most active online communities in the Linux world. If you encounter any issues or have questions, you can find solutions and assistance through forums, wikis, and dedicated support channels. This robust community is invaluable for both beginners and experienced users.
- Regular Updates and Long-Term Support (LTS): Ubuntu releases new versions regularly, but its Long-Term Support (LTS) versions are particularly important for users who prioritize stability and security. LTS releases are supported with updates and security patches for five years, making them ideal for production environments and users who prefer a stable system over the latest features.
- Flexibility and Customization: While user-friendly out-of-the-box, Ubuntu also offers unparalleled flexibility. You can customize almost every aspect of your system, from the desktop environment to the core functionalities, allowing you to tailor it precisely to your needs and preferences.
- Security: Linux is renowned for its robust security. Ubuntu inherits these strengths, with a strong emphasis on security features and prompt updates to address any vulnerabilities.
Preparing for Installation: The Essential Steps
A successful operating system installation hinges on meticulous preparation. Before you begin the Ubuntu installation, there are several crucial steps to take to ensure a smooth process and protect your existing data.
1. Back Up Your Important Data
This is arguably the most critical step. While the Ubuntu installation process is generally safe, accidents can happen, or you might inadvertently choose to format the wrong drive. Therefore, always back up all your important files, documents, photos, and any other data you cannot afford to lose to an external hard drive, cloud storage, or a separate partition. This precautionary measure will give you peace of mind throughout the installation.
2. Determine Your Installation Method: Dual Boot or Full Install
You have two primary options when installing Ubuntu alongside your existing operating system (like Windows):
- Dual Boot: This allows you to install Ubuntu on a separate partition on your hard drive. When you start your computer, you’ll be presented with a boot menu where you can choose to boot into either your existing OS or Ubuntu. This is an excellent option if you want to keep both operating systems accessible.
- Full Install (Replace Existing OS): This method involves wiping your hard drive entirely and installing only Ubuntu. This is ideal if you are dedicating the machine solely to Linux or if you have no need for your previous operating system.
For this guide, we will primarily focus on the dual-boot scenario, as it’s the most common and offers a gentle introduction to Ubuntu. If you opt for a full install, the process is similar, but you’ll select the option to erase the entire disk during the partitioning stage.
3. Download the Ubuntu ISO Image
An ISO image is a file containing the complete operating system installation package. You’ll need to download the correct version of Ubuntu.
- Visit the Official Ubuntu Website: Go to ubuntu.com/download.
- Choose the LTS Version: For most users, the Long-Term Support (LTS) version is recommended due to its extended support period and stability. Look for the latest LTS release (e.g., Ubuntu 22.04 LTS “Jammy Jellyfish”).
- Download the Desktop Image: Select the “Desktop” version. The download size is typically a few gigabytes, so ensure you have a stable internet connection.
4. Create a Bootable USB Drive or DVD
Once you have the ISO image, you need to transfer it to a bootable medium. A USB flash drive (8GB or larger recommended) is the most common and convenient method.
- For Windows:
- Rufus: A popular and straightforward tool. Download Rufus from rufus.ie.
- Open Rufus, select your USB drive, click “SELECT” to choose your downloaded Ubuntu ISO file, and then click “START.” Ensure you select the correct writing mode if prompted (usually DD mode for ISOs).
- For macOS:
- Etcher: A user-friendly cross-platform tool. Download Etcher from etcher.balena.io.
- Open Etcher, select your downloaded ISO, select your USB drive, and click “Flash.”
- For Linux:
- You can use Etcher or the
ddcommand in the terminal (use with extreme caution as an incorrect command can wipe your data).
- You can use Etcher or the
If you prefer a DVD, you can burn the ISO image using your operating system’s built-in disc-burning utility or third-party software.
5. Prepare Disk Space for Ubuntu
If you’re dual-booting, you need to allocate unallocated space on your hard drive for Ubuntu.
- Windows:
- Press
Windows Key + Xand select “Disk Management.” - Right-click on your C: drive (or the drive where you want to create space) and select “Shrink Volume.”
- Enter the amount of space you want to free up (in MB) for Ubuntu. Ubuntu requires at least 25GB, but 50GB or more is recommended for a comfortable experience.
- Click “Shrink.” You will see a new “Unallocated” space appear. Do not format this space. Ubuntu’s installer will handle it.
- Press
- macOS:
- Open “Disk Utility” (Applications > Utilities > Disk Utility).
- Select your main drive from the sidebar.
- Click the “Partition” tab.
- Click the “+” button to add a new partition.
- Resize the new partition to create space for Ubuntu. You can format it later during the Ubuntu installation.
The Installation Process: Step-by-Step
With your preparation complete, it’s time to install Ubuntu. This is where you’ll interact with the Ubuntu installer.
1. Boot from the Installation Media
- Insert your bootable USB drive or DVD into your computer.
- Restart your computer.
- Enter your BIOS/UEFI settings: You’ll need to press a specific key during the initial boot-up to access these settings. Common keys include
F2,F10,F12,Del, orEsc. Consult your computer’s manual if unsure. - Change the Boot Order: In the BIOS/UEFI settings, find the “Boot” or “Boot Order” section and set your USB drive (or DVD drive) as the first boot device.
- Save and Exit: Save the changes and exit the BIOS/UEFI. Your computer will restart, and this time it should boot from your Ubuntu installation media.
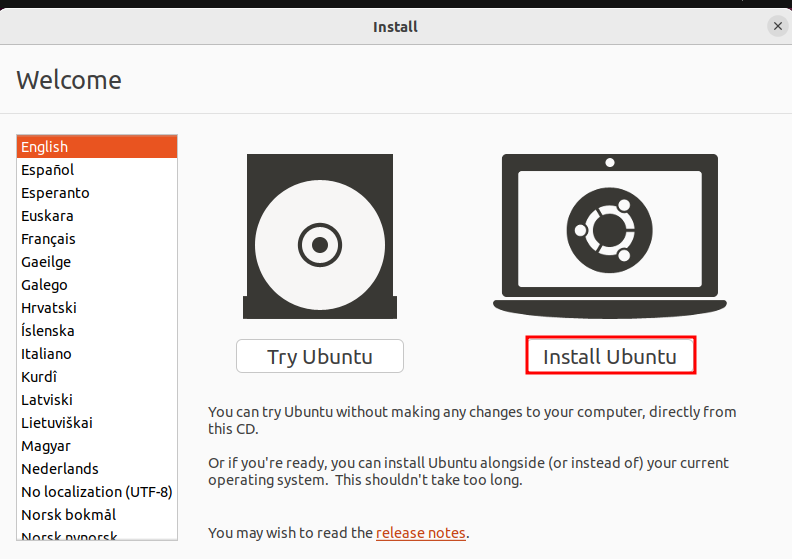
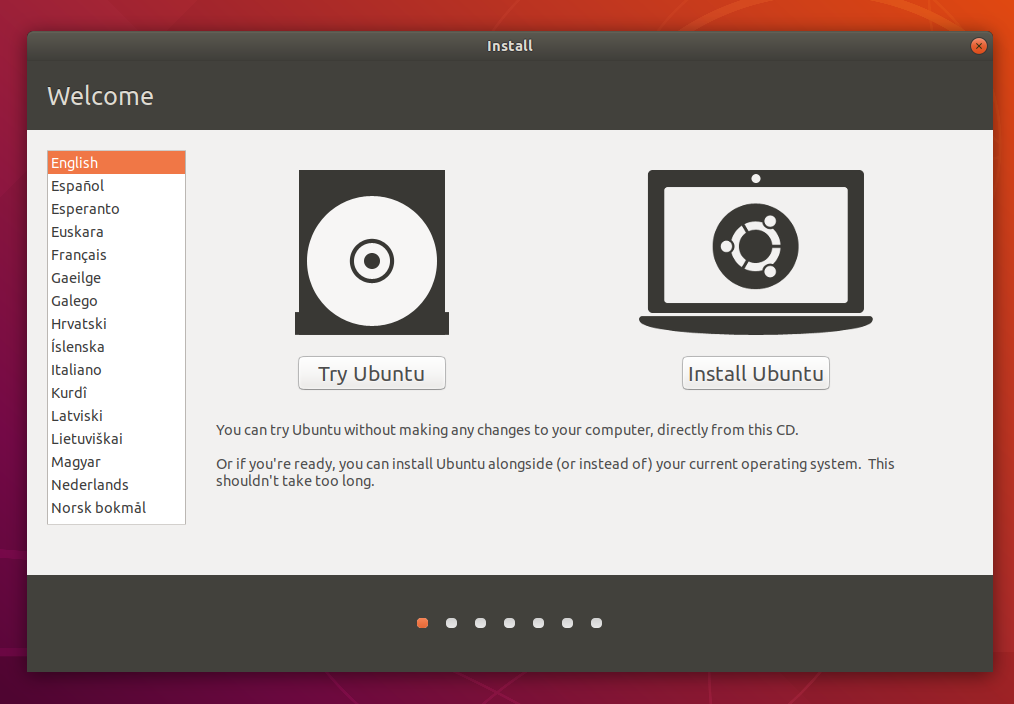
2. Welcome and Initial Setup
You’ll be greeted with the Ubuntu boot menu (GRUB). You’ll typically have two options:
- “Try Ubuntu without installing”: This will boot into a live session of Ubuntu, allowing you to explore the desktop environment and test your hardware without making any changes to your system. This is a great way to ensure everything works before committing to an installation.
- “Install Ubuntu”: This starts the installation process directly.
For this guide, select “Install Ubuntu.”
You’ll then be presented with a few initial choices:
- Keyboard Layout: Select your preferred keyboard layout. You can test it in the provided text box.
- Updates and Other Software:
- “Normal installation” vs. “Minimal installation”: Normal installation includes a web browser, utilities, office software, games, and media players. Minimal installation includes only a web browser and basic utilities. For most users, “Normal installation” is recommended.
- “Download updates while installing Ubuntu”: This is highly recommended as it ensures you have the latest security patches and software updates from the beginning.
- “Install third-party software for graphics and Wi-Fi hardware and additional media formats”: This option is crucial for ensuring optimal hardware compatibility, especially for Wi-Fi and graphics cards, and for playing common media formats. Check this box.

Click “Continue.”
3. Installation Type: The Crucial Decision
This is the most critical step where you decide how Ubuntu will be installed on your hard drive.
- “Install Ubuntu alongside [Your Existing OS]” (Dual Boot): If you shrink your drive in Windows and have unallocated space, this option will usually be detected. The installer will automatically propose to use that unallocated space for Ubuntu. This is the simplest option for dual-booting.
- “Erase disk and install Ubuntu” (Full Install): As mentioned earlier, this will format your entire hard drive and install only Ubuntu. Use this with extreme caution, as it will delete all existing data.
- “Something else” (Manual Partitioning): This option gives you complete control over partitioning your hard drive. This is for advanced users who want to create specific partitions (e.g., separate partitions for
/home,/var, etc.).
For dual-booting, select “Install Ubuntu alongside [Your Existing OS].” The installer will then present a slider or graphical representation of your disk, showing how much space will be allocated to Ubuntu and your existing OS. Adjust the slider if needed, but ensure you leave enough space for your existing OS.
If you choose “Something else,” you’ll need to manually create partitions:
- Root Partition (
/): This is where the Ubuntu system files will reside. Format it asext4and assign a mount point of/. A size of at least 20GB is recommended, but 30-50GB is better. - Swap Area: This acts as virtual RAM. The recommended size is often equal to your RAM, or slightly more.
- Home Partition (
/home): This is where your personal files and user settings are stored. Formatting this separately allows you to reinstall Ubuntu without losing your personal data. Format it asext4and assign a mount point of/home. Allocate the remaining space here.
After selecting your installation type, click “Install Now.” You will likely see a warning about the changes that will be made to your disk; confirm by clicking “Continue.”
4. Location, User Account, and Final Touches
- Where are you?: Select your time zone. This is important for system time synchronization.
- Who are you?:
- Your name: Enter your full name.
- Your computer’s name: This is the network name of your computer.
- Pick a username: This will be your login name.
- Choose a password: Create a strong password and confirm it. Remember this password; you’ll need it to log in and perform administrative tasks.
- Log in automatically or Require my password to log in: It’s generally recommended to require a password for security.
Click “Continue.”
The installation will now proceed. This can take anywhere from 15 minutes to over an hour, depending on your computer’s speed and whether you chose to download updates. You’ll see a slideshow of Ubuntu’s features during this time.
5. Restart and First Boot
Once the installation is complete, you’ll see a message prompting you to restart your computer. Click “Restart Now.”
Important: When prompted, remove the installation media (USB drive or DVD) before the computer fully restarts.
Upon rebooting, you should see a boot menu (GRUB) that lists your operating systems. Select “Ubuntu” to boot into your newly installed system.
Congratulations! You have successfully installed Linux Ubuntu.
Post-Installation Essentials and Getting Started
Your Ubuntu installation is complete, but there are a few important steps to take to optimize your new system and begin exploring its capabilities.
1. Update Your System
Even if you downloaded updates during installation, it’s good practice to run a full system update immediately after your first boot.
- Open the Terminal: You can find it by searching for “Terminal” in the applications menu or by pressing
Ctrl + Alt + T. - Run the following commands:
bash

sudo apt update

sudo apt upgrade
You will be prompted to enter your password. Type it in (you won’t see any characters appear as you type) and press Enter.sudo apt updatefetches information about available updates, andsudo apt upgradeinstalls them.
2. Explore the Ubuntu Software Center
This is your gateway to thousands of applications.
- Open the “Ubuntu Software” application from your applications menu.
- Browse categories, search for specific software (e.g., VLC for media, GIMP for image editing, VS Code for development), or click on featured applications.
- Click “Install” for any application you wish to add to your system.
3. Familiarize Yourself with the GNOME Desktop Environment
Take some time to explore the GNOME interface:
- The Dash (Activities Overview): Click the “Activities” button in the top-left corner (or press the
Superkey, often the Windows key on your keyboard) to access your open windows, applications, and the search bar. - The Dock: The bar on the left side of the screen contains your favorite applications and running programs. You can customize this by right-clicking on an application icon and selecting “Add to Favorites.”
- System Settings: Access system settings from the top-right corner of the screen (click on the power/volume/network icons) to configure your display, network, sound, power, and more.
4. Explore the Terminal
While Ubuntu is user-friendly, the terminal is a powerful tool for advanced users and for performing tasks that might not have a graphical interface.
- Basic commands:
ls: List files and directories.cd [directory]: Change directory.pwd: Print working directory.mkdir [directory_name]: Create a new directory.rm [file_name]: Remove a file.sudo apt install [package_name]: Install a package from the command line.
5. Consider Your Next Steps
Depending on your interests, you might want to:
- Install development tools: If you’re a programmer, install IDEs like VS Code, Python, Node.js, etc.
- Customize your desktop: Explore different themes, icons, and extensions to personalize your Ubuntu experience.
- Learn about Linux commands: The command line is a fundamental part of Linux. There are many resources online to help you learn.
- Explore other Linux distributions: Once you’re comfortable with Ubuntu, you might be curious to try other popular distributions like Fedora, Linux Mint, or Debian.
Installing Ubuntu is an exciting step into the world of open-source computing. It’s a system that offers power, flexibility, and a vibrant community, empowering you to take control of your digital environment. With this comprehensive guide, you’re well-equipped to embark on your Ubuntu journey.
aViewFromTheCave is a participant in the Amazon Services LLC Associates Program, an affiliate advertising program designed to provide a means for sites to earn advertising fees by advertising and linking to Amazon.com. Amazon, the Amazon logo, AmazonSupply, and the AmazonSupply logo are trademarks of Amazon.com, Inc. or its affiliates. As an Amazon Associate we earn affiliate commissions from qualifying purchases.