
In the modern computing landscape, the web browser serves as the primary gateway to both productivity and entertainment. For the vast majority of macOS users, Google Chrome is the preferred tool for navigating the digital world, thanks to its speed, vast extension library, and seamless integration with the Google ecosystem. However, even the most robust software can succumb to performance degradation over time. Cache bloat, corrupted preference files, and conflicting extensions can lead to sluggishness, frequent crashes, or “Aw, Snap!” errors.
When standard troubleshooting—such as clearing history or disabling extensions—fails to resolve these issues, a “clean install” becomes the most effective solution. Unlike a simple reinstallation, a clean install involves purging every trace of the application from the macOS system architecture before starting fresh. This technical guide provides a deep dive into how to execute a clean install of Chrome on Mac, ensuring your browsing environment is restored to peak performance.
1. Understanding the Necessity of a Clean Install
A common misconception among Mac users is that dragging an application from the “Applications” folder to the Trash constitutes a full uninstallation. On macOS, applications are often distributed as “bundles,” but their operational data—user profiles, cached images, local storage, and preference files—are scattered across the system’s hidden Library directories.
The Problem with Residual Files
When you perform a standard uninstall, these residual files remain on your hard drive. If the root cause of your Chrome issues lies within a corrupted user profile or a buggy preference file (a .plist file), simply reinstalling the app binary will not fix the problem. The new installation will simply reconnect to the old, corrupted data. A clean install bypasses this by ensuring the software starts with a completely blank slate.
Identifying When to Start Over
You should consider a clean install if you experience:
- Persistent browser hijacking or stubborn adware that persists after running security scans.
- Significant memory leaks that cannot be attributed to a specific tab or extension.
- The inability to update Chrome due to permission errors within the internal file structure.
- Consistent synchronization errors with your Google Account that manual signing in/out doesn’t fix.
2. Preparing for the Clean Install: Data Preservation
Before we dismantle the current installation, it is vital to secure your data. Because a clean install deletes your local user profile, any data not synced to the cloud will be permanently lost.
Leveraging Google Sync
The most efficient way to prepare is through Google’s native synchronization. Navigate to Settings > You and Google > Sync and Google Services. Ensure that Bookmarks, Passwords, History, and Settings are toggled to “on.” Once you sign back into the fresh installation, this data will populate automatically.
Manual Backup of Local Data
If you do not use Google Sync for privacy reasons or if your sync is broken, you must manually export your data.
- Bookmarks: Go to the Bookmark Manager (
Cmd + Option + B), click the three dots in the top right, and select “Export Bookmarks” to save an HTML file. - Passwords: If you use Chrome as your primary password manager, go to Settings > Autofill > Password Manager and export your passwords to a CSV file. Note: Keep this file secure, as it contains plain-text credentials.
3. The Technical Deep Dive: Removing Chrome Remnants
To perform a true clean install, we must venture into the macOS Library. This is the “Tech” core of the process, where we remove the configuration files that standard uninstalls ignore.
Step 1: Terminating All Processes
You cannot delete a software’s core files while it is running. Close Chrome and then open the Activity Monitor (found in /Applications/Utilities/). Search for “Google” or “Chrome.” If any “Google Chrome Helper” or “Google Software Update” processes are running, highlight them and click the “X” button to “Force Quit.”
Step 2: Deleting the Application Binary
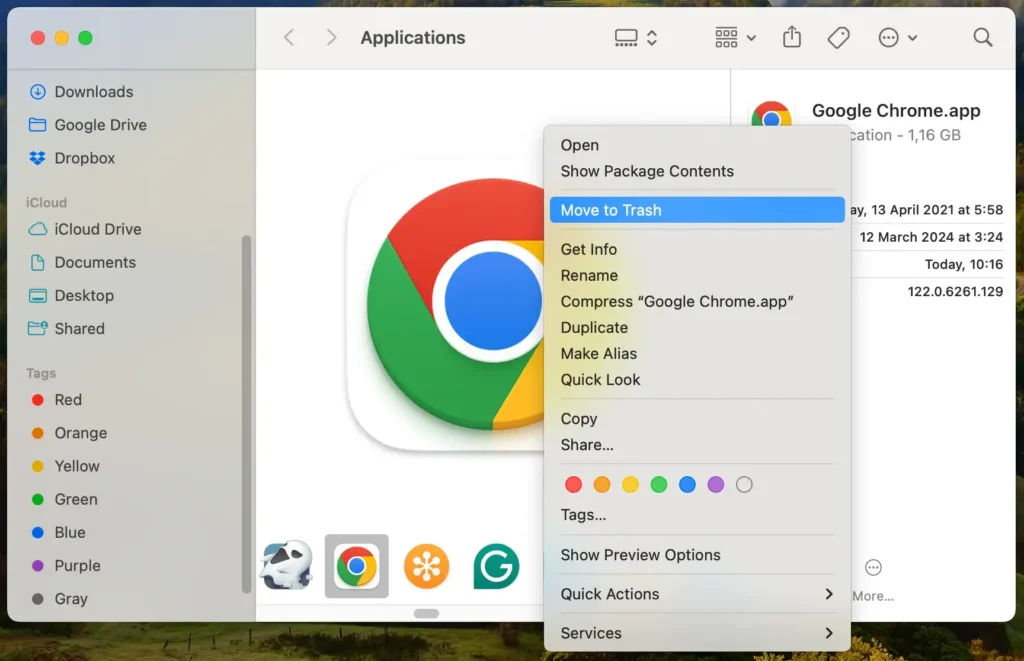
Open your Applications folder and drag Google Chrome to the Trash. While this is the most visible step, it is only about 10% of the total cleanup process.
Step 3: Purging the Library Folders
This is the critical phase. Open Finder, click “Go” in the top menu bar, and select “Go to Folder…” (or press Cmd + Shift + G). You will need to navigate to and delete the contents of the following paths:
~/Library/Application Support/Google/Chrome: This folder contains your entire user profile. Deleting this is what truly “cleans” the installation. Select all folders inside and move them to the Trash.~/Library/Caches/Google/Chrome: This is where temporary web data is stored. Over time, this can grow to several gigabytes. Clear it out.~/Library/Preferences/com.google.Chrome.plist: This file stores your specific macOS-level browser preferences. If this file is corrupted, Chrome may fail to launch.
Note: Ensure you are looking in the user Library (indicated by the ~ symbol) and not just the system-wide Library, though checking /Library/Google/ for any system-wide update tools is also recommended for a total purge.
4. Reinstalling Chrome and Restoring Stability
With the system scrubbed of all previous Google Chrome data, you are now ready to reintroduce the software to a clean environment.
Securing the Official DMG
Always download Google Chrome directly from the official Google website (google.com/chrome). Avoid third-party “software hubs” or “update aggregators,” as these often package the installer with bundled software or outdated versions that may have security vulnerabilities.
The Installation Process
- Open the downloaded
.dmgfile. - Drag the Chrome icon into the Applications folder shortcut provided in the window.
- Eject the virtual disk image from your desktop.
- Launch Chrome. You will be greeted with the “Set up Chrome” welcome screen, confirming that the clean install was successful and the browser does not recognize any previous settings.
Initial Configuration and Gatekeeper
macOS may prompt you with a security warning stating that Chrome is an “application downloaded from the internet.” Click “Open.” This is a standard macOS Gatekeeper protocol. Once open, sign in to your Google Account to initiate the resyncing of your bookmarks and passwords.
5. Post-Install Optimization: Maintaining a Healthy Browser
A clean install provides a “new computer” feel to your browsing experience. To prevent the need for another clean install in the near future, consider these optimization strategies.
Extension Auditing
One of the primary causes of Chrome bloat is the over-accumulation of extensions. Every extension you install runs as a separate process in the background. After your clean install, do not simply reinstall every extension you previously had. Audit them: if you haven’t used an extension in the last 30 days, leave it uninstalled.
Utilizing Chrome’s Built-in Performance Tools
Google has recently introduced “Performance” settings that help manage how Chrome interacts with macOS hardware.
- Memory Saver: Found in Settings > Performance, this feature reclaims memory from tabs you aren’t using. This is particularly useful for Mac users with 8GB or 16GB of RAM.
- Energy Saver: This limits background activity and frame rates for videos when your MacBook is unplugged, extending battery life while maintaining browser speed.
Regular Maintenance
While a full clean install is an intensive process, you can maintain your fresh state by occasionally visiting chrome://settings/clearBrowserData and clearing “Cached images and files.” Unlike a clean install, this doesn’t touch your settings or profiles but keeps the “junk” from accumulating to a point where it interferes with the browser’s database.

Conclusion
A clean install of Google Chrome on macOS is more than just a troubleshooting step; it is a vital maintenance ritual for power users and tech enthusiasts. By understanding the underlying file structure of macOS and the way Chrome stores user data, you can move beyond the limitations of simple “reinstalls” and ensure your digital workspace remains fast, secure, and reliable. With a fresh installation and a mindful approach to extensions and sync settings, you effectively reset the clock on your browser’s performance, allowing you to focus on the content of the web rather than the tools used to access it.
aViewFromTheCave is a participant in the Amazon Services LLC Associates Program, an affiliate advertising program designed to provide a means for sites to earn advertising fees by advertising and linking to Amazon.com. Amazon, the Amazon logo, AmazonSupply, and the AmazonSupply logo are trademarks of Amazon.com, Inc. or its affiliates. As an Amazon Associate we earn affiliate commissions from qualifying purchases.