In the vast and ever-evolving landscape of technology, Java stands as a towering pillar, a robust and versatile programming language that powers everything from enterprise-level applications and complex backend systems to mobile apps (via Android) and sophisticated web services. Its “write once, run anywhere” philosophy has made it indispensable for developers and essential for countless everyday users whose favorite applications and tools rely on the Java Runtime Environment (JRE). Whether you’re an aspiring developer eager to dive into coding, a system administrator setting up a new server, or simply a user needing to run a specific piece of software, understanding how to install Java is a fundamental skill.

This comprehensive guide will demystify the Java installation process, walking you through the critical distinctions between different Java components, helping you choose the right distribution for your needs, and providing detailed, step-by-step instructions for installation across Windows, macOS, and Linux. We’ll also cover verification, troubleshooting, and best practices to ensure your Java environment is set up securely and efficiently, making your tech journey smoother and more productive.
Understanding Java: JRE vs. JDK and Why It Matters
Before embarking on the installation journey, it’s crucial to grasp the two primary components of Java that you might encounter: the Java Runtime Environment (JRE) and the Java Development Kit (JDK). While their names might sound similar, their purposes are distinct and cater to different user needs. Choosing the correct one is the first step towards a successful installation.
Java Runtime Environment (JRE): For Running Java Applications
The Java Runtime Environment (JRE) is precisely what its name implies: an environment for running Java applications. If you’re a typical end-user who simply needs to execute software written in Java – whether it’s a desktop application, a game, or a browser-based applet (though less common now) – the JRE is what you need. It includes the Java Virtual Machine (JVM), which interprets and executes Java bytecode, along with the core class libraries and supporting files.
Think of the JRE as the engine that allows a car (your Java application) to run. Without it, the car is just a collection of parts. The JRE provides the necessary resources for Java programs to operate on your computer, but it does not contain the tools needed to create or compile Java programs. For most users, particularly those who aren’t involved in programming, the JRE is sufficient.
Java Development Kit (JDK): For Developing Java Applications
The Java Development Kit (JDK), on the other hand, is designed for Java developers. It’s a superset of the JRE, meaning it includes everything in the JRE, plus development tools like the Java compiler (javac), debugger (jdb), archiver (jar), and other utilities essential for writing, compiling, and debugging Java applications.
If your goal is to write Java code, build your own applications, or contribute to existing Java projects, the JDK is absolutely necessary. It provides the complete ecosystem required for the entire software development lifecycle in Java. For instance, if you’re working with an Integrated Development Environment (IDE) like IntelliJ IDEA, Eclipse, or NetBeans, these tools will require a JDK to compile and run your code.
In essence, if you only want to run Java programs, get the JRE. If you want to write and run Java programs, get the JDK. Since the JDK includes the JRE, installing the JDK typically satisfies both requirements.
Why Choose Java? The Power Behind the Platforms
Java’s enduring popularity stems from several key strengths, making it a powerful choice in the tech world. Its platform independence (“write once, run anywhere”) allows applications to run on any device with a compatible JVM, regardless of the underlying operating system. This makes it incredibly versatile for enterprise systems, mobile development (Android), web applications, and large-scale data processing.
Furthermore, Java is known for its robustness, security features, and extensive ecosystem of libraries and frameworks, which significantly boosts developer productivity. Its strong community support and continuous evolution ensure it remains a relevant and powerful language, driving innovation in areas like big data, artificial intelligence, and cloud computing. Installing Java is often the first step to harnessing this immense power, whether as a user or a developer.
Navigating the Java Ecosystem: Choosing Your Distribution
Once you’ve decided between the JRE and JDK, the next crucial step is to choose a Java distribution. The Java landscape has become quite diverse over the years, with various providers offering different versions and support models. Understanding these options is key to making an informed decision that aligns with your project requirements, licensing considerations, and support preferences.
Oracle JDK: Commercial Support and Licensing Considerations
Historically, Oracle JDK was the primary and often default choice for Java installations. Oracle, the steward of Java, offers its own JDK builds. While Oracle JDK provides robust performance and official support, its licensing model shifted starting with Java 11. Modern versions of Oracle JDK are free for development and testing purposes, but require a commercial license for production use. This change prompted many organizations and developers to explore alternative distributions.
For those requiring direct commercial support from Oracle, or who are bound by specific enterprise agreements, Oracle JDK remains a viable option. However, it’s vital to be aware of the licensing implications to avoid compliance issues, especially in production environments.
OpenJDK and Its Derivatives: The Open-Source Advantage
OpenJDK is the open-source reference implementation of the Java Standard Edition (Java SE). It’s the foundation upon which most other Java distributions are built, including Oracle JDK itself. The open-source nature of OpenJDK means it’s freely available for anyone to use, modify, and distribute without licensing costs.
Several reputable vendors provide their own builds of OpenJDK, often bundling additional features, performance optimizations, or long-term support (LTS) options. These “derivatives” are fully compliant with the Java SE specification and are increasingly becoming the preferred choice for many developers and enterprises due to their flexibility and cost-effectiveness. Some of the most popular OpenJDK distributions include:
- Adoptium (formerly AdoptOpenJDK): A leading provider of high-quality OpenJDK binaries, backed by the Eclipse Foundation. Adoptium offers builds from OpenJDK source code and provides robust community support.
- Amazon Corretto: Amazon’s no-cost, multiplatform, production-ready distribution of OpenJDK. Corretto comes with long-term support and is used internally by Amazon for many of its production services.
- Azul Zulu: Another popular OpenJDK build that offers both free community editions and commercial support options. Azul is known for its focus on performance and enterprise-grade features.
- Microsoft Build of OpenJDK: Microsoft’s free distribution of OpenJDK, optimized for Azure and Windows, but available for all platforms.
When choosing an OpenJDK distribution, consider factors like the provider’s reputation, the availability of long-term support for your chosen Java version, and any specific optimizations or features that might benefit your use case. For most users, an OpenJDK distribution from a reputable source like Adoptium or Amazon Corretto is an excellent, free, and fully functional choice.
Identifying Your System Requirements and Version Compatibility
Before downloading, confirm your operating system (Windows, macOS, Linux) and its architecture (32-bit or 64-bit). Most modern systems are 64-bit. Then, choose the appropriate Java version (e.g., Java 8, 11, 17, 21 – with 11, 17, and 21 being current Long-Term Support, or LTS, releases). LTS versions are generally recommended for stability and longer support periods. Check if your applications or development frameworks have specific Java version requirements.
Step-by-Step Installation Guides for Major Operating Systems
With your choice of JDK/JRE and distribution in hand, it’s time to proceed with the installation. The process varies slightly depending on your operating system.
Installing Java on Windows
Windows is a common platform for Java development and execution. The installation process typically involves downloading an executable installer.
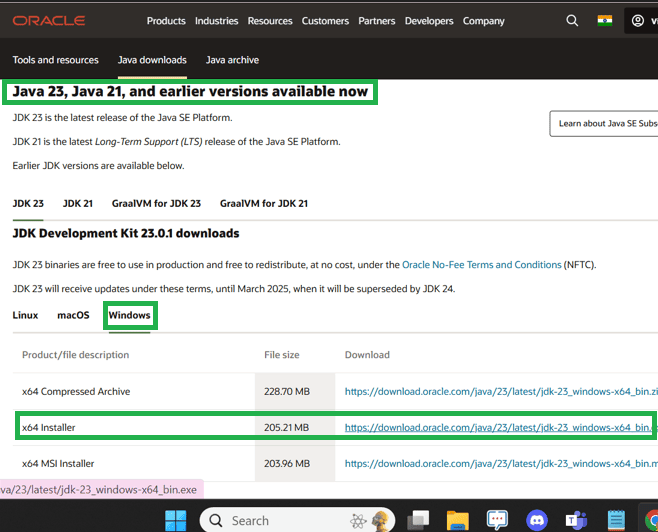
Downloading the Installer
- Visit the Provider’s Website: Go to the official website of your chosen Java distribution (e.g., Adoptium, Amazon Corretto, Oracle).
- Select Your Version: Navigate to the download section and select the appropriate Java version (e.g., JDK 17 LTS) for Windows (x64 for 64-bit systems, which is most common).
- Choose the Installer: Look for an
.msi(Microsoft Installer) or.exefile. The.msiis generally preferred as it integrates better with Windows’ package management.
Executing the Installation Wizard
- Run as Administrator: Locate the downloaded installer file and double-click it. If prompted, click “Yes” to allow the application to make changes to your device.
- Follow the Wizard: The installation wizard will guide you through the process.
- Click “Next” to begin.
- Accept the license agreement if prompted.
- You can typically accept the default installation path (e.g.,
C:Program FilesJavajdk-<version>). If you change it, remember the location. - Ensure that “Set JAVA_HOME environment variable” (if offered by the installer) or “Add to PATH” is selected. If not, you’ll need to do this manually later.
- Click “Next” or “Install” to complete the process.
- Finish: Once the installation is complete, click “Close” or “Finish.”
Setting Environment Variables (JAVA_HOME and PATH)
Even if the installer attempts to set these, it’s good practice to verify or set them manually, especially JAVA_HOME. These variables help your system locate the Java installation.
- Find Java Installation Path: Note the directory where Java was installed (e.g.,
C:Program FilesJavajdk-17.0.6). - Open System Properties: Search for “Environment Variables” in the Windows search bar and select “Edit the system environment variables.”
- System Variables: In the System Properties window, click “Environment Variables…”
- Set JAVA_HOME:
- Under “System variables,” click “New…”.
- For “Variable name,” enter
JAVA_HOME. - For “Variable value,” enter the path to your Java installation directory (e.g.,
C:Program FilesJavajdk-17.0.6). Click “OK.”
- Edit PATH Variable:
- Under “System variables,” find and select the “Path” variable. Click “Edit…”.
- Click “New” and add two entries:
%JAVA_HOME%binand%JAVA_HOME%jrebin(the JRE bin might not be strictly necessary if using JDK, but good practice). - Ensure these entries are added. If you have older Java versions, ensure your new entries are higher in the list to prioritize the new installation.
- Click “OK” on all open windows to save changes.
Installing Java on macOS
macOS users have a few options for installing Java, including graphical installers and command-line tools like Homebrew.
Downloading and Running the DMG Installer
- Visit the Provider’s Website: Go to your chosen Java distribution’s website.
- Select Your Version: Download the macOS (x64 for Intel, ARM64 for Apple Silicon like M1/M2)
.dmgfile for your desired Java version (e.g., JDK 17 LTS). - Install:
- Double-click the downloaded
.dmgfile to mount it. - Double-click the
.pkginstaller inside the mounted disk image. - Follow the on-screen instructions of the installation wizard, clicking “Continue” and “Install” as prompted. You may need to enter your macOS user password.
- Once finished, close the installer and move the
.dmgfile to the trash.
- Double-click the downloaded
Using Homebrew for Command-Line Installation
For developers and users comfortable with the terminal, Homebrew is an excellent package manager for macOS.
- Install Homebrew (if not already installed): Open Terminal and run:
bash

/bin/bash -c "$(curl -fsSL https://raw.githubusercontent.com/Homebrew/install/HEAD/install.sh)"
- Install Java: Once Homebrew is installed, you can install a specific JDK (e.g., OpenJDK 17 from Adoptium) using
brew install --cask.
bash

brew install --cask temurin@17 # For Adoptium's OpenJDK 17
Or, to install the latest stable version:
bash

brew install --cask temurin # For the latest Adoptium OpenJDK
Homebrew handles installation and often sets up symlinks for you.
Configuring Environment Variables on macOS
While macOS often configures Java path automatically, it’s good practice to set JAVA_HOME for specific development tools.
- Find Java Installation Path: The default path for macOS installations is usually
/Library/Java/JavaVirtualMachines/. For Homebrew, it’s typically/usr/local/Cellar/temurin/<version>.
You can find installed Java versions using:
bash

/usr/libexec/java_home -V
This will list available JDKs and their paths. Pick the desired path (e.g.,/Library/Java/JavaVirtualMachines/temurin-17.jdk/Contents/Home). - Edit Shell Profile: Open your shell’s profile file (
.zshrcfor Zsh,.bash_profileor.bashrcfor Bash) in a text editor:
bash

nano ~/.zshrc # or ~/.bash_profile
- Add JAVA_HOME: Add the following lines to the end of the file, replacing the path with your actual Java home path:
bash

export JAVA_HOME="/Library/Java/JavaVirtualMachines/temurin-17.jdk/Contents/Home"

export PATH="$JAVA_HOME/bin:$PATH"
- Save and Reload: Save the file (Ctrl+O, Enter, Ctrl+X in Nano) and then reload your shell profile:
bash

source ~/.zshrc # or source ~/.bash_profile
Installing Java on Linux
Linux distributions offer flexible ways to install Java, primarily through package managers or manual installation.
Installation via Package Managers (APT, YUM, DNF)
This is the recommended method for most Linux users as it handles dependencies and updates seamlessly.
For Debian/Ubuntu (APT):
- Update Package List:
bash

sudo apt update
- Install OpenJDK:
bash

sudo apt install openjdk-17-jdk # For OpenJDK 17

# Or to install the default JDK:

# sudo apt install default-jdk
- Manage Multiple Java Versions (if needed):
bash

sudo update-alternatives --config java

sudo update-alternatives --config javac
For RHEL/CentOS/Fedora (YUM/DNF):
- Update Packages:
bash

sudo dnf update # Or sudo yum update for older systems
- Install OpenJDK:
bash

sudo dnf install java-17-openjdk-devel # For OpenJDK 17 JDK

# Or for just the JRE:

# sudo dnf install java-17-openjdk
Manual Installation and Configuration
If your desired distribution isn’t available via package managers, or if you prefer a specific vendor build, manual installation is an option.
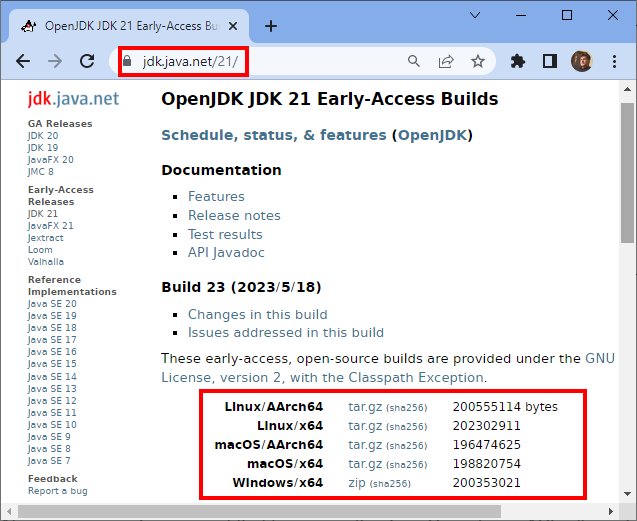
- Download the Tarball: From your chosen provider, download the Linux x64
.tar.gzarchive for your desired Java version. - Extract: Move the downloaded file to a suitable location (e.g.,
/opt/javaor/usr/local/java) and extract it:
bash

sudo mkdir -p /usr/local/java

sudo mv ~/Downloads/jdk-<version>.tar.gz /usr/local/java/

cd /usr/local/java

sudo tar -xzf jdk-<version>.tar.gz

sudo rm jdk-<version>.tar.gz
This will create a directory like/usr/local/java/jdk-<version>.
Setting Environment Variables on Linux
Similar to macOS, you’ll need to set JAVA_HOME and update your PATH variable.
- Edit Profile File: Open your shell’s profile file (e.g.,
~/.bashrc,~/.zshrc, or/etc/profilefor system-wide):
bash

nano ~/.bashrc
- Add Variables: Add the following lines to the end of the file, replacing the path with your actual Java home directory:
bash

export JAVA_HOME=/usr/local/java/jdk-<version>

export PATH=$PATH:$JAVA_HOME/bin
- Save and Reload: Save the file and then reload your profile:
bash

source ~/.bashrc
Verifying Your Java Installation and Initial Setup
After completing the installation steps, it’s crucial to verify that Java has been installed correctly and that your system can locate it. This simple check can save you significant troubleshooting time later.
Confirming Installation with the Command Line
The most straightforward way to verify your Java installation is through the command line or terminal.
- Open Terminal/Command Prompt:
- Windows: Search for “cmd” or “Command Prompt” and open it.
- macOS/Linux: Open your preferred terminal application.
- Check Java Version: Type the following command and press Enter:
bash

java -version
If Java is installed correctly, you should see output similar to this (the version number will vary):
openjdk version "17.0.6" 2023-01-17 LTS

OpenJDK Runtime Environment (Temurin-17.0.6+10) (build 17.0.6+10-LTS)

OpenJDK 64-Bit Server VM (build 17.0.6+10-LTS, mixed mode, sharing)
This output confirms the Java Runtime Environment is functioning.
Checking Java Version and Runtime Environment
For developers, it’s also important to verify the Java compiler (javac) version to ensure the JDK is properly recognized.
-
Check Java Compiler Version: In the same terminal, type:
javac -versionYou should see output indicating the compiler version:
javac 17.0.6If
java -versionworks butjavac -versiondoes not (e.g., “command not found”), it usually means you’ve either installed only the JRE (not JDK) or yourPATHenvironment variable isn’t correctly configured to include the JDK’sbindirectory. Revisit the environment variable setup for your OS if this occurs. -
Verify JAVA_HOME (Optional but Recommended): You can also check if your
JAVA_HOMEenvironment variable is set correctly.- Windows:
bash

echo %JAVA_HOME%
- macOS/Linux:
bash

echo $JAVA_HOME
This should output the path to your JDK installation directory that you set earlier. If it’s empty or incorrect, you need to reconfigureJAVA_HOME.
- Windows:
Basic Troubleshooting for Common Installation Issues
- ‘java’ or ‘javac’ not recognized: This is almost always an issue with the
PATHenvironment variable. Ensure the%JAVA_HOME%bin(Windows) or$JAVA_HOME/bin(macOS/Linux) entry is correctly added and that your terminal session has been reloaded (source ~/.bashrcor restart the terminal). - Multiple Java Versions: If you have multiple Java versions installed, ensure the desired version is prioritized in your
PATHvariable or explicitly set asJAVA_HOME. Useupdate-alternativeson Linux or adjust yourPATHorder manually. - Installation Errors: If the installer fails, check the installation logs (if available) for specific error messages. Ensure you have administrative privileges to install software.
- Application-Specific Issues: If an application still fails to run after Java is verified, it might require a specific Java version. Ensure your installed version meets the application’s requirements.
Maintaining Your Java Environment: Updates and Best Practices
Installing Java is just the first step. To ensure optimal performance, security, and compatibility, it’s crucial to properly maintain your Java environment. This involves keeping it updated, knowing how to manage multiple versions, and adhering to digital security best practices.
Keeping Java Updated for Security and Performance
Software updates are not just about new features; they are critically important for security and performance. Java is no exception. Oracle and OpenJDK providers regularly release updates that patch security vulnerabilities, fix bugs, and introduce performance enhancements.
- Security Patches: Java, being widely used, is a frequent target for malicious actors. Updates often include critical security fixes that protect your system from potential exploits. Running an outdated Java version can leave your system vulnerable.
- Performance Improvements: New releases and updates frequently include optimizations to the JVM and core libraries, leading to faster execution of Java applications and better resource utilization.
- Bug Fixes: Updates address known issues and bugs, improving the stability and reliability of your Java environment.
Recommendation: For production systems, it’s highly recommended to use Long-Term Support (LTS) versions (like Java 11, 17, or 21) as they receive extended support and regular updates from their providers. Set up a routine to check for and apply updates. For OpenJDK distributions installed via package managers (like apt or dnf), updates are typically handled with your system’s regular software updates. For manual installations, you’ll need to periodically download and install new versions.
Managing Multiple Java Versions
In development environments, it’s common to work on projects that require different Java versions. For example, an older legacy application might need Java 8, while a new microservice uses Java 17.
- Version Managers: Tools like
SDKMAN!(for Linux/macOS) orjEnv(macOS/Linux) are invaluable for managing multiple Java installations. They allow you to easily switch between different JDKs on a project-by-project or global basis without manually changing environment variables. - Manual Management: If you prefer manual control, ensure each JDK is installed in a unique directory. You can then temporarily set
JAVA_HOMEand updatePATHin your terminal session or project-specific scripts to point to the desired Java version. - IDE Configuration: Most modern IDEs (IntelliJ IDEA, Eclipse) allow you to configure the specific JDK to be used for each project, overriding the system-wide default. This is often the most convenient way for developers to handle versioning within their development workflow.
The Importance of a Secure Java Environment
Digital security is paramount, and your Java environment plays a role in it.
- Download from Trusted Sources: Always download Java distributions from official and reputable sources (e.g., Adoptium.net, Amazon.com, Oracle.com). Avoid unofficial or suspicious download sites that might bundle malware or provide compromised versions.
- Regular Updates: As mentioned, keeping Java updated is a primary security measure.
- Minimize Exposure: If you don’t need Java for web browser applets (which are now largely obsolete), consider disabling Java in your browser or uninstalling the JRE if you only need the JDK for development.
- Understand Permissions: Be mindful of the permissions granted to Java applications. Always assess the trustworthiness of any Java application you run, especially those downloaded from unknown sources.
By understanding the differences between JRE and JDK, choosing a reliable distribution, following the installation steps carefully, verifying your setup, and adhering to best practices for maintenance and security, you can ensure a robust and efficient Java environment. This foundational step empowers you, whether you’re running critical applications or embarking on ambitious development projects, to leverage the full power of Java in the dynamic world of technology.
aViewFromTheCave is a participant in the Amazon Services LLC Associates Program, an affiliate advertising program designed to provide a means for sites to earn advertising fees by advertising and linking to Amazon.com. Amazon, the Amazon logo, AmazonSupply, and the AmazonSupply logo are trademarks of Amazon.com, Inc. or its affiliates. As an Amazon Associate we earn affiliate commissions from qualifying purchases.