Minecraft, since its inception, has remained a cornerstone of the sandbox gaming genre, not merely for its gameplay mechanics but for its incredible capacity for user-driven modification. Among the most popular ways to enhance the visual and auditory experience of the game is through the installation of resource packs (formerly known as texture packs). While the process may seem straightforward to the seasoned modder, understanding the underlying technical infrastructure and the nuances of different game versions is essential for a seamless integration.
This guide provides an in-depth, professional analysis of how to install resource packs across various platforms, ensuring that your software environment is optimized for high-fidelity performance.
1. Understanding the Architecture of Minecraft Resource Packs
To effectively manage Minecraft’s visual assets, one must first understand what these packs are from a software perspective. In the early days of the “Java Edition,” users utilized “Texture Packs,” which were limited strictly to the visual skins of blocks and items. However, with the release of version 1.6.1, Mojang introduced the “Resource Pack” system, a more robust framework that allows for the modification of textures, sounds, fonts, and even language files.
From Texture Packs to Resource Packs: A Technical Evolution
The shift to the Resource Pack system was a significant architectural upgrade. It allowed multiple packs to be layered simultaneously, with the game engine prioritizing files based on their position in a stack. This modularity means a player can have a high-definition block pack at the bottom of the stack while overlaying a specific GUI (Graphical User Interface) pack on top. Technically, this is managed by the game’s asset manager, which scans the resourcepacks directory for valid metadata files (pack.mcmeta) to recognize the content.
File Structures and JSON Configurations
At the heart of every resource pack is the pack.mcmeta file. This is a JSON-formatted file that tells Minecraft’s internal engine two things: the description of the pack and the “pack format” version. The pack format version is critical; if a pack’s format does not match the current game version, the software may fail to render certain assets, leading to the infamous “purple and black checkerboard” texture—the engine’s default signal for a missing asset. Understanding these JSON configurations allows advanced users to manually edit packs to maintain compatibility across game updates.
2. Prerequisite Configurations and Hardware Considerations
Before initiating the installation process, it is vital to assess the hardware environment. Minecraft is a Java-based application, and its performance is heavily dependent on RAM allocation and GPU efficiency, especially when dealing with high-resolution assets.
Assessing System Resources for High-Definition Assets
Standard Minecraft textures are 16×16 pixels. Resource packs can scale this up to 32x, 64x, 128x, or even 512x and 1024x for photorealistic results. However, as resolution increases, the demand on Video RAM (VRAM) grows exponentially. For users intending to run packs above 128x, it is recommended to have at least 8GB of system RAM, with at least 4GB dedicated specifically to the Minecraft JVM (Java Virtual Machine) arguments within the launcher settings.
The Role of Third-Party Optimization Tools
To maximize the potential of high-end resource packs, the use of optimization mods like OptiFine or the Iris/Sodium stack is highly recommended. These tools provide the technical bridge required for “Connected Textures” (allowing glass or grass to blend seamlessly) and “Custom Skybox” rendering. Furthermore, they allow for the implementation of Shaders, which work in tandem with resource packs to introduce real-time lighting, shadows, and water reflections. Without these optimization layers, many advanced resource packs will not display their full range of features.
3. Step-by-Step Installation Protocol for Minecraft Java Edition
The Java Edition remains the primary platform for enthusiast-level customization. The installation process involves navigating the local file system to integrate third-party assets into the game’s directory.
Locating the Resource Pack Directory
The most direct method to install a pack is through the game’s internal menu.
- Launch Minecraft and navigate to Options > Resource Packs.
- Click on Open Pack Folder. This action triggers the OS file explorer (Windows Explorer or macOS Finder) to open the specific directory:
%appdata%.minecraftresourcepacks. - Alternatively, users can navigate there manually. In Windows, press
Win+R, type%appdata%, and navigate through the.minecraftfolder.
Integration and Activation
Once the folder is open, the installation is a simple “drag-and-drop” operation. Resource packs are typically downloaded as .zip files. You do not need to extract these files; Minecraft’s engine is designed to read the contents of the compressed archive directly to save disk space and improve load times.
- Move the downloaded
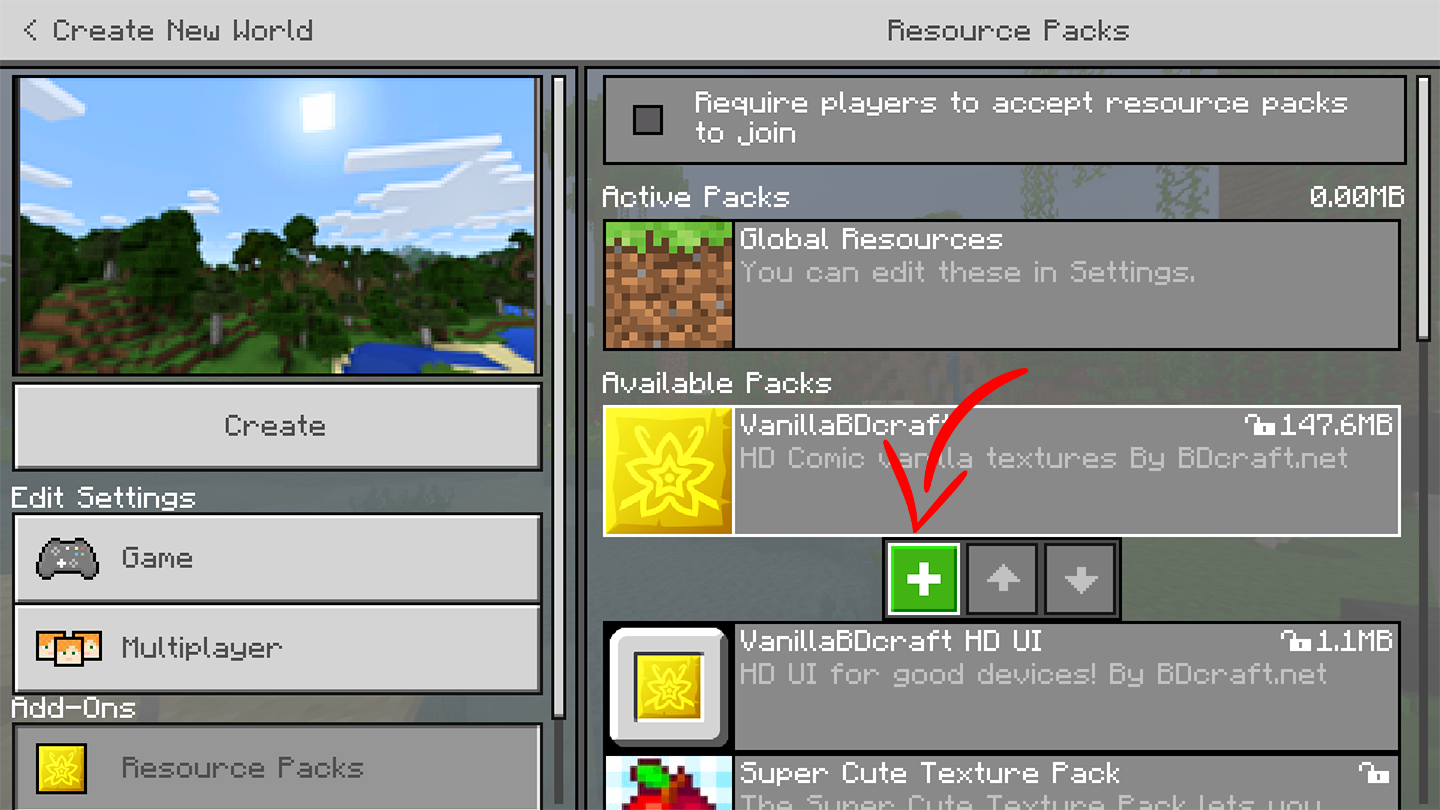
.zipfile into theresourcepacksfolder. - Return to the Minecraft window. The pack should now appear in the “Available” column.
- Click the arrow icon on the pack thumbnail to move it to the “Selected” column.
- Click Done. The game will then reload its internal asset manager and apply the new textures.
Managing Version Compatibility and Legacy Packs
If a pack is highlighted in red within the menu, it indicates a version mismatch. While many textures are backward compatible, significant engine changes (such as the “Flattening” in version 1.13) changed the internal naming conventions of blocks. For the best technical stability, always ensure the pack matches your game version, or utilize a “Legacy” converter tool to update the file names within the ZIP archive.
4. Installation and Management for Minecraft Bedrock Edition
Minecraft Bedrock Edition (available on Windows 10/11, consoles, and mobile) utilizes a different engine—C++ instead of Java. This necessitates a different approach to resource management, often focusing on the .mcpack file format.
The .mcpack Format and Automated Integration
On PC and mobile devices, Bedrock resource packs often come with the .mcpack extension. This is essentially a renamed ZIP file that includes a manifest file allowing for automated installation.
- On Windows: Simply double-clicking the
.mcpackfile will automatically launch Minecraft and import the assets into thecom.mojangdevelopment folder. - On Mobile (iOS/Android): Users often need a file manager app to move these files into the game’s internal directory or “Share” the file directly to the Minecraft app.
Cross-Platform Synchronization via the Marketplace
For console players (Xbox, PlayStation, Switch), manual file manipulation is generally restricted by the hardware’s closed ecosystem. In these instances, resource packs are acquired through the Minecraft Marketplace. Technically, these are tied to the user’s Microsoft Account (Xbox Live), allowing the assets to sync across any Bedrock-compatible device. This ensures that a pack purchased on a tablet will be available on a console, provided the hardware can handle the rendering load.
5. Troubleshooting Common Technical Discrepancies
Even with a perfect installation, technical hurdles can arise due to software conflicts or hardware limitations. Addressing these requires a systematic approach to troubleshooting.
Resolving Dependency Errors and Broken Textures
If you see missing textures or “null” objects, the first step is to check the load order. In the Java Edition, ensure that any “core” packs (those that change fundamental block models) are at the bottom of the list, while “add-on” packs (which might only change tools or the UI) are at the top. If the problem persists, verify the integrity of the pack’s assets folder; a single typo in a file path within the ZIP can cause the engine to ignore the entire sub-directory.
Memory Allocation and Performance Optimization
A common technical failure is the “Out of Memory” crash shortly after applying a high-resolution pack. This happens when the JVM reaches its heap size limit. To fix this:
- Open the Minecraft Launcher.
- Go to the Installations tab.
- Select your version and click More Options.
- In the JVM Arguments box, find the string
-Xmx2G. Change the2Gto4G(or higher, depending on your system’s RAM). This allocates more memory to the game, allowing it to cache the larger texture files required by high-fidelity packs.
Reloading Assets In-Game
When tweaking files or testing new packs, you don’t need to restart the entire application. By pressing F3 + T simultaneously on the keyboard, you trigger a manual refresh of the game’s resource manager. This force-reloads all textures, sounds, and models, which is an invaluable tool for developers and users who are fine-tuning their digital environment.

Conclusion
Installing resource packs for Minecraft is more than just a cosmetic upgrade; it is an exercise in managing software assets and optimizing hardware performance. Whether you are navigating the file directories of the Java Edition or utilizing the automated imports of the Bedrock Edition, understanding the technical “why” behind the “how” ensures a more stable and visually stunning gaming experience. By following the protocols outlined in this guide—from RAM allocation to version synchronization—you can transform the pixelated landscapes of Minecraft into a bespoke digital world tailored to your specific aesthetic and technical standards.
aViewFromTheCave is a participant in the Amazon Services LLC Associates Program, an affiliate advertising program designed to provide a means for sites to earn advertising fees by advertising and linking to Amazon.com. Amazon, the Amazon logo, AmazonSupply, and the AmazonSupply logo are trademarks of Amazon.com, Inc. or its affiliates. As an Amazon Associate we earn affiliate commissions from qualifying purchases.