
Tire Pressure Monitoring Systems (TPMS) have become an indispensable safety feature in modern vehicles, offering real-time insights into the health of your tires. They’re a silent guardian, alerting you to under-inflated tires that could otherwise lead to dangerous blowouts, decreased fuel efficiency, and premature tire wear. While replacing a TPMS sensor might seem like a task best left to professionals, with the right tools, knowledge, and a methodical approach, it’s a perfectly manageable DIY project that can save you significant money. This guide will walk you through every step, from understanding the technology to the final programming, ensuring your vehicle’s safety system is fully operational.

Understanding TPMS: Why It Matters for Your Vehicle’s Health and Your Wallet
The sophisticated technology behind your vehicle’s Tire Pressure Monitoring System plays a crucial role in maintaining driving safety and operational efficiency. Ignoring an illuminated TPMS warning light can have far-reaching consequences, impacting not just your safety but also your wallet. Understanding what TPMS is and why it’s vital is the first step in appreciating the importance of proper sensor installation and maintenance.
What is TPMS and How Does It Work?
TPMS is an electronic system designed to monitor the air pressure inside the pneumatic tires on various types of vehicles. When tire pressure drops below a safe threshold or, in some cases, exceeds a recommended maximum, the system alerts the driver, typically via a warning light on the dashboard. There are two main types of TPMS:
- Direct TPMS: This system uses individual pressure sensors mounted inside each tire (usually attached to the valve stem). These sensors transmit real-time tire pressure data wirelessly to the vehicle’s onboard computer. This is the most common and accurate type, providing specific pressure readings for each tire, which is why we focus on replacing these sensors in this guide. Each sensor has its own power source, often a small, sealed battery, which eventually dies, necessitating replacement of the entire sensor unit.
- Indirect TPMS: This system works in conjunction with the vehicle’s Anti-lock Braking System (ABS) wheel speed sensors. It monitors individual wheel speeds and detects a drop in tire pressure when a tire’s rotational speed changes (a lower-pressure tire has a slightly smaller diameter and thus rotates faster). While less expensive and not requiring specific tire sensors, it doesn’t provide real-time pressure readings and can be less accurate.
For direct TPMS, the sensor not only measures pressure but often also temperature. This data is crucial for the vehicle’s control module to make informed decisions and alert the driver promptly. The technological advancement in these tiny gadgets underscores the broader trend in automotive engineering towards greater digital control and predictive maintenance.
The Importance of Correct Tire Pressure
Maintaining correct tire pressure is paramount for several reasons, directly linking to vehicle performance, safety, and economy:
- Safety: Under-inflated tires are a significant safety hazard. They can lead to increased tire temperature, which significantly raises the risk of a tire blowout, especially at highway speeds. They also compromise vehicle handling, braking performance, and stability, making it harder to control the car in emergency situations.
- Fuel Efficiency: Tires that are not properly inflated create more rolling resistance, forcing your engine to work harder to maintain speed. This directly translates to increased fuel consumption, costing you more money at the pump over time. According to studies, maintaining proper tire pressure can improve gas mileage by up to 3%.
- Tire Lifespan: Both under-inflation and over-inflation can lead to uneven and accelerated tire wear. Under-inflation causes excessive wear on the outer edges of the tread, while over-inflation causes wear down the center. By ensuring correct pressure, you maximize your tires’ lifespan, delaying the need for costly replacements and thus saving money.
- Handling and Comfort: Properly inflated tires contribute to optimal vehicle handling characteristics, providing a smoother ride and more predictable steering response.
The integration of TPMS technology has made it easier for drivers to stay informed about their tire health, bridging the gap between advanced vehicle systems and everyday maintenance.
Common Reasons for TPMS Sensor Replacement
While TPMS sensors are designed for durability, they aren’t immortal. Several factors can necessitate their replacement:
- Dead Battery: The most common reason. Direct TPMS sensors are powered by non-rechargeable lithium-ion batteries sealed within the sensor unit. These batteries typically last 5-10 years, depending on usage and environmental factors. Once the battery dies, the sensor stops transmitting data, and the TPMS warning light illuminates.
- Physical Damage: Sensors can be damaged during tire mounting or demounting, especially if proper procedures are not followed. Impact from road debris or accidents can also cause damage.
- Corrosion: The valve stem portion of the sensor is exposed to the elements, making it susceptible to corrosion from road salt, moisture, and chemicals. This can lead to air leaks or sensor malfunction.
- Valve Stem Wear: Even if the sensor itself is fine, the rubber or metal valve stem component can degrade or get damaged, causing leaks. Many modern sensors integrate the valve stem directly, requiring sensor replacement for valve stem issues.
- Software Glitches/Malfunction: Though less common, internal electronic failures can occur, causing the sensor to transmit incorrect data or cease functioning altogether.
Recognizing these issues allows you to proactively address TPMS problems, maintaining the integrity of your vehicle’s safety systems.
Preparation is Key: Gathering Your Tools and New Sensors
Before you even think about lifting your vehicle, proper preparation is paramount. This includes gathering all necessary tools, selecting the correct replacement sensors, and taking critical safety precautions. A well-prepared workspace and the right components will make the installation process smoother and safer, echoing the efficiency principles seen in professional tech deployments.
Essential Tools You’ll Need
While some tools might seem specialized, many are standard garage items. For a successful DIY TPMS sensor replacement, you’ll need:
- Vehicle Jack and Jack Stands: Absolutely crucial for safely lifting and supporting your vehicle. Never work under a vehicle supported only by a jack.
- Lug Wrench: To remove and reinstall your wheel’s lug nuts.
- Tire Bead Breaker: This is often the most specialized tool. It’s used to separate the tire’s bead (the edge of the tire that seals against the rim) from the wheel rim. You can find manual bead breakers or use a tire machine if you have access to one. Some auto parts stores rent these.
- Valve Core Removal Tool: A small, inexpensive tool to remove the valve core and deflate the tire quickly.
- Tire Mounting/Demounting Levers (Tire Spoons): These help carefully pry the tire off and onto the rim without damaging either.
- Air Compressor and Tire Pressure Gauge: For reinflating the tire to the correct pressure after installation.
- Torque Wrench: Essential for tightening lug nuts and the TPMS sensor nut to specified values. Overtightening can strip threads, and undertightening can lead to loose wheels or air leaks.
- TPMS Scan/Relearn Tool: This specialized electronic device is critical for activating, programming, and performing the relearn procedure for your new sensors. Without it, your vehicle’s computer won’t recognize the new sensors, and the TPMS light will remain on. Several brands offer DIY-friendly models.
- Gloves and Eye Protection: Safety first! Protect your hands and eyes from potential debris or accidental scrapes.
- Soapy Water Spray Bottle: Useful for checking for leaks after inflation.
Having all these tools readily available prevents interruptions and frustration during the installation.
Choosing the Right TPMS Sensors
Selecting the correct replacement TPMS sensors is critical for compatibility and functionality. Just like choosing the right software for a specific operating system, the sensor must match your vehicle’s make, model, and year.
- OEM vs. Aftermarket: Original Equipment Manufacturer (OEM) sensors are identical to those installed by the factory. Aftermarket sensors are produced by other manufacturers and are often more affordable. High-quality aftermarket sensors are generally reliable, but ensure they are specifically listed as compatible with your vehicle.
- Frequency: TPMS sensors operate on specific radio frequencies (e.g., 315 MHz or 433 MHz). Your new sensors must match the frequency required by your vehicle. This information is usually found in your owner’s manual or by checking the part number of your old sensor.
- Programmable vs. Pre-programmed: Some aftermarket sensors are “blank” and need to be programmed with your vehicle’s specific protocols using a TPMS relearn tool. Others come pre-programmed for specific vehicle applications. Universal programmable sensors offer flexibility, as they can be configured for many different vehicles using a compatible programming tool.
- Valve Stem Type: Sensors come with different valve stem designs (e.g., clamp-in metal stems or snap-in rubber stems). Ensure the replacement sensor’s stem matches your rim’s requirements and the original sensor’s design. Often, a new valve stem assembly (including grommet, washer, and nut) is included with the sensor; always use the new hardware.
It’s advisable to purchase sensors from a reputable supplier or automotive parts store. Double-check compatibility using your vehicle’s VIN if possible.
Safety First: Precautions Before You Start
Working on your vehicle always carries inherent risks. Prioritizing safety is non-negotiable.
- Read Your Vehicle Manual: Familiarize yourself with your vehicle’s specific jacking points and any TPMS-related procedures.
- Work on a Level Surface: Never attempt to lift your car on an incline or uneven ground.
- Use Jack Stands: Once the vehicle is lifted, immediately place jack stands under the appropriate support points. Lower the vehicle onto the stands. Never rely solely on the jack.
- Chock the Wheels: Place wheel chocks behind the wheels that remain on the ground to prevent the vehicle from rolling.
- Engage Parking Brake: Ensure the parking brake is fully engaged.
- Wear Personal Protective Equipment (PPE): Always wear safety glasses or goggles to protect your eyes from debris, and sturdy gloves to protect your hands from scrapes and sharp edges.
- Clear Your Workspace: Ensure the area around your vehicle is free of clutter to prevent trips and falls.
- Mind Your Fingers: Be extremely careful when working with tire beads and mounting tools, as pinch points can cause severe injury.
By adhering to these safety guidelines, you minimize risks and ensure a secure environment for your DIY project.
Step-by-Step Installation Process: Replacing Your TPMS Sensor
With all preparations complete and safety measures in place, you’re ready to tackle the physical installation of the new TPMS sensor. This process requires patience and precision, particularly when handling the tire and sensor components.
Deflating the Tire and Breaking the Bead
This is the initial phase of accessing the old sensor.
- Lift and Secure the Vehicle: Using your jack, lift the corner of the vehicle where the tire with the faulty sensor is located. Once lifted, place jack stands securely under the vehicle’s frame or designated jack points. Slowly lower the vehicle onto the jack stands.
- Remove the Wheel: Use your lug wrench to loosen and remove the lug nuts, then carefully pull the wheel off the hub. Set it aside on a clean, stable surface.
- Deflate the Tire: Remove the valve stem cap and use your valve core removal tool to unscrew and remove the valve core. This will rapidly deflate the tire. Store the valve core in a safe place.
- Break the Tire Bead: This is often the trickiest part.
- Lay the wheel flat.
- Apply a tire bead breaker tool to the sidewall of the tire, as close to the rim edge as possible without touching the rim itself.
- Activate the bead breaker (either manually or with a machine) to push the tire’s bead inward, away from the rim lip. You’ll hear a popping sound as it separates.
- Repeat this process around the entire circumference of both sides of the tire until both beads are fully separated from the rim. If you only plan to replace the sensor and not fully remove the tire, you might only need to break one side’s bead sufficiently to access the sensor.
Removing the Old Sensor

Once the bead is broken, you can access the sensor inside the tire.
- Push Down the Sidewall: With the tire bead broken, push the top sidewall of the tire down into the rim’s drop center (the deepest part of the rim). This creates space between the tire bead and the rim edge, allowing you to reach inside.
- Unscrew the Retaining Nut: Locate the old TPMS sensor, which is typically mounted directly opposite the valve stem on the inside of the rim. Use a small wrench or socket to unscrew the retaining nut that holds the sensor assembly to the rim.
- Carefully Remove the Sensor: Once the nut is off, gently pull the old sensor through the valve stem hole from the outside of the rim. Be careful not to let the sensor drop inside the tire if it detaches prematurely. Note its orientation and any washers or grommets. Inspect the old sensor for any visible damage or corrosion.
Installing the New Sensor
Now, reverse the process to install the new sensor.
- Clean the Valve Hole: Before installing the new sensor, thoroughly clean the valve stem hole on the rim. Remove any dirt, corrosion, or old rubber residue that could prevent a proper seal.
- Assemble the New Sensor (if required): Some new sensors come disassembled (e.g., separate valve stem, nut, washer, and grommet). Assemble them according to the manufacturer’s instructions. Ensure the rubber grommet or sealing washer is correctly seated.
- Insert the New Sensor: From the inside of the rim, carefully guide the new sensor’s valve stem through the valve stem hole until it protrudes from the outside. Ensure the sensor body is oriented correctly within the rim so it doesn’t interfere with tire rotation or balancing weights.
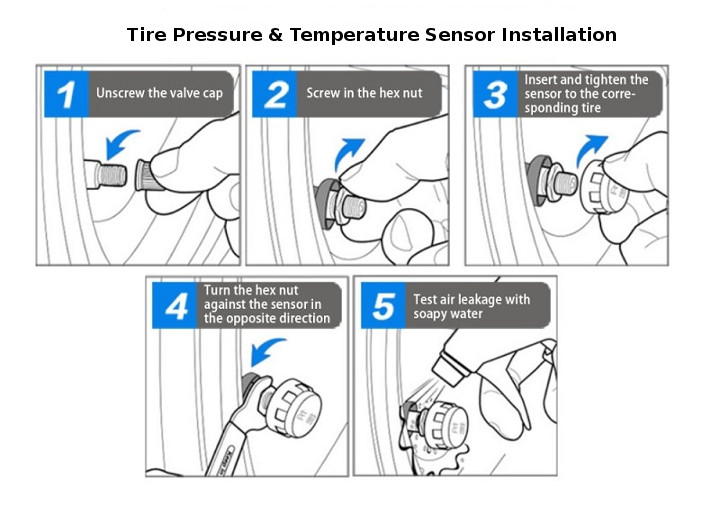
- Secure the Sensor: From the outside, thread the new retaining nut onto the valve stem. Hand-tighten it first. Then, using a torque wrench, tighten the nut to the manufacturer’s specified torque setting. This is critical: undertightening can lead to leaks, while overtightening can damage the sensor or the rim. Refer to the sensor manufacturer’s instructions or your vehicle’s service manual for the correct torque.
- Re-seat the Tire Bead (Partial): If you only broke one bead, gently coax the tire back towards the rim, ensuring the sensor’s body has enough clearance.
Re-seating the Tire and Inflation
This step requires careful attention to avoid damaging the new sensor.
- Lubricate the Tire Beads: Apply a generous amount of tire mounting lubricant (soapy water or specialized tire soap) to both inner and outer tire beads. This reduces friction and helps the tire slide back onto the rim without stress.
- Mount the Tire (if fully removed): If you fully removed the tire, carefully use your tire levers to remount the tire onto the rim, starting with one side, then the other. Ensure the new TPMS sensor is not in the path of the tire bead or mounting tools during this process.
- Inflate the Tire: Reinstall the valve core into the valve stem. Connect your air compressor and slowly inflate the tire. As you inflate, you’ll hear the tire beads “pop” as they seat firmly against the rim lips. Continue inflating to the vehicle manufacturer’s recommended pressure (found on a sticker inside the driver’s door jamb or in the owner’s manual).
- Check for Leaks: Spray the valve stem and the tire beads with soapy water. Look for any bubbles, which indicate an air leak. If you find a leak, deflate, adjust the sensor or bead, and re-inflate.
- Reinstall the Wheel: Once the tire is properly inflated and seated, reinstall the wheel onto the vehicle’s hub. Hand-tighten the lug nuts, then lower the vehicle until the tire just touches the ground. Use your torque wrench to tighten the lug nuts in a star pattern to the vehicle manufacturer’s specified torque. Finally, lower the vehicle completely and remove the jack and jack stands.
Balancing the Wheel (Optional but Recommended)
Whenever a tire is demounted, or a component inside the wheel (like a TPMS sensor) is replaced, the wheel’s balance can be affected.
- Why Balance? An unbalanced wheel can cause vibrations at certain speeds, leading to uncomfortable driving, premature tire wear, and wear on suspension components.
- Professional Service: While you can install the sensor yourself, having the wheel professionally balanced by a tire shop is highly recommended. They use specialized machines to detect imbalances and apply small weights to the rim to correct them, ensuring a smooth ride and optimal tire performance. This small investment prevents bigger issues down the road.
Post-Installation: Programming and Calibration for Seamless Operation
Installing the physical sensor is only half the battle. For your new TPMS sensor to communicate with your vehicle and clear the warning light, it needs to be recognized and programmed. This post-installation phase is crucial for integrating the new technology into your existing vehicle system.
Activating and Programming Your New Sensors
New TPMS sensors, especially aftermarket universal ones, often need to be “woken up” or programmed before they can transmit data.
- Activation: Many new sensors are in a “sleep” mode to conserve battery during shipping. A TPMS relearn tool is used to activate them. Simply hold the tool near the valve stem of each new sensor and follow the tool’s instructions. It sends a low-frequency signal to “wake up” the sensor.
- Programming (for Universal Sensors): If you’ve used universal programmable sensors, they typically need to be programmed with the correct vehicle protocol. Your TPMS tool will have a database of vehicle makes and models. You’ll select your vehicle’s specific information, and the tool will then program the sensor with the correct frequency and data transmission format. This essentially “tells” the sensor how to speak to your car’s computer. OEM sensors or pre-programmed aftermarket sensors usually skip this step as they are already configured for specific vehicles.
TPMS Relearn Procedures (Auto-Learn, Manual, OBDII)
Once activated and programmed, the vehicle’s computer needs to “learn” the unique ID codes of the new sensors. This process, known as a TPMS relearn, is critical for the system to function correctly. The method varies significantly by vehicle manufacturer and model.
- Auto-Learn (Drive Cycle): Some vehicles have an auto-learn feature. After new sensors are installed and activated, you simply need to drive the vehicle for a certain period (e.g., 10-20 minutes) above a specific speed (e.g., 25 mph). The vehicle’s computer will automatically detect and register the new sensor IDs. This is the simplest method but not universally available.
- Manual Relearn: Certain vehicles require a manual procedure, which often involves a sequence of button presses inside the vehicle. This might include turning the ignition on/off a certain number of times, pressing the brake pedal, or manipulating the hazard light switch. Consult your vehicle’s owner’s manual or a reliable online resource for the exact steps for your specific model. This method typically requires the TPMS tool to activate each sensor sequentially during the process.
- OBDII Relearn (Using a Scan Tool): This is the most common and reliable method, especially for vehicles without auto-learn or a simple manual procedure. It requires a professional-grade TPMS scan tool or a capable OBDII diagnostic tool.
- The tool connects to the vehicle’s OBDII port (usually under the dashboard).
- It communicates with the vehicle’s engine control unit (ECU) or body control module (BCM).
- The tool reads the unique IDs from the activated sensors (by triggering them with the tool) and then writes those IDs into the vehicle’s computer.
- Follow the prompts on the scan tool, which will guide you through the process, often involving triggering each sensor in a specific order (e.g., front left, front right, rear right, rear left).
Failing to perform the correct relearn procedure will result in the TPMS warning light remaining on, even if the sensors are physically installed correctly.
Testing and Verification
After the relearn procedure is completed, it’s essential to verify that the system is working as intended.
- Check the Dashboard: The TPMS warning light should turn off. If it doesn’t, repeat the relearn procedure or consult the troubleshooting section.
- Drive the Vehicle: Take the vehicle for a short drive, mimicking typical driving conditions. Pay attention to any unusual warnings or persistent lights.
- Use Your TPMS Tool (if capable): Some advanced TPMS tools can read the live data from the sensors, allowing you to confirm that each sensor is transmitting its pressure reading correctly to the vehicle’s computer. This provides an extra layer of confidence in your installation.
A successful installation and relearn mean your TPMS is fully integrated, providing accurate tire pressure monitoring and contributing to your vehicle’s overall safety and efficiency.
Troubleshooting Common Issues and Expert Tips
Even with careful execution, sometimes things don’t go perfectly. Understanding common issues and having a few expert tips can save you time and frustration, reinforcing the “Tech” aspect of problem-solving.
What If the Light Stays On?
If your TPMS warning light remains illuminated after installation and relearn, don’t panic. Here’s a systematic approach to troubleshooting:
- Recheck Tire Pressure: First and foremost, verify that all tires are inflated to the exact recommended pressure. Even a slight discrepancy can trigger the light.
- Repeat Relearn Procedure: Carefully follow the relearn procedure again, ensuring every step is executed precisely. Sometimes a small deviation can prevent success.
- Verify Sensor Activation: Ensure all new sensors were properly activated by your TPMS tool before attempting the relearn.
- Check Sensor Compatibility: Double-check that the new sensors are indeed compatible with your vehicle’s make, model, and year, particularly their frequency.
- Inspect for Physical Damage: Re-inspect the sensors for any physical damage that might have occurred during installation. Ensure the valve stems are tight and not leaking.
- Diagnostic Trouble Codes (DTCs): Use your TPMS scan tool or a generic OBDII scanner to check for any diagnostic trouble codes (DTCs) related to the TPMS system. These codes can provide specific insights into the malfunction (e.g., “Sensor 1 Malfunction,” “Lost Communication with Sensor”).
- Battery in Sensor: Though new, a sensor could rarely have a faulty battery. If a specific sensor consistently fails to communicate, it might be defective.
- Vehicle’s TPMS Module: In very rare cases, the issue might lie with the vehicle’s TPMS control module itself, rather than the sensors. This usually requires professional diagnosis.
Extending Sensor Lifespan and Maintenance
While sensor batteries are sealed, proper tire and wheel maintenance can contribute to the overall longevity of your TPMS system.
- Regular Tire Pressure Checks: Even with TPMS, manually checking your tire pressure regularly with a reliable gauge is good practice. TPMS is a warning system, not a replacement for routine checks.
- Proper Tire Rotation: Adhering to your vehicle’s recommended tire rotation schedule promotes even tire wear, which can indirectly benefit sensor longevity by ensuring consistent conditions across all tires.
- Careful Tire Service: Inform tire technicians that your wheels have TPMS sensors whenever you get new tires or have them rotated. This reminds them to use proper tire changing techniques to avoid damaging the sensors.
- Valve Stem Caps: Always keep valve stem caps on. They prevent dirt and moisture from entering the valve stem, which can cause corrosion and damage.
When to Seek Professional Help
While DIY installation is rewarding, there are times when calling in a professional is the smartest move.
- Lack of Specialized Tools: If you don’t have access to a tire bead breaker, tire levers, or a TPMS scan/relearn tool, the cost of purchasing them for a one-off job might outweigh the savings.
- Complex Relearn Procedures: Some vehicles have notoriously difficult relearn procedures that might require specific dealer-level diagnostic equipment.
- Persistent Issues: If you’ve tried all troubleshooting steps and the TPMS light stubbornly remains on, or if you suspect a deeper electrical issue, professional diagnosis is warranted.
- Damage Risk: If you’re uncomfortable with the physical aspects of breaking the bead or mounting the tire, there’s a risk of damaging the tire, rim, or the new sensor. A professional tire shop has the right equipment and experience to minimize these risks.
By understanding how to install and troubleshoot TPMS sensors, you empower yourself with valuable automotive tech knowledge, maintain your vehicle’s safety features, and potentially save a significant amount of money that would otherwise go to garage labor costs. This DIY approach not only keeps your wheels rolling safely but also adds a tangible skill to your personal branding as a savvy vehicle owner.
aViewFromTheCave is a participant in the Amazon Services LLC Associates Program, an affiliate advertising program designed to provide a means for sites to earn advertising fees by advertising and linking to Amazon.com. Amazon, the Amazon logo, AmazonSupply, and the AmazonSupply logo are trademarks of Amazon.com, Inc. or its affiliates. As an Amazon Associate we earn affiliate commissions from qualifying purchases.