In the ever-evolving digital landscape, the ability to customize and personalize your workspace is paramount. Whether you’re a graphic designer crafting a striking brand identity, a writer meticulously formatting a manuscript, or simply an individual looking to inject some personality into your digital life, fonts play a crucial role. They are the silent architects of our visual communication, influencing mood, legibility, and overall aesthetic. This comprehensive guide will delve into the intricacies of installing fonts, ensuring you can seamlessly integrate new typographic styles into your workflow across various operating systems and applications.
The concept of “how to install fonts” might seem straightforward, but the process can vary depending on your operating system and the intended use of the font. This article will break down the installation methods for Windows and macOS, and also touch upon specific application installations, providing you with the knowledge to expand your font library effectively. We’ll also explore the importance of fonts in branding, design, and even how they can subtly impact financial communications, aligning with the diverse interests of our readership in tech, brand, and money.

Understanding Font Files and Installation Methods
Before we dive into the step-by-step instructions, it’s essential to understand the basic types of font files you’ll encounter and the fundamental approaches to their installation. Most modern operating systems are designed to handle common font formats with ease.
Common Font File Types
You’ll primarily come across two dominant font file formats:
- TrueType Fonts (.ttf): Developed by Apple and Microsoft, TrueType fonts are widely compatible and offer good scalability. They contain both the outline data for the font’s appearance and bitmap data for screen rendering at different sizes, ensuring consistent display.
- OpenType Fonts (.otf): An extension of TrueType, OpenType fonts are a more advanced format developed collaboratively by Microsoft and Adobe. They offer greater flexibility, supporting a wider range of characters and glyphs, including advanced typographic features like ligatures, stylistic alternates, and small caps. OpenType is often the preferred choice for professional design and typography.
While less common for general use, you might also encounter:
- Web Open Font Format (.woff/.woff2): These formats are optimized for web use, offering smaller file sizes for faster loading times on websites. While you won’t typically “install” these in the same way for desktop applications, understanding their purpose is beneficial for web designers.
- PostScript Fonts (.pfb/.pfm): An older format, still supported by some systems but less common than TrueType or OpenType for new installations.
General Installation Principles
The core principle behind font installation is making the font file accessible to your operating system’s font management system. Once installed, the operating system then makes these fonts available to all compatible applications installed on your computer. The installation process generally involves either a double-click action that prompts an install option or dragging and dropping font files into a designated system folder.
The elegance of modern operating systems lies in their user-friendly interfaces, which aim to simplify complex tasks like font management. However, understanding the underlying logic can empower you to troubleshoot effectively if issues arise and to manage your font library more efficiently.
Installing Fonts on Windows
Windows offers a straightforward and intuitive method for installing new fonts, ensuring that even users new to the platform can easily expand their typographic options.
Method 1: Using the Font Viewer (Recommended)
This is the most common and user-friendly method for installing individual font files or small collections.
- Locate Your Font File: Navigate to the folder where you have downloaded or extracted your font files. These are often in
.ttfor.otfformats. - Open the Font File: Double-click on the font file. This action will typically open the font in Windows’ built-in font viewer. This viewer displays a preview of the font, including various characters and the font’s name.
- Click “Install”: In the upper-left corner of the font viewer window, you will see an “Install” button. Click this button.
- Wait for Installation: Windows will then install the font. You may see a brief progress bar. Once complete, the font is ready for use.
For Administrators/Multiple Users: If you have administrator privileges and wish to install the font for all users on the computer, right-click the font file and select “Install for all users.” This ensures the font is available to everyone who logs into the machine.
Method 2: Using the Fonts Folder
This method is particularly useful when you have a large number of fonts to install simultaneously.
- Open the Fonts Folder:
- Press the
Windows key + Rto open the Run dialog box. - Type
fontsand press Enter. This will open the Fonts folder, typically located atC:WindowsFonts.
- Press the
- Drag and Drop: Select all the font files you wish to install from their source folder. Drag these selected font files and drop them directly into the opened Fonts folder.
- Automatic Installation: Windows will automatically detect and install the fonts you’ve dropped into the folder. You will see a progress window indicating the installation status for each font.
Method 3: Via Settings App (Windows 10 and later)
For a more modern approach, especially in newer versions of Windows, you can utilize the Settings app.
- Open Settings: Click the Start button and select the “Settings” gear icon, or press
Windows key + I. - Navigate to Personalization: In the Settings window, click on “Personalization.”
- Select Fonts: In the left-hand menu of the Personalization settings, click on “Fonts.”
- Drag and Drop into the Designated Area: You’ll see a section labeled “Add fonts” with a dotted box. You can drag and drop your font files directly into this box.
- Installation: The fonts will be installed automatically. You can then see your installed fonts listed below this section.
Once installed, new fonts should appear in the font selection dropdown menus of most applications, such as Microsoft Word, Adobe Photoshop, and others, typically after restarting the application.
Installing Fonts on macOS
macOS provides a robust and user-friendly font management system through its Font Book application, making font installation a seamless experience for Mac users.
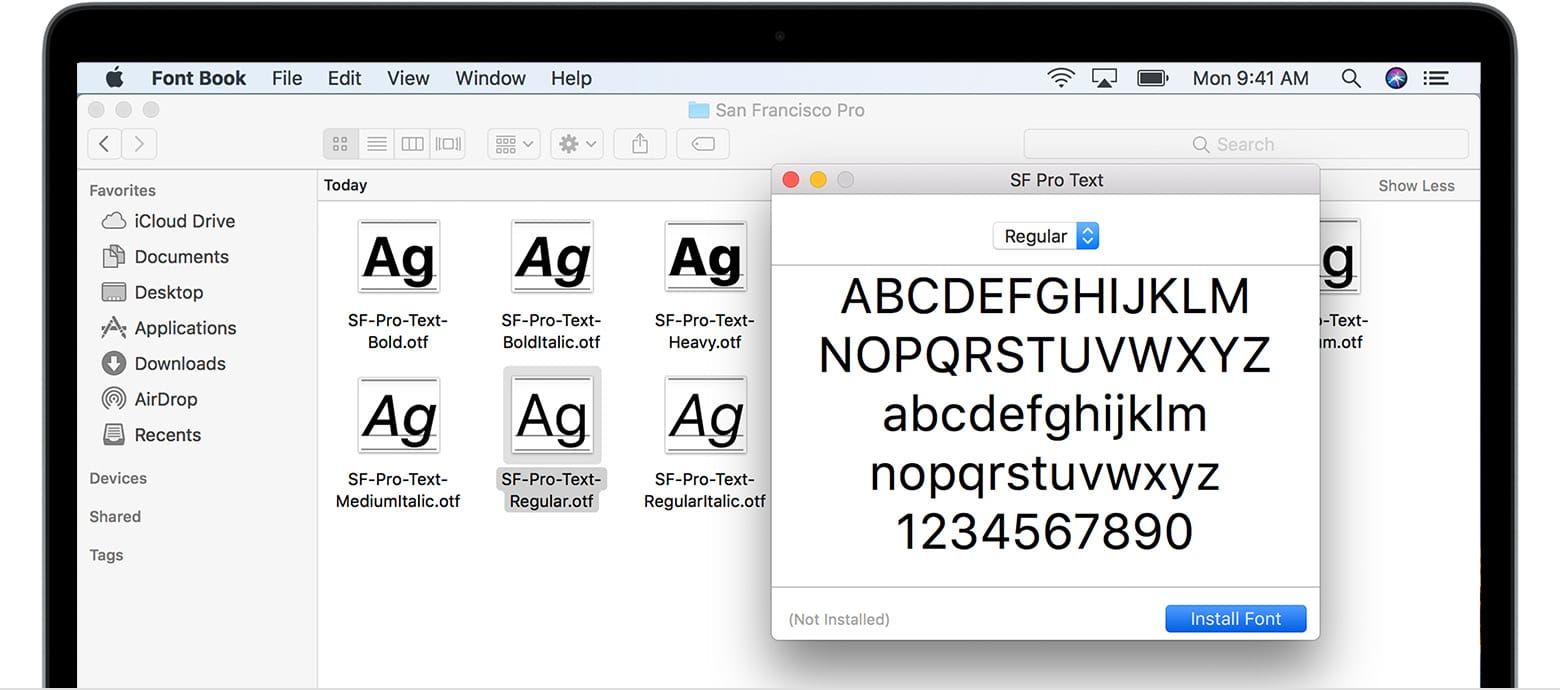
Method 1: Using Font Book (Recommended)
Font Book is the central hub for managing fonts on your Mac, offering an intuitive interface for installation, previewing, and organization.
- Locate Your Font File: Find the font file you want to install. These are commonly in
.ttfor.otfformats. - Open the Font File: Double-click the font file. This action will automatically launch Font Book and display a preview of the font.
- Click “Install Font”: Within the Font Book preview window, you’ll see a button labeled “Install Font” (often located in the lower right corner). Click this button.
- Font Book Handles Installation: Font Book will then add the font to your system’s font library.
Organizing Fonts in Font Book: Once installed, you can use Font Book to organize your fonts into collections, disable fonts you don’t frequently use (to improve application performance), and resolve duplicate fonts.
Method 2: Dragging and Dropping into Font Book
Similar to the Windows Fonts folder, you can also drag and drop font files directly into the Font Book application.
- Open Font Book: You can find Font Book in your Applications folder or by searching with Spotlight (
Command + Spaceand typing “Font Book”). - Drag and Drop: Open the folder containing your font files. Select the font files you want to install and drag them directly into the Font Book window.
- Automatic Installation: Font Book will then proceed with the installation process for each font.
Method 3: Using the Fonts Folder (User vs. System)
macOS has distinct locations for user-specific fonts and system-wide fonts.
- User Fonts (Recommended for personal use):
- Open Finder.
- Click “Go” in the menu bar.
- Hold down the
Optionkey, and “Library” will appear in the dropdown menu. Click “Library.” - Navigate to the
Fontsfolder within your user’s Library. - Drag and drop your font files into this
Fontsfolder.
- System Fonts (Requires administrator privileges):
- Open Finder.
- Click “Go” in the menu bar.
- Select “Computer.”
- Navigate to the main hard drive (usually named “Macintosh HD”).
- Open the
Libraryfolder. - Navigate to the
Fontsfolder within the system’s Library. - Drag and drop your font files into this
Fontsfolder. You will likely be prompted for your administrator password.
After installation, applications that are already open might need to be restarted to recognize the newly installed fonts.
Fonts in Branding, Design, and Beyond
The installation of fonts is not merely a technical exercise; it’s a gateway to enhancing your visual communication. This is particularly relevant in the realms of branding and design, where typography is a cornerstone of identity.
H2: The Power of Typography in Brand Identity
A brand’s visual language is a complex tapestry, and its choice of typography is a significant thread. The fonts used in a company’s logo, website, marketing materials, and packaging communicate personality, values, and tone.
- Conveying Personality: Serif fonts (like Times New Roman or Georgia) often evoke a sense of tradition, trustworthiness, and formality, making them suitable for established institutions or luxury brands. Sans-serif fonts (like Arial or Helvetica) are perceived as modern, clean, and approachable, often favored by tech companies and minimalist brands. Script fonts can add elegance or playfulness, while decorative fonts can convey a specific theme or artistic flair.
- Ensuring Readability and Accessibility: Beyond aesthetics, the chosen fonts must be legible across various media and sizes. This is critical for conveying information clearly, especially in areas like financial reports or product instructions. A well-chosen font enhances user experience and can contribute to the overall perception of professionalism and care.
- Brand Recognition: Consistent use of a unique font or typeface family across all brand touchpoints helps build strong brand recognition. When a consumer sees that specific font, they should instantly associate it with your brand. Think of the distinctive lettering of Coca-Cola or the clean, modern typeface of Google – these are integral to their brand identities.
For businesses and individuals focused on their Brand and Personal Branding, investing time in selecting and properly implementing fonts is a strategic decision that directly impacts how they are perceived.
H3: Practical Applications in Design Workflows
Graphic designers, web developers, and content creators frequently install new fonts to meet project-specific requirements.
- Graphic Design Projects: When working on logos, brochures, posters, or social media graphics, designers often need a diverse font library to match the client’s brief and the project’s aesthetic. Installing a new font allows them to experiment with different typographic treatments and find the perfect fit.
- Web Design and Development: For websites, custom fonts can significantly enhance user experience and brand distinctiveness. Web fonts (like WOFF/WOFF2) are installed differently by embedding them into the website’s code, but the process begins with obtaining and preparing these font files. Properly installed fonts on a website ensure a consistent visual experience for all visitors.
- Document Formatting and Productivity: Even for everyday tasks, having access to a wider range of fonts can improve document presentation. Whether you’re creating a resume, a report, or a personal journal, installing fonts can help you achieve a more polished and professional look, aligning with the Productivity aspect of our Tech interests.

H3: Font Choices and Financial Communication
While perhaps less obvious, font choices can even subtly influence the perception of Money and Business Finance.
- Professionalism and Trust: In financial reports, investment prospectuses, or business proposals, the choice of font directly impacts the reader’s perception of credibility and professionalism. Overly stylized or difficult-to-read fonts can create an impression of sloppiness or a lack of seriousness, potentially undermining the information presented. Traditional, legible fonts are generally preferred to convey stability and trust.
- Clarity in Data Presentation: Financial data often involves numbers, tables, and charts. Fonts that offer clear distinction between similar characters (like ‘1’ and ‘l’, or ‘0’ and ‘O’) and are highly legible at small sizes are crucial for accurate interpretation. This is where the technical aspects of font design intersect with financial literacy.
By understanding how to install and utilize fonts effectively, you unlock a powerful tool for enhancing your digital presence, refining your brand, and communicating your message with clarity and impact across all facets of your professional and personal life. The process itself is a testament to the user-friendly advancements in Tech, empowering you to customize your digital world to your exact specifications.
aViewFromTheCave is a participant in the Amazon Services LLC Associates Program, an affiliate advertising program designed to provide a means for sites to earn advertising fees by advertising and linking to Amazon.com. Amazon, the Amazon logo, AmazonSupply, and the AmazonSupply logo are trademarks of Amazon.com, Inc. or its affiliates. As an Amazon Associate we earn affiliate commissions from qualifying purchases.