
In the dynamic world of personal computing, few components are as critical to the visual fidelity and performance of games and multimedia applications as DirectX. For Windows users, DirectX acts as a crucial bridge between your operating system, graphics card, and the software that demands high-performance visuals. With each iteration, DirectX pushes the boundaries of what’s graphically possible, and DirectX 12 stands as a monumental leap forward, unlocking unprecedented levels of optimization, efficiency, and stunning visual effects.
This comprehensive guide will walk you through everything you need to know about installing DirectX 12, ensuring your system is primed to deliver the best possible gaming and application experience. We’ll delve into its importance, essential compatibility checks, the straightforward installation process primarily via Windows Update, and critical troubleshooting tips to get you up and running smoothly. Whether you’re a hardcore gamer, a 3D designer, or simply aiming to maximize your PC’s graphical capabilities, understanding DirectX 12 is key to staying ahead in the ever-evolving tech landscape.
I. Understanding DirectX 12 and Its Importance
Before diving into the installation process, it’s essential to grasp what DirectX 12 is and why it holds such significance in modern computing, particularly for high-performance applications.
A. What is DirectX and Why Version 12 Matters?
DirectX is a collection of application programming interfaces (APIs) developed by Microsoft for handling tasks related to multimedia, especially game programming and video, on Microsoft platforms. Essentially, it allows software developers to communicate directly with your computer’s hardware, enabling efficient rendering of complex graphics, 3D audio, and input controls. Without DirectX, many modern games and visually intensive applications simply wouldn’t run.
DirectX 12, specifically, represents a paradigm shift from its predecessors. Previous versions, like DirectX 11, primarily operated with higher-level APIs, meaning they handled many processes automatically, abstracting the hardware from the developer. While convenient, this often led to inefficiencies and limited control over the GPU. DirectX 12, on the other hand, introduces a “closer-to-the-metal” approach, offering developers much finer-grained control over how the CPU and GPU interact.
The key advantages of DirectX 12 are profound:
- Improved CPU Utilization: DX12 can better leverage multi-core CPUs, distributing workloads more efficiently across multiple threads. This reduces CPU bottlenecks, allowing the CPU to send more rendering commands to the GPU, leading to higher frame rates, especially in CPU-intensive games.
- Lower API Overhead: By giving developers more direct hardware access, DX12 reduces the “overhead” — the time and resources the CPU spends preparing data for the GPU. This translates to more processing power dedicated to actual game logic and rendering.
- Advanced Feature Sets: DirectX 12 introduced and standardized features that are crucial for cutting-edge graphics, such as:
- Ray Tracing (DXR): A revolutionary rendering technique that simulates the physical behavior of light, resulting in incredibly realistic lighting, reflections, and shadows.
- Variable Rate Shading (VRS): Allows the GPU to render different parts of a scene at varying levels of detail, saving processing power on less critical areas (like the periphery) while maintaining high fidelity where it matters most.
- Mesh Shaders: A more flexible and powerful way to handle geometric processing, enabling developers to create more detailed and complex environments with greater efficiency.
- Multi-Adapter Support: In certain configurations, DX12 allows games to utilize multiple GPUs more effectively, even those from different manufacturers (though this feature is less commonly implemented by developers).
For end-users, this translates directly to smoother gameplay, higher frame rates, more immersive visuals, and the ability to enjoy the latest graphical innovations in supported titles. From a broader “Tech” perspective, DX12 underscores the continuous evolution of software-hardware integration, driving innovation in AI tools for rendering and optimizing digital experiences across various apps.
B. System Requirements and Compatibility Checks
While DirectX 12 is a powerful tool, it’s not universally compatible. To leverage its capabilities, your system needs to meet specific requirements, primarily related to your operating system and graphics hardware.
-
Operating System: DirectX 12 is exclusive to modern Windows operating systems.
- Windows 10: All versions of Windows 10 inherently support DirectX 12.
- Windows 11: Windows 11 also fully supports DirectX 12 and its enhanced versions like DirectX 12 Ultimate.
- Older Windows versions (Windows 7, 8, 8.1) do not support DirectX 12. While some older games might utilize a “DirectX 12” runtime on these systems (often a wrapper), native DX12 API calls require Windows 10 or newer. This highlights the importance of keeping your OS updated not just for features, but for digital security and fundamental compatibility with the latest software.
-
Graphics Card (GPU): This is the most crucial component. Your GPU needs to support DirectX 12 at a hardware level, specifically a “Feature Level” of 120 or higher (e.g., 121, 12_2).
- WDDM 2.0 Driver: Your graphics card must also use a Windows Display Driver Model (WDDM) 2.0 or newer driver.
- Generally, most GPUs released since 2015 from NVIDIA (Maxwell, Pascal, Turing, Ampere architectures), AMD (GCN 3rd Gen and newer, RDNA architectures), and Intel (Skylake and newer iGPUs) support DX12 Feature Level 12_0. For advanced features like Ray Tracing and VRS, you’ll need even newer hardware (e.g., NVIDIA RTX series, AMD RX 6000 series, Intel Arc series).
How to Check Your Current DirectX Version and Feature Level:
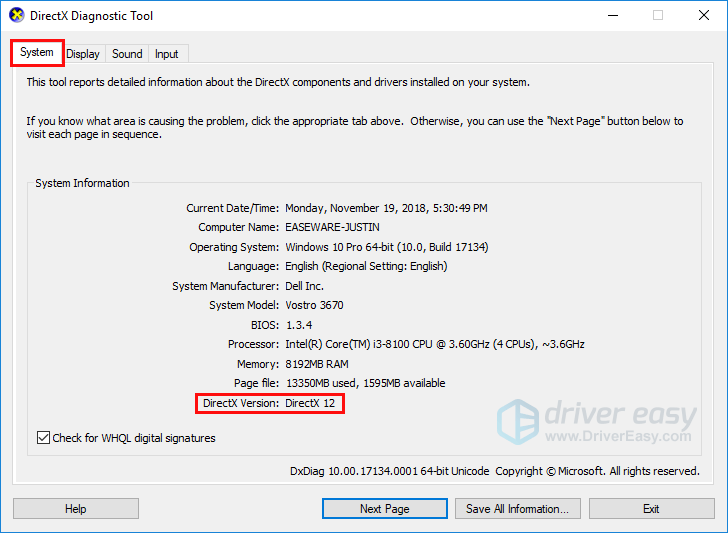
The easiest way to check your system’s DirectX status is by using the built-in DirectX Diagnostic Tool, dxdiag.
- Open Run Dialog: Press
Windows Key + R. - Type
dxdiag: In the Run dialog box, typedxdiagand press Enter. - Confirm Access: If prompted, click “Yes” to allow the tool to scan your system.
- System Tab: On the “System” tab, you’ll see “DirectX Version:” listed. For Windows 10/11, this should show “DirectX 12.”
- Display Tab(s): Navigate to the “Display” tab (or “Display 1” if you have multiple monitors/GPUs). Under “Drivers,” look for “Feature Levels.” This will show you the highest DirectX Feature Level supported by your graphics card. For full DX12 compatibility, you should see “120,” “121,” or “122″ listed. If it only shows 110, 11_1, etc., your GPU does not fully support DirectX 12 hardware features.
Understanding these requirements prevents frustration. If your hardware doesn’t meet the criteria, no amount of software installation will enable DirectX 12 features. In such cases, considering a hardware upgrade (often a new GPU) would be necessary to tap into the full potential of modern gaming and 3D applications, which can be a significant “Money” investment but also a substantial upgrade to your digital “Productivity” and entertainment value.
II. The Primary Method: Installing DirectX 12 Through Windows Update
Unlike previous versions where DirectX updates were often standalone installers or bundled with games, DirectX 12 is deeply integrated into Windows 10 and Windows 11. This means you don’t typically “install” DirectX 12 as a separate package. Instead, it comes as part of your operating system.
A. Keeping Your System Up-to-Date
The most straightforward and essential way to ensure you have DirectX 12 (and its latest components, including DirectX 12 Ultimate features) is to keep your Windows operating system fully updated. Microsoft continually refines and enhances DirectX through regular Windows updates.
-
The Symbiotic Relationship: DirectX 12 is not a separate application you download. It’s an integral component of Windows 10 and 11. When Microsoft releases major feature updates or cumulative updates for these operating systems, they often include updates to DirectX components. This ensures optimal performance, bug fixes, and compatibility with the latest hardware and software innovations.
-
Automatic Updates via Windows Update: By default, Windows 10 and 11 are configured to download and install updates automatically. This is the primary mechanism for receiving DirectX 12 updates.
- How to Manually Check for Windows Updates: While automatic updates are generally reliable, it’s a good practice to manually check occasionally, especially if you’re troubleshooting an issue or want to ensure you have the very latest versions.
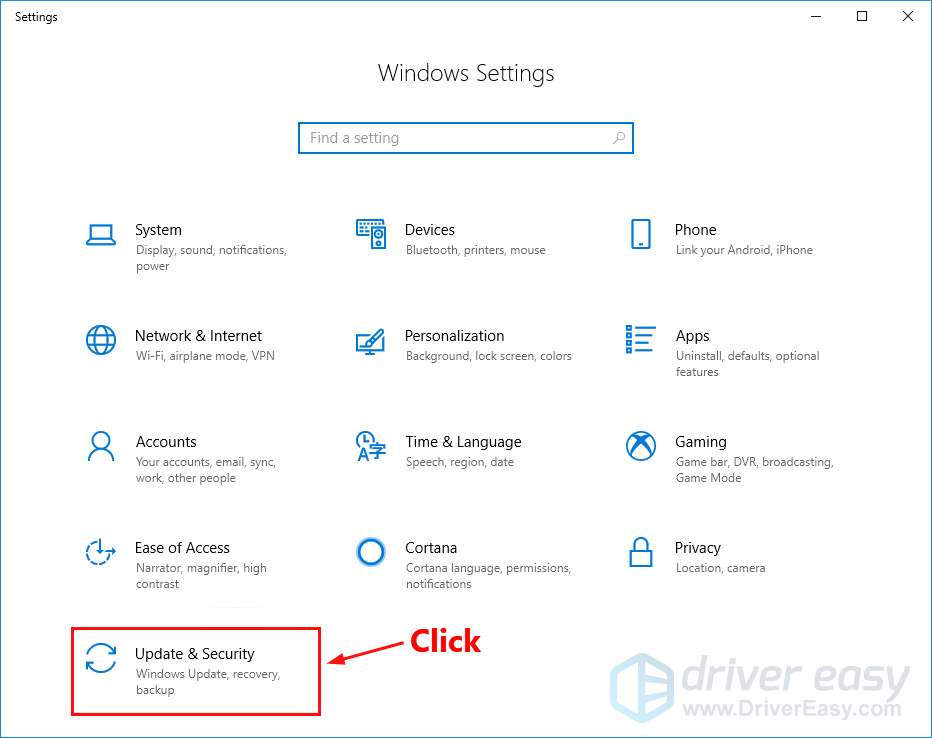
- For Windows 10: Go to
Start > Settings > Update & Security > Windows Update. Click “Check for updates.” - For Windows 11: Go to
Start > Settings > Windows Update. Click “Check for updates.”
- For Windows 10: Go to
- Allow any pending updates to download and install. You may need to restart your computer. After the restart, your DirectX components will be updated alongside the rest of your operating system.
- How to Manually Check for Windows Updates: While automatic updates are generally reliable, it’s a good practice to manually check occasionally, especially if you’re troubleshooting an issue or want to ensure you have the very latest versions.
-
Importance of Updating Drivers for Full DX12 Potential: While Windows Update handles the core DirectX API, your graphics card driver plays an equally critical role in enabling and optimizing DirectX 12 performance. A newer DirectX API can only fully utilize your hardware’s capabilities if your GPU drivers are also up-to-date and specifically optimized for that API version. This is a crucial aspect of overall system “Productivity” and performance.
-
Digital Security Aspect: Beyond performance, keeping your Windows OS and drivers updated is paramount for “Digital Security.” Updates often include critical security patches that protect your system from vulnerabilities. An outdated system is a potential entry point for malware, making regular updates a cornerstone of a secure computing environment.
B. Updating Graphics Card Drivers for Optimal Performance
Even if your Windows OS is fully updated to DirectX 12, an outdated or generic graphics driver can severely limit your system’s ability to leverage DX12’s full potential, leading to lower frame rates, graphical glitches, or even preventing games from running in DX12 mode. Your graphics card manufacturer (NVIDIA, AMD, Intel) frequently releases new drivers that offer performance improvements, bug fixes, and support for the latest games and DirectX features.
-
Why GPU Drivers are Crucial for DirectX 12: The graphics driver acts as the translator between DirectX (software) and your GPU (hardware). For DirectX 12’s low-level access to work efficiently, the driver must be specifically written to expose and manage those hardware features. Older drivers simply won’t know how to handle new DX12 commands or advanced features like Ray Tracing.
-
Methods for Updating GPU Drivers:
- Manufacturer’s Website (Recommended): This is generally the most reliable way to get the latest, optimized drivers.
- NVIDIA: Visit the NVIDIA Driver Download page. Select your product type, series, and operating system. Download the latest Game Ready Driver.
- AMD: Visit the AMD Drivers and Support page. Use the auto-detect tool or manually select your graphics card. Download the latest Radeon Software Adrenalin Edition.
- Intel: Visit the Intel Download Center. Use the Intel Driver & Support Assistant or manually find drivers for your integrated graphics.
- Dedicated Software:
- NVIDIA GeForce Experience: If you have an NVIDIA card, GeForce Experience can automatically detect and install the latest Game Ready Drivers.
- AMD Radeon Software: Similarly, AMD’s Radeon Software provides automatic driver updates for AMD GPUs.
- Windows Device Manager: You can technically update drivers via
Device Manager(Right-click Start > Device Manager > Display adapters > Right-click your GPU > Update driver), but this often only finds generic or slightly older drivers. It’s less recommended for graphics drivers.
- Manufacturer’s Website (Recommended): This is generally the most reliable way to get the latest, optimized drivers.
-
Step-by-Step Guide for Updating GPU Drivers (General Process):
- Identify Your GPU: If you’re unsure, use
dxdiag(as shown in Section I.B) orDevice Manager. - Download Latest Driver: Go to your GPU manufacturer’s website and download the appropriate driver package for your specific card and Windows version.
- Uninstall Old Driver (Optional but Recommended for Clean Install): For a clean installation, especially if you’re experiencing issues, it’s often best to uninstall the old driver first. You can use a tool like Display Driver Uninstaller (DDU) in Windows Safe Mode, or follow the manufacturer’s uninstallation guide.
- Install New Driver: Run the downloaded driver installer. Follow the on-screen prompts. It’s usually best to choose a “Custom” or “Clean Installation” option if available, as this ensures all old files are removed and a fresh installation occurs.
- Restart Your PC: A restart is almost always required after a driver installation to apply the changes fully.
- Identify Your GPU: If you’re unsure, use
-
Avoiding Common Driver Issues:
- Incorrect Driver: Always ensure you download the driver for your exact graphics card model and Windows version (64-bit).
- Interrupted Installation: Ensure your system is stable during the installation process.
- Conflicting Software: Temporarily disable any aggressive antivirus software that might interfere with the installation.
By diligently keeping both your Windows OS and graphics card drivers updated, you ensure that your system has the fundamental software infrastructure in place to properly utilize DirectX 12, delivering the best possible performance and stability.
III. Verifying Installation and Troubleshooting Common Issues
After ensuring your system is updated, it’s crucial to confirm that DirectX 12 is indeed installed and functioning correctly. Even with the best preparation, issues can arise, and knowing how to troubleshoot them is invaluable.
A. How to Confirm DirectX 12 is Installed and Active
Verifying your DirectX installation is a straightforward process that confirms both the API version and your hardware’s support for its features.
-
Using the
dxdiagTool to Verify: This remains your primary tool for verification.- Open
dxdiagby pressingWindows Key + R, typingdxdiag, and hitting Enter. - Check “DirectX Version”: On the “System” tab, confirm that “DirectX Version:” states “DirectX 12.” This indicates the core API is present on your operating system.
- Interpret the
dxdiagReport for “Feature Levels”: Crucially, switch to the “Display” tab (or “Display 1/2”). Under the “Drivers” section, look for “Feature Levels.” Here, you should see “120,” “121,” “122,” or similar entries. This confirms that your graphics card hardware supports DirectX 12 features. If you only see “110,” “11_1,” etc., your hardware is the bottleneck, not the Windows OS installation. - For advanced DX12 Ultimate features (like hardware-accelerated Ray Tracing or VRS Tier 2), you’d ideally see “12_2” listed.
- Open
-
Checking Game/Application Settings for DX12 Options: Many modern games and 3D applications offer a choice between DirectX 11 and DirectX 12 rendering modes in their graphics settings.
- Launch a DirectX 12-compatible game (e.g., Cyberpunk 2077, Forza Horizon 5, Control).
- Navigate to the graphics or video settings.
- Look for an option to select the “API” or “Renderer.” If “DirectX 12” is available and selectable, it’s a strong indicator that your system is ready for it. If it’s greyed out or missing, refer to the troubleshooting steps below.
B. Addressing Common DirectX 12 Installation and Performance Problems
Despite DirectX 12’s deep integration, users can still encounter issues. Here’s how to address some of the most common problems:
-
“DX12 not supported” Errors or Missing Options:
- Hardware Incompatibility: Revisit Section I.B. The most frequent cause is a graphics card that genuinely doesn’t support DX12 Feature Level 120 or higher. Use
dxdiagto confirm your GPU’s Feature Levels. If they are below 120, a hardware upgrade is your only solution. - Outdated Graphics Drivers: Even with compatible hardware, old drivers might not properly expose DX12 capabilities. Ensure your GPU drivers are fully up-to-date from the manufacturer’s website (see Section II.B).
- Outdated Windows: While less common for DX12 itself, some advanced DX12 Ultimate features might require a specific Windows version or update. Ensure your Windows 10/11 is fully updated (Section II.A).
- Hardware Incompatibility: Revisit Section I.B. The most frequent cause is a graphics card that genuinely doesn’t support DX12 Feature Level 120 or higher. Use
-
Game Crashes or Performance Issues When Using DX12:
- Driver Conflicts: Try a clean installation of your graphics drivers (using DDU, for example) to eliminate any lingering conflicts from previous driver versions.
- Corrupted Game Files: Verify the integrity of game files through your game launcher (Steam, Epic Games, GOG, Xbox app). Sometimes, specific game updates or installations can corrupt files necessary for DX12.
- Background Applications: High CPU or RAM usage from other background apps can impact DX12 performance. Close unnecessary programs before gaming.
- Overclocking Instability: If you’ve overclocked your CPU or GPU, revert to stock settings to check for stability issues.
- Specific Game Bugs: Some games might have specific bugs with DX12 implementations, especially at launch. Check game forums or developer updates for known issues and potential workarounds.
-
Corrupted DirectX Components:
- While rare for the core DX12 API (as it’s tied to the OS), individual DirectX runtime components might become corrupted.
- System File Checker (SFC): Run
sfc /scannowin an elevated Command Prompt (Right-click Start > Terminal (Admin) or Command Prompt (Admin)). This tool scans for and repairs corrupted Windows system files. - Deployment Image Servicing and Management (DISM): If SFC doesn’t help, DISM can repair the Windows image itself. In an elevated Command Prompt, run:
DISM /Online /Cleanup-Image /CheckHealthDISM /Online /Cleanup-Image /ScanHealthDISM /Online /Cleanup-Image /RestoreHealth
- Reinstalling DirectX (Generally Not Applicable for DX12): Unlike older DirectX versions that had a redistributable installer, there is no standalone DirectX 12 installer. If core DX12 components are truly corrupted beyond repair by SFC/DISM, it often points to a deeper OS corruption, potentially requiring a Windows repair install or a clean reinstallation. This also emphasizes the importance of regular backups as a “Digital Security” best practice.
-
The Role of “Legacy” DirectX Components: Many older games still rely on DirectX 9, 10, or 11. Your Windows 10/11 system should automatically include these older runtimes for backward compatibility. If you encounter issues with older games, you might need to manually install the DirectX End-User Runtime Web Installer from Microsoft’s website. This package installs older, missing DirectX libraries without affecting your DX12 installation.
By systematically working through these troubleshooting steps, you can often identify and resolve most DirectX 12-related issues, ensuring your tech setup delivers the high-performance visuals you expect.
IV. Beyond Installation: Maximizing Your DirectX 12 Experience
Installing and verifying DirectX 12 is just the beginning. To truly capitalize on its benefits, an ongoing approach to system optimization and understanding its advanced features will elevate your digital experience.
A. Optimizing Your Gaming and Application Environment
Achieving peak DirectX 12 performance involves more than just having the correct version installed; it requires a holistic approach to system management.
- Game Settings Adjustments (DX12 vs. DX11 Modes): Many games that support DirectX 12 also offer a DX11 fallback. While DX12 generally offers better performance and features on compatible hardware, sometimes specific games might run more stably or even slightly better on DX11 on certain configurations. Experiment with both modes in game settings to find the optimal balance for your system. Pay attention to benchmark results and real-world framerates.
- Windows Game Mode and Related Optimizations: Windows 10 and 11 include “Game Mode” (found in
Settings > Gaming > Game Mode). Enabling this feature tells Windows to prioritize gaming performance by minimizing background processes and resource usage when a game is detected. Additionally, ensure your power plan is set to “High Performance” (or “Ultimate Performance” if available) inControl Panel > Hardware and Sound > Power Options. - Maintaining System Health: A clean, efficient system is crucial for any high-performance application.
- Disk Cleanup: Regularly clean up temporary files and system clutter.
- Defragmentation (for HDDs): If you still use a traditional Hard Disk Drive (HDD), defragmenting it can improve load times. However, for Solid State Drives (SSDs), defragmentation is unnecessary and can reduce drive lifespan.
- Storage Space: Ensure you have ample free space on your primary drive, especially for games that utilize advanced caching.
- Software and AI Tools for Performance Monitoring: Utilize tools like MSI Afterburner, HWiNFO, or the built-in Windows Task Manager to monitor your CPU, GPU, and RAM usage while gaming. This helps identify bottlenecks and allows you to fine-tune settings. Modern AI tools are also emerging that can intelligently optimize game settings based on your hardware, striving for the best performance without manual tweaking. Investing time in these “Productivity” aspects ensures consistent high performance.
B. The Future of Gaming and 3D with DirectX 12 Ultimate
DirectX 12 isn’t static; it’s a continuously evolving platform. DirectX 12 Ultimate represents the pinnacle of this evolution, bundling several groundbreaking features into one API set. If your hardware supports it (e.g., NVIDIA RTX 30/40 series, AMD RX 6000/7000 series GPUs with Windows 10 version 20H2 or newer, or Windows 11), you’re already experiencing its benefits.
DirectX 12 Ultimate standardizes critical features:
- DirectX Raytracing (DXR) 1.1: Enhanced ray tracing capabilities for more efficient and visually impressive global illumination, reflections, and shadows.
- Variable Rate Shading (VRS) Tier 2: More granular control over shading rates, further boosting performance by intelligently reducing detail in less critical areas without perceptible quality loss.
- Mesh Shaders: A more flexible geometry pipeline allowing for richer, more complex scenes with greater detail and efficiency than ever before.
- Sampler Feedback: Improves texture streaming efficiency, reducing memory bandwidth and allowing games to load textures more intelligently.
These features are not just buzzwords; they represent the foundation for the next generation of hyper-realistic gaming and sophisticated 3D applications. The continuous updates to DirectX 12 Ultimate ensure that developers have the tools they need to push graphical boundaries, and users with compatible hardware are always at the forefront of visual computing. This ongoing advancement highlights the ever-present “Tech” trends that redefine our digital interactions and experiences.
Conclusion
Installing and maintaining DirectX 12 is a foundational step for anyone looking to maximize their Windows PC’s graphical prowess. As an integral component of Windows 10 and 11, its availability is largely dependent on keeping your operating system and, crucially, your graphics card drivers meticulously updated. By understanding DirectX 12’s importance, confirming your system’s compatibility, and adhering to simple update protocols, you unlock a world of enhanced performance, stunning visuals, and access to the latest graphical innovations. Regularly checking for updates and performing basic system optimizations will ensure your PC remains a cutting-edge platform for gaming, content creation, and all demanding visual applications, truly delivering on the promise of modern technology.
aViewFromTheCave is a participant in the Amazon Services LLC Associates Program, an affiliate advertising program designed to provide a means for sites to earn advertising fees by advertising and linking to Amazon.com. Amazon, the Amazon logo, AmazonSupply, and the AmazonSupply logo are trademarks of Amazon.com, Inc. or its affiliates. As an Amazon Associate we earn affiliate commissions from qualifying purchases.