In the dynamic world of software development, managing build processes across different operating systems and environments can be a significant hurdle. Developers often face challenges in ensuring that their projects compile consistently, regardless of whether they are working on Windows, macOS, or Linux. This is where CMake steps in, offering a powerful, cross-platform solution to automate the generation of build systems. For Windows users, understanding how to properly install and configure CMake is a fundamental skill that streamlines workflows, enhances productivity, and paves the way for building complex, multi-platform applications. This guide will walk you through the entire process, from understanding CMake’s core purpose to mastering its installation on your Windows machine, alongside essential tips for verification and troubleshooting.
Understanding CMake: The Cross-Platform Build System
Before diving into the installation process, it’s crucial to grasp what CMake is and why it has become an indispensable tool in modern software development. CMake is not a build system itself, but rather a meta-build system that generates native build files (like Makefiles, Visual Studio projects, Xcode projects, etc.) that can then be used in the native build environment.
What is CMake and Why is it Essential?
At its heart, CMake is an open-source tool designed to manage the build process of software using a compiler-independent method. Instead of writing build scripts directly for specific compilers or IDEs, developers write CMakeLists.txt files that describe their project’s structure, dependencies, and build rules in a high-level, platform-agnostic language. CMake then reads these files and generates the appropriate build scripts or project files for the target platform.
For example, a developer could use CMake to generate Visual Studio project files (.sln, .vcxproj) on Windows, Makefiles on Linux, or Xcode project files (.xcodeproj) on macOS, all from the same set of CMakeLists.txt files. This capability significantly reduces the overhead of maintaining separate build configurations for different environments, making it a cornerstone for cross-platform development. Its flexibility and widespread adoption have solidified its position as a standard tool in numerous open-source and commercial projects.
Key Benefits for Windows Developers
For developers primarily working on Windows, CMake offers several compelling advantages:
- Cross-Platform Compatibility: Even if you primarily develop on Windows, your projects might eventually need to be compiled on other systems. CMake ensures that your build process remains consistent and portable.
- Integration with IDEs: CMake integrates seamlessly with popular Windows IDEs like Visual Studio, allowing you to generate and open project files directly, leveraging the powerful debugging and development features these environments offer.
- Simplified Dependency Management: For projects with numerous libraries and external dependencies, CMake provides robust mechanisms to find, configure, and link them, simplifying an otherwise complex task.
- Flexibility and Customization: While it handles common scenarios out of the box, CMake also allows for extensive customization, enabling developers to define intricate build rules and processes tailored to their specific project needs.
- Modern C++ Development: With the increasing complexity of modern C++ projects, CMake offers features like module support, advanced target properties, and better handling of C++ standards, making it ideal for contemporary C++ development on Windows.
Pre-Installation Checklist: Preparing Your Windows Environment
Before you proceed with installing CMake, it’s good practice to ensure your Windows environment is ready. A few simple checks and preparations can prevent common issues and make the installation process smoother.
System Requirements and Administrative Privileges
CMake is lightweight and has minimal system requirements. It runs on virtually all modern Windows versions (Windows 7 and newer are generally supported). You will, however, need:
- Administrator Privative: To install CMake system-wide and modify system environment variables (which is highly recommended), you’ll need administrative rights on your Windows machine. If you’re on a corporate machine, you might need to consult your IT department.
- Internet Connection: You’ll need an active internet connection to download the CMake installer from the official website.
- Sufficient Disk Space: The installer itself is small, and CMake occupies only a modest amount of disk space, typically less than 100MB.
Essential Tools and Mindset
While not strictly required for CMake installation, having certain tools or knowledge can enhance your experience:
- Command Prompt or PowerShell: Familiarity with using the command line is beneficial, as you’ll often interact with CMake through
cmdor PowerShell after installation, especially for verification. - Visual Studio (Optional but Recommended): If you plan to develop C++ projects on Windows, having Visual Studio installed (even the free Community edition) is highly recommended. CMake is often used to generate Visual Studio project files.
- Basic Understanding of Environment Variables: The installation process involves setting environment variables. A basic understanding of what the
PATHvariable does will be helpful, though we will cover it in detail.
Step-by-Step Installation of CMake on Windows
There are a few ways to install CMake on Windows, each catering to different preferences and levels of technical expertise. The most common and recommended method for most users is using the official installer. For those who prefer managing their software through package managers, Chocolatey and Scoop offer convenient alternatives.
Method 1: Installing via the Official CMake Installer (Recommended for Most Users)
This method involves downloading an executable installer directly from the CMake website and running it, much like any other Windows application. It’s straightforward and ensures that all necessary components are correctly set up.
Downloading the Installer
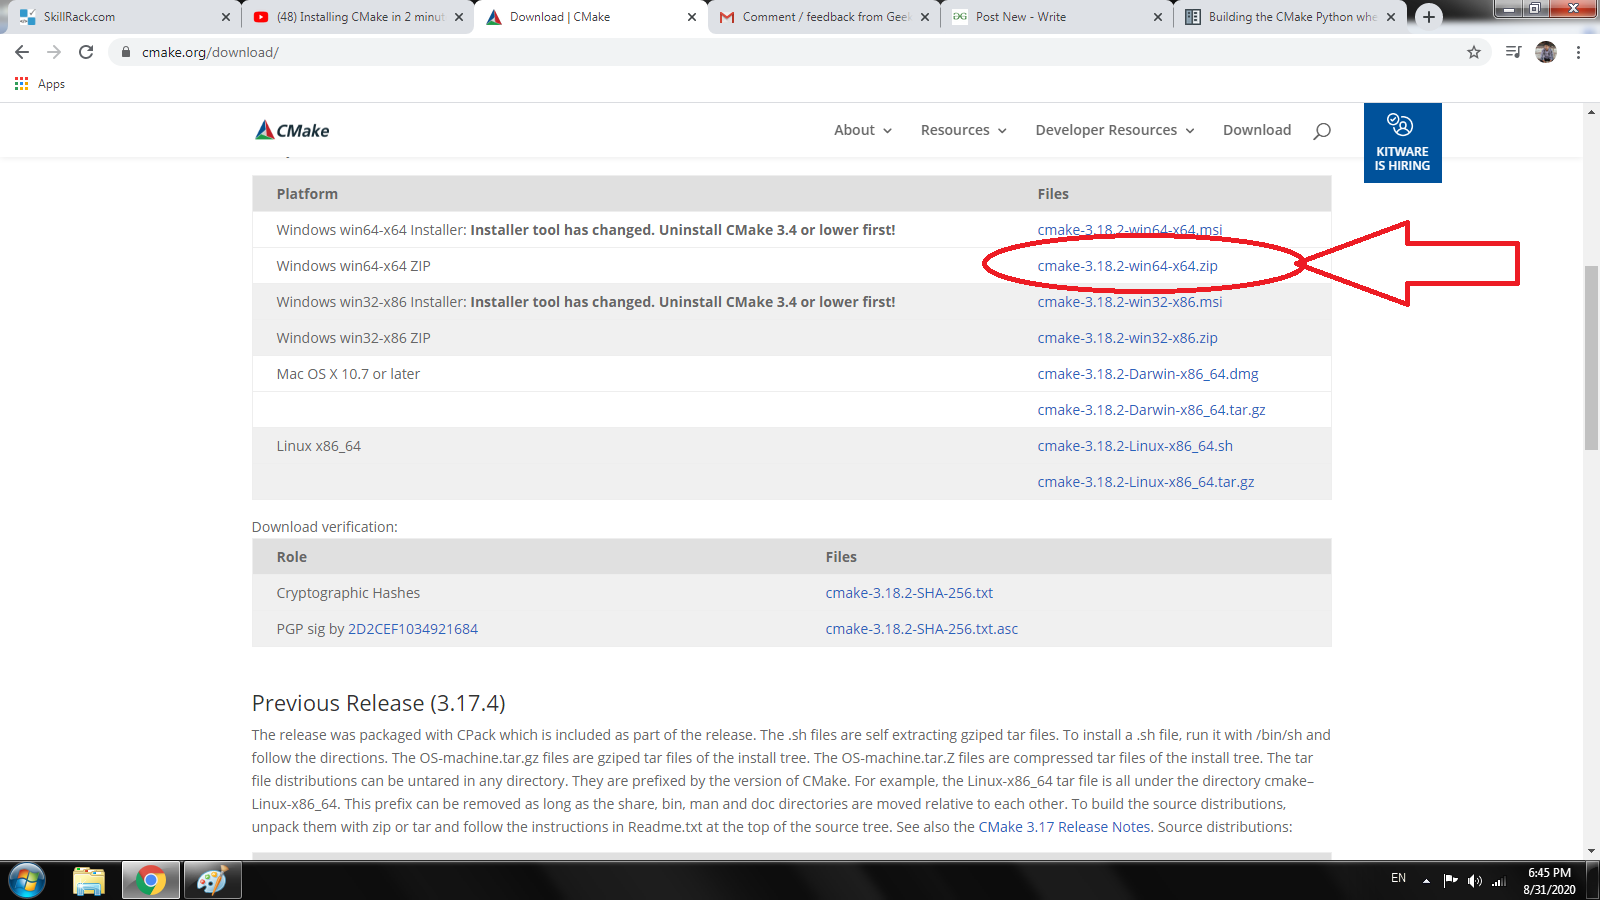
- Navigate to the Official CMake Website: Open your web browser and go to
https://cmake.org/download/. - Locate the Windows Installer: On the download page, you’ll see various versions of CMake. Look for the latest stable release. Under the “Binary distributions” section, find the link for “Windows x64 Installer” (for 64-bit Windows) or “Windows win32 Installer” (for 32-bit Windows). Most modern systems are 64-bit, so
cmake-*-windows-x64.msiis usually the correct choice. - Download the
.msiFile: Click on the appropriate link to download the installer file. Save it to a location on your computer where you can easily find it, such as yourDownloadsfolder.
Running the Setup Wizard
Once the download is complete, follow these steps:
- Launch the Installer: Double-click the downloaded
.msifile. You might see a User Account Control (UAC) prompt asking for permission to run the installer; click “Yes.” - Accept the License Agreement: The CMake Setup Wizard will appear. Read the license agreement carefully, and if you agree to the terms, select the “I accept the terms in the License Agreement” radio button and click “Next.”
- Choose Installation Options (Crucial Step): This is perhaps the most important step for ensuring CMake works seamlessly from the command line. You will be presented with options for modifying the system PATH.
- Recommended: Select “Add CMake to the system PATH for all users.” This option ensures that CMake’s executable can be found from any command prompt window, regardless of your current directory. It’s the most convenient choice for most developers.
- Alternatively, you can choose “Add CMake to the system PATH for the current user” if you’re the only user who needs CMake or “Do not add CMake to the system PATH” if you prefer to manually manage your PATH or only use CMake through its GUI. However, these latter options require more manual configuration or limit functionality, so “Add CMake to the system PATH for all users” is strongly advised.
- Click “Next.”
- Select Components: The next screen allows you to choose which components to install. Typically, the default selections (CMake command-line tools, GUI, and documentation) are sufficient. Click “Next.”
- Choose Installation Location: You can accept the default installation directory (usually
C:Program FilesCMake) or click “Browse…” to choose a different location. Unless you have a specific reason, the default is fine. Click “Next.” - Initiate Installation: The wizard is now ready to install CMake. Click “Install” to begin the process. A progress bar will indicate the installation status.
- Complete the Installation: Once the installation is finished, you’ll see a “Completed the CMake Setup Wizard” message. Click “Finish” to exit the wizard.
Configuring PATH Environment Variables: A Critical Step
If you did not select “Add CMake to the system PATH for all users” during installation, or if you encounter issues where cmake commands are not recognized after installation, you might need to manually add CMake to your system’s PATH environment variable. This step is crucial for using CMake from the command line or any integrated development environment (IDE) that relies on the system PATH.
- Open System Properties:
- Right-click on “This PC” (or “My Computer”) on your desktop or in File Explorer.
- Select “Properties.”
- In the System window, click “Advanced system settings” on the left sidebar.
- Access Environment Variables:
- In the “System Properties” dialog, go to the “Advanced” tab.
- Click the “Environment Variables…” button at the bottom.
- Edit the PATH Variable:
- Under “System variables” (for all users) or “User variables for [Your Username]” (for current user only), find the variable named
Path(orPATH). - Select it and click “Edit…”.
- Under “System variables” (for all users) or “User variables for [Your Username]” (for current user only), find the variable named
- Add CMake’s Bin Directory:
- In the “Edit environment variable” dialog, click “New.”
- Enter the path to CMake’s
bindirectory. By default, this is typicallyC:Program FilesCMakebin. If you installed CMake to a different location, adjust the path accordingly. - Click “OK” on all open dialogs to save the changes.
- Important: For the changes to take effect, you must close and reopen any command prompt or PowerShell windows that were open before modifying the PATH variable.
Method 2: Streamlining Installation with Package Managers (For Advanced Users)
For developers who prefer managing their software through command-line package managers, Chocolatey and Scoop offer excellent ways to install and update CMake on Windows. These methods are generally faster and allow for easy automation.
Using Chocolatey for CMake Installation
Chocolatey is a popular package manager for Windows, akin to apt-get or yum on Linux.
- Install Chocolatey (if not already installed):
- Open PowerShell as Administrator.
- Run the command:
powershell

Set-ExecutionPolicy Bypass -Scope Process -Force; [System.Net.ServicePointManager]::SecurityProtocol = [System.Net.ServicePointManager]::SecurityProtocol -bor 3072; iex ((New-Object System.Net.WebClient).DownloadString('https://community.chocolatey.org/install.ps1'))
- After installation, close and reopen PowerShell as Administrator.
- Install CMake via Chocolatey:
- In the Administrator PowerShell window, run:
powershell

choco install cmake --installargs 'ADD_CMAKE_TO_PATH=System'
The--installargs 'ADD_CMAKE_TO_PATH=System'argument ensures CMake is added to your system’s PATH, similar to selecting “Add CMake to the system PATH for all users” in the GUI installer. - Chocolatey will download and install CMake, automatically handling dependencies and PATH configuration.
- In the Administrator PowerShell window, run:
Leveraging Scoop for CMake Management
Scoop is another excellent command-line installer for Windows, focusing on providing a clean, unprivileged installation experience.
- Install Scoop (if not already installed):
- Open PowerShell.
- Run the commands:
powershell

Set-ExecutionPolicy RemoteSigned -Scope CurrentUser

irm get.scoop.sh | iex
- Follow any on-screen prompts.
- Install CMake via Scoop:
- In your PowerShell window, run:
powers0hell

scoop install cmake
- Scoop will download and install CMake, automatically managing its path configuration within the Scoop environment. Scoop installations are typically isolated to your user profile, making them easy to manage and uninstall.
- In your PowerShell window, run:
Verifying Your CMake Installation and First Steps
After completing the installation using any of the methods above, it’s crucial to verify that CMake is correctly installed and accessible from your system. This simple check ensures that you can begin using CMake without encountering “command not found” errors.
Confirming Installation via Command Prompt
- Open a New Command Prompt or PowerShell Window: It’s important to open a new window after installation or PATH modification, as existing windows might not have the updated environment variables.
- Type the Verification Command: In the command prompt, type:
bash

cmake --version
- Check the Output: If CMake is installed correctly and its path is configured, you should see output similar to this:
cmake version 3.29.0

CMake suite main page
(The version number will correspond to the version you installed).
If you see an error like'cmake' is not recognized as an internal or external command, operable program or batch file., it indicates that CMake is either not installed or itsbindirectory is not correctly added to your system’s PATH. In this case, revisit the “Configuring PATH Environment Variables” section.
A Basic CMake Project Configuration Example
Once verified, you can try a very basic example to understand how CMake works.
-
Create a Project Directory:
bash

mkdir my_cmake_project

cd my_cmake_project
-
Create a Simple C++ Source File (
main.cpp):// main.cpp #include <iostream> int main() { std::cout << "Hello from CMake on Windows!" << std::endl; return 0; } -
Create a
CMakeLists.txtFile:# CMakeLists.txt cmake_minimum_required(VERSION 3.10) # Specify minimum CMake version project(MyProject CXX) # Define project name and language add_executable(MyProject main.cpp) # Add an executable target -
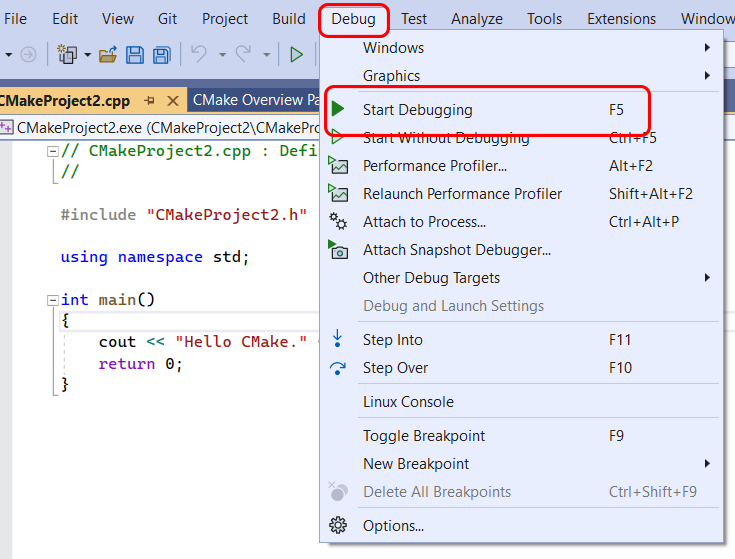
Configure and Build (Using Visual Studio Generator):
# Create a build directory
mkdir build
cd build

# Configure the project (generates Visual Studio solution files)
cmake .. -G "Visual Studio 17 2022" -A x64
# (Adjust generator and architecture based on your Visual Studio version)
# Common generators: "Visual Studio 16 2019", "Visual Studio 17 2022"

# Build the project
cmake --build .
After running these commands, you should find a
MyProject.exeexecutable in yourbuildDebug(orRelease) folder, which you can run to see the “Hello” message. This demonstrates CMake’s ability to generate and orchestrate a build process using your installed compilers.
Troubleshooting Common CMake Installation Issues
Even with careful steps, you might encounter issues during or after CMake installation. Here are some common problems and their solutions.
“CMake Not Recognized” Error
This is by far the most frequent issue. It means your system cannot find the cmake.exe executable when you type cmake in the command prompt.
- Cause: The CMake
bindirectory is not in your system’sPATHenvironment variable, or the command prompt window was opened before thePATHvariable was updated. - Solution:
- Restart Command Prompt/PowerShell: Close all open command prompt or PowerShell windows and open a new one. This refreshes the environment variables.
- Verify PATH: Manually check your
PATHenvironment variable as described in the “Configuring PATH Environment Variables” section. Ensure thatC:Program FilesCMakebin(or your custom install path) is listed. - Re-run Installer (if necessary): If you initially chose “Do not add CMake to the system PATH,” consider re-running the installer and selecting “Add CMake to the system PATH for all users.”
Installation Failures and Permissions
If the installer fails or rolls back, it’s often due to permission issues.
- Cause: Insufficient administrative privileges.
- Solution:
- Run as Administrator: Right-click on the
.msiinstaller file and select “Run as administrator.” - Check Antivirus/Firewall: Temporarily disable your antivirus or firewall if it’s overly aggressive and might be blocking the installation. Remember to re-enable it afterward.
- Disk Space: Ensure you have enough free disk space, though CMake is small, lack of space can halt any installation.
- Run as Administrator: Right-click on the
Managing Multiple CMake Versions
Sometimes developers might need to work with different versions of CMake.
- Cause: Installing a new version might overwrite an old one, or multiple versions might lead to
PATHconflicts. - Solution:
- Official Installer: The official installer typically handles upgrades smoothly, replacing older versions.
- Package Managers: Scoop and Chocolatey can manage different versions more gracefully. Scoop, in particular, allows for installing multiple versions side-by-side and switching between them using
scoop reset cmake@x.y.z. - Manual PATH Management: If you need specific control, install different CMake versions to distinct directories and manually adjust your
PATHvariable to point to the desired version’sbinfolder, or create batch scripts that temporarily modify thePATHfor specific projects.
Beyond Installation: Leveraging CMake for Efficient Development
Installing CMake is just the first step. To truly harness its power, especially in a Windows development environment, understanding its integration with IDEs and its various “generators” is key.
Integrating CMake with Popular IDEs
Windows developers frequently use IDEs like Visual Studio. CMake plays a crucial role in managing projects within these environments.
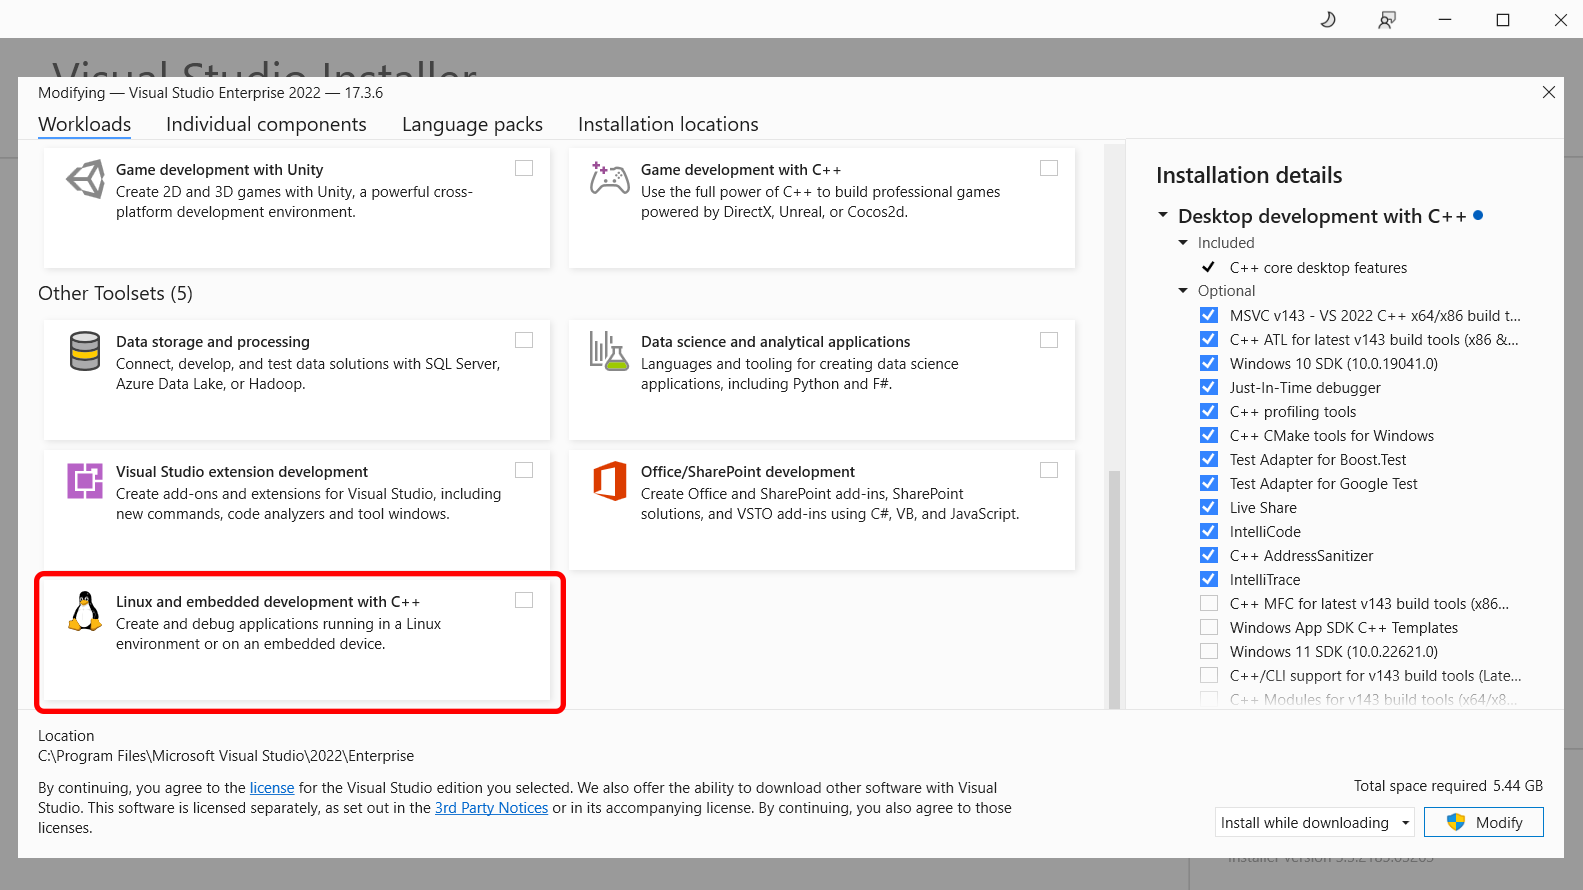
- Visual Studio: CMake has first-class support in Visual Studio. When you use CMake to generate Visual Studio project files (e.g.,
cmake .. -G "Visual Studio 17 2022"), you get a.slnfile that you can open directly in Visual Studio. Visual Studio 2017 and newer also have native CMake support, allowing you to open a folder containing aCMakeLists.txtdirectly. Visual Studio will automatically detect and configure the project, making development and debugging seamless. - Visual Studio Code: For a lighter-weight editor, VS Code, with its CMake Tools extension, offers excellent integration. You can configure, build, and debug CMake projects directly within VS Code, providing a powerful and flexible development experience.
- CLion: JetBrains CLion is an IDE specifically designed for C/C++ development and deeply integrates with CMake. It uses CMake as its primary project model, offering a superb experience for CMake-driven projects.
Exploring CMake Generators and Build Systems
CMake’s core functionality relies on “generators,” which are responsible for outputting the appropriate build system files. On Windows, the most common generators are for Visual Studio.
- Visual Studio Generators:
Visual Studio 17 2022: For Visual Studio 2022Visual Studio 16 2019: For Visual Studio 2019Visual Studio 15 2017: For Visual Studio 2017- When using these, you often need to specify the architecture (
-A x64for 64-bit builds, or-A Win32for 32-bit builds).
- Ninja: Ninja is a fast, small build system often used with CMake, especially in continuous integration (CI) environments or for developers who prefer command-line builds over IDE-specific project files. CMake can generate Ninja build files with
-G "Ninja". You’ll need to install Ninja separately. - MSYS Makefiles / MinGW Makefiles: If you’re using MinGW or MSYS2 environments on Windows for GCC/G++ compilers, CMake can generate Makefiles compatible with those systems (
-G "MinGW Makefiles").
Understanding and choosing the right generator for your project and development environment is key to leveraging CMake’s full potential on Windows.
Conclusion
Installing CMake on Windows is a fundamental step for any developer looking to build cross-platform applications, manage complex C++ projects efficiently, or simply streamline their build processes. Whether you opt for the user-friendly official installer, or the robust package management solutions like Chocolatey or Scoop, the goal remains the same: to equip your development environment with a powerful meta-build system.
By following the detailed steps outlined in this guide – from careful installation and critical PATH variable configuration to verifying its accessibility and understanding its integration with modern IDEs – you’re now well-prepared to harness CMake’s capabilities. Remember that proficiency with CMake, much like any powerful tool, grows with practice. Experiment with CMakeLists.txt files, integrate it into your projects, and explore its advanced features. With CMake properly installed and understood, you’re set to embark on a more efficient, flexible, and consistent software development journey on your Windows machine.