For anyone serious about harnessing the full power of their Apple macOS machine, particularly developers, system administrators, or even just tech-savvy users, encountering a powerful utility like Homebrew is almost inevitable. Often referred to as “the missing package manager for macOS,” Homebrew streamlines the installation and management of command-line tools, open-source software, and even graphical applications, transforming your Mac into a robust development and productivity powerhouse.
In the ever-evolving landscape of Tech, where efficiency and access to cutting-edge tools are paramount, Homebrew stands out as an indispensable asset. It simplifies what used to be a convoluted process of compiling software from source code or hunting for specific .pkg installers. This guide will walk you through the entire process of installing Homebrew on your Mac, from essential prerequisites to mastering its core functionalities, ensuring you’re equipped to leverage this magnificent tool to its fullest potential.
Understanding Homebrew: The macOS Package Manager
Before diving into the installation process, it’s crucial to understand what Homebrew is, why it’s so widely adopted, and how it fits into your workflow. Think of it as your Mac’s personal assistant for software management, diligently fetching, installing, and updating applications with simple commands.
What is Homebrew?
At its core, Homebrew is a free and open-source package management system designed for macOS. Developed by Max Howell, it allows users to install software that Apple doesn’t typically provide. Instead of manually downloading installers, compiling source code, or dealing with complex dependencies, Homebrew handles all the heavy lifting. It works by fetching pre-compiled binaries (most of the time) or compiling software from its source code, placing everything in appropriate locations (primarily /opt/homebrew for Apple Silicon or /usr/local for Intel Macs) and managing dependencies seamlessly.
The beauty of Homebrew lies in its simplicity and effectiveness. It integrates cleanly with macOS, using standard directory structures and avoiding the need for sudo for most operations, thereby maintaining system integrity. For those looking to optimize their Tech stack, Homebrew is a fundamental building block.
Why Every Mac User (Especially Developers) Needs Homebrew
While often associated with developers, Homebrew offers significant advantages for a broader audience. For software engineers, data scientists, web developers, or anyone working with command-line utilities, Homebrew is non-negotiable.
- Simplified Software Installation: Gone are the days of hunting for specific download links or grappling with complex installation instructions. With Homebrew, a single command like
brew install wgetis all it takes to getwgetup and running. - Efficient Updates: Keeping your software current is vital for security and access to new features. Homebrew simplifies this with
brew updateto update Homebrew itself andbrew upgradeto update all your installed packages. - Dependency Management: Many software packages rely on other underlying components (dependencies). Homebrew intelligently resolves and installs these dependencies automatically, preventing compatibility issues and saving countless hours of troubleshooting.
- Access to a Vast Software Library: Homebrew boasts an enormous repository of available software, including essential development tools (Node.js, Python, Git, Ruby), databases (PostgreSQL, MySQL), utilities (htop, tree, imagemagick), and much more.
- Manages Command-Line and GUI Applications: Beyond command-line tools, Homebrew Cask, an extension to Homebrew, allows you to install macOS graphical applications like Google Chrome, Visual Studio Code, Spotify, or Zoom with similar ease, making it a comprehensive solution for managing your entire software ecosystem. This centralized management can contribute to a cleaner, more organized system, indirectly supporting a more professional personal Brand for tech users.
The Power of Homebrew: A Digital Toolbox for Your Mac
By providing a unified interface for software management, Homebrew essentially transforms your Mac into a powerful digital toolbox. It empowers users to quickly set up development environments, experiment with new technologies, and maintain their system with minimal effort. This efficiency directly impacts productivity and can even translate to better management of time, which, for professionals, often means managing Money more effectively by optimizing workflow. Whether you’re configuring a new machine or maintaining an existing one, Homebrew vastly reduces the friction associated with software setup and maintenance.
Prerequisites for a Smooth Homebrew Installation
Before executing the Homebrew installation command, a few preliminary steps are necessary to ensure a smooth and successful setup. These steps primarily involve preparing your macOS environment.
Ensuring Your System is Ready
- macOS Version: Homebrew officially supports the latest stable version of macOS. While it might work on older versions, it’s always recommended to keep your operating system updated for optimal compatibility, security, and performance.
- Administrative Privileges: You’ll need to be logged into an administrator account on your Mac, as the installation process requires permissions to modify system paths and directories.
- Internet Connection: An active internet connection is essential for downloading the Homebrew installer script and any subsequent software packages.
- Terminal Access: You’ll be using the Terminal application (found in
Applications/Utilities) to execute all the commands. Familiarity with basic terminal operations is helpful but not strictly necessary for this guide, as we’ll provide exact commands.
Installing Xcode Command Line Tools
The single most critical prerequisite for Homebrew is the installation of Apple’s Xcode Command Line Tools. These tools provide essential Unix utilities, compilers (like gcc), and other development tools that Homebrew relies on to function correctly and compile software. Without them, Homebrew cannot perform its tasks.
To install Xcode Command Line Tools, open your Terminal and enter the following command:
xcode-select --install
Upon executing this command, a software update dialog will appear, prompting you to install the tools. Click “Install” and agree to the terms and conditions. The download and installation process may take a few minutes, depending on your internet speed.
Once the installation is complete, you can verify it by typing:
xcode-select -p
This command should return a path like /Applications/Xcode.app/Contents/Developer (if Xcode is installed) or /Library/Developer/CommandLineTools (if only the Command Line Tools are installed). If you see a path, you’re good to go.
Understanding Your Terminal
The Terminal is your interface for interacting with Homebrew. For new users, it might seem daunting, but it’s essentially a text-based window where you type commands instead of clicking icons. Each command you enter tells your computer to perform a specific action. All the commands in this guide are designed to be copied and pasted directly into your Terminal, followed by pressing Enter.
The Core Installation Process
With the prerequisites in place, you are now ready for the main event: installing Homebrew itself. This is a straightforward process, but paying attention to the details will ensure success.
Executing the Homebrew Installation Command
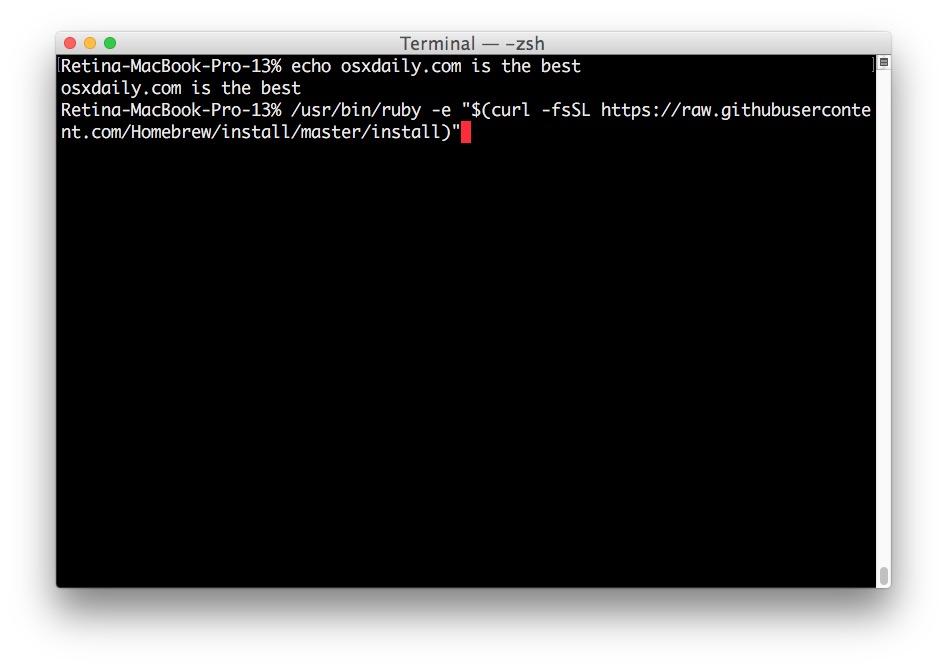
Homebrew provides a single, simple command to initiate its installation. This command downloads and runs an installation script from Homebrew’s official GitHub repository. Open your Terminal and paste the following line:
/bin/bash -c "$(curl -fsSL https://raw.githubusercontent.com/Homebrew/install/HEAD/install.sh)"
Let’s break down this command for better understanding:
/bin/bash -c: This tells your system to execute the following string as a Bash command.curl -fsSL https://raw.githubusercontent.com/Homebrew/install/HEAD/install.sh: Thecurlcommand is used to fetch the Homebrew installation script from its official GitHub repository.-f: Fail silently (no output at all) on HTTP errors.-s: Silent mode (don’t show progress meter or error messages).-S: Show error messages even in silent mode.-L: Follow redirects.
$(...): This is command substitution, meaning the output of thecurlcommand (the installation script) is passed as input to thebashinterpreter.
Security Note: Running scripts directly from the internet, especially with curl | bash patterns, always carries a small inherent risk. However, Homebrew is a widely trusted and open-source project, and its installation script is regularly reviewed by a large community. You can always inspect the script manually by navigating to the URL in your browser before executing it, if you wish to verify its contents.
Walking Through the Installation Script
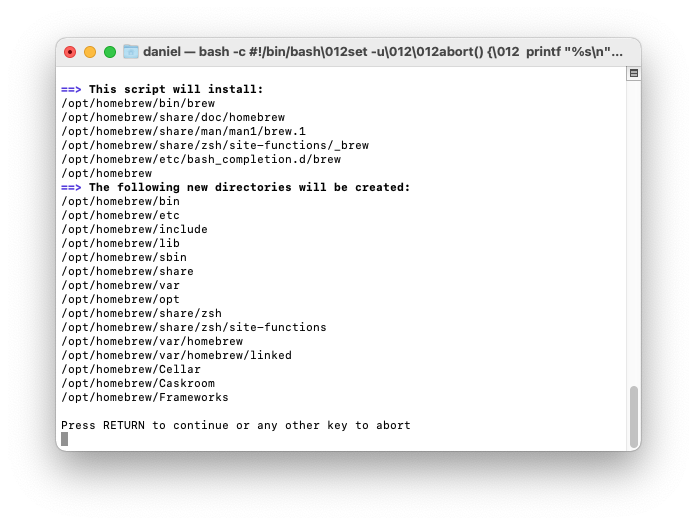
Once you press Enter after pasting the command, the script will begin to run. Here’s what you can expect:
- Initial Output: The script will first explain what it’s about to do and list the directories it will create or modify. It will then prompt you to press
RETURN(orEnter) to continue or any other key to abort. - Password Prompt: You will likely be asked to enter your administrator password. This is necessary for the script to create directories and set permissions in locations like
/opt/homebrew(for Apple Silicon) or/usr/local(for Intel Macs). - Downloading and Installing: The script will then proceed to download and install Homebrew’s core components. This includes creating the necessary directory structure, fetching the
brewexecutable, and setting up initial configurations. This process may take several minutes depending on your internet speed. - Final Instructions: After the core installation, the script will provide important post-installation instructions. Pay close attention to these! They often include commands you need to run to add Homebrew to your system’s
PATHenvironment variable, ensuring that your shell can find thebrewcommand.
Initial Post-Installation Steps (Adding Homebrew to PATH)
The most crucial instruction after the installation is usually about configuring your PATH. The PATH environment variable tells your shell (like Zsh, the default on modern macOS, or Bash) where to look for executable commands. If brew isn’t in your PATH, your terminal won’t recognize the brew command.
The commands differ slightly depending on your Mac’s architecture (Apple Silicon M1/M2/M3 or Intel). The installer script will intelligently detect your architecture and display the correct commands.
For Apple Silicon (M1/M2/M3 Macs):
You’ll typically see a message instructing you to add Homebrew to your PATH by running:
echo 'eval "$(/opt/homebrew/bin/brew shellenv)"' >> ~/.zprofile
eval "$(/opt/homebrew/bin/brew shellenv)"
echo '...' >> ~/.zprofile: This appends theevalcommand to your.zprofilefile. The.zprofilefile is a configuration file that Zsh reads when you open a new shell session. This ensures Homebrew is added to your PATH every time you open a new terminal window.eval "$(/opt/homebrew/bin/brew shellenv)": This command immediately adds Homebrew to yourPATHin your current terminal session, so you don’t have to close and reopen it.
For Intel Macs:
You might see instructions for .zprofile (if you use Zsh) or .bash_profile (if you use Bash). The principle is the same, but the path will usually be /usr/local/bin:
echo 'eval "$(/usr/local/bin/brew shellenv)"' >> ~/.zprofile # or ~/.bash_profile
eval "$(/usr/local/bin/brew shellenv)" # for current session
Important: If you’re using a different shell (e.g., Fish or a custom setup), the exact instructions for modifying your shell’s configuration file might vary. Refer to your shell’s documentation or the Homebrew installation output.
Verifying Your Homebrew Installation
Once you’ve configured your PATH, it’s time to verify that Homebrew is correctly installed and accessible.
-
Check Homebrew Version:
brew --versionYou should see output similar to
Homebrew 4.2.0(the version number will vary), indicating a successful installation. -
Run
brew doctor: This command is your best friend for troubleshooting. It checks your system for potential issues, missing dependencies, or misconfigurations that might affect Homebrew’s operation.
bash

brew doctor
Ideally, this command should returnYour system is ready to brew.If it reports warnings or errors, it will usually provide clear instructions on how to resolve them. Addressing these warnings is crucial for a stable Homebrew environment.
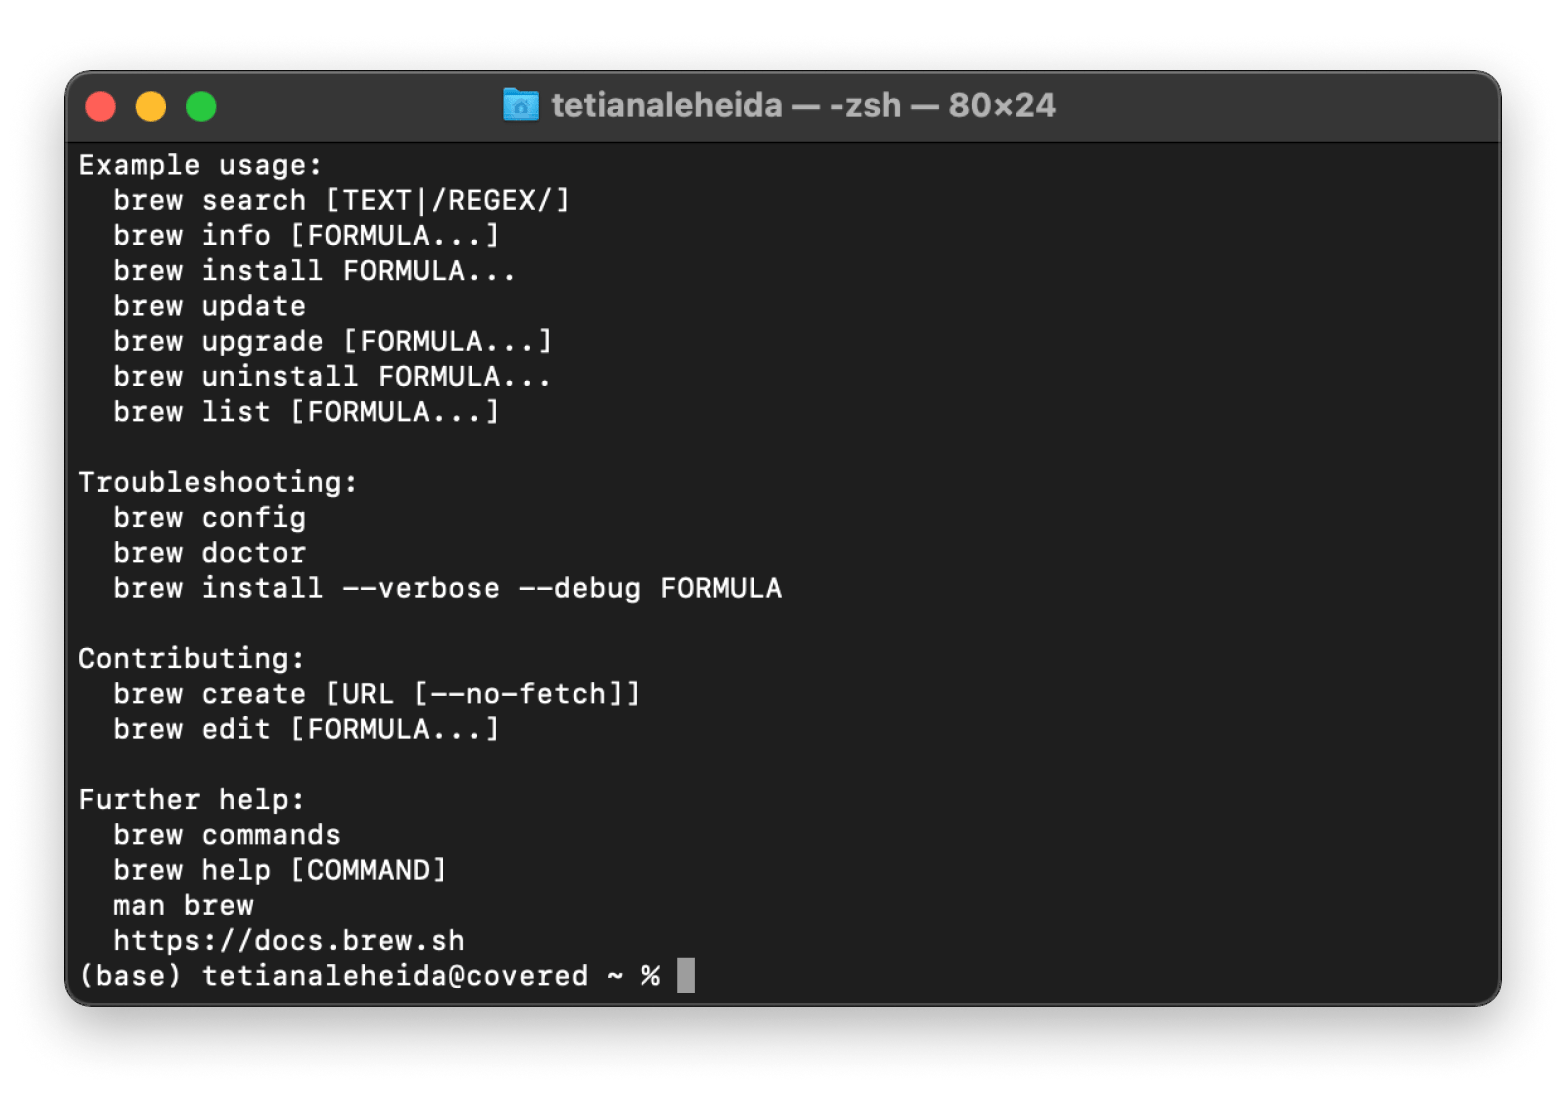
- Check
brew help: This command displays a list of all available Homebrew commands, confirming that thebrewexecutable is recognized.
bash

brew help
Congratulations! You have successfully installed Homebrew on your Mac. You’ve now unlocked a powerful tool that will significantly enhance your software management capabilities and productivity in the realm of Tech.
Mastering Homebrew: Essential Commands and Usage
Now that Homebrew is installed, let’s explore the fundamental commands you’ll use daily to manage your software. Mastering these commands will unlock the true potential of Homebrew.
Installing Software (brew install)
The most common command you’ll use is brew install to get new software.
brew install <package_name>
Examples:
- To install
wget, a popular command-line utility for retrieving files:
bash

brew install wget
- To install
htop, an interactive process viewer:
bash

brew install htop
- To install
tree, a utility that displays directories as a tree-like diagram:
bash

brew install tree
- To install Node.js (which also installs npm):
bash

brew install node
Homebrew will download the package, resolve any dependencies, and install it to the appropriate location.
Managing GUI Applications with Homebrew Cask (brew install --cask)
Homebrew Cask extends Homebrew’s capabilities to install macOS graphical applications. This means you can manage desktop apps just as easily as command-line tools.
brew install --cask <app_name>
Examples:
- To install Google Chrome:
bash

brew install --cask google-chrome
- To install Visual Studio Code:
bash

brew install --cask visual-studio-code
- To install Spotify:
bash

brew install --cask spotify
- To install Zoom:
bash

brew install --cask zoom
Homebrew Cask installs these applications to your /Applications folder, just like dragging and dropping from a .dmg file, but with the added benefit of command-line management. This capability significantly streamlines the setup of any new Mac, making it a fantastic tool for maintaining consistency across machines, which can be valuable for an individual’s professional Brand or a company’s internal Tech policies.
Keeping Your Software Up-to-Date (brew update, brew upgrade)
Regularly updating your software is crucial for security, performance, and accessing the latest features. Homebrew makes this process effortless.
-
Update Homebrew itself:
brew updateThis command fetches the latest definitions of formulae (packages) and casks from Homebrew’s repositories. It doesn’t upgrade your installed software, only updates Homebrew’s knowledge of what’s available.
-
Upgrade installed software:
bash

brew upgrade
This command will then upgrade all your installed packages (both formulae and casks) to their latest versions, based on the definitions fetched bybrew update.
Removing Unwanted Software (brew uninstall, brew cleanup)
Just as easily as installing, you can uninstall software with Homebrew.
-
Uninstall a package:
brew uninstall <package_name>
# For a Cask application:
brew uninstall --cask <app_name>
Example:
brew uninstall wget
brew uninstall --cask visual-studio-code
This command removes the specified package and its associated files.
-
Clean up old versions and stale lock files:
bash

brew cleanup
As you upgrade packages, Homebrew keeps older versions for a while.brew cleanupremoves these old versions and other stale files, freeing up disk space. It’s good practice to run this periodically.
Exploring Homebrew Further (brew search, brew info)
To discover new software or learn more about an installed package:
-
Search for packages:
brew search <keyword>This command will search Homebrew’s repositories for packages (both formulae and casks) matching your keyword.
-
Get information about a package:
bash

brew info <package_name>
This command displays detailed information about a specific package, including its version, dependencies, installation options, and where it’s installed.
Troubleshooting Common Homebrew Issues
While Homebrew is generally robust, you might encounter issues from time to time. Here are solutions to some common problems. Remember that brew doctor is always your first line of defense!
Permissions Problems
One of the most frequent issues is incorrect file permissions, especially in the /opt/homebrew or /usr/local directories. Homebrew generally doesn’t require sudo for its operations, so if you’re prompted for sudo excessively or see permission denied errors, something might be wrong.
Common Fix: Ensure that the Homebrew installation directory is owned by your user account.
For Apple Silicon Macs:
sudo chown -R $(whoami) /opt/homebrew
For Intel Macs:
sudo chown -R $(whoami) /usr/local
Replace $(whoami) with your actual username if you prefer, but $(whoami) is a convenient way to dynamically insert it. After running this, try running brew doctor again.
PATH Environment Variable Errors
If your terminal can’t find the brew command, it’s almost certainly a PATH issue.
Symptoms:
zsh: command not found: brew
or similar.
Solution: Revisit the post-installation steps. Ensure the eval "$(/opt/homebrew/bin/brew shellenv)" (for Apple Silicon) or eval "$(/usr/local/bin/brew shellenv)" (for Intel) command is correctly added to your ~/.zprofile (or ~/.bash_profile if you use Bash).
- Open your shell’s profile file with a text editor:
bash

nano ~/.zprofile # or ~/.bash_profile
- Add or ensure the correct line is present at the end of the file.
- Save the file (Ctrl+X, Y, Enter for
nano). - Apply the changes to your current session:
bash

source ~/.zprofile # or source ~/.bash_profile
Or simply open a new terminal window.
Dealing with brew doctor Warnings
brew doctor is designed to be helpful, but sometimes its warnings can seem cryptic.
- “Warning: Your Xcode Command Line Tools are too old.”: Run
xcode-select --installagain to update them. - “Warning: Some applications were installed using
sudo brew install.”: Homebrew strongly discourages usingsudofor installations (except for the initialchownfix if permissions are messed up). If you did this,brew doctorwill tell you tochownthe directories back to your user. - “Warning: You have uncommitted modifications to Homebrew/core.”: This means you might have manually edited a formula. Homebrew prefers a clean state. You might need to
cd "$(brew --repository)"and thengit statusto see what changes were made, and potentiallygit restore .orgit reset --hard origin/HEADto revert them (be careful with these Git commands).
Always read the specific advice brew doctor provides, as it’s usually tailored to your particular issue.
Reinstalling Homebrew
If you encounter severe, persistent issues that brew doctor can’t resolve, or if your Homebrew installation seems corrupted, a full reinstallation might be the quickest solution.
-
Uninstall Homebrew:
/bin/bash -c "$(curl -fsSL https://raw.githubusercontent.com/Homebrew/install/HEAD/uninstall.sh)"This command will completely remove Homebrew and all its managed packages. You’ll be prompted to confirm.
-
Reinstall Homebrew: Follow the “Core Installation Process” steps from scratch.
This should give you a fresh, clean Homebrew installation.
Conclusion: The Indispensable Tool for Mac Power Users
Installing Homebrew on your Mac is not just about adding another utility; it’s about unlocking a new level of control and efficiency over your operating system. For professionals navigating the fast-paced world of Tech, where the right tools can make all the difference, Homebrew is truly indispensable. It transforms software management from a tedious chore into a seamless background process, allowing you to focus on innovation and productivity rather than installation woes.
By streamlining development environment setup, granting access to a vast ecosystem of open-source tools, and simplifying software updates, Homebrew empowers you to manage your digital assets effectively. This efficiency not only saves time but also indirectly contributes to smarter resource management, potentially impacting your personal Money through increased output or your professional Brand by showcasing technical proficiency. Embrace Homebrew, integrate it into your workflow, and watch your Mac transform into the powerful, agile machine it was always meant to be. Happy brewing!
aViewFromTheCave is a participant in the Amazon Services LLC Associates Program, an affiliate advertising program designed to provide a means for sites to earn advertising fees by advertising and linking to Amazon.com. Amazon, the Amazon logo, AmazonSupply, and the AmazonSupply logo are trademarks of Amazon.com, Inc. or its affiliates. As an Amazon Associate we earn affiliate commissions from qualifying purchases.