
In an era where technology evolves at breakneck speed, the performance demands on our laptops are constantly increasing. Whether you’re a student juggling multiple research tabs, a professional powering through complex spreadsheets, a creative working with large multimedia files, or a gamer seeking smoother frame rates, your laptop’s ability to keep up is paramount. One of the most common questions users ask when their trusty machine starts to feel sluggish is: “Can I install more RAM on my laptop?” The answer, happily for many, is a resounding “yes,” but with crucial caveats and considerations.
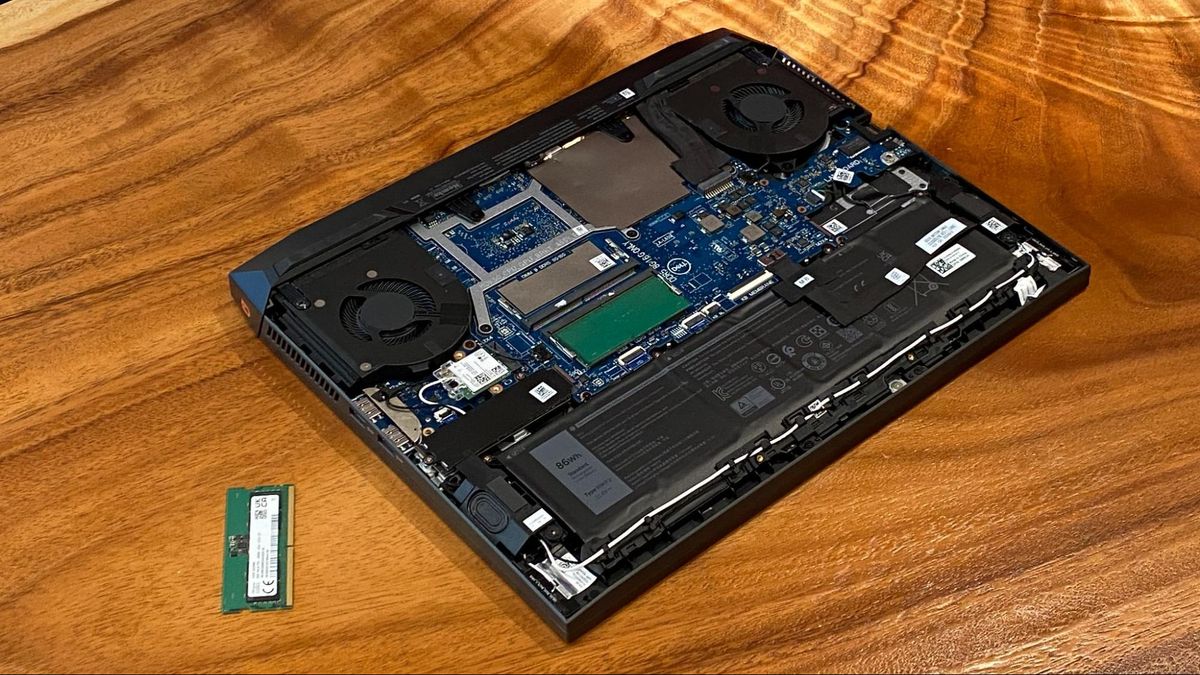
Upgrading your laptop’s Random Access Memory (RAM) is often one of the most effective and cost-efficient ways to breathe new life into an aging device or enhance the capabilities of a newer one. It directly impacts your system’s ability to multitask, run demanding applications, and generally provide a snappier user experience. This comprehensive guide will walk you through everything you need to know, from understanding the role of RAM to the step-by-step installation process, ensuring you can make an informed decision and execute a successful upgrade.
Understanding RAM: Why More Memory Matters
To truly appreciate the value of a RAM upgrade, it’s essential to grasp what RAM does for your computer. Far from being just another component, RAM is your system’s short-term memory, a super-fast workspace where your CPU stores data it needs to access quickly. Unlike your hard drive or SSD, which stores data long-term, RAM holds the active programs, files, and operating system processes you’re currently using.
The Role of RAM in Laptop Performance
Think of your RAM as the size of your desk. The more RAM you have, the bigger your desk, allowing you to have more applications open and more tasks active simultaneously without having to constantly put things away and pull them out from slower long-term storage (your hard drive/SSD). When your laptop runs low on RAM, it has to resort to “paging” – temporarily moving data from RAM to the much slower storage drive. This constant swapping causes significant slowdowns, often referred to as “lag” or “stuttering.”
More RAM means:
- Smoother Multitasking: You can seamlessly switch between applications, browsers with numerous tabs, and background processes without noticeable delays.
- Faster Application Loading and Responsiveness: Programs that require substantial memory, like video editors, CAD software, or modern games, will launch faster and operate more fluidly.
- Improved Gaming Experience: Games often demand significant RAM to load textures, levels, and in-game assets quickly, leading to higher frame rates and less stuttering.
- Enhanced Productivity: Less waiting for your computer means more time focused on your tasks, boosting overall efficiency.
Signs Your Laptop Needs a RAM Upgrade
How do you know if a RAM upgrade is the right solution for your performance woes? Look out for these common symptoms:
- Frequent Stuttering or Freezing: Your laptop often pauses or locks up, especially when you open new applications or switch between existing ones.
- Slow Application Launch Times: Programs take an unusually long time to open, even basic ones.
- Browser Tabs Crashing: If you use browsers like Chrome or Firefox with many tabs, you might experience tabs reloading or crashing frequently.
- “Out of Memory” Errors: While less common today, older systems or extremely demanding tasks can still trigger these messages.
- High Disk Usage (Paging File): If your hard drive or SSD activity light is constantly flashing and you hear it working overtime, even when you’re not saving files, it might be due to excessive paging.
- General Sluggishness: If your once-zippy laptop now feels like it’s wading through treacle, a RAM shortage is a prime suspect.
You can also check your current RAM usage by opening Task Manager (Windows: Ctrl+Shift+Esc) or Activity Monitor (macOS: Cmd+Space, search Activity Monitor) and navigating to the “Performance” tab. If your RAM usage is consistently above 80-90% during typical use, an upgrade is likely to yield significant benefits.
Assessing Your Laptop’s RAM Upgrade Potential
Before you can even think about buying new RAM, you need to conduct a thorough assessment of your existing setup and your laptop’s capabilities. Not all laptops are created equal, and some have limitations that could prevent or complicate a RAM upgrade.
Determining Current RAM Configuration
The first step is to understand what kind of RAM your laptop currently has and how much. This information is crucial for compatibility.
For Windows Laptops:
- Task Manager: Right-click on the Taskbar and select “Task Manager” (or Ctrl+Shift+Esc). Go to the “Performance” tab and click on “Memory.” Here you’ll see the total RAM, speed (e.g., 2400MHz), and how many slots are used.
- System Information: Press Windows Key + R, type
msinfo32, and hit Enter. Under “System Summary,” look for “Installed Physical Memory (RAM).” While it shows the total, it won’t detail individual sticks or speeds. - Third-Party Tools: Utilities like CPU-Z (free) offer a much more detailed breakdown, showing individual RAM sticks, their speed, type (DDR3, DDR4, DDR5), manufacturer, and even part numbers. This is often the most reliable method.
For macOS Laptops:
- About This Mac: Click the Apple menu in the top-left corner and select “About This Mac.” Under the “Overview” tab, it will list your total RAM. For more details on individual modules and slots, click “System Report” and then “Memory.”
Note down the total amount of RAM (e.g., 8GB), the type (DDR3, DDR4, DDR5), and the speed (e.g., 2666MHz). If possible, also note the number of slots occupied versus total slots available.
Checking Your Laptop’s Maximum RAM Capacity
Just because your laptop has 8GB of RAM doesn’t mean it can handle unlimited amounts. Every laptop, determined by its motherboard and CPU, has a maximum RAM capacity it can support.
- Manufacturer’s Website: The most authoritative source is your laptop manufacturer’s official support page. Search for your specific laptop model number (e.g., Dell XPS 15 9500, HP Spectre x360 14). Look for specifications or service manuals, which often detail the maximum RAM supported and the number of upgradeable slots.
- Online RAM Configurators: Websites like Crucial.com or Kingston.com offer handy “RAM Finder” tools. You enter your laptop’s make and model, and they will tell you exactly what RAM is compatible and its maximum capacity.
- CPU Limitations: In some cases, especially with older CPUs, the processor itself may have a RAM limit. You can check your CPU model (using Task Manager/Activity Monitor or CPU-Z) and then search its specifications on the manufacturer’s website (e.g., Intel ARK, AMD Product Specifications).
Always aim to confirm the maximum capacity from at least two sources to ensure accuracy. This also helps you understand how much RAM you can add to your existing setup or if you need to replace both sticks.
Identifying Compatible RAM Types (DDR Generation, Speed, Form Factor)
RAM isn’t a one-size-fits-all component. Compatibility is critical:
- DDR Generation (DDR3, DDR4, DDR5): This is the most important factor. You cannot mix generations. If your laptop uses DDR4, you must buy DDR4 RAM. The physical notches on the RAM sticks are different, preventing incorrect installation.
- Form Factor (SODIMM): Laptops almost exclusively use SODIMM (Small Outline Dual In-line Memory Module), which is smaller than the DIMM modules used in desktop PCs. Ensure you purchase SODIMM RAM.
- Speed (MHz): RAM speed is measured in MHz (e.g., 2400MHz, 3200MHz). While your system will typically default to the lowest speed module installed, it’s generally best to match the speed of your existing RAM or purchase new modules at the highest speed supported by your laptop’s motherboard. Buying faster RAM than your motherboard supports is wasteful, as it will only run at the motherboard’s maximum supported speed.
- Voltage: Most modern laptop RAM (DDR4, DDR5) runs at 1.2V. Older DDR3 might be 1.5V or 1.35V (DDR3L). Mismatched voltages can cause instability or prevent booting.
- Capacity (GB): Once you know the max capacity, decide on the total amount you want. Common upgrade paths include 4GB to 8GB, 8GB to 16GB, or 16GB to 32GB. For most users, 16GB is the sweet spot, offering excellent multitasking capabilities.
The Soldered RAM Challenge: When Upgrading Isn’t an Option
Unfortunately, not all laptops are designed for user-upgradable RAM. Many ultra-slim notebooks, 2-in-1s, and Apple MacBooks (especially newer models) have their RAM chips soldered directly onto the motherboard. This makes upgrading virtually impossible for the average user, as it requires specialized equipment and expertise.
To check if your RAM is soldered, consult your laptop’s specifications or service manual. If it explicitly states “onboard memory” or “soldered RAM,” then an upgrade via conventional means is out of the question. In such cases, your only option is to ensure you purchase a laptop with sufficient RAM from the outset or consider other performance enhancements like an SSD upgrade.
Choosing the Right RAM: A Smart Investment
Once you’ve determined your laptop’s compatibility and maximum capacity, it’s time to select the right RAM modules. This is where smart investment decisions come into play, balancing performance gains with cost.
Matching RAM Specifications for Optimal Performance
For the best performance, especially if you’re adding to existing RAM, try to match the new module as closely as possible to your current one in terms of:
- DDR Generation: Must be identical (e.g., DDR4 to DDR4).
- Speed (MHz): While your system will clock down to the slowest module, matching speeds ensures optimal dual-channel performance.
- Latency (CL): CAS Latency (CL) is a measure of how many clock cycles it takes for the RAM to respond to a request. Lower CL numbers are better. While not as critical as speed or generation, matching CL can slightly improve performance.
- Capacity: Ideally, for dual-channel operation (which effectively doubles the memory bandwidth), you should have two identical sticks of RAM (e.g., two 8GB sticks for a total of 16GB). If you have one 8GB stick and add another 8GB stick of the same type and speed, you’ll likely benefit from dual-channel mode. If you’re replacing all RAM, buying a matched kit (e.g., 2x16GB) is often the best approach.
If you cannot find an exact match for an existing stick, prioritize matching the DDR generation and ensuring the speed is compatible with your motherboard. The system will adapt, but performance might not be perfectly optimized if the specs are wildly different.
Popular RAM Brands and Considerations
Several reputable manufacturers produce high-quality laptop RAM. Sticking with well-known brands often ensures reliability and good customer support. Some popular choices include:
- Crucial: A brand of Micron, known for its compatibility and reliability. Their website’s configurator is excellent.
- Kingston (and its gaming sub-brand, HyperX/Fury): Another industry veteran with a strong reputation.
- Samsung: Often found as OEM RAM in laptops, their retail modules are also high quality.
- SK Hynix: Similar to Samsung, a major manufacturer of memory chips.
- G.Skill: Popular among enthusiasts for performance RAM.
- Corsair: Known for a wide range of PC components, including reliable RAM.
When choosing, consider:
- Warranty: Most reputable RAM brands offer limited lifetime warranties, reflecting their confidence in product longevity.
- Reviews: Check user reviews for specific modules, especially concerning compatibility with various laptop brands.
- Price: Compare prices across different brands for similar specifications. RAM prices fluctuate, so keep an eye out for deals.
Cost-Benefit Analysis: Is a RAM Upgrade Worth It?
From a “Money” perspective, a RAM upgrade is often one of the smartest investments you can make for an aging laptop.
Benefits:
- Cost-Effective: A new RAM module (e.g., 8GB or 16GB SODIMM) typically costs between $30-$100, a fraction of the price of a new laptop.
- Significant Performance Boost: For RAM-limited systems, the performance improvement can be dramatic, making your laptop feel new again.
- Extends Laptop Lifespan: By improving performance, you delay the need to purchase a completely new system, saving you money in the long run.
- DIY Friendly: As you’ll see, the installation process is generally straightforward and doesn’t require specialized tools or training for most laptops.
Considerations:
- Not a Magic Bullet: If your primary bottleneck is an old, slow CPU or an ancient HDD (instead of an SSD), a RAM upgrade alone might not provide the full transformation you desire. In such cases, an SSD upgrade is often equally, if not more, impactful.
- Soldered RAM: If your RAM is soldered, the cost of a “repair” or “upgrade” is prohibitively high, making a new laptop a more sensible option.
- Diminishing Returns: Going from 4GB to 8GB is usually a huge leap. Going from 16GB to 32GB might only be beneficial for very specific, heavy-duty users (e.g., professional video editors, virtual machine enthusiasts), and less impactful for average users.
For most users experiencing sluggishness on an 8GB or less laptop, upgrading to 16GB (or 32GB for power users) is almost always a worthwhile investment that pays dividends in productivity and user satisfaction.
The Step-by-Step RAM Installation Process
You’ve done your research, bought the right RAM, and are ready to boost your laptop’s performance. Now comes the hands-on part. While specific steps may vary slightly between laptop models, the general procedure remains consistent. Always consult your laptop’s service manual or a reliable disassembly guide (e.g., from iFixit) for your specific model before proceeding.
Essential Tools and Safety Precautions
Before you begin, gather these items:
- New SODIMM RAM module(s): The one you carefully selected.
- Small Phillips-head screwdriver: The most common type for laptop screws.
- Plastic prying tool (optional but recommended): Helps gently separate plastic clips without scratching.
- Anti-static wrist strap (highly recommended): Protects components from static electricity discharge, which can permanently damage electronics. If you don’t have one, frequently touch a grounded metal object (like an unpainted metal pipe) to discharge static.
- Clean, well-lit workspace: Ensures you don’t lose tiny screws and can see what you’re doing.
- Container for screws: To keep screws organized and prevent loss.
Safety First:
- Power Down Completely: Shut down your laptop, don’t just put it to sleep.
- Disconnect Power: Unplug the AC adapter.
- Remove Battery (if external/easily removable): For most modern laptops, the battery is internal. If you can easily remove it, do so. If not, proceed to the next step.
- Discharge Residual Power: Press and hold the power button for 10-15 seconds after disconnecting all power sources. This drains any lingering charge from the system’s capacitors.
- Ground Yourself: Wear your anti-static wrist strap, or periodically touch a metal, grounded object.
Opening Your Laptop: Accessing the RAM Slots
This is often the trickiest part, as every laptop has a different way of being opened.
- Flip Your Laptop: Place your laptop upside down on a soft, clean surface to prevent scratches.
- Locate Access Panels (if any): Some older laptops have small, dedicated access panels secured by a few screws for RAM or storage upgrades. If so, unscrew and remove that panel.
- Remove the Entire Bottom Cover: Most modern laptops require you to remove the entire bottom panel.
- Unscrew all visible screws: They might be different lengths, so note their positions or use a magnetic mat. Some screws might be hidden under rubber feet or stickers.
- Gently Pry Open: Once all screws are removed, use your plastic prying tool to carefully work your way around the edges of the bottom cover, separating it from the main chassis. Be gentle and listen for clicks of plastic clips. Avoid excessive force.
- Disconnect Cables (if any): Sometimes, the bottom cover might have a small cable (e.g., for an LED or speaker) connecting it to the motherboard. Disconnect this carefully if present.
- Locate the RAM Slots: Once the bottom cover is off, you’ll see the internal components. The RAM modules are usually visible, often secured by small metal clips on either side. There might be one or two slots, sometimes stacked.
Installing New RAM Modules
Now for the main event:
- Remove Old RAM (if applicable): If you’re replacing existing modules, gently push the metal clips outwards on both sides of the RAM stick. The stick will pop up at an angle. Carefully slide it out of the slot. Store it safely.
- Insert New RAM:
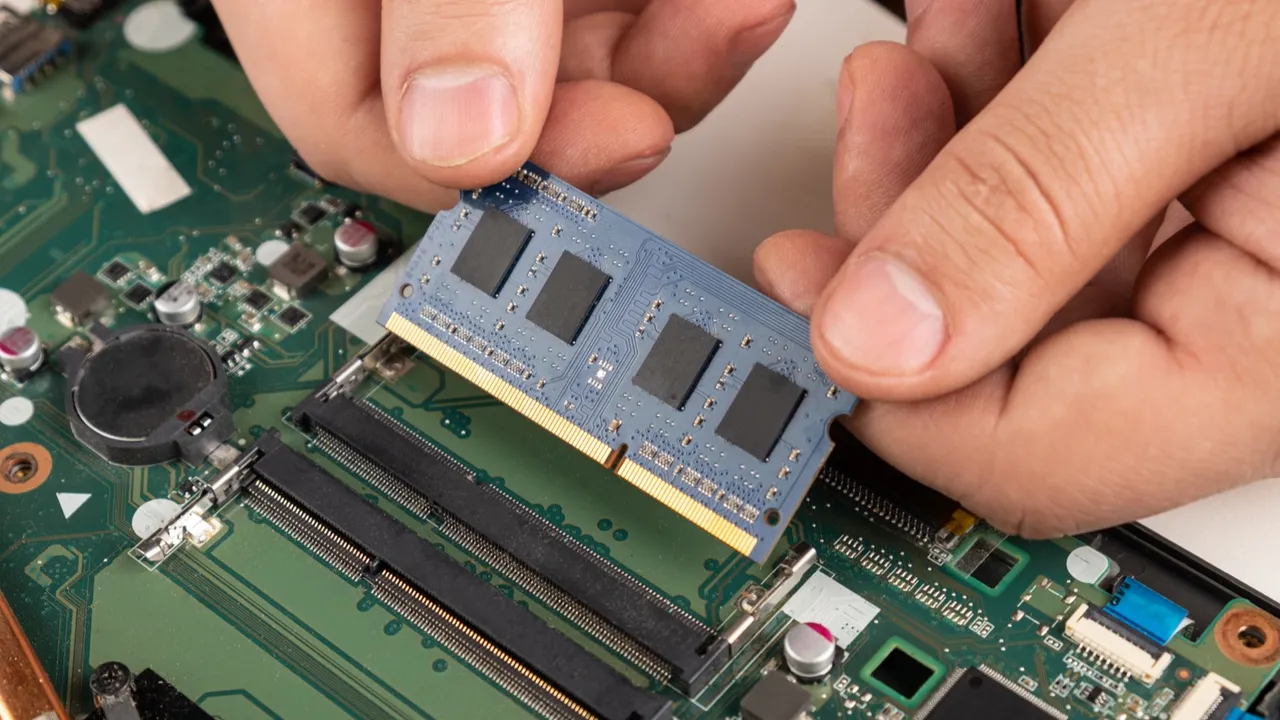
- Align the Notch: Hold the new SODIMM module by its edges (avoiding the gold contacts) and align the notch on the stick with the key in the RAM slot. It will only fit one way.
- Angle and Push: Insert the RAM module into the slot at roughly a 30-45 degree angle.
- Press Down Firmly: Once seated, gently but firmly push down on the top edge of the RAM module until the metal clips on either side snap into place, securing the RAM horizontally. You should hear a soft click.
- Repeat for Second Slot (if applicable): If you have two slots and are installing a second module, repeat the process.
- Double-Check: Ensure both modules are securely seated and the clips are holding them firmly.
Post-Installation Checks and Troubleshooting
After installing the RAM:
- Reassemble Your Laptop: Carefully reattach any disconnected cables, align the bottom cover, and press firmly around the edges until all clips snap back into place. Reinsert all screws, ensuring they go into their original positions if they varied in length.
- Power On: Plug in your AC adapter and power on your laptop.
- Verify New RAM:
- BIOS/UEFI: Your laptop might automatically detect the new RAM. Sometimes, it might take a moment longer to boot for the first time or display a message about updated memory. You can enter the BIOS/UEFI settings (usually by pressing F2, Del, or Esc during startup) to confirm the total RAM displayed.
- Operating System: Once booted into Windows or macOS, check Task Manager/Activity Monitor (as described earlier) or System Information to confirm the total installed RAM.
Troubleshooting Common Issues:
- Laptop Doesn’t Boot / Blank Screen:
- Re-seat RAM: Power down, unplug, open the laptop, and carefully re-seat the RAM modules. They might not be fully seated.
- Test One Stick at a Time: If you installed two modules, try booting with only one at a time to identify a potentially faulty stick or slot.
- Check Compatibility: Double-check that you purchased the correct type of RAM for your laptop.
- Laptop Boots, But Doesn’t Show Full RAM:
- Check BIOS: Ensure the BIOS recognizes the full amount. If not, the issue might be with the RAM module, a faulty slot, or motherboard limitations.
- Windows 32-bit vs. 64-bit: A 32-bit operating system can only utilize about 3.5GB to 4GB of RAM. If you have more than that installed, you’ll need a 64-bit OS to use it all. Most modern laptops come with 64-bit Windows.
- Motherboard/CPU Limit: Reconfirm your laptop’s maximum supported RAM.
Beyond RAM: Other Performance Enhancements
While a RAM upgrade is often a game-changer, it’s worth noting that it’s part of a broader strategy for optimizing laptop performance. For a truly revitalized machine, especially older ones, considering other upgrades can compound the benefits.
SSD Upgrades: The Speed Revolution
If your laptop still uses a traditional Hard Disk Drive (HDD), upgrading to a Solid State Drive (SSD) is arguably the single most impactful performance upgrade you can make, often surpassing the perceived benefits of a RAM upgrade for general responsiveness. SSDs are dramatically faster at reading and writing data, leading to:
- Instant Boot Times: Your operating system will load in seconds.
- Lightning-Fast Application Launches: Programs will open almost instantaneously.
- Snappier File Transfers: Copying and moving large files becomes a breeze.
- Reduced Paging: As mentioned, when RAM is full, the system pages to disk. A fast SSD makes this process much less painful than an HDD.
Combining an SSD upgrade with a RAM upgrade creates a potent duo that can make an old laptop feel brand new, transforming it into a highly capable machine for years to come.

Software Optimization and Maintenance
Beyond hardware, regular software maintenance plays a crucial role in maintaining peak performance:
- Regular Updates: Keep your operating system and drivers up to date.
- Remove Bloatware: Uninstall unnecessary programs that consume system resources.
- Antivirus/Anti-malware: Use reputable security software and run regular scans.
- Disk Cleanup/Optimization: Regularly clear temporary files and optimize your drives (though defragmentation is not needed for SSDs).
- Startup Programs: Limit the number of programs that launch automatically with your system.
By addressing both hardware and software aspects, you can ensure your laptop runs at its absolute best.
In conclusion, installing more RAM on your laptop is a widely accessible and highly beneficial upgrade for most users. It’s a relatively straightforward DIY project that can significantly improve multitasking, application responsiveness, and overall system fluidity. By carefully assessing your current setup, understanding compatibility requirements, choosing the right modules, and following safety protocols, you can unlock your laptop’s untapped potential and extend its useful life, making it a wise “Tech” and “Money” investment in the long run. Don’t let a sluggish system hold you back; empower your laptop with the memory it deserves.
aViewFromTheCave is a participant in the Amazon Services LLC Associates Program, an affiliate advertising program designed to provide a means for sites to earn advertising fees by advertising and linking to Amazon.com. Amazon, the Amazon logo, AmazonSupply, and the AmazonSupply logo are trademarks of Amazon.com, Inc. or its affiliates. As an Amazon Associate we earn affiliate commissions from qualifying purchases.