
In an increasingly connected world, a robust and reliable internet connection isn’t just a luxury; it’s a fundamental necessity. From streaming 4K content and engaging in seamless online gaming to participating in critical video conferences and managing smart home devices, the demand for high-speed, stable wireless connectivity continues to soar. Yet, many users find themselves grappling with sluggish speeds, frequent disconnections, or a complete lack of wireless capability on their desktop PCs or older laptops. This is where the humble, yet powerful, WiFi card comes into play.

Whether you’re building a new PC from scratch, looking to upgrade an aging system to the latest WiFi standards like Wi-Fi 6E, replacing a faulty adapter, or simply seeking to improve your existing wireless performance, installing a new WiFi card can be a transformative upgrade. It’s a surprisingly straightforward process that empowers you to take control of your network experience, often at a fraction of the cost of buying a new device or relying on external technicians. This comprehensive guide will walk you through everything you need to know, from understanding the different types of WiFi cards available to the step-by-step installation process and post-installation optimization, ensuring you unlock the full potential of your wireless network. Dive in to discover how a simple hardware upgrade can dramatically enhance your digital productivity, entertainment, and overall computing experience.
Understanding Your WiFi Card Options: Choosing the Right Wireless Solution
Before you even think about opening your computer case, it’s crucial to understand the different types of WiFi cards available on the market. Each type offers distinct advantages and is suited for various use cases and technical requirements. Making an informed choice at this stage will ensure compatibility, optimal performance, and a smooth installation process.
Internal PCIe WiFi Cards: The Performance Powerhouse
For most desktop PC users seeking the best possible wireless performance and stability, an internal PCIe (Peripheral Component Interconnect Express) WiFi card is the gold standard. These cards connect directly to your motherboard via an available PCIe slot, typically a smaller PCIe x1 slot, though some may use x4.
- Advantages: PCIe cards benefit from a direct, high-bandwidth connection to the motherboard, leading to superior speeds, lower latency, and more stable connections compared to external alternatives. They often come with larger, external antennas that can be strategically positioned for optimal signal reception, or even relocated for better line-of-sight to your router. Many modern PCIe cards also integrate Bluetooth functionality, adding further utility without consuming an extra port. Their integrated nature means they don’t clutter your desk with cables or dongles, maintaining a clean aesthetic for your workspace.
- Use Cases: Ideal for gamers, content creators, power users, and anyone who demands consistent, high-speed wireless connectivity for bandwidth-intensive tasks. They are a staple in custom PC builds and popular upgrades for older desktops that lack built-in WiFi or only support older, slower standards. Ensuring your desktop has an available PCIe slot (usually a small x1 slot) is the primary compatibility concern here.
M.2 WiFi Cards: Compact Power for Laptops and Specific Desktops
M.2 WiFi cards are much smaller, resembling a stick of RAM, and are primarily found in laptops and compact desktop systems. They utilize the M.2 slot on the motherboard, which is also commonly used for NVMe SSDs, though the keying (B-key, M-key, E-key) differs for WiFi modules.
- Advantages: Their compact size is their biggest advantage, making them perfect for space-constrained devices. They offer similar performance characteristics to PCIe cards dueating directly into the motherboard’s high-speed bus. Like their PCIe counterparts, M.2 WiFi modules often include integrated Bluetooth.
- Use Cases: Primarily for upgrading or replacing WiFi modules in laptops. However, M.2 WiFi cards can also be used in desktop PCs with the aid of a PCIe adapter card. These adapters allow you to install the tiny M.2 module into a standard PCIe slot, providing the benefits of an internal card with the compact module form factor. This is a common solution for motherboards that have M.2 slots for SSDs but not for WiFi, or when repurposing an M.2 WiFi module from another device. Installation involves connecting tiny antenna cables to the module, which can be a delicate process.
USB WiFi Adapters: Simplicity and Portability
USB WiFi adapters are external dongles that plug directly into an available USB port on your computer. They are by far the simplest to install and offer unparalleled portability.
- Advantages: Plug-and-play functionality makes them incredibly user-friendly. No need to open your computer case or deal with internal components. Their portability means you can easily move them between different computers. They are also generally the most affordable option, making them a cost-effective choice for quick fixes or temporary solutions.
- Disadvantages: While convenient, USB adapters can sometimes suffer from lower performance compared to internal cards due to the overhead of the USB bus and potentially less effective antenna designs (especially on smaller dongles). Larger USB adapters with external antennas can mitigate this to some extent, but they add bulk. They also occupy a valuable USB port, which can be a consideration for devices with limited ports.
- Use Cases: Excellent for quickly adding WiFi to a desktop that lacks it, upgrading an older laptop’s WiFi standard without internal surgery, or as a temporary solution when an internal card fails. They are also a popular choice for older systems that don’t have available PCIe or M.2 slots, or for users who are uncomfortable opening their PC case.
Pre-Installation Checklist: Getting Ready for the Upgrade
Before you power down your system and grab your tools, a thorough pre-installation checklist is essential. Proper preparation not only ensures a smooth installation but also minimizes the risk of compatibility issues, data loss, or damage to your components. Think of this as the strategic planning phase for your tech upgrade, ensuring you maximize efficiency and minimize potential downtime.
Compatibility Check: The Foundation of a Successful Install
The most critical step is confirming that your chosen WiFi card will work seamlessly with your existing hardware and software. Rushing this step can lead to frustration and wasted investment.
- Motherboard Slots: For PCIe cards, identify an available PCIe x1 slot (the smallest one, often located near the bottom of the motherboard or alongside larger graphics card slots). If considering an M.2 card, ensure your motherboard has an M.2 E-key slot for WiFi modules. If not, a PCIe adapter for M.2 cards will be necessary, which then requires an available PCIe slot. Consult your motherboard’s manual for its layout and available slots.
- Operating System: While most modern WiFi cards support Windows 10/11 out of the box (and often Linux distributions), always double-check the manufacturer’s specifications for OS compatibility. Older operating systems might have limited driver support for newer hardware.
- Driver Availability: Before purchasing, visit the manufacturer’s website to confirm that drivers are readily available for your operating system. Downloading these drivers in advance to a USB drive or ensuring you have an Ethernet connection ready will save you a headache post-installation.
- Antenna Connections: If you’re installing an M.2 card, note that they typically require tiny U.FL/IPEX antenna connectors. Ensure your M.2 card comes with suitable antennas or that you purchase compatible ones, often bundled with the PCIe adapter. For PCIe cards, antennas are usually screw-on SMA connectors and are almost always included.
- Physical Space: For internal cards, ensure there’s enough physical clearance inside your case. Some large graphics cards or CPU coolers might obstruct smaller PCIe slots.
Essential Tools and Safety Precautions: Protecting Your Investment
Working inside a computer requires a few basic tools and adherence to safety guidelines to protect both yourself and your hardware. This isn’t just about successful installation; it’s about safeguarding your tech assets and ensuring longevity.
- Screwdriver Set: A good Phillips head screwdriver (PH1 or PH2) is usually all you need for opening the case and securing the card. Magnetic tips are helpful but use with caution around sensitive components.
- Anti-Static Wrist Strap/Mat: Electrostatic discharge (ESD) can be lethal to computer components. An anti-static wrist strap, clipped to an unpainted metal part of your PC case, is highly recommended to ground yourself. Alternatively, work on an anti-static mat. If neither is available, frequently touch a grounded metal object before handling components.
- Flashlight/Headlamp: The inside of a PC can be dark, especially in cramped spaces. A flashlight will help you locate slots, screws, and connections.
- Small Container: Keep a small bowl or magnetic tray handy for screws to prevent them from getting lost or rolling into inaccessible areas of your case.
- Power Down and Unplug: Crucially, before opening your PC, shut it down completely, then unplug the power cable from the wall outlet and the power supply unit (PSU). This prevents accidental shocks and protects components from electrical surges.
- Organized Workspace: Clear a clean, flat, and well-lit workspace. This reduces the chance of misplacing screws or tools and allows for better focus.
Backing Up Your System (Optional but Recommended): A Safety Net
While installing a WiFi card is generally a low-risk procedure, any hardware modification carries a minuscule chance of unforeseen issues. For critical systems, a quick backup provides peace of mind and is a best practice for any tech enthusiast or professional. This proactive step aligns with sound digital security and productivity habits.
- Why Back Up? In the rare event of an unexpected software conflict, driver issue that causes system instability, or accidental data corruption during the process, a recent backup allows you to revert your system to a working state without significant data loss or extensive troubleshooting.
- What to Back Up: Consider creating a system restore point in Windows, which captures your system files and settings. For more critical data, a full disk image or a backup of essential personal files to an external drive or cloud storage is advisable. This ensures business continuity and protects your digital assets.
Step-by-Step Installation Guide: Bringing Your WiFi Card to Life
With your preparations complete and the right WiFi card in hand, it’s time to physically install the hardware. This section will guide you through the process, focusing on clarity and precision to ensure a smooth and successful upgrade.
Opening Your PC Case: Gaining Access
The first physical step is to access the internal components of your desktop computer.
- Lay it Down: Gently lay your PC tower on its side on your clean, anti-static workspace. This provides easier access to the internal components.
- Locate Side Panel Screws: Most PC cases have two or more thumbscrews or Phillips head screws at the rear, securing the side panel. Typically, you’ll need to remove the side panel that exposes the motherboard (usually the left side when viewed from the front).
- Remove the Panel: Once the screws are removed, slide the side panel backward and then lift it away. Be mindful of any cables that might be attached to the panel (e.g., RGB lighting, fan cables), though this is rare for the main side panel. Set the panel aside in a safe place.
- Ground Yourself: If you’re not wearing an anti-static wrist strap, now is the time to touch an unpainted metal part of the PC case (like the power supply enclosure) to discharge any static electricity. Repeat this periodically throughout the process.
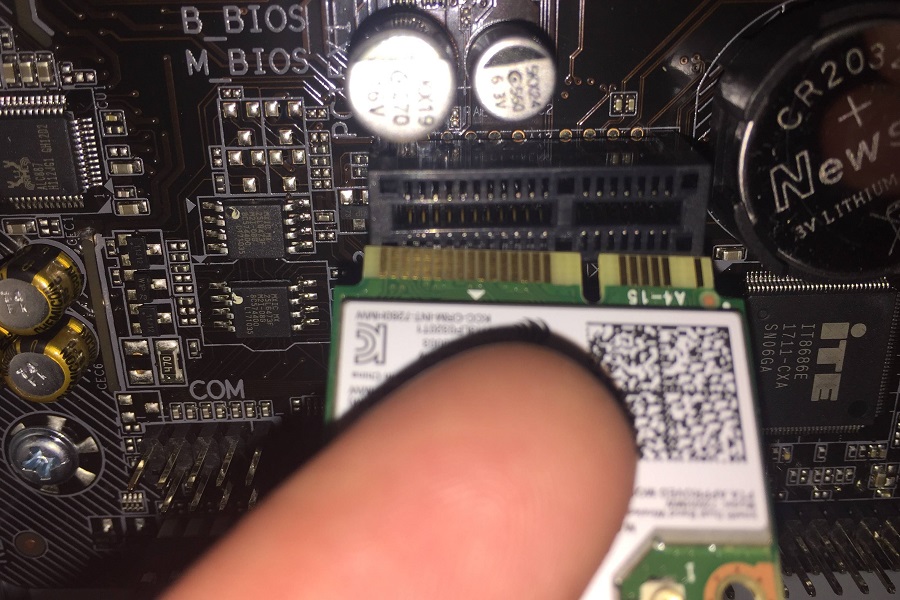
Installing an Internal PCIe WiFi Card: The Desktop Standard
This is the most common installation method for desktop users.
- Locate an Available PCIe Slot: Look for a short, open PCIe x1 slot on your motherboard. These are typically much smaller than the long PCIe x16 slot used by graphics cards. Some motherboards might have multiple x1 slots.
- Remove the Slot Cover: At the back of your PC case, corresponding to the chosen PCIe slot, there will be a metal bracket or cover secured by a small screw or a latch mechanism. Remove this screw or open the latch to free the cover and carefully pull it out. This creates an opening for your WiFi card’s external connectors.
- Insert the WiFi Card: Hold the WiFi card by its edges, avoiding touching the gold contacts at the bottom. Align the card’s gold contacts with the PCIe slot on the motherboard. Gently but firmly push the card straight down into the slot until it is fully seated. You should feel a satisfying click or resistance indicating it’s properly in place. Do not force it; if it doesn’t go in easily, re-check alignment.
- Secure the Card: Once seated, use the screw you removed from the slot cover (or one provided with the card) to secure the metal bracket of the WiFi card to the PC case. This prevents the card from wiggling loose.
- Connect Antennas: Screw the external antennas (usually two) that came with your WiFi card into the designated ports on the card’s bracket. Hand-tighten them until snug; do not overtighten. Orient the antennas for optimal signal reception once the PC is upright.
Installing an M.2 WiFi Card (and Adapter if Needed): The Compact Solution
This process is slightly more intricate, especially with the small antenna connections.
- For Motherboards with M.2 E-key Slot:
- Locate the M.2 E-key slot on your motherboard (check your manual). It will typically be labeled for “WiFi” or “Wireless.”
- Unscrew the small M.2 standoff screw at the end of the slot.
- Gently insert the M.2 WiFi module at a slight angle into the slot.
- Push the module down until it lies flat, then secure it with the standoff screw.
- Connect Antenna Cables: This is the most delicate part. The M.2 module will have two tiny U.FL/IPEX connectors. Carefully align the small coaxial antenna cables (usually black and white, routed from a case antenna or an M.2 adapter’s external antennas) with these connectors. Press down firmly but gently until you hear or feel a soft click.
- For M.2 Card with a PCIe Adapter:
- First, install the M.2 WiFi module onto the PCIe adapter card following the steps above (insert, screw, connect antenna cables to the adapter’s U.FL ports).
- Then, treat the combined M.2/PCIe adapter as a standard PCIe card and follow the “Installing an Internal PCIe WiFi Card” steps (locate slot, remove cover, insert, secure, connect external antennas to the adapter).
Installing a USB WiFi Adapter: The Easiest Path
This is the simplest method and requires no internal access.
- Choose a USB Port: Select an available USB port on your computer, preferably a USB 3.0 or higher port (often colored blue or red internally) for optimal performance. Front panel USB ports are convenient but can sometimes offer slightly less stable power or data than rear ports.
- Plug and Play: Simply insert the USB WiFi adapter firmly into the chosen USB port.
- Placement (for external antennas): If your USB adapter has an external antenna, orient it to point towards your router for better signal strength. Some larger USB adapters come with a cradle or extension cable, allowing for more flexible placement away from the back of the PC, which can significantly improve reception.
Reassembling Your PC: Closing Up Shop
Once the card is physically installed, it’s time to put your computer back together.
- Replace Side Panel: Carefully slide the side panel back onto your PC case, ensuring it aligns with the chassis rails.
- Secure Side Panel: Replace and tighten the screws you removed earlier to secure the side panel.
- Connect Peripherals: Reconnect all your peripherals (monitor, keyboard, mouse, speakers, Ethernet cable if used for initial driver download).
- Power Up: Reconnect the power cable to your PSU and the wall outlet.
- Boot Up: Power on your computer and proceed to the post-installation steps.
Post-Installation: Drivers, Connectivity, and Optimization
The hardware installation is only half the battle. To ensure your new WiFi card functions optimally, you’ll need to install the correct drivers, connect to your network, and potentially troubleshoot any issues that arise. This phase is critical for turning your hardware investment into a tangible performance gain, directly impacting your digital productivity and connectivity experience.
Installing the WiFi Drivers: The Software Brains
Drivers are the essential software bridge that allows your operating system to communicate with and control the new hardware. Without them, your WiFi card is just a fancy piece of silicon.
- Initial Power On: Boot your computer normally. For Windows 10/11, there’s a good chance your operating system will automatically detect the new hardware and install generic drivers or even the correct manufacturer drivers via Windows Update.
- Check Device Manager: To confirm, right-click the Start button, select “Device Manager.” Look under “Network adapters.” You should see your new WiFi card listed. If it has a yellow exclamation mark or is listed as an “Unknown Device,” it means the drivers are not correctly installed.
- Obtain Drivers:
- Manufacturer’s Website (Recommended): This is the safest and most reliable source. Visit the website of your WiFi card’s manufacturer (e.g., Intel, TP-Link, ASUS, Fenvi). Navigate to the “Support” or “Downloads” section, search for your specific model number, and download the latest drivers compatible with your operating system.
- Included CD/USB (If Available): Some cards come with a small CD or USB stick containing drivers. Use this if you don’t have an internet connection and can’t download. However, drivers on physical media are often outdated, so update them later if possible.
- Using Ethernet: If your PC has an Ethernet port, connect it directly to your router or modem. This will provide internet access to download the necessary drivers wirelessly.
- Install Drivers: Run the downloaded driver executable file (usually a
.exe). Follow the on-screen instructions. You might need to restart your computer after installation. - Verify Installation: After restarting, check Device Manager again. The yellow exclamation mark should be gone, and your WiFi card should be listed correctly. You should also see the WiFi icon appear in your system tray or network settings.
Connecting to Your Network: Getting Online
Once the drivers are installed, connecting to your wireless network is straightforward.
- Access Network Settings:
- Windows: Click the WiFi icon in the system tray (bottom-right of the screen) or go to
Settings > Network & Internet > Wi-Fi. - macOS: Click the Wi-Fi icon in the menu bar (top-right of the screen) or go to
System Settings > Wi-Fi.
- Windows: Click the WiFi icon in the system tray (bottom-right of the screen) or go to
- Select Your Network: A list of available wireless networks (SSIDs) will appear. Find your home network’s name and click or tap on it.
- Enter Password: If your network is secured (which it should be!), you’ll be prompted to enter your Wi-Fi password (WPA2 or WPA3 key). Type it carefully.
- Connect: Click “Connect.” Your computer should now establish a connection to your wireless network.
- Test the Connection: Open a web browser and try to visit a few websites. Perform a speed test (e.g., Speedtest.net) to verify your connection speed.
Troubleshooting Common Issues: Navigating Hiccups
Even with careful preparation, minor issues can sometimes arise. Don’t panic; most problems have simple solutions.
- Card Not Detected:
- Re-seat the Card: Power down, unplug, open the case, and firmly re-seat the PCIe or M.2 card. Sometimes it wasn’t pushed in all the way.
- Try Another Slot: If available, try installing the card in a different PCIe slot to rule out a faulty slot.
- Check BIOS/UEFI: Ensure the PCIe slot is enabled in your motherboard’s BIOS/UEFI settings (though usually enabled by default).
- No Internet Connection (Even with WiFi Connected):
- Driver Issues: Reinstall the drivers, ensuring you have the latest version from the manufacturer.
- Router Problems: Restart your router and modem. Sometimes the network device itself needs a refresh.
- Incorrect Password: Double-check your WiFi password.
- IP Address Conflict: In rare cases, an IP conflict can occur. Try releasing and renewing your IP address (via Command Prompt:
ipconfig /releasethenipconfig /renew).
- Slow Speeds or Dropped Connections:
- Antenna Placement: Adjust the orientation of your external antennas. Try positioning them for direct line-of-sight to your router.
- Interference: Other devices (cordless phones, microwaves, neighboring WiFi networks) can cause interference. Try changing your router’s WiFi channel (usually done through the router’s admin interface).
- Driver Updates: Ensure your WiFi card drivers are up to date.
- Distance/Obstacles: Your distance from the router and physical obstacles (walls, metal objects) significantly impact signal strength.
- Router Age: An old router might be the bottleneck. Consider upgrading if it doesn’t support modern WiFi standards.
Optimizing Your WiFi Performance: Maximizing Your Investment
Once connected, you can take steps to ensure you’re getting the best possible performance from your new WiFi card. This optimization contributes directly to increased productivity and a smoother user experience, making your tech investment truly pay off.
- Router Placement: Position your router in a central, open location in your home, away from walls, large metal objects, and other electronics that could cause interference. Elevating it can also help.
- Keep Drivers Updated: Regularly check the WiFi card manufacturer’s website for new driver releases. Updates often include performance enhancements, bug fixes, and security patches.
- Firmware Updates for Your Router: Your router’s firmware is just as important as your WiFi card’s drivers. Check your router manufacturer’s website for firmware updates to ensure optimal performance and security.
- Channel Optimization: Use a WiFi analyzer app (many free options available for smartphones) to identify the least congested WiFi channels in your area. Then, log into your router’s administration interface and manually set your WiFi to one of these less crowded channels.
- Consider a Mesh WiFi System: For larger homes or areas with dead zones, a mesh WiFi system can extend your network’s coverage and provide more consistent speeds throughout your property, leveraging your new high-performance WiFi card effectively.
- Enable QoS (Quality of Service): If your router supports it, enable QoS settings to prioritize traffic for certain applications (e.g., online gaming, video conferencing) over less critical activities.

Conclusion: Unleashing Your Full Wireless Potential
Installing a new WiFi card is more than just a simple hardware upgrade; it’s an investment in the efficiency, reliability, and future-proofing of your digital life. From the moment you successfully connect to your network with blazing-fast speeds and rock-solid stability, you’ll immediately recognize the profound impact on your daily computing experience.
Gone are the frustrations of dropped calls during crucial video conferences, the pixelation during your favorite streaming shows, or the dreaded lag that costs you a victory in an online game. By choosing the right card, following careful preparation, and executing the installation steps meticulously, you’ve empowered your system to embrace the full potential of modern wireless technology. This DIY approach not only saves you money but also instills a valuable sense of accomplishment and a deeper understanding of your own technology.
Moreover, a high-performance WiFi card ensures that your system can take full advantage of current and future wireless standards, such as Wi-Fi 6 and Wi-Fi 6E, providing faster speeds, lower latency, and greater capacity, even in congested network environments. This translates directly into enhanced productivity for work-from-home professionals, seamless entertainment for families, and a competitive edge for gamers. In an era where every aspect of our lives is intertwined with connectivity, ensuring your PC has the best possible wireless link is a smart strategic move, ensuring your digital brand and financial efficiency are never hindered by a weak signal. So, go forth and enjoy the freedom and power of superior wireless connectivity!
aViewFromTheCave is a participant in the Amazon Services LLC Associates Program, an affiliate advertising program designed to provide a means for sites to earn advertising fees by advertising and linking to Amazon.com. Amazon, the Amazon logo, AmazonSupply, and the AmazonSupply logo are trademarks of Amazon.com, Inc. or its affiliates. As an Amazon Associate we earn affiliate commissions from qualifying purchases.