
In the ecosystem of modern computing, the seamless interaction between software and hardware is often taken for granted. We plug in a mouse, a keyboard, an external hard drive, or a high-end audio interface, and we expect it to “just work.” This convenience is made possible by a critical piece of software: the USB driver. A Universal Serial Bus (USB) driver acts as a translator, allowing your operating system to communicate effectively with the physical hardware connected to your machine.
When these drivers are missing, outdated, or corrupted, the results can range from minor lag to a complete failure of the peripheral device. Whether you are a creative professional relying on external storage or a casual user trying to connect a new printer, knowing how to install and manage USB drivers is a foundational tech skill. This guide provides a deep dive into the various methods of installing USB drivers, ensuring your system remains stable and your peripherals perform at their peak.
Understanding the Role of USB Drivers in Modern Computing
Before diving into the installation process, it is essential to understand what these drivers do and why they are necessary. Without a driver, the operating system (OS) sees a piece of hardware but has no instructions on how to send data to it or receive data from it.
What are USB Drivers?
A USB driver is a software component that allows a computer’s operating system to communicate with USB devices. While the USB standard is designed to be “Plug and Play,” this term is slightly misleading. Plug and Play simply means the operating system is capable of automatically identifying the device and searching for a compatible driver. The driver itself defines the parameters of data transfer, power management, and functional features of the device.
Why Keeping Drivers Updated is Essential
Technology moves at a rapid pace. Operating system updates, such as those released for Windows 11, often change the way the kernel interacts with hardware. Keeping your USB drivers updated ensures compatibility with the latest security patches and performance enhancements. Furthermore, updated drivers often resolve common “bugs,” such as intermittent connectivity, slow data transfer speeds (bottlenecks), and the dreaded “USB Device Not Recognized” error.
Method 1: Utilizing Windows Update for Automatic Installation
For the vast majority of users, the most efficient way to install or update USB drivers is through the built-in Windows Update service. Microsoft maintains a massive library of driver signatures from various manufacturers, making this the safest starting point.
The Benefits of System-Integrated Updates
Using Windows Update is the preferred method because Microsoft verifies the drivers for stability and compatibility. These are often referred to as WHQL (Windows Hardware Quality Labs) certified drivers. By using this method, you minimize the risk of installing a driver that might cause system crashes or “Blue Screen of Death” (BSOD) errors.
Step-by-Step Guide for Automatic Updates
To initiate a search for USB drivers via Windows Update, follow these steps:
- Open Settings: Press the
Windows Key + Ion your keyboard. - Navigate to Updates: Click on “Windows Update” in the sidebar.
- Check for Updates: Click the “Check for updates” button. Windows will automatically scan for available software and driver updates.
- View Optional Updates: This is a crucial step often missed. Many USB drivers are categorized as “Optional.” Click on “Advanced options,” then select “Optional updates.”
- Install Drivers: If you see a driver listed under “Driver updates” that corresponds to your USB controller or a specific device, check the box and click “Download & install.”
Method 2: Manual Installation via Device Manager
When Windows Update fails to find a specific driver, or if you are dealing with a legacy device, the Device Manager is your most powerful tool. This utility provides a granular view of all hardware recognized by the system.
Accessing the Device Manager
To open the Device Manager, right-click on the Start button and select Device Manager from the power user menu. Alternatively, you can press Windows Key + X and select it from the list. Once open, you will see a categorized list of every hardware component in your PC.
Locating and Updating USB Controllers
USB drivers are typically found under two specific categories: “Universal Serial Bus controllers” and “Other devices” (if the driver is missing entirely).
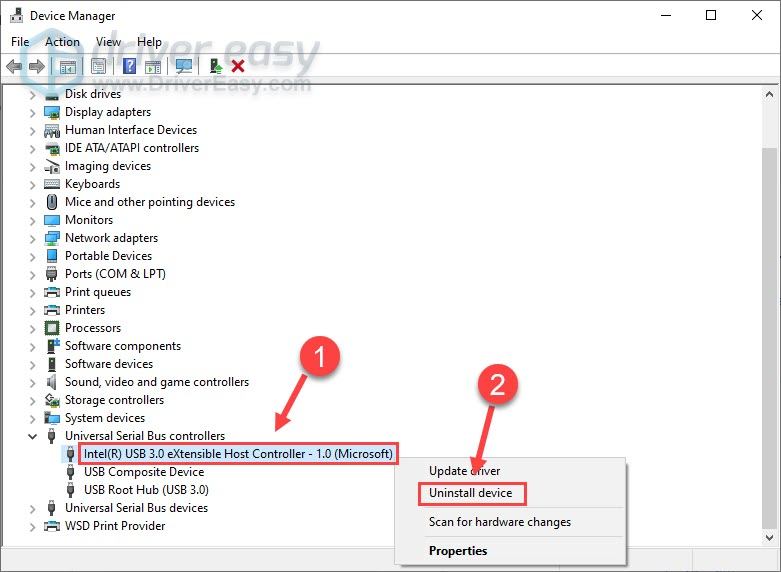
- Expand the Section: Click the arrow next to “Universal Serial Bus controllers.”
- Identify the Device: Look for entries like “USB Root Hub,” “Extensible Host Controller,” or the specific name of your device.
- Update Driver: Right-click the specific entry and select “Update driver.”
- Automatic Search: Choose “Search automatically for drivers.” Windows will search your computer and the internet for the best software for your device.
Dealing with “Unknown Devices”
If you see a yellow exclamation mark next to an entry labeled “Unknown Device,” it means the OS knows something is plugged in but has no idea what it is. In this case, right-clicking and selecting “Update driver” is the first step. If that fails, you may need to look at the “Hardware IDs” in the device’s properties to manually identify the manufacturer.
Method 3: Downloading Drivers from Manufacturer Websites
In professional environments or high-performance gaming setups, the generic drivers provided by Microsoft may not offer the full feature set of the hardware. In these instances, downloading drivers directly from the manufacturer is the best course of action.
Identifying Your Hardware Make and Model
To find the right driver, you must know who made the hardware. If you are using a laptop or a pre-built desktop (like Dell, HP, or Lenovo), you should visit the manufacturer’s support page and enter your serial number or service tag. If you built your own PC, you would need the drivers for your motherboard, which handles the USB controllers. Common motherboard manufacturers include ASUS, MSI, Gigabyte, and ASRock.
Navigating Support and Download Portals
Once on the manufacturer’s website:
- Navigate to the Support or Drivers section.
- Enter your model name (e.g., “ROG STRIX Z790-E”).
- Select your operating system (e.g., Windows 11 64-bit).
- Look for “Chipset” drivers or “USB” drivers. The Chipset driver is particularly important because it governs how the processor communicates with the USB ports.
- Download the executable (
.exe) or the compressed folder (.zip).
Safe Installation Practices
Before installing a manually downloaded driver, ensure it is from an official source. Avoid third-party “driver updater” software, as these often contain adware or install incorrect versions. Once the file is downloaded, run the installer as an administrator. After the installation is complete, a system restart is almost always required to initialize the new driver properly.
Troubleshooting Common USB Driver Issues
Even with the correct installation steps, you may encounter issues. Troubleshooting USB connectivity requires a systematic approach to isolate whether the problem is software or hardware-based.
Rolling Back to Previous Driver Versions
Sometimes, a new driver update can be buggy. If your USB device stopped working immediately after an update, you can “Roll Back” the driver. In Device Manager, right-click the device, select Properties, go to the Driver tab, and click Roll Back Driver. This restores the previously functioning version.
Reinstalling Drivers to Fix Connectivity Bugs
If a driver becomes corrupted, the best fix is often to uninstall it entirely and let Windows rediscover it.
- In Device Manager, right-click the malfunctioning USB controller.
- Select Uninstall device.
- Restart your computer. Upon reboot, Windows will automatically attempt to reinstall the driver from its local cache. This often clears up conflicts caused by improper shutdowns or power surges.
Advanced BIOS/UEFI USB Settings
If USB ports aren’t working even before the operating system loads (e.g., you can’t use your keyboard to enter the BIOS), the issue may be at the firmware level. Restart your computer and tap F2, Del, or F12 to enter the BIOS/UEFI. Ensure that “USB Support” or “Legacy USB Support” is set to “Enabled.” Additionally, ensure that “USB Power Delivery” is active if you are trying to charge devices while the computer is in sleep mode.

Conclusion
The installation of USB drivers is more than just a maintenance task; it is a vital part of hardware management that ensures your digital tools function correctly. By mastering the three main methods—Windows Update for convenience, Device Manager for control, and Manufacturer downloads for performance—you can resolve almost any connectivity issue. As USB technology continues to evolve with USB4 and Thunderbolt integration, staying informed about driver management will remain a cornerstone of a smooth and productive computing experience. Always remember to restart your system after changes and keep a backup of your stable drivers to ensure maximum uptime.
aViewFromTheCave is a participant in the Amazon Services LLC Associates Program, an affiliate advertising program designed to provide a means for sites to earn advertising fees by advertising and linking to Amazon.com. Amazon, the Amazon logo, AmazonSupply, and the AmazonSupply logo are trademarks of Amazon.com, Inc. or its affiliates. As an Amazon Associate we earn affiliate commissions from qualifying purchases.